单机记账APP演示及源码
具体演示如下面视频所示。免费下载地址:
点击进入
预览APP(内含开屏广告)下载地址:http://8.142.10.182:8888/down/aWHWeGaEQE2W.apk
服务器买的便宜,带宽很小所以下载速度慢,主要还是囊中羞涩,哈哈。
内容有点长,将结构、样式、方法都写进去了,可以复制粘贴直接用,资源就去下载地址直接全部下载下来吧。
一、本章详细讲解记账功能页面的实现
1.基本搭建
首先使用HBuilder新建项目(文件>>新建>>项目>>选择默认模板),然后引入uView2.0的UI框架(官网有详细的指引
地址连接
)。
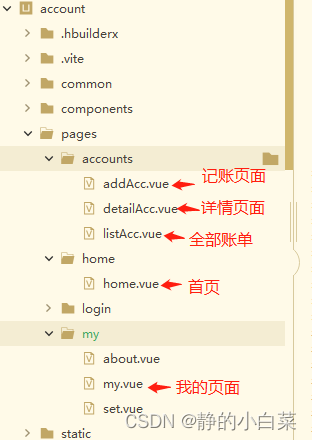
总共5个页面结构图所示,别的是之前连接自己的服务器,写的登录设置密码的功能,现在改成单机的另外的页面就不需要了。
2.记账页面实现
先看页面,然后我们分别要实现的是
收支类型、金额输入、时间选择、备注
以及
记账
。
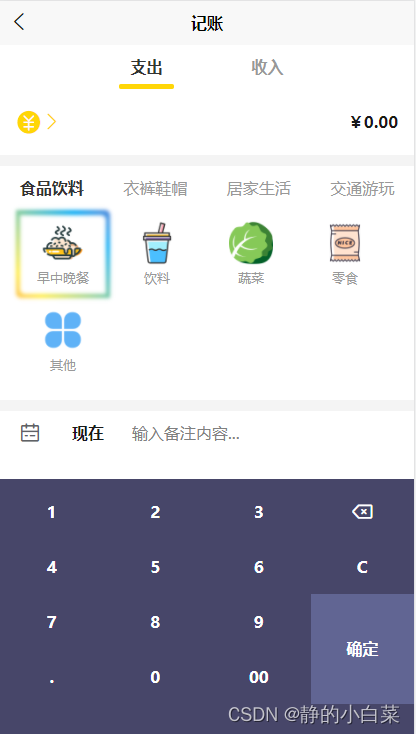
(1)收支类型
先行铺写收支类型部分的结构和样式,具体的代码如下:
<!--结构-->
<!-- 收支类型 -->
<view class="headNav">
	<text @click.stop="setType(0)" :class="{'navActive':statusPay == 0}">支出</text>
	<text @click.stop="setType(1)" :class="{'navActive':statusPay == 1}">收入</text>
	<view class="navLine" :style="{'left':lineLeft}"></view>
</view>

<!-- 金额 -->
<view class="inputBox">
	<view class="alignItems">
		<u-icon name="rmb-circle-fill" size="26" color="#ffd607"></u-icon>
		<u-icon name="arrow-right" size="20" color="#ffd607"></u-icon>
	</view>
	<text @click.stop="showkey = true" style="min-width: 200rpx;text-align: right;flex: 1;">¥{{money?money:'0.00'}}</text>
</view>


<!-- 分类选择 -->
<view>
	<!-- 支出类别 -->
	<view v-show="statusPay == 0" class="typeTitle">
		<text @click="setKind(0)" :class="{'typeActive':kindNav == 0}">食品饮料</text>
		<text @click="setKind(1)" :class="{'typeActive':kindNav == 1}">衣裤鞋帽</text>
		<text @click="setKind(2)" :class="{'typeActive':kindNav == 2}">居家生活</text>
		<text @click="setKind(3)" :class="{'typeActive':kindNav == 3}">交通游玩</text>
	</view>
	<!-- 收入类别 -->
	<view v-show="statusPay == 1" class="typeTitle">
		<text @click="setKind(4)" :class="{'typeActive':kindNav == 4}">收入</text>
	</view>
	<!-- 转账类别 -->
	<view v-show="statusPay != 2" class="typeBox">
		<view class="selectKind" :style="selKindClass">
			<view class="fillUp"></view>
		</view>
		<view @click="setKindBox(index)" v-for="(item,index) in list[kindNav]" :key="index" class="kindBox">
			<image :src="item.img" class="kindImg" mode=""></image>
			<text>{{item.name}}</text>
		</view>
	</view>
</view>


<!--样式-->
<style>
.headNav {
	position: relative;
	display: flex;
	color: #999999;
	justify-content: center;
}

.navLine {
	position: absolute;
	bottom: 0;
	width: 100rpx;
	height: 10rpx;
	background: #ffd607;
	border-radius: 10rpx;
	transition: ease-out 0.4s;
}

.headNav text {
	font-weight: bold;
	text-align: center;
	width: 220rpx;
	line-height: 80rpx;
	transition: ease-out 0.4s;
}

.navActive {
	color: #333;
}

/* 金额 */
.inputBox {
	position: relative;
	display: flex;
	align-items: center;
	justify-content: space-between;
	padding: 0 30rpx;
	font-weight: bold;
	line-height: 120rpx;
}

.alignItems {
	display: flex;
	align-items: center;
}

/* 分类选择 */
.typeTitle {
	display: flex;
	line-height: 60rpx;
	color: #999999;
	border-top: 20rpx #F4F4F4 solid;
}

.typeTitle text {
	width: 25%;
	line-height: 80rpx;
	text-align: center;
}

.typeActive {
	color: #333;
	font-weight: bold;
}

.typeBox {
	position: relative;
	font-size: 24rpx;
	color: #999999;
	display: flex;
	flex-wrap: wrap;
	padding: 0 30rpx 30rpx 30rpx;
	border-bottom: 20rpx #F4F4F4 solid;
}

.kindBox {
	width: 172rpx;
	padding: 20rpx 0;
	display: flex;
	flex-direction: column;
	align-items: center;
	justify-content: center;
	z-index: 1;
}

.kindImg {
	width: 80rpx;
	height: 80rpx;
	margin-bottom: 8rpx;
}

/* 类型选择框 */
.fillUp {
	width: 156rpx;
	height: 144rpx;
	border-radius: 0 10rpx 0 10rpx;
	background: #FFFFFF;
}

.selectKind {
	position: absolute;
	display: flex;
	align-items: center;
	justify-content: center;
	width: 172rpx;
	height: 160rpx;
	background: linear-gradient(45deg, #03a9f4, #f441a5, #ffeb3b, #03a9f4, #f441a5);
	background-size: 400%;
	border-radius: 0 10rpx 0 10rpx;
	filter: blur(2px);
	animation: animate 8s linear infinite;
	transition: ease-out 0.4s;
}
/* 让颜色动起来的动画 */
@keyframes animate {
	0% {
		background-position: 0%;
	}

	100% {
		background-position: 400%;
	}
}
</style>
具体实现切换的方法思想:
为了实现收支下面小横条的移动所以通过“lineLeft”变量来实现控制,在css样式中 写有transition: ease-out 0.4s;动画属性。
同理选择类别的也是通过“selKindClass”来控制选择框的移动,中间选择框颜色会想弥红灯一样的改变颜色也是通过css中控制的。
具体方法和需要的变量如下所示:
// data() {return { 存放的值如下 }}
selKindClass: "left:-100px;top:0;", // 选择框
statusPay: 0, // 0支出、1收入、2转账
lineLeft: '216rpx', // 收支下的小黄条
showkey: true, // 数字键盘
money: '', // 金额
kindNav: 0, // 分类
//img中资源找不到可以自行下载修改名字
list: [
	// 食品分类
	[{
		"img": "/static/icon/food01.png",
		"name": "早中晚餐",
		"id": 1
	}, {
		"img": "/static/icon/food02.png",
		"name": "饮料",
		"id": 2
	}, {
		"img": "/static/icon/food03.png",
		"name": "蔬菜",
		"id": 3
	}, {
		"img": "/static/icon/food04.png",
		"name": "零食",
		"id": 4
	}, {
		"img": "/static/icon/other.png",
		"name": "其他",
		"id": 5
	}],
	// 衣物分类
	[{
		"img": "/static/icon/dress01.png",
		"name": "衣服",
		"id": 6
	}, {
		"img": "/static/icon/dress02.png",
		"name": "鞋子",
		"id": 7
	}, {
		"img": "/static/icon/dress03.png",
		"name": "帽子",
		"id": 8
	}, {
		"img": "/static/icon/dress04.png",
		"name": "首饰",
		"id": 9
	}, {
		"img": "/static/icon/other.png",
		"name": "其他",
		"id": 10
	}],
	// 居家分类
	[{
		"img": "/static/icon/home01.png",
		"name": "日常用品",
		"id": 11
	}, {
		"img": "/static/icon/home02.png",
		"name": "厨房用品",
		"id": 12
	}, {
		"img": "/static/icon/home03.png",
		"name": "床上用品",
		"id": 13
	}, {
		"img": "/static/icon/home04.png",
		"name": "电器用品",
		"id": 14
	}, {
		"img": "/static/icon/other.png",
		"name": "其他",
		"id": 15
	}],
	// 游玩分类
	[{
		"img": "/static/icon/play01.png",
		"name": "交通费",
		"id": 16
	}, {
		"img": "/static/icon/play02.png",
		"name": "油费",
		"id": 17
	}, {
		"img": "/static/icon/play03.png",
		"name": "娱乐",
		"id": 18
	}, {
		"img": "/static/icon/other.png",
		"name": "其他",
		"id": 19
	}],
	// 支出分类
	[{
		"img": "/static/icon/outlay01.png",
		"name": "工资",
		"id": 20
	}, {
		"img": "/static/icon/outlay02.png",
		"name": "兼职",
		"id": 21
	}, {
		"img": "/static/icon/outlay03.png",
		"name": "福利",
		"id": 22
	}, {
		"img": "/static/icon/other.png",
		"name": "其他",
		"id": 23
	}]
],


// 	methods: {方法如下}
// 收支下方横条
setType(stu) {
	// 下面是后面金额输入时控制自定义数字键盘的显示和隐藏。
	// this.showkey = true
	this.statusPay = stu
	this.lineLeft = stu * 220 + 216 + 'rpx'
	this.statusPay == 0 ? this.setKind(0) : this.setKind(4)
},
// 类别选择
setKind(index) {
	this.selKindClass = "left:-100px;top:0;"
	this.kindNav = index
},
// 类别选择框
setKindBox(index) {
	this.typeStatu = this.list[this.kindNav][index].id
	this.showkey = false
	var topSum = parseInt(index / 4)
	var leftSum = parseInt(index % 4)
	this.selKindClass = "left:" + (leftSum * 172 + 30) + "rpx;top:" + (topSum * 160) + "rpx;"
},
(2)金额输入
金额输入可以将哪个金额的地方设置为input的输入框,为了尝试一下自己能否写一个数字键盘,最终发现还是比较简单的。
具体结构和样式如下:
<!--结构-->
<!-- 键盘 -->
<view v-show="showkey" class="keyboardBox">
	<view v-for="(item,index) in keyboardList" :key="index" class="flexColumn">
		<view @click.stop="countMoney(itemTwo)" v-for="itemTwo in item" :key="itemTwo">{{itemTwo}}</view>
	</view>
	<view class="flexColumn">
		<view @click.stop="delMoney(1)" style="height: 100rpx;">
			<u-icon name="backspace" color="#FFFFFF" size="28"></u-icon>
		</view>
		<view @click.stop="delMoney(2)">C</view>
		<view @click="readyBtn()" class="keyBtn">确定</view>
	</view>
</view>


<!--样式-->
<style>
/* 键盘样式 */
.keyboardBox {
	position: absolute;
	bottom: 0;
	width: 100%;
	display: flex;
	background: #474669;
	color: #FFFFFF;
	font-weight: bold;
	padding: 10rpx 0 60rpx 0;
}

.flexColumn {
	flex: 1;
	display: flex;
	flex-direction: column;
	align-items: center;
	justify-content: center;
	line-height: 100rpx;
}

.flexColumn view {
	width: 100%;
	display: flex;
	align-items: center;
	justify-content: center;
	text-align: center;
}

.flexColumn view:hover {
	background: #656496;
}

.keyBtn {
	width: 100%;
	text-align: center;
	background: #616593;
	line-height: 200rpx;
}
</style>
具体方法和变量如下:
// data() {return { 存放的值如下 }}
// 键盘
keyboardList: [
	['1', '4', '7', '.'],
	['2', '5', '8', '0'],
	['3', '6', '9', '00']
],


// 	methods: {方法如下}
// 输入数字
countMoney(sum) {
	// 小数点
	this.money += sum
},
// 删除
delMoney(stu) {
	if (stu == 2) {
		this.money = ''
	} else {
		var newMoney = this.money.substr(0, this.money.length - 1)
		this.money = newMoney
	}
},
// 确定
readyBtn() {
	this.showkey = false
},
(3)时间选择、备注
时间选择使用了uView中的“u-datetime-picker”组件,正常使用是可以的,我这里使用了formatter过滤器实现一下每个数字后面跟着对应的文字。备注没啥说的。具体结构和样式如下:
<!-- 结构-->
<!-- 时间以及备注 -->
<view class="footBox">
	<view @click="showPicker = true" class="footBoxleft">
		<u-icon name="calendar" size="28"></u-icon>
		<text class="timeTitle">{{addBillTime}}</text>
	</view>
	<input type="text" v-model="remark" placeholder="输入备注内容...">
</view>

<!-- 时间选择框 -->
<u-datetime-picker ref="datetimePicker" :show="showPicker" v-model="datetime" :formatter="formatter"
	mode="datetime" @cancel="showPicker = false" @confirm="setAddTime"></u-datetime-picker>

<!-- 样式-->
<style>
/* 时间以及备注 */
.footBox {
	display: flex;
	padding: 0 30rpx;
	line-height: 80rpx;
}

.footBoxleft {
	display: flex;
	align-items: center;
}

.footBox input {
	display: block;
	flex: 1;
	height: 80rpx;
}
.timeTitle {
	font-weight: bold;
	width: 160rpx;
	text-align: center;
	font-size: 30rpx;
}
</style>
添加完时间和备注在部分小机型上,会出现数字键盘遮挡的现象存在,所有要给整个屏幕注册一个隐藏键盘的事件
具体方法和变量如下:
// data() {return { 存放的值如下 }}
showPicker: false, // 时间选择器
datetime: Number(new Date()), // 时间
addBillTime: '现在', // 用于显示的文字
remark:'', // 备注
yearTime: '', // 年
monthTime: '', // 月


// 	methods: {方法如下}
//点击空白处隐藏键盘(这个事件 需要放在<template> 紧跟的view标签下 @click="setShowkey()")
setShowkey() {
	this.showkey = false
},
// 时间选择框过滤器
formatter(type, value) {
	if (type === 'year') {
		return `${value}年`
	}
	if (type === 'month') {
		return `${value}月`
	}
	if (type === 'day') {
		return `${value}日`
	}
	if (type === 'hour') {
		return `${value}时`
	}
	if (type === 'minute') {
		return `${value}分`
	}
	return value
},
// 设置时间
setAddTime(e) {
	this.yearTime = uni.$u.date(e.value, 'yyyy')
	this.monthTime = uni.$u.date(e.value, 'mm')
	this.addBillTime = uni.$u.date(e.value, 'mm-dd')

	this.showPicker = false
},
(4)记账
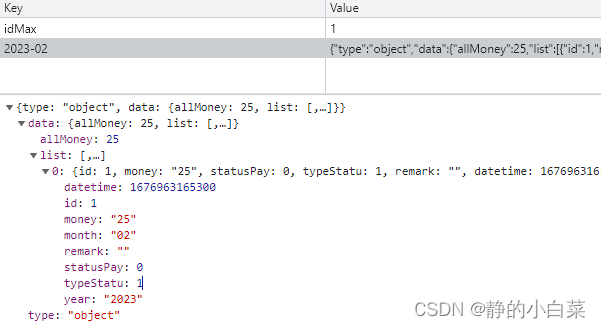
本地记账以月份为单位,将每次记录的内容追加进去。为了区分每一个数据需要一个ID字段,这就需要一个信息idMax去记录目前最大的ID数,然后每次追加新的数据的时候将idMax加一。**“allMoney”**字段是本月支出总额。方便后续全部账单哪里去展示避免哪个页面初始加载的时候需要计算大量数据。具体数据结构以及结构和样式如下:
<!-- 按钮 -->
<view @click="updateBtn()" v-if="isUpdate" class="updateClass">
	修改
</view>
<view v-else class="lastBtn">
	<view @click="addBtn(1)" class="footBtn left">
		再记一笔
	</view>
	<view @click="addBtn(0)" class="footBtn right">
		保存
	</view>
</view>

<style>
/* 记账按钮样式 */
.lastBtn {
	padding: 80rpx 30rpx 30rpx;
	display: flex;
	justify-content: space-between;
}

.lastBtn .left {
	color: #ff8e07;
	border: 4rpx #ff8e07 solid;
	border-radius: 20rpx;
}

.lastBtn .right {
	color: #333333;
	background: #ffd608;
	border-radius: 20rpx;
}

.footBtn {
	text-align: center;
	width: 300rpx;
	line-height: 80rpx;
	font-size: 28rpx;
	font-weight: bold;
}

.updateClass {
	margin: 80rpx auto 0;
	color: #333333;
	text-align: center;
	width: 300rpx;
	line-height: 80rpx;
	font-size: 28rpx;
	font-weight: bold;
	background: #ffd608;
	border-radius: 20rpx;
}
</style>
这个记账页面和修改记账共用,所以在页面加载的时候要判断是记账还是修改,
具体方法和变量如下:
onLoad(option) {
	if (option.type == 'update') {
		this.isUpdate = true
	}
},
onReady() {
	// 判断是否是修改操作
	if (this.isUpdate) {
		let listAcc = uni.getStorageSync('detailAcc')
		this.setType(listAcc.statusPay)
		this.accid = listAcc.id
		this.money = listAcc.money
		this.typeStatu = listAcc.typeStatu
		this.remark = listAcc.remark
		this.yearTime = listAcc.year
		this.monthTime = listAcc.month
		this.datetime = listAcc.datetime
		this.addBillTime = uni.$u.date(listAcc.datetime, 'mm-dd')
		// 设置类型选择框
		this.list.map((kindVal, kindIndex) => {
			kindVal.map((typeValue, index) => {
				if (typeValue.id == this.typeStatu) {
					this.kindNav = kindIndex
					this.setKindBox(index)
					return
				}
			})
		})
	} else {
		this.$refs.datetimePicker.setFormatter(this.formatter)
		this.yearTime = uni.$u.date(this.datetime, 'yyyy')
		this.monthTime = uni.$u.date(this.datetime, 'mm')
	}
},

// data() {return { 存放的值如下 }}
isUpdate: false,// 是记账还是修改


// 	methods: {方法如下}
// 记录
addBtn(isAgain) {
	// 本地存储数据
	let accName = this.yearTime + '-' + this.monthTime
	// 本地存贮数据的ID
	let Pid = parseInt(uni.getStorageSync('idMax') || '0') || 0
	Pid++;
	uni.setStorageSync('idMax', Pid.toString())
	// 需要记录的数据
	let arrAry = {
		id: Pid,
		money: this.money,
		statusPay: this.statusPay,
		typeStatu: this.typeStatu,
		remark: this.remark,
		datetime: this.datetime,
		month:this.monthTime,
		year:this.yearTime,
	}
	// 判断本月有没有存储过数据,有就追加,无就赋初始值
	let arrList = uni.getStorageSync(accName) || {'allMoney':0,'list':[]}
	arrList.list.push(arrAry)
	// 这个步骤是为了全部账单哪里方便显示
	if(this.statusPay == 0){
		arrList.allMoney =  parseInt(arrList.allMoney)  + parseInt(this.money)
	}else{
		arrList.allMoney =  parseInt(arrList.allMoney)  - parseInt(this.money)
	}
	uni.setStorageSync(accName, arrList)
	this.$u.toast('记录成功')
	if(isAgain == 0){
		setTimeout(() => {
			uni.navigateBack()
		}, 1200)
	}
},
// 修改
updateBtn() {
	let accName = this.yearTime + '-' + this.monthTime

	let arrList = uni.getStorageSync(accName)

	let arrAry = {
		id: this.accid,
		money: this.money,
		statusPay: this.statusPay,
		typeStatu: this.typeStatu,
		remark: this.remark,
		month:this.monthTime,
		year:this.yearTime,
		datetime: this.datetime,
	}

	let newAllMoney = 0
	arrList.list.map(arr => {
		if(arr.id == this.accid){
			arr.money = this.money,
			arr.statusPay = this.statusPay,
			arr.typeStatu = this.typeStatu,
			arr.remark = this.remark,
			arr.month =this.monthTime,
			arr.year =this.yearTime,
			arr.datetime = this.datetime
		}
		if(arr.statusPay == 0){
			newAllMoney =  newAllMoney  + parseInt(arr.money)
		}else{
			newAllMoney =  newAllMoney  - parseInt(arr.money)
		}
	})
	arrList.allMoney = newAllMoney
	uni.setStorageSync(accName, arrList)
	this.$u.toast('修改成功')
	setTimeout(() => {
		uni.navigateBack()
	}, 1200)
},
小结
下章写首页。码字不易点个赞吧