记录1—–捣鼓了2个晚上终于能实现hello slam了
前言
ubuntu版本 20.04
VMware Workstation 16 Pro
注意在Ubuntu商店下载的vscode不能输入中文
使用命令下载vscode链接如下
命令下载vscode
准备工作
1.按住Ctrl+Alt+T调出终端命令行
输入如下命令
sudo apt-get install g++
下面会提示你输入密码(ubuntu的开机密码),直接输入就行,不会显示

开始
1.找到Ubuntu Software这个图标点击打开

2.搜索框内输入vscode

3.点击安装,安装完如图所示

4.然后在Files中新建一个存放C++项目文件的文件夹
空白处右键,选择New Folder
输入文件名然后点击Create

5.然后打开vscode,如果左边任务栏没有可以点击左下角的点阵

6.界面如图所示,打开文件夹

7.找到刚刚创建的文件,然后点击OK

8.点击扩展按钮(Ctrl+shift+x),搜索栏里输入C++

9.安装如下几个扩展包

10.点击文件,在文件夹名字后面创建文件,输入main.cpp

11.在main.cpp中输入最简单的hello world 代码,然后点击运行和调试,在跳出的框里创建launch.json文件
#include <iostream>
using namespace std;

int main(int argc, char **argv) {
  cout << "Hello SLAM!" << endl;
  return 0;
}

12.选择第一个C++(GDB/LLDB)

12.把launch.json里面的内容全部删除,换成的代码如下

代码如下:
{
    // Use IntelliSense to learn about possible attributes.
    // Hover to view descriptions of existing attributes.
    // For more information, visit: https://go.microsoft.com/fwlink/?linkid=830387
    "version": "0.2.0",
    "configurations": [
        {
            "name": "(gdb) Launch",
            "type": "cppdbg",
            "request": "launch",
            "program": "${workspaceFolder}/${fileBasenameNoExtension}.out",
            "args": [],
            "stopAtEntry": false,
            "cwd": "${workspaceFolder}",
            "environment": [],
            "externalConsole": true,
            "MIMode": "gdb",
            "preLaunchTask": "build",
            "miDebuggerArgs": "-q -ex quit; wait() { fg >/dev/null; }; /usr/bin/gdb -q --interpreter=mi",
            "setupCommands": [
                {
                    "description": "Enable pretty-printing for gdb",
                    "text": "-enable-pretty-printing",
                    "ignoreFailures": true
                }
            ]
        }
    ]
}
13.然后点击运行,点击启动调试或者直接F5都行

14.跳出来找不到任务”build”,点击配置任务

15.点击第一个使用模板创建tasks.json文件

16.然后选择最后一个Others运行任意外部命令的实例
就会生成一个tasks.json文件

17.同样的把tasks.json里面的代码全部删除,换成如下的

代码如下:
{
    // See https://go.microsoft.com/fwlink/?LinkId=733558
    // for the documentation about the tasks.json format
    "version": "2.0.0",
    "tasks": [
        {
            "label": "build",
            "type": "shell",
            "command": "g++",
            "args": ["-g", "${file}", "-std=c++11", "-o", "${fileBasenameNoExtension}.out"]
        }
     ]
}
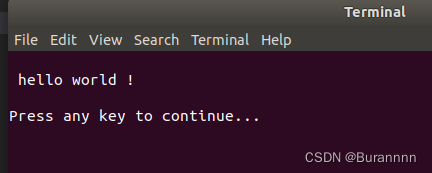
18.然后点击main.cpp文件,在当前页面点击运行调试,一个hello slam程序就生成啦

之前会出现一串[1] + Done什么的,我在launch.json加了一句就可以清除[1] + Done等后面的一些不必要的字符