参考文章
Springboot 整合RabbitMq ,用心看完这一篇就够了
RabbitMQ 延迟队列,消息延迟推送
方案一:死信队列+TTL过期时间来实现延迟队列
在 RabbitMQ 3.6.x 之前我们一般采用死信队列+TTL过期时间来实现延迟队列。
死信队列&死信交换器
死信消息:
- 消息被拒绝(Basic.Reject或Basic.Nack)并且设置 requeue 参数的值为 false
- 消息过期了
- 队列达到最大的长度
消息过期:在 rabbitmq 中存在2种方可设置消息的过期时间,第一种通过对队列进行设置,这种设置后,该队列中所有的消息都存在相同的过期时间,第二种通过对消息本身进行设置,那么每条消息的过期时间都不一样。如果同时使用这2种方法,那么以过期时间小的那个数值为准。当消息达到过期时间还没有被消费,那么那个消息就成为了一个 死信 消息。
- 队列设置:在队列申明的时候使用 x-message-ttl 参数,单位为 毫秒
- 单个消息设置:是设置消息属性的 expiration 参数的值,单位为 毫秒
DLX 全称(Dead-Letter-Exchange),称之为死信交换器,当消息变成一个死信之后,如果这个消息所在的队列存在x-dead-letter-exchange参数,那么它会被发送到x-dead-letter-exchange对应值的交换器上,这个交换器就称之为死信交换器,与这个死信交换器绑定的队列就是死信队列。
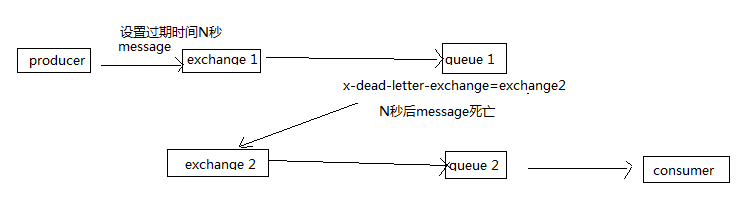
producer发生message(设置过期时间N秒)给exchange1,再传给queue1。queue1没有consumer消费消息。message在queue1等待N秒后消息死亡,转发给exchange2,再传给queue2。consumer接受queue2的message,消费这条消息。这样message就达到延迟N秒的效果。
代码实现
引入jar包
<dependency>
   <groupId>org.springframework.boot</groupId>
   <artifactId>spring-boot-starter-amqp</artifactId>
</dependency>
配置
application.yml配置:
spring:
  #配置rabbitMq 服务器
  rabbitmq:
    host: 127.0.0.1
    port: 5672
    username: root
    password: root
exchange 和 queue
import org.springframework.amqp.core.Binding;
import org.springframework.amqp.core.BindingBuilder;
import org.springframework.amqp.core.DirectExchange;
import org.springframework.amqp.core.Queue;
import org.springframework.context.annotation.Bean;
import org.springframework.context.annotation.Configuration;

import java.util.HashMap;
import java.util.Map;

@Configuration
public class DirectRabbitConfig {

    //队列 queue1
    @Bean
    public Queue queue1() {
        // durable:是否持久化,默认是false,持久化队列:会被存储在磁盘上,当消息代理重启时仍然存在,暂存队列:当前连接有效
        // exclusive:默认也是false,只能被当前创建的连接使用,而且当连接关闭后队列即被删除。此参考优先级高于durable
        // autoDelete:是否自动删除,当没有生产者或者消费者使用此队列,该队列会自动删除。
        // x-dead-letter-exchange:死信交换器,当消息变成一个死信之后,那么它会被发送到x-dead-letter-exchange对应值的交换器上
        // x-dead-letter-routing-key:死信路由,引导exchange进入哪个死信queue
        Map<String, Object> arguments = new HashMap<>();
        arguments.put("x-dead-letter-exchange", "exchange2");
        arguments.put("x-dead-letter-routing-key", "directRouting2");
        return new Queue("queue1", true, true, false, arguments);
    }

    //Direct交换机 exchange1
    @Bean
    DirectExchange exchange1() {
        return new DirectExchange("exchange1", true, true);
    }

    //绑定  将队列和交换机绑定, 并设置用于匹配键:TestDirectRouting
    @Bean
    Binding bindingDirect1() {
        return BindingBuilder.bind(queue1()).to(exchange1()).with("directRouting1");
    }

    //队列 queue2
    @Bean
    public Queue queue2() {
        return new Queue("queue2", true, true, false);
    }

    //Direct交换机 exchange1
    @Bean
    DirectExchange exchange2() {
        return new DirectExchange("exchange2", true, true);
    }

    //绑定  将队列和交换机绑定, 并设置用于匹配键:TestDirectRouting
    @Bean
    Binding bindingDirect2() {
        return BindingBuilder.bind(queue2()).to(exchange2()).with("directRouting2");
    }
}
发消息
import org.springframework.amqp.rabbit.core.RabbitTemplate;
import org.springframework.beans.factory.annotation.Autowired;
import org.springframework.web.bind.annotation.GetMapping;
import org.springframework.web.bind.annotation.RestController;

import java.util.HashMap;
import java.util.Map;
import java.util.UUID;


@RestController
public class SendMessageController {
    @Autowired
    RabbitTemplate rabbitTemplate;

    @GetMapping("/send/message")
    public String sendDirectMessage() {
        Map<String, Object> map = new HashMap<>();
        map.put("messageId", String.valueOf(UUID.randomUUID()));
        map.put("messageData", "test delay message !");
        rabbitTemplate.convertAndSend("exchange1", "directRouting1", map, messagePostProcessor -> {
            //设置过期时间30000毫秒
            messagePostProcessor.getMessageProperties().setExpiration(String.valueOf(30000));
            return messagePostProcessor;
        });
        return "ok";
    }
}
消费消息
import com.alibaba.fastjson.JSON;
import org.springframework.amqp.rabbit.annotation.RabbitHandler;
import org.springframework.amqp.rabbit.annotation.RabbitListener;
import org.springframework.stereotype.Component;

import java.util.Map;

@Component
@RabbitListener(queues = "queue2")
public class RabbitConsumer{

    @RabbitHandler
    public void process(Map message) {
        System.out.println("DirectReceiver消费者收到消息  : " + JSON.toJSONString(message));
    }

}
方案二:延迟队列的插件实现延迟队列
在 RabbitMQ 3.6.x 开始,RabbitMQ 官方提供了延迟队列的插件,可以下载放置到 RabbitMQ 根目录下的 plugins 下。
延迟队列插件下载
引入jra包
<dependency>
   <groupId>org.springframework.boot</groupId>
   <artifactId>spring-boot-starter-amqp</artifactId>
</dependency>
配置
	spring:
	  #配置rabbitMq 服务器
	  rabbitmq:
	    host: 127.0.0.1
	    port: 5672
	    username: root
	    password: root
exchange 和 queue
import org.springframework.amqp.core.Binding;
import org.springframework.amqp.core.BindingBuilder;
import org.springframework.amqp.core.Queue;
import org.springframework.amqp.core.TopicExchange;
import org.springframework.context.annotation.Bean;
import org.springframework.context.annotation.Configuration;

import java.util.HashMap;
import java.util.Map;

@Configuration
public class RabbitConfig {
    @Bean
    public TopicExchange lazyExchange() {
        TopicExchange exchange = new TopicExchange("Ex.LazyExchange", true, false);
        exchange.setDelayed(true);
        return exchange;
    }

    @Bean
    public Queue lazyQueue() {
        return new Queue("MQ.LazyQueue", true);
    }

    @Bean
    public Binding lazyBinding() {
        return BindingBuilder.bind(lazyQueue()).to(lazyExchange()).with("lazy.#");
    }
}
发消息
import org.springframework.amqp.core.MessageDeliveryMode;
import org.springframework.amqp.rabbit.core.RabbitTemplate;
import org.springframework.beans.factory.annotation.Autowired;
import org.springframework.web.bind.annotation.GetMapping;
import org.springframework.web.bind.annotation.RestController;

import java.util.HashMap;
import java.util.Map;
import java.util.UUID;


@RestController
public class SendMessageController {
    @Autowired
    RabbitTemplate rabbitTemplate;

    @GetMapping("/send/message")
    public String sendDirectMessage() {
        Map<String, Object> map = new HashMap<>();
        map.put("messageId", String.valueOf(UUID.randomUUID()));
        map.put("messageData", "test delay message !");
        rabbitTemplate.convertAndSend("MQ.LazyQueue", "lazy.boot", map, message -> {
            //设置消息持久化
            message.getMessageProperties().setDeliveryMode(MessageDeliveryMode.PERSISTENT);
            //设置过期时间30000毫秒
            message.getMessageProperties().setExpiration(String.valueOf(30000));
            return message;
        });
        return "ok";
    }
}
消费消息
import com.alibaba.fastjson.JSON;
import com.rabbitmq.client.Channel;
import org.springframework.amqp.core.Message;
import org.springframework.amqp.rabbit.annotation.RabbitHandler;
import org.springframework.amqp.rabbit.annotation.RabbitListener;
import org.springframework.stereotype.Component;

import java.io.IOException;

@Component
public class RabbitConsumer {
    @RabbitListener(queues = "MQ.LazyQueue")
    @RabbitHandler
    public void onLazyMessage(Message msg, Channel channel) throws IOException {
        try {
            System.out.println("lazy receive " + JSON.toJSONString(msg.getBody()));
        } catch (Exception e) {
            e.printStackTrace();
        } finally {
            long deliveryTag = msg.getMessageProperties().getDeliveryTag();
            channel.basicAck(deliveryTag, true);
        }
    }
}
版权声明:本文为fangye1原创文章,遵循 CC 4.0 BY-SA 版权协议,转载请附上原文出处链接和本声明。