dubbo容错和负载均衡
This article was originally published on Alibaba Cloud. Thank you for supporting the partners who make SitePoint possible.
本文最初发表在阿里云上 。 感谢您支持使SitePoint成为可能的合作伙伴。
High Availability (HA), Fault Tolerance (FT), and Horizontal Scale Friendly (HSF) are equally important to functionality for web applications to run and succeed today. Existing or new web applications should be designed and provisioned with such underlying architecture. Fortunately, you can easily and promptly deploy the aforementioned architecture in the Cloud era today (compared to the on-premises bare-metal machine era)!
高可用性(HA),容错(FT)和水平缩放友好(HSF)对于Web应用程序今天运行和成功的功能同样重要。 现有或新的Web应用程序应使用此类基础架构进行设计和配置。 幸运的是,您可以在当今的云时代(与本地裸机时代相比)轻松,Swift地部署上述架构!
However, this flexibility comes with a caveat – how do you choose the right cloud provider? We are spoiled for choice and it can be really challenging (and hectic!) when evaluating and choosing the right one.
但是,这种灵活性伴随着警告-您如何选择合适的云提供商? 我们无暇顾及选择,在评估和选择合适的产品时,它确实具有挑战性(而且很忙!)。
This post is intended to discuss and provide a walkthrough on deploying web applications on Alibaba Cloud from the ground up, including HA, FT, and HSF. Throughout this post, I will briefly introduce several services and tools provided in Alibaba Cloud. Yes, briefly! If you wish to learn more about particular services or tools, please visit the Documentation Center. In addition, this post will highlight the concerns and considerations when deploying such services.
这篇文章旨在讨论并提供从头开始在阿里云上全面部署Web应用程序的演练,包括HA,FT和HSF。 在本文中,我将简要介绍阿里云中提供的几种服务和工具。 是的,简短地! 如果您想了解有关特定服务或工具的更多信息,请访问文档中心 。 此外,本文还将重点介绍部署此类服务时的关注点和注意事项。
WordPress is used as the demo web application that would be deployed on Alibaba Cloud in this post. The same deploying principle shall apply to many other web applications. This post is not intended to discuss on WordPress configuration at all. It shall not (and not able to) serves as reference for WordPress configuration. There are tons and tons of good resources out there regarding best practices on WordPress administrative.
WordPress是用作演示Web应用程序,将在本文中部署在阿里云上。 相同的部署原理应适用于许多其他Web应用程序。 这篇文章根本不打算讨论WordPress配置。 它不能(也不能)用作WordPress配置的参考。 关于WordPress管理的最佳实践,有无数的优秀资源。
1.高层架构 (1. High-level Architecture)
Like many other web applications, the demo web application consists of an application layer (WordPress) and a database layer (MySQL).
与许多其他Web应用程序一样,该演示Web应用程序由应用程序层(WordPress)和数据库层(MySQL)组成。
Goal: Ultimately, we want an always-on web application (WordPress)!
目标 :最终,我们需要一个永远在线的Web应用程序(WordPress)!
In order to achieve such a “simple” goal, the demo web application must be deployed with the following minimum requirements:
为了实现这样的“简单”目标,必须按照以下最低要求部署演示Web应用程序:
- A single main site.
单个主站点。
- A minimum of two physically separate WordPress instances on each site for redundancy and load balancing purposes.
每个站点上至少两个物理上分离的WordPress实例,用于冗余和负载平衡。
- Auto-spawning the other WordPress instance when the existing instance stops or experiences a failure.
当现有实例停止或出现故障时,自动生成另一个WordPress实例。
- The database instance (MySQL) must also be running in redundancy mode. It should automatically failover to the active standby instance when necessary.
数据库实例(MySQL)也必须在冗余模式下运行。 必要时,它应自动故障转移到活动备用实例。
- Centralized dataspace. Shared resources must be accessible and available to all running WordPress instances. For example, a document uploaded by a user via WordPress should be synced across all running WordPress instances.
集中式数据空间。 共享资源必须可访问并且可用于所有正在运行的WordPress实例。 例如,用户通过WordPress上传的文档应在所有正在运行的WordPress实例之间同步。
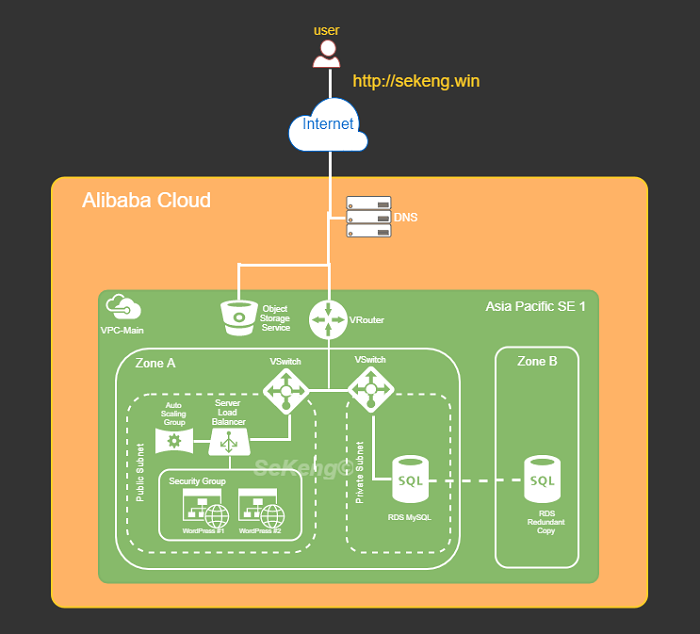
Fortunately, Alibaba Cloud provides a list of services and tools for us to fulfil these requirements. In this post specifically, we’ll utilize Cloud DNS (DNS), Auto Scaling Group (ASG), Server Load Balancer (SLB), Elastic Compute Service (ECS), Relational Database System (RDS), Object Storage Service (OSS), and Object Storage File System (OSSFS) tools to achieve our goal. The high-level architecture diagram for the deployed WordPress would be as following:
幸运的是,阿里云为我们提供了满足这些要求的服务和工具列表。 具体来说,在本文中,我们将利用Cloud DNS(DNS) , Auto Scaling Group(ASG) , 服务器负载平衡器(SLB) , 弹性计算服务(ECS) , 关系数据库系统(RDS) , 对象存储服务(OSS) ,和对象存储文件系统(OSSFS)工具来实现我们的目标。 部署的WordPress的高级架构图如下所示:
2.部署程序 (2. Deployment Procedures)
We’ll briefly introduce the components shown in Figure 1.0 before diving into each individual configuration. As stated earlier, you would have to refer to other sources such as Alibaba Cloud online documentation for detailed explanation. The following table summarizes the description and usage of such components according to our deployment context:
在深入探讨每个单独的配置之前,我们将简要介绍图1.0中所示的组件。 如前所述,您必须参考其他资源,例如阿里云在线文档以获取详细说明。 下表根据我们的部署上下文总结了此类组件的描述和用法:
Table 1: Cloud Components in Demo Deployments
表1:演示部署中的云组件
| Site / Region | Geographical area of the data center | 1. Site for deployments |
| Zone | Physically isolated data center within a region | 2. Used for redundancy purpose for Database |
| Cloud DNS | Domain name resolution and management service | 3. Purchase new Domain Name4. Route traffic to WordPress instance |
| VPC (Virtual Private Cloud) | Virtual isolated network built for private usage | 5. To group and separate resources6. To setup security control7. Assign network IP range |
| VRouter | Virtual routing table | 8. To configure network route for provisioned resources |
| VSwitch | Segment virtual networks into subnets | 9. To separate resources into group within specify Zone via subnet |
| Server Load Balancer | Distribute traffic to instances according to configured profile | 10. To load balance (round robin) request among provisioned WordPress instances |
| Auto Scaling Group | Automatically adjust computing resources based on scaling configuration | 11. Serves as watchdog to maintain the defined healthy running WordPress instances |
| Elastics Computing Service (WordPress instance) | Compute and process unit provided by Alibaba Cloud | 12. To install and run WordPress. This is the application layer of demo deployment |
| Relational Database Service (MySQL) | On-demand managed database service | 13. The DB for WordPress application |
| Object Storage Service | High availability and fault tolerance object storage | 14. Centralized storage for files/objects uploaded by user via WordPress application |
| 网站/地区 | 数据中心的地理区域 | 1.部署站点 |
| 区 | 区域内物理隔离的数据中心 | 2.用于数据库冗余 |
| 云端DNS | 域名解析与管理服务 | 3.购买新的域名4。 将流量路由到WordPress实例 |
| VPC(虚拟私有云) | 为私人使用而构建的虚拟隔离网络 | 5.分组和分离资源6。 设置安全控制7。 分配网络IP范围 |
| 虚拟现实 | 虚拟路由表 | 8.为配置的资源配置网络路由 |
| 开关 | 将虚拟网络分段为子网 | 9.通过子网将资源分成指定区域内的组 |
| 服务器负载均衡器 | 根据配置的配置文件将流量分配给实例 | 10.在预配置的WordPress实例之间负载平衡(循环)请求 |
| Auto Scaling组 | 根据扩展配置自动调整计算资源 | 11.充当看门狗以维护已定义的健康运行的WordPress实例 |
| Elastics Computing Service(WordPress实例) | 阿里云提供的计算和处理单元 | 12.安装并运行WordPress。 这是演示部署的应用程序层 |
| 关系数据库服务(MySQL) | 按需托管数据库服务 | 13. WordPress应用程序数据库 |
| 对象存储服务 | 高可用性和容错对象存储 | 14.集中存储用户通过WordPress应用程序上传的文件/对象 |
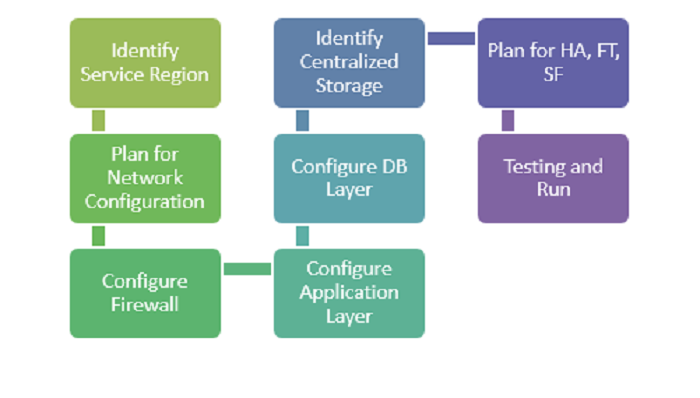
The workflow below describes the general steps involved in deploying a web application on Alibaba Cloud.
以下工作流描述了在阿里云上部署Web应用程序所涉及的一般步骤。
2.1。 识别服务区域 (2.1. Identify Service Region)
It’s important to decide on the region where an application should be deployed. The general considerations shall include the following:
确定应部署应用程序的区域非常重要。 一般考虑应包括以下内容:
-
Cost: The mother of all considerations. Yes, the cost may vary according region.
费用 :所有考虑因素之母。 是的,费用可能会因地区而异。
-
Service availability in the region? It’s not uncommon that some regions provide additional services that aren’t available in another region — you have to test to find out!
该地区的服务可用性 ? 某些地区提供其他地区无法提供的其他服务并不少见-您必须进行测试才能发现!
-
Main target users’ geographical location. It’s definitely better for user experience if the application is physically closer to the customer, resulting in shorter latency.
主要目标用户的地理位置 。 如果应用程序在物理上更接近客户,从而缩短了延迟时间,那么对于用户体验而言绝对是更好的选择。
-
Rules & Regulations. Is it legally OK for the application to be hosted in the selected region?
规章制度 。 在选定地区托管应用程序在法律上可以吗?
-
Number of Availability Zonez. Occasionally, we need to improve application availability by deploying redundant applications in a different zone. Since I’m based in Southeast Asia, I will be looking at the Singapore and Kuala Lumpur data centers. At the time of writing, “Asia Pacific SE 3 (Kuala Lumpur)” has only a single zone while “Asia Pacific SE 1 (Singapore)” has dual zones.
可用区数 。 有时,我们需要通过在不同区域中部署冗余应用程序来提高应用程序可用性。 由于我位于东南亚,因此我将研究新加坡和吉隆坡的数据中心。 在撰写本文时,“亚太SE 3(吉隆坡)”只有一个区域,而“亚太SE 1(新加坡)”则有两个区域。
After consideration, we’ve decided “Asia Pacific SE 1 (Singapore)” will be the main region for our demo deployment.`
在考虑之后,我们决定将“亚太SE 1(新加坡)”作为我们进行演示部署的主要区域。
2.2。 规划网络配置 (2.2. Plan for Network Configuration)
一,VPC (I. VPC)
We have to consider the number of nodes that might potentially be running in the deployment. Each running node is subject to one private IP, and we don’t want to end up running out of private IPs for nodes in the future!
我们必须考虑部署中可能正在运行的节点数。 每个正在运行的节点都受一个专用IP的约束,我们不希望将来最终会耗尽节点的专用IP!
There are three type of CIDR blocks allowed by Alibaba Cloud for a VPC: 10.0.0.0/8, 172.16.0.0/12, 192.168.0.0/16. According to Alibaba Cloud documentation, the first & last three IPs of CIDR block would be reserved by system usage, and hence the maximum number of private IPs for each CIDR block are:
对于VPC,阿里云允许三种CIDR块:10.0.0.0/8、172.16.0.0/12、192.168.0.0/16。 根据阿里云文档 ,CIDR块的前三个IP将根据系统使用情况保留,因此每个CIDR块的专用IP的最大数量为:
- 10.0.0.0/8 = 16777212 (16777216 – 4)
10.0.0.0/8 = 16777212(16777216 – 4)
- 172.16.0.0/12 1048572 (1048576 – 4)
172.16.0.0/12 1048572(1048576 – 4)
- 192.168.0.0/16 = 65532 (65536 – 4)
192.168.0.0/16 = 65532(65536 – 4)
You may also wonder, why don’t we just use the biggest CIDR block allowed to avoid potentially running out of private IP in future? The following might help you to reconsider that thought:
您可能还想知道,为什么我们不只使用允许的最大CIDR块,以避免将来可能耗尽私有IP? 以下内容可以帮助您重新考虑该想法:
-
Bigger CIDR block may increase the complexity when dealing with IP-related configuration, such as subnet creation, route configuration, security group configuration, and etc.
当处理与IP相关的配置(例如子网创建,路由配置,安全组配置等)时, 更大的CIDR块可能会增加复杂性 。
-
If the above is not a valid show-stopper for you, then consider this: “VPC peering (interconnect)” with other VPCs doesn’t allow overlapping CIDR block. In other words, it’s not possible to peer with other VPC once you using 10.0.0.0/8 as CIDR block!
如果以上内容对您而言不是有效的阻止手段,则请考虑以下问题:与其他VPC的“ VPC对等(互连) ”不允许重叠的CIDR块。 换句话说,一旦使用10.0.0.0/8作为CIDR块,就无法与其他VPC对等!
After consideration, we’ll use “192.168.0.0/16” for our demo deployment as there will only be a few running nodes within the VPC.
考虑之后,我们将在演示部署中使用“ 192.168.0.0/16”,因为VPC中只有几个正在运行的节点。
二。 子网路 (II. Subnet)
In Alibaba Cloud, VSwitch could be used to further segment the VPC CIDR block into a subnet with a smaller CIDR block. The general consideration for segmenting subnets includes the following:
在阿里云中,可以使用VSwitch将VPC CIDR块进一步细分为具有较小CIDR块的子网。 分段子网的一般注意事项包括:
-
Logical grouping of instances according to functionality. E.g. grouping the application in one group and RDS in another group for easier maintainability. For example, disabling a group of instances by deleting VSwitch attached to the group.
根据功能对实例进行逻辑分组 。 例如,将应用程序分为一组,而将RDS分为另一组,则可维护性更高。 例如,通过删除附加到该组的VSwitch来禁用一组实例。
-
Simplify security group profile configuration. Security rules based on the subnet CIDR block level rather than the individual instance’s IP are cleaner.
简化安全组配置文件配置。 基于子网CIDR块级别而不是单个实例的IP的安全规则更加清晰。
-
Enable Auto-scaling and Server Load Balancer monitoring and actions on a specific subnet.
在特定子网上启用自动扩展和Server Load Balancer监视和操作。
-
Redundancy on resources. It’s possible to seamlessly failover to a different subnet that’s based in a different zone when the existing subnet’s zone encounters failure.
资源冗余 。 当现有子网的区域遇到故障时,可以无缝地故障转移到基于不同区域的另一个子网。
After consideration, we’re grouping WordPress in one subnet (192.168.1.0/24) and the RDS instance in another subnet (192.168.2.0/24).
考虑之后,我们将WordPress分组在一个子网(192.168.1.0/24)中,而RDS实例在另一个子网(192.168.2.0/24)中。
2.3。 配置防火墙(安全组) (2.3. Configure Firewall (Security Group))
Network access at the instance level could be limited via Security Group in Alibaba Cloud. The Security Group Rule configuration could be very granular, up to the per-protocol, per-port, per-client IP level. Hence, to avoid unauthorized access to the instance, we need to consider the following:
可以通过阿里云中的安全组来限制实例级别的网络访问。 安全组规则配置可能非常细致,达到每个协议,每个端口,每个客户端IP级别。 因此,为了避免对实例的未授权访问,我们需要考虑以下因素:
-
Always comply with least privilege practice. Restrict access to the required client only.
始终遵守最低特权惯例 。 仅限制对所需客户端的访问。
-
Intranet or/and internet connectivity. You can use Security Group to create a “private subnet” (no internet usage) by only allowing access for inbound intranet. In addition, a NAT gateway could be used to allow the instance in the private network to access outbound internet services.
内联网或/和互联网连接 。 您可以使用安全组通过仅允许入站Intranet访问来创建“专用子网”(不使用Internet)。 另外,可以使用NAT网关来允许专用网络中的实例访问出站Internet服务。
Since we are running WordPress on Linux instances, we would at least allow an inbound rule for Port 80 (HTTP) and 22 (SSH) in Security Group. Besides that, all outbound traffic would be allowed since there’s no specific requirement on that.
由于我们在Linux实例上运行WordPress,因此至少应在安全组中允许端口80(HTTP)和22(SSH)的入站规则。 除此之外,所有出站流量都将被允许,因为对此没有特别要求。
2.4。 配置应用层 (2.4. Configure the Application Layer)
This could be the trickiest and most uncertain decision we have to make when deploying web applications. As stated earlier, this post will not discuss an application’s capacity requirements and hence, choosing a proper instance type is out of scope of this post. Anyhow, the following considerations may assist in deciding on an instance type generally:
这可能是我们在部署Web应用程序时必须做出的最棘手,最不确定的决定。 如前所述,本文不会讨论应用程序的容量要求,因此,选择合适的实例类型不在本文讨论范围之内。 无论如何,以下注意事项通常可以帮助确定实例类型:
-
Always start with the Pay-As-You-Go model if you have no idea on the instance type performance nor the actual capacity requirement. This pricing model allows you to experiment with different instance types freely without a lock-in period.
如果您对实例类型的性能或实际容量需求一无所知,请始终从即付即用模型开始。 通过这种定价模型,您可以自由地尝试不同的实例类型,而没有锁定期。
-
You have to understand the nature of the to-be deployed application’s constraint. Is the application CPU-bound or IO-bound? You have to answer that in order to determine a proper instance type with the best cost efficiency.
您必须了解要部署的应用程序约束的性质 。 应用程序受CPU约束还是受IO约束? 您必须回答该问题,才能确定具有最佳成本效益的适当实例类型。
-
Deploy with one step down instance whenever possible. If an application’s capacity requirement could be satisfied with a ‘X’ instance of a instance family type Y, it might be better if we deploy the application with two one step down instances (e.g. X/2) from the same family type for the same amount of workload. This will increase the availability of the application. For example, we can still process 50% of the workload if any the X/2 instance goes down compared with 100% downtime if the X instance is down. Of course, this approach is subject to the design and usage of the application.
尽可能使用降级实例进行部署。 如果一个实例族类型为Y的“ X”实例可以满足应用程序的容量要求,那么最好为我们部署具有相同家族类型的两个单步降级实例(例如X / 2)的应用程序工作量。 这将增加应用程序的可用性。 例如,如果X / 2实例发生故障,我们仍然可以处理50%的工作负载,而X实例发生故障时,我们仍然可以处理100%的停机时间。 当然,这种方法取决于应用程序的设计和使用。
-
Decide on other usage parameters e.g. network type, network bandwidth, operating system image, and etc. accordingly.
相应地确定其他使用参数,例如网络类型,网络带宽,操作系统映像等。
Since this is a demo deployment without any real production usage, we’ll go for the lowest (cheapest) ECS instance configuration. For example: General Type n1: 1-core, 1GB, Ubuntu 16.04 OS, Ultra Cloud Disk 40GB, and 1Mbps network bandwidth.
由于这是演示部署,没有任何实际的生产用途,因此我们将采用最低(最便宜)的ECS实例配置。 例如:常规类型n1:1核,1GB,Ubuntu 16.04 OS,Ultra Cloud Disk 40GB和1Mbps网络带宽。
2.5。 配置数据库层 (2.5. Configure the Database Layer)
Generally, we have to decide between using self-managed DB instances (self-install DB at ECS instance) like what we usually do for on-premises solutions, or using fully managed RDS DB services like ApsaraDB. Again, it’s out of this post’s scope in comparing or benchmarking the two variants of database services. These guidelines may assist in choosing database variants generally:
通常,我们必须决定是使用像我们通常对本地解决方案所做的那样使用自我管理的数据库实例(在ECS实例中为自我安装的数据库),还是使用像ApsaraDB这样的完全托管的RDS DB服务 。 同样,在比较或基准测试数据库服务的两种变体时,超出了本文的讨论范围。 这些准则通常可以帮助选择数据库变体:
- Do you have available resources for managing and operating database instances? The management and operational tasks may include backing up data files, OS/DB patching, access control on the host machine, etc. If the answer is no, then maybe a fully managed RDS DB is preferable.
您是否有可用资源来管理和操作数据库实例? 管理和操作任务可能包括备份数据文件,OS / DB修补程序,主机上的访问控制等。如果回答为“否”,则最好使用完全托管的RDS DB。
- Do you need a dedicated database instance? If your database is small and the workload is minimal and able to co-exist with the application (e.g. in the development environment), perhaps the self-managed variant is preferable due to cost efficiency.
您需要专用的数据库实例吗? 如果您的数据库很小,并且工作量最少并且能够与应用程序共存(例如,在开发环境中),则由于成本效益,自管理变量可能是更可取的。
- Do you need access to the underlying host for the database instance? For example, if you need to perform specific OS/DB configuration for performance-tuning purposes, then the self-managed variant shall be employed.
您是否需要访问数据库实例的基础主机? 例如,如果出于性能调整的目的需要执行特定的OS / DB配置,则应采用自我管理的变体。
- Does the fully-managed database service provide the DB type that you required? If no, then the answer is straightforward, go for a self-managed DB variant.
完全托管的数据库服务是否提供您所需的数据库类型? 如果否,那么答案很简单,那就选择一个自我管理的数据库变体。
-
If you are concerned about possible cloud vendor lock-in, then you might want to avoid the fully-managed variant as some RDS implementations could be cloud vendor specific.
如果您担心云供应商的锁定,那么您可能要避免使用完全托管的变体,因为某些RDS实施可能是特定于云供应商的。
Since there is neither manpower to maintain the demo database nor any specify DB configuration, we’ll deploy the demo DB with ApsaraDB RDS – MySQL. In addition, this variant allows us to make a redundancy (active standby) database easily (with just a click!).
由于既没有维护演示数据库的人力,也没有指定数据库的配置,因此我们将使用ApsaraDB RDS – MySQL部署演示数据库。 此外,此变体使我们能够轻松地(只需单击一下!)就可以创建冗余(活动备用)数据库。
2.6。 识别集中存储 (2.6. Identify Centralized Storage)
Eventually, there could be multiple concurrent WordPress applications running on physically separate ECS instances. Each instance might generate and store certain files/image/media resulting from users’ operations. Obviously, objects that are generated by any instance would have to be synchronized across all other running application instances. One of the approaches to achieve this mentioned synchronization is through centralized storage. Objects generated shall be synchronzied to centralized storage and followed by synchronization between centralized objects and other running instances. Additionally, the centralized storage must always be available and any failure of any instance shouldn’t impact the availability and durability of centralized storage.
最终,可能会在物理上独立的ECS实例上运行多个并发WordPress应用程序。 每个实例可能会生成并存储用户操作产生的某些文件/图像/媒体。 显然,任何实例生成的对象都必须在所有其他正在运行的应用程序实例之间进行同步。 实现此提到的同步的方法之一是通过集中式存储。 生成的对象应同步到集中存储,然后在集中对象和其他正在运行的实例之间进行同步。 此外,集中存储必须始终可用,并且任何实例的任何故障都不应影响集中存储的可用性和持久性。
Alibaba Cloud provides a couple of fully managed services which could serve as centralized storage:
阿里云提供了一些完全托管的服务,可以用作集中存储:
- Object Storage Service for objects: It’s ideal as centralized object storage due to the guaranteed high availability (99.9%), scalability, and fully-managed nature. Specifically to this demo deployment, each running WordPress instance shall sync with a dedicated common Object Storage Service’s bucket. By employing such a syncing mechanism, all the running WordPress instances would have an identical set of created objects.
对象的对象存储服务:由于保证的高可用性(99.9%),可伸缩性和完全托管的性质,它非常适合作为集中对象存储。 专门针对此演示部署,每个正在运行的WordPress实例均应与专用的通用对象存储服务的存储桶同步。 通过采用这种同步机制,所有正在运行的WordPress实例将具有相同的一组创建对象。
- ApsaraDB Redis for application state: Sharing state (e.g. shared value, parameter) among running instances is possible via fully-managed ApsaraDB Redis.
ApsaraDB Redis用于应用程序状态:通过完全托管的ApsaraDB Redis,可以在运行的实例之间共享状态(例如,共享值,参数)。
A dedicated bucket in Object Storage Service would be created and used to store objects created as a result of user operations. All running WordPress instances shall sync with the relevant bucket for the list of created objects.
将在对象存储服务中创建一个专用存储桶,并将其用于存储由于用户操作而创建的对象。 所有正在运行的WordPress实例均应与相关存储桶同步,以创建对象列表。
2.7。 规划HA,FT和HSF (2.7. Plan for HA, FT, and HSF)
To achieve HA, FT, and HSF in Alibaba Cloud, a web application shall be fundamentally designed as stateless and horizontally scalable. Any dependent application’s state or data shall be decoupled from the web application and migrated to centralized storage as discussed in the earlier section.
为了在阿里云中实现HA,FT和HSF,Web应用程序应从根本上设计为无状态且可水平扩展。 如上一节所述,任何从属应用程序的状态或数据都应与Web应用程序分离,并迁移到集中式存储。
Services listed below could be employed for deploying a HA, FT, and HSF web application:
可以使用下面列出的服务来部署HA,FT和HSF Web应用程序:
-
Cloud DNS: It’s possible to configure ‘A’ record types for instances hosted in different regions. It’s really useful during failover scenarios whereby an ‘A’ record of a standby instance could be enabled with one click, resulting in network traffic diversion to the standby instance.
Cloud DNS :可以为不同区域中托管的实例配置“ A”记录类型。 这在故障转移场景中非常有用,通过该操作,只需单击一下即可启用备用实例的“ A”记录,从而将网络流量转移到备用实例。
-
Auto Scaling: It can be used to auto-spawn instances in a desired Zone when running instances go down or become unhealthy.
Auto Scaling :当正在运行的实例出现故障或运行状况不佳时,可用于在所需区域中自动生成实例。
-
Server Load Balancer: This service would provide a health check on configured instances and report their status to the Auto Scaling service for further action. Besides that, this service would also load balance workload among running instances.
Server Load Balancer :此服务将对配置的实例提供运行状况检查,并将其状态报告给Auto Scaling服务以采取进一步的措施。 除此之外,该服务还将在运行实例之间平衡工作负载。
-
ApsaraDB RDS: RDS MySQL provides the multi-zone availability feature with just a click. It will really ease the effort required to provide HA and FT for the database.
ApsaraDB RDS :RDS MySQL只需单击即可提供多区域可用性功能。 确实可以减轻为数据库提供HA和FT所需的工作。
The demo deployment will utilize DNS to route traffic to WordPress instances, Auto Scaling to ensure a minimum of two running instances in each region, and Server Load Balancer to provide a health check as well as to load balance workload. Last but not least, the Multi-Zone availability feature on RDS MySQL is enabled to provide HA and FT for the database.
该演示部署将利用DNS将流量路由到WordPress实例,使用Auto Scaling来确保每个区域中至少有两个正在运行的实例,并使用Server Load Balancer进行运行状况检查以及负载均衡工作负载。 最后但并非最不重要的一点是,RDS MySQL的多区域可用性功能已启用,可以为数据库提供HA和FT。
2.8。 测试并运行 (2.8. Testing and Run)
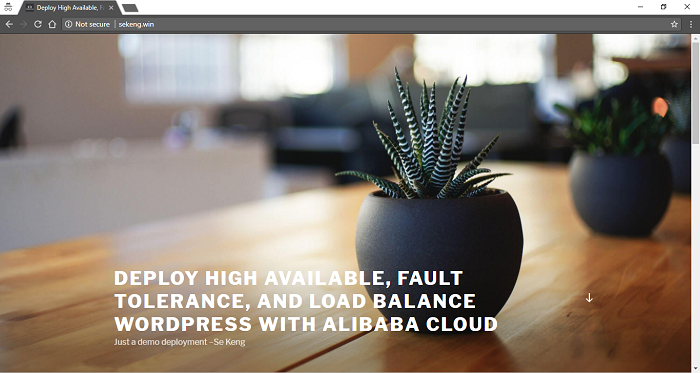
To test the HA and FT behavior, we may stop a running ECS manually and observe the action triggers by the auto-scaling service. If the auto-scaling has been configured properly, a new instance would be spawned automatically. Besides that, we may also manually turn off the RDS DB instance to observe the Multi-Zone redundancy failover happening. The best thing is that these actions are automatically handled by the respective services without any manual intervention. Shown below is our deployed WordPress:
为了测试HA和FT行为,我们可以手动停止正在运行的ECS ,并观察自动扩展服务的动作触发。 如果已正确配置自动缩放比例,则将自动产生一个新实例。 除此之外,我们还可以手动关闭RDS数据库实例以观察正在发生的多区域冗余故障转移。 最好的是,这些操作由相应的服务自动处理,而无需任何手动干预。 下面显示的是我们部署的WordPress :
3.可能的改进 (3. Possible Improvements)
The following suggestions might be useful to further improve the resiliency, performance, and availability of a deployed web application:
以下建议对于进一步提高已部署的Web应用程序的弹性,性能和可用性可能是有用的:
- Auto scale out/in according to the instance’s workload. For example, spawn a new instance when CPU/memory exceeds a certain threshold over a defined period.
根据实例的工作负载自动扩展/扩展。 例如,当CPU /内存在定义的时间段内超过某个阈值时,生成一个新实例。
- Utilize the CDN to cache and distribute content to minimize geographical latency and reduce traffic to the application instance. In addition, the CDN also acts as defense layer for DDoS attacks on application instances.
利用CDN缓存和分发内容,以最大程度地减少地理延迟并减少到应用程序实例的流量。 此外,CDN还可充当针对应用程序实例的DDoS攻击的防御层。
- Offload the database’s ‘read’ workload by creating a read replica.
通过创建只读副本来减轻数据库的“读取”工作量。
- Plan a Disaster Recovery Region and create failover strategy.
规划灾难恢复区域并创建故障转移策略。
- Setup cloud monitoring, enable alert, and turn on detailed log at least for critical metrics and incidents such as instance failure, disk space full, auto scaling triggered, and etc.
设置云监视,启用警报并至少针对关键指标和事件(例如实例故障,磁盘空间已满,触发自动缩放等)打开详细日志。
4.附录(样本配置) (4. Appendix (Sample Configuration))
The following sample configuration steps are based on the outcome discussed in the “Deployment Procedures” section. You would need an Alibaba Cloud account to run the following configuration. If you are yet to get one, you may register (with US$300 free credit at the time of this writing) with this link.
以下示例配置步骤基于“部署过程”部分中讨论的结果。 您需要一个阿里云帐户来运行以下配置。 如果您还没有获得此奖励,可以使用此链接进行注册(在撰写本文时可获得300美元的免费信用)。
1. VPC和网络配置(确定服务区域并计划网络配置) (1. VPC & Network Configuration (Identify Service Region & Plan for Network Configuration))
- Login to Alibaba Cloud console
登录阿里云控制台
-
Create “VPC”. Go to “Product” and click on “Virtual Private Cloud” under “Networking”. Select region as “Asia Pacific SE 1”. Once landed at VPC overview page, click at “VPC” on side tab follows by click on “Create VPC” button.
创建“ VPC”。 转到“产品”,然后单击“网络”下的“虚拟私有云”。 选择地区作为“亚太SE 1”。 进入VPC概述页面后,单击侧面选项卡上的“ VPC”,然后单击“创建VPC”按钮。
- Name: VPC-Main
名称:VPC-主要
- CIDR range: 192.168.0.0/16
CIDR范围:192.168.0.0/16
- Name: VPC-Main
-
Create a “subnet”. One subnet for the WordPress instance and one subnet for RDS.
创建一个“子网”。 WordPress实例一个子网,RDS一个子网。
-
First subnet (Continue with “Next Step” at Step 2 to “Create VSwitch”):
第一个子网(在步骤2继续“下一步”以创建“ VSwitch”):
- VPC: Recently created VPC (e.g. VPC-Main)
VPC:最近创建的VPC(例如VPC-Main)
- Name: Public-Subnet1
名称:Public-Subnet1
- Zone: Zone A
区域:A区
- CIDR: 192.168.1.0/24
CIDR:192.168.1.0/24
- VPC: Recently created VPC (e.g. VPC-Main)
-
Second subnet (Click on ‘Create More’ to create second switch):
第二个子网(单击“创建更多”以创建第二个交换机):
- VPC: Recently created VPC (e.g. VPC-Main)
VPC:最近创建的VPC(例如VPC-Main)
- Name: Public-Subnet2
名称:Public-Subnet2
- Zone: Zone A
区域:A区
- CIDR: 192.168.2.0/24
CIDR:192.168.2.0/24
- VPC: Recently created VPC (e.g. VPC-Main)
-
2.安全组配置(配置防火墙) (2. Security Group Configuration (Configure Firewall))
-
Create “Security Group”. Go to “Product” and click on “Elastic Computing Service”. Once landed at ECS overview page, click at “Security Group” on side tab follow by click on “Create Security Group” button.
创建“安全组”。 转到“产品”,然后单击“弹性计算服务”。 进入ECS概述页面后,单击侧面选项卡上的“安全组”,然后单击“创建安全组”按钮。
- Name: Any name. E.g. SG-SSH-HTTP
名称:任何名称。 例如SG-SSH-HTTP
- Network Type: VPC
网路类型:VPC
- VPC: VPC-Main
VPC:VPC-主要
- Click on “Set the Rule Immediately”
点击“立即设置规则”
- Name: Any name. E.g. SG-SSH-HTTP
-
Add rule. Click on “Add Security Group Rules”
添加规则。 点击“添加安全组规则”
-
First Rule (SSH for any inbound client)
第一规则(适用于任何入站客户端的SSH)
- Rule Direction: Inbound
规则方向:入站
- Authorization Policy: Allow
授权政策:允许
- Protocol Type: SSH
协议类型:SSH
- Authorization Object: 0.0.0.0/0
授权对象:0.0.0.0/0
- Rule Direction: Inbound
-
Second Rule (HTTP for any inbound client)
第二条规则(任何入站客户端的HTTP)
- Rule Direction: Inbound
规则方向:入站
- Authorization Policy: Allow
授权政策:允许
- Protocol Type: HTTP
协议类型:HTTP
- Authorization Object: 0.0.0.0/0
授权对象:0.0.0.0/0
- Rule Direction: Inbound
-
Third Rule (All protocol for any outbound target)
第三条规则(所有出站目标的所有协议)
- Rule Direction: outbound
规则方向:出站
- Authorization Policy: Allow
授权政策:允许
- Protocol Type: All
协议类型:全部
- Authorization Object: 0.0.0.0/0
授权对象:0.0.0.0/0
- Rule Direction: outbound
-
3. ECS配置(配置应用程序层–第1部分) (3. ECS Configuration (Configure Application Layer – Part 1))
-
Create “Key Pair”. Go to “Product” and click on “Elastic Computing Service”. Once you’re on the ECS overview page, click “Key Pairs” on the side tab, then click “Create Key Pair”.
创建“密钥对”。 转到“产品”,然后单击“弹性计算服务”。 进入ECS概述页面后,单击侧面选项卡上的“密钥对”,然后单击“创建密钥对”。
- Name: ECS-Lab
名称:ECS-Lab
- Type: Automatically Create a Key Pair
类型:自动创建密钥对
- A key pair file named “ECS-Lab.pem” should be automatically downloaded. This file will be used as your authentication key when connecting to the ECS instance.
应该自动下载名为“ ECS-Lab.pem”的密钥对文件。 连接到ECS实例时,此文件将用作您的身份验证密钥。
- Name: ECS-Lab
-
Create an ECS instance for your WordPress installation. Go to “Product” and click on “Elastic Computing Service”. Once on the ECS overview page, click “Instances” on the side tab, then click the “Create Instance” button.
为您的WordPress安装创建ECS实例。 转到“产品”,然后单击“弹性计算服务”。 在ECS概述页面上,单击侧面选项卡上的“实例”,然后单击“创建实例”按钮。
- Pricing Model: Pay-As-You-Go
定价模式:现收现付
- Region and Zone: Asia Pacific SE 1 (Singapore), Asia Pacific SE 1 Zone A
地区和区域:亚太SE 1区(新加坡),亚太SE 1区A区
- Instance Type: General Type n1 – 1 core 1GB
实例类型:常规类型n1 – 1核1GB
- Network Type: Select the created ‘VPC’ (VPC-Main), VSwitch (Public-Subnet1), and Security Group (SG-SSH-HTTP) accordingly
网络类型:分别选择创建的“ VPC”(VPC-Main),VSwitch(Public-Subnet1)和“安全组”(SG-SSH-HTTP)
- Operating System: Ubuntu 16.04
作业系统:Ubuntu 16.04
- Security Setting: Attach Key Pair, select the generated key-pair from Step 6 (ECS-Lab).
安全设置:附加密钥对,从步骤6(ECS-Lab)中选择生成的密钥对。
- Instance name: ECS-Lab-WP
实例名称:ECS-Lab-WP
- Click “Buy Now” and proceed accordingly
点击“立即购买”并继续进行操作
- Pricing Model: Pay-As-You-Go
-
SSH into the purchased ECS instance with the key pair generated at Step 3.1. Refer to this link on how to SSH into the ECS instance. Go to “Product” and click on “Elastic Computing Service”. Once landed on the ECS overview page, click “Instances” on the side tab. The internet IP address is in the “IP Address” column.
使用在步骤3.1中生成的密钥对,SSH到购买的ECS实例中。 请参考此链接以了解如何通过SSH进入ECS实例。 转到“产品”,然后单击“弹性计算服务”。 登陆到ECS概述页面后,单击侧面选项卡上的“实例”。 互联网IP地址在“ IP地址”列中。
SSH into the ECS instance, and run the following commands to install the necessary software and packages for WordPress. Please ensure all commands are executed successfully.
SSH进入ECS实例,然后运行以下命令为WordPress安装必要的软件和软件包。 请确保所有命令均已成功执行。
apt-get update
apt-get install apache2 libapache2-mod-php php php-mcrypt php-mysql mysql-client-core-5.7 -y
cd /var/www/html
mv index.html index.html.bk
wget https://wordpress.org/latest.tar.gz
tar -xzf latest.tar.gz
cp -r wordpress/* /var/www/html/
rm -rf wordpress latest.tar.gz
chown -R www-data:www-data /var/www/html
chmod -R 755 /var/www/html/wp-content
service apache2 restart
4. ApsaraDB RDS配置(配置数据库层) (4. ApsaraDB RDS Configuration (Configure Database Layer))
-
Create ApsaraDB RDS – MySQL. Go to “Product” and click on “ApsaraDB for RDS”. Once landed on the RDS page, click “Create Instances”.
创建ApsaraDB RDS – MySQL。 转到“产品”,然后单击“ ApsaraDB for RDS”。 登陆到RDS页面后,单击“创建实例”。
- Billing Method: Pay-As-You-Go
计费方式:现收现付
- Region and Zone: Singapore, Multiple Zone (Zone A + Zone B)
地区和区域:新加坡,多个区域(A区+ B区)
- Database Engine: MySQL
数据库引擎:MySQL
- Instance type: 1 Core 1GB (rds.mysql.t1.small)
实例类型:1个核心1GB(rds.mysql.t1.small)
- Network Type: “VPC”, and select VPC (VPC-Main) and VSwitch (Public-Subnet2) accordingly
网络类型:“ VPC”,并相应地选择VPC(VPC-Main)和VSwitch(Public-Subnet2)
- Click “Buy Now” and proceed accordingly
点击“立即购买”并继续进行操作
- Billing Method: Pay-As-You-Go
- Configure the RDS instance. Go to “Product” and click on “ApsaraDB for RDS” (it might take a while before the purchased “RDS” appears on the page). Once the purchased RDS is up and running, click “Manage” on the RDS.
配置RDS实例。 转到“产品”,然后单击“ ApsaraDB for RDS”(可能要花一些时间才能在页面上显示购买的“ RDS”)。 一旦购买的RDS启动并运行,请在RDS上单击“管理”。
-
Create a whitelist. Click “Security” on the side tab. Under the “Whitelist Setting” tab, click on “+ Add a Whitelist Group”.
创建白名单。 单击侧面选项卡上的“安全性”。 在“白名单设置”选项卡下,单击“ +添加白名单组”。
- Group Name: rds_ecs_whitelist
组名:rds_ecs_whitelist
- Whitelist: 192.168.1.0/24
白名单:192.168.1.0/24
- Click “OK”
点击“确定”
- Group Name: rds_ecs_whitelist
-
Create the “wordpress” database. Click “Databases” on the side tab followed by “Create Database”.
创建“ wordpress”数据库。 单击侧面选项卡上的“数据库”,然后单击“创建数据库”。
- Database Name: wordpress
数据库名称:wordpress
- Supported Characters: utf8
支持的字符:utf8
- Click OK
点击确定
- Database Name: wordpress
-
Create a user account. Click “Accounts” on the side tab followed by “Create Account”.
创建一个用户帐户。 单击侧面选项卡上的“帐户”,然后单击“创建帐户”。
- Database Account: wordpress_user
数据库帐户:wordpress_user
- Authorized Databases: select the created database (wordpress)
授权数据库:选择创建的数据库(wordpress)
-
Password & Re-enter Password: WordPress123 (insert your own more secure password here)
密码并重新输入密码:WordPress123 (在此处输入您自己的更安全的密码)
- Database Account: wordpress_user
- Click “OK” to create the account.
单击“确定”创建帐户。
5. WordPress配置(配置应用程序层–第2部分) (5. WordPress Configuration (Configure Application Layer – Part 2))
- Browse to the ECS internet IP (created at Step 3.2) using your web browser.
使用Web浏览器浏览到ECS互联网IP(在步骤3.2中创建)。
- Fill in the MySQL connection details, such as “Database Name”, “Username”, “Password” as defined in Step 4.2. The “Database Host” is the “Intranet Address” of the created RDS instance at 4.1. You may get the intranet address by going to Alibaba Cloud’s console at “Product” and click on “ApsaraDB for RDS”. Once landed on the RDS page, click on the created RDS instance, and copy the “Intranet Address” value.
填写MySQL连接详细信息,如步骤4.2中定义的“数据库名称”,“用户名”,“密码”。 “数据库主机”是在4.1处创建的RDS实例的“内联网地址”。 您可以通过转到“产品”处的阿里云控制台,然后单击“用于RDS的ApsaraDB”来获得Intranet地址。 登陆到RDS页面后,单击创建的RDS实例,然后复制“ Intranet Address”值。
-
Click “Run on Installation” and continue the WordPress configuration until completion. Hooray! By now, your first WordPress instance should be installed and running at Alibaba Cloud!
单击“在安装时运行”并继续WordPress配置,直到完成。 万岁! 现在,您的第一个WordPress实例应已在阿里云上安装并运行!
6.同步从属数据存储(标识集中存储) (6. Sync Dependent Data Storage (Identify Centralized Storage))
- The folder used by WordPress to store user-uploaded files should be synchronized to centralized storage.
WordPress用于存储用户上传文件的文件夹应同步到集中存储。
-
Create an OSS bucket. Go to “Product” and click on “Object Storage Service” under “Storage & CDN”. Once you’ve landed on the Object Storage page, click on “Create Bucket” on the RDS.
创建一个OSS存储桶。 转到“产品”,然后单击“存储和CDN”下的“对象存储服务”。 进入“对象存储”页面后,单击RDS上的“创建存储桶”。
-
Bucket Name: lab-wp-XXX (using your own bucket name)
值区名称: lab-wp-XXX (使用您自己的值区名称)
- Region: Asia Pacific SE 1 (Singapore)
地区:亚太SE 1(新加坡)
- Storage Class: Standard
存储类别:标准
- ACL: Private
ACL:私人
- Click OK
点击确定
Create an OSS bucket. Go to “Product” and click on “Object Storage Service” under “Storage & CDN”. Once you’ve landed on the Object Storage page, click on “Create Bucket” on the RDS.
创建一个OSS存储桶。 转到“产品”,然后单击“存储和CDN”下的“对象存储服务”。 进入“对象存储”页面后,单击RDS上的“创建存储桶”。
-
-
Grant access to the bucket created at Step 14. Go to “Product” and click on “Resource Access Management” under “Monitor and Management”. Once you’ve landed on the RAM page, click on “User” followed by “Create User”.
授予对在步骤14中创建的存储桶的访问权限。转到“产品”,然后单击“监视和管理”下的“资源访问管理”。 进入RAM页面后,单击“用户”,然后单击“创建用户”。
- User Name: oss-user
用户名:oss-user
- Click OK
点击确定
- User Name: oss-user
-
Authorize the created user with OSS access. Go to “Product” and click on “Resource Access Management” under “Monitor and Management”. Once you’ve landed on the RAM page, click on the “Authorize” button for the newly created user.
使用OSS访问权限授权创建的用户。 转到“产品”,然后单击“监视器和管理”下的“资源访问管理”。 进入RAM页面后,单击新创建用户的“授权”按钮。
- Select and add the “AliyunOSSFullAccess”
选择并添加“ AliyunOSSFullAccess”
- Click OK
点击确定
Authorize the created user with OSS access. Go to “Product” and click on “Resource Access Management” under “Monitor and Management”. Once you’ve landed on the RAM page, click on the “Authorize” button for the newly created user.
使用OSS访问权限授权创建的用户。 转到“产品”,然后单击“监视器和管理”下的“资源访问管理”。 进入RAM页面后,单击新创建用户的“授权”按钮。
- Select and add the “AliyunOSSFullAccess”
- Generate “User Access Key”. Go to “Product” and click on “Resource Access Management” under “Monitor and Management”. Once you’ve landed on the RAM page, click on “Manage” for the newly created user.
生成“用户访问密钥”。 转到“产品”,然后单击“监视器和管理”下的“资源访问管理”。 进入RAM页面后,为新创建的用户单击“管理”。
- Go to the “User Access Key” section and click “Create Access Key”.
转到“用户访问密钥”部分,然后单击“创建访问密钥”。
- Click on “Save Access Key Information” to save the generated Access Key and Access Key Secret.
单击“保存访问密钥信息”以保存生成的访问密钥和访问密钥秘密。
- Install the “ossfs” tool. This tool is used to sync WordPress’ dependent folder with the OSS bucket created at Step 6.2.
安装“ ossfs”工具。 该工具用于将WordPress的依赖文件夹与在步骤6.2中创建的OSS存储桶同步。
- SSH into the launched WordPress ECS instance
SSH进入已启动的WordPress ECS实例
-
Install ‘ossfs’ according to the guidelines at this link
根据此链接上的指南安装“ ossfs”
-
cd wget https://github.com/aliyun/ossfs/releases/download/v1.80.3/ossfs_1.80.3_ubuntu16.04_amd64.deb sudo apt-get update sudo apt-get install gdebi-core -y sudo gdebi ossfs_1.80.3_ubuntu16.04_amd64.deb - Make the WordPress uploads directory:
制作WordPress上载目录:
-
mkdir -p /var/www/html/wp-content/uploads chown -R www-data:www-data /var/www/html/wp-content/uploads - Setup credentials with the bucket name and key created at Step 6.2 and 6.5 accordingly.
相应地使用在步骤6.2和6.5中创建的存储桶名称和密钥来设置凭证。
-
chmod 640 /etc/passwd-ossfs - Mount the ‘lab-wp-XXX’ OSS bucket to WordPress’ dependent folder and enable auto-mounting during instance startup.
将’lab-wp-XXX’OSS存储桶安装到WordPress’相关文件夹,并在实例启动期间启用自动安装。
-
Add the following command into
/etc/fstabto mountlab-wp-XXXduring system startup. Beware of using the correct zone. E.g. “http://oss-ap-southeast-1.aliyuncs.com”在系统启动期间,将以下命令添加到
/etc/fstab以挂载lab-wp-XXX。 当心使用正确的区域。 例如“ http://oss-ap-southeast-1.aliyuncs.com ” -
echo "ossfs#lab-wp-XXX /var/www/html/wp-content/uploads fuse _netdev,url=http://oss-ap-southeast-1.aliyuncs.com,allow_other, 0 0" >> /etc/fstabecho "ossfs#lab-wp-XXX /var/www/html/wp-content/uploads fuse _netdev,url=http://oss-ap-southeast-1.aliyuncs.com,allow_other, 0 0" >> /etc/fstab -
Execute the mounting operation:
mount -a执行安装操作:
mount -a -
To avoid the mounted OSS bucket being scanned by Linux (which incurs unnecessary costs), add the following details into “/etc/updatedb.conf”:
为避免Linux扫描已安装的OSS存储桶(这会产生不必要的费用),请在“ /etc/updatedb.conf”中添加以下详细信息:
- Add “/var/www/html/wp-content/uploads” to PRUNEPATHS
将“ / var / www / html / wp-content / uploads”添加到PRUNEPATHS
- Add “fuse.ossfs” into PRUNEFS
将“ fuse.ossfs”添加到PRUNEFS
- Add “/var/www/html/wp-content/uploads” to PRUNEPATHS
7.高可用性,容错和负载平衡配置 (7. High Availability, Fault Tolerance, and Load Balance Configuration)
-
Create the Load Balancer. On the ECS overview page, click “Load Balancer” on the side tab. On the Load Balancer page, click “Create Server Load Balancer”.
创建负载均衡器 。 在“ ECS概述”页面上,单击侧面选项卡上的“负载均衡器”。 在“负载平衡器”页面上,单击“创建服务器负载平衡器”。
- Region: Singapore
地区:新加坡
- Zone: Multi-zone
区域:多区域
- Primary Zone: Zone A
主要区域:A区
- Backup Zone: Zone B
备份区:B区
- Instance Type: Internet
实例类型:Internet
- Quantity: 1
数量:1
Create the Load Balancer. On the ECS overview page, click “Load Balancer” on the side tab. On the Load Balancer page, click “Create Server Load Balancer”.
创建负载均衡器 。 在“ ECS概述”页面上,单击侧面选项卡上的“负载均衡器”。 在“负载平衡器”页面上,单击“创建服务器负载平衡器”。
- Region: Singapore
- Configure load balancer. On the ECS overview page, click “Load Balancer” on the side tab. Once the Load Balancer page is loaded, click “Manage” on the purchased load balancer at Step 7.1.
配置负载均衡器。 在“ ECS概述”页面上,单击侧面选项卡上的“负载均衡器”。 加载Load Balancer页面后,在步骤7.1中单击购买的Load Balancer上的“管理”。
-
Click “Listener” and then click the “Add Listener” button.
单击“侦听器”,然后单击“添加侦听器”按钮。
- Front-end Protocol: HTTP, port 80
前端协议:HTTP,端口80
- Back-end Protocol: HTTP, port 80
后端协议:HTTP,端口80
- Scheduling: Weighted Round
调度:加权回合
- Click “Show Advance” and enable persistence session
单击“显示高级”并启用持久性会话
- Timeout Duration: 300
超时时间:300
- Front-end Protocol: HTTP, port 80
-
Click “Next” to configure the health check.
点击“下一步”配置健康检查。
- Domain Name: Leave Blank
域名:留空
- Health Check Port: 80
健康检查端口:80
- Health Check Path: /index.php
健康检查路径:/index.php
- Normal Status Code: enable http_2xx and http_3xx
正常状态码:启用http_2xx和http_3xx
- Click “Confirm” to provision Load Balancer
单击“确认”以配置负载均衡器
- Domain Name: Leave Blank
-
Update the Load Balancer internet IP address in WordPress. This is important as the running WordPress instance has been auto-configured with the running ECS IP. We need to change the IP to point to the Load Balancer’s IP, as WordPress might be running by any ECS instance behind the load balancer. If you have a domain name, you might want to update to the domain name instead.
在WordPress中更新负载均衡器的Internet IP地址。 这一点很重要,因为已使用运行中的ECS IP对运行中的WordPress实例进行了自动配置。 我们需要更改IP使其指向负载均衡器的IP,因为WordPress可能由负载均衡器后面的任何ECS实例运行。 如果您拥有域名,则可能需要更新为该域名。
-
Browse to WordPress using the browser. Go to the “Settings” URL e.g. “http://
/wp-admin/options-general.php” and then change the “WordPress Address (URL)” & “Site Address (URL)” to the Load Balancer’s internet IP accordingly.
使用浏览器浏览到WordPress。 转到“设置” URL,例如“ http://
/wp-admin/options-general.php”,然后将“ WordPress地址(URL)”和“站点地址(URL)”相应地更改为负载均衡器的Internet IP。
-
- Stop the ECS instance. Go to “Product” and click on “Elastic Computing Service”. Once landed on the ECS overview page, click “Instances” on the side tab, followed by “More” and then “Stop”.
停止ECS实例。 转到“产品”,然后单击“弹性计算服务”。 进入ECS概述页面后,单击侧面选项卡上的“实例”,然后单击“更多”,然后单击“停止”。
-
Create a Custom Image. Once ECS has stopped, click on “More” then “Create Custom Image”.
创建一个自定义图像。 ECS停止后,单击“更多”,然后单击“创建自定义图像”。
- Image Name: IMG-WP
图像名称:IMG-WP
- Image Description: Image for WordPress
图片描述:WordPress图片
- Image Name: IMG-WP
- Restart ECS once the ‘custom image’ creation at Step 22 has completed (you may check the creation status under the “Snapshot” section). Go to “Product” and click on “Elastic Computing Service”. Once landed on the ECS overview page, click “Instances” on the side tab, followed by “More” and then “Start”.
完成步骤22中的“自定义映像”创建后,重新启动ECS(您可以在“快照”部分下检查创建状态)。 转到“产品”,然后单击“弹性计算服务”。 进入ECS概述页面后,单击侧面选项卡上的“实例”,然后单击“更多”,然后单击“启动”。
-
Once ECS is up and running, create an Auto Scaling Group. Go to “Product” and click on “Auto Scaling” under “Elastic Computing”. Once landed on the “Auto Scaling” page, click on “Create Scaling Group”.
ECS启动并运行后,创建一个Auto Scaling组 。 转到“产品”,然后单击“弹性计算”下的“自动缩放”。 登陆到“ Auto Scaling”页面后,单击“ Create Scaling Group”。
- Scaling Group Name: ASG-WS
伸缩组名称:ASG-WS
- Maximum Number: 2
最多人数:2
- Minimum Number: 2
最少人数:2
- Default Cool-down Time: 300
默认冷却时间:300
- Network Type: VPC and select the VPC (VPC-Main) and VSwitch (Public-Subnet1)
网络类型:VPC,然后选择VPC(VPC-Main)和VSwitch(Public-Subnet1)
- Server Load Balancer: Select the load balance created at step 7.1. You may need to click “Load more data” to show the load balancer.
服务器负载平衡器:选择在步骤7.1创建的负载平衡。 您可能需要单击“加载更多数据”以显示负载均衡器。
- Configure the ECS source and ‘User Defined Image’ accordingly.
相应地配置ECS源和“用户定义的图像”。
- Click the “Submit” button.
点击“提交”按钮。
Once ECS is up and running, create an Auto Scaling Group. Go to “Product” and click on “Auto Scaling” under “Elastic Computing”. Once landed on the “Auto Scaling” page, click on “Create Scaling Group”.
ECS启动并运行后,创建一个Auto Scaling组 。 转到“产品”,然后单击“弹性计算”下的“自动缩放”。 登陆到“ Auto Scaling”页面后,单击“ Create Scaling Group”。
- Scaling Group Name: ASG-WS
-
Create a “Scaling Configuration”. Click on “Create Scaling Configuration”.
创建一个“缩放配置”。 单击“创建扩展配置”。
- Source ECS: Select the one that got restarted at Step 7.8.
源ECS:选择在步骤7.8重新启动的ECS。
- Configuration Name: ASG_ECS_WP
配置名称:ASG_ECS_WP
- Security Group: Select the one created at Step 2.1
安全组:选择在步骤2.1中创建的一个
- User Defined Image: Select the one created at Step 7.7.
用户定义的图像:选择在步骤7.7创建的图像。
-
Click “Next”, followed by “OK” and “Enable” the Auto Scaling Group.
单击“下一步”,然后单击“确定”并“启用” Auto Scaling组 。
-
Retrieve the Load Balancer Public IP. Go to “Product” and click on “Elastic Computing Service”. Once landed on the ECS overview page, click “Load Balancer” on the side tab. The Public IP is under the “IP Address” column.
检索负载均衡器公共IP。 转到“产品”,然后单击“弹性计算服务”。 进入ECS概述页面后,单击侧面选项卡上的“ Load Balancer”。 公用IP在“ IP地址”列下。
- Source ECS: Select the one that got restarted at Step 7.8.
- The health check carried out by the Load Balancer might take a while to complete. You may visit the WordPress application by using the Load Balancer’s public IP once the Load Balance status is shown as “normal”.
由负载均衡器执行的运行状况检查可能需要一段时间才能完成。 一旦负载均衡状态显示为“正常”,您就可以使用负载均衡器的公共IP访问WordPress应用程序。
Congratulations! You’ve now successfully deployed a high availability, fault tolerant, and load balanced WordPress server in a single region!
恭喜你! 您现在已经在单个区域中成功部署了高可用性,容错和负载平衡的WordPress服务器!
If you would like to buy a domain name, go to “Domain” under “Domain & Websites” and proceed for purchasing.
如果您想购买域名,请转到“域和网站”下的“域”,然后继续进行购买。
If you would like to associate your domain name with the deployed WordPress, go to “Alibaba Cloud DNS” under “Domain & Websites” and add at least ‘A’ records for the ‘Server Load Balance’ public IP.
如果您想将域名与已部署的WordPress相关联,请转到“域和网站”下的“阿里云DNS ”,并至少为“服务器负载平衡”公共IP添加“ A”记录。
翻译自: https://www.sitepoint.com/deploy-fault-tolerant-load-balanced-web-apps-on-alibaba-cloud/
dubbo容错和负载均衡