
禁用windows10更新
Starting with the
May 2019 Update
, Windows 10 will reserve about 7 GB of your device’s storage for updates and optional files. This will ensure easy installation of updates in the future—but you can recover that space if you want.
从
2019年5月更新开始
,Windows 10将为更新和可选文件保留约7 GB的设备存储空间。 这样可以确保将来轻松安装更新,但是您可以根据需要恢复该空间。
什么是预留存储?
(
What is Reserved Storage?
)
Windows requires a certain amount of free disk space to update. Updates will fail to install if your PC doesn’t have enough free space. With the recent May 2019 Update, Microsoft aims to fix this problem by reserving disk space for future updates.
Windows需要一定数量的可用磁盘空间来更新。 如果您的电脑没有足够的可用空间,更新将无法安装。 通过最近的2019年5月更新,Microsoft旨在通过保留磁盘空间以供将来更新来解决此问题。
Before, if you had insufficient free disk space on your PC, Windows would fail to install updates properly. The only workaround is to free up some storage space before continuing.
以前,如果PC上的可用磁盘空间不足,Windows将无法正确安装更新。 唯一的解决方法是在继续操作之前释放一些存储空间。
With “reserved storage,” Microsoft makes Windows 10 set aside
at least 7 gigabytes of space
on your hard drive to ensure updates can download—regardless of how much disk space you have.
借助“保留的存储”,Microsoft使得Windows 10
在
硬盘驱动器上
至少
留出
7 GB的空间
,以确保可以下载更新,无论您有多少磁盘空间。
When not being used by update files, Reserved Storage will be used for apps, temporary files, and system caches, improving the day-to-day function of your PC.
当更新文件不使用预留存储时,预留存储将用于应用程序,临时文件和系统缓存,从而改善了PC的日常功能。
In other words, reserved storage doesn’t mean that Windows is using a full extra 7 GB of storage—it’s likely storing some temporary files there that it would normally be stored elsewhere on your system drive.
换句话说,保留的存储空间并不意味着Windows会使用额外的7 GB的完整存储空间-它可能会在那里存储一些临时文件,这些文件通常会存储在系统驱动器的其他位置。
如何检查您的PC是否已保留存储空间
(
How to Check If Your PC Has Reserved Storage
)
Before you go any further, you should make sure that your system is using Reserved Storage. If it doesn’t, then there’s no need to go on, because Windows isn’t reserving any additional storage on your device. You can check whether or not the system is using extra storage—and how much—through the Settings app.
在继续进行操作之前,应确保系统正在使用预留存储。 如果不是,则无需继续,因为Windows不会在设备上保留任何其他存储。 您可以通过“设置”应用检查系统是否正在使用额外的存储空间以及使用了多少存储空间。
This feature will be enabled automatically on new PCs with Windows 10 version 1903 (that’s the May 2019 Update) pre-installed, along with clean installs of Windows 10 version 1903. If you’re updating from a previous version of Windows 10, Reserved Storage will not be enabled.
在预装有Windows 10版本1903(即2019年5月更新)的新PC上,以及全新安装Windows 10版本1903的新PC上,将自动启用此功能。如果要从Windows 10的先前版本进行更新,则保留存储将不会启用。
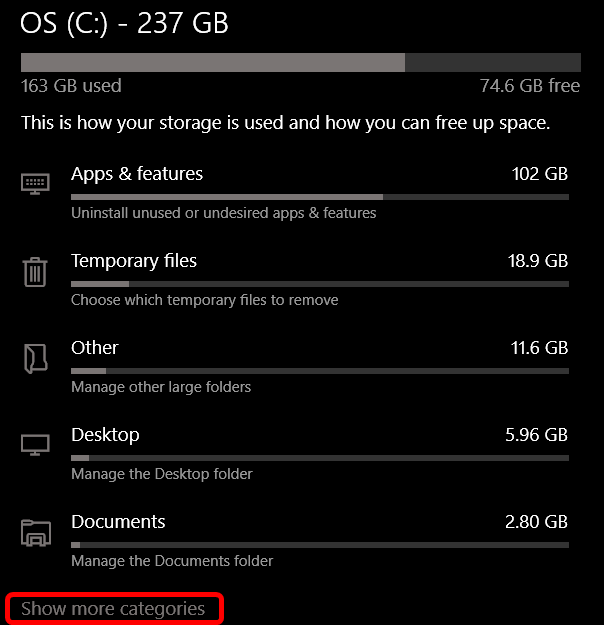
To check whether Windows is using Reserved Storage, head to Settings > System > Storage. (You can quickly open the Settings app by pressing Windows+i on your keyboard.) Click “Show More Categories” under the list of items taking up space.
要检查Windows是否正在使用保留的存储,请转到设置>系统>存储。 (您可以通过按键盘上的Windows + i来快速打开“设置”应用程序。)单击占用空间的项目列表下的“显示更多类别”。
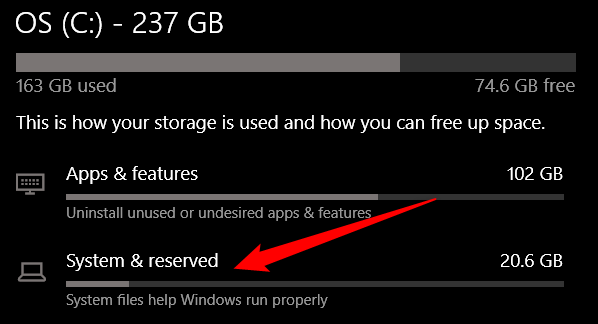
Click on “System & Reserved.”
点击“系统并保留”。
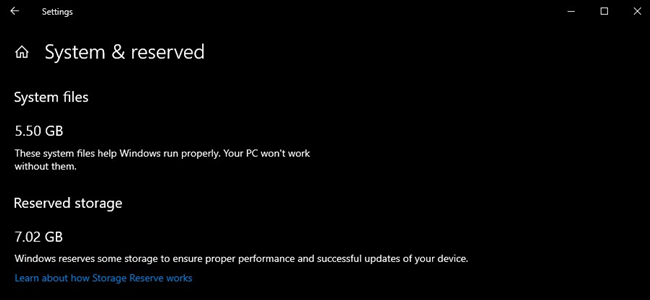
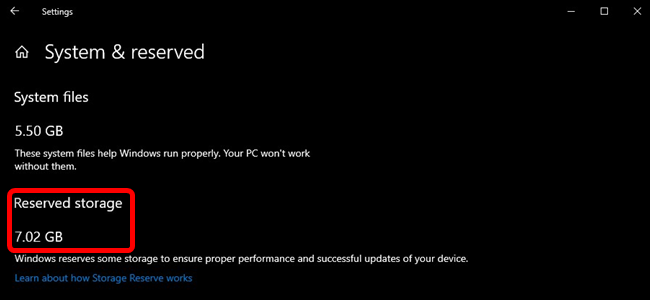
If enabled on your PC, you will see the “Reserved Storage” section with 7+ GB of storage space in use. If you don’t see “Reserved Storage” here, your system doesn’t have the “Storage Reserve” feature enabled.
如果在您的PC上启用,您将看到“保留的存储”部分,其中有7 GB以上的存储空间正在使用。 如果您在此处看不到“保留的存储”,则您的系统没有启用“存储保留”功能。
您应该禁用预留存储吗?
(
Should You Disable Reserved Storage?
)
You can free a bit of reserved storage space by uninstalling optional features (Settings > Apps & Features > Manage Optional Features) and language packs (Settings > Time & Language > Language.)
您可以通过卸载可选功能(“设置”>“应用程序和功能”>“管理可选功能”)和语言包(“设置”>“时间和语言”>“语言”)来释放一些保留的存储空间。
However, if you want to free up the maximum amount of space, you’ll need to disable the reserved storage functionality altogether.
Microsoft
recommends against this, explaining:
但是,如果要释放最大空间,则需要完全禁用保留的存储功能。
Microsoft
建议不要这样做,并解释:
Our goal is to improve the day-to-day function of your PC by ensuring critical OS functions always have access to disk space.
Without
reserved storage, if a user almost fills up her or his storage, several Windows and application scenarios become unreliable. Windows and application scenarios may not work as expected if they need free space to function.
With
reserved storage, updates, apps, temporary files, and caches are less likely to take away from valuable free space and should continue to operate as expected.我们的目标是通过确保关键的OS功能始终可以访问磁盘空间来改善PC的日常功能。
如果没有
保留的存储空间,那么如果用户几乎用完了他或他的存储空间,那么几种Windows和应用程序方案将变得不可靠。 如果Windows和应用程序方案需要可用空间才能正常工作,则它们可能无法按预期工作。
使用
保留的存储,更新,应用程序,临时文件和缓存不太可能从宝贵的可用空间中夺走,并且应继续按预期运行。
But, if you need the space, feel free to continue and disable reserved storage. After all, most Windows 10 PCs in the real world still have this disabled and are working fine.
但是,如果需要空间,请随时继续并禁用保留的存储。 毕竟,现实世界中的大多数Windows 10 PC仍然禁用了此功能,并且运行良好。
如何禁用预留存储
(
How to Disable Reserved Storage
)
Before you continue, know this: Your change won’t take effect immediately. We tested this, and the reserved storage won’t be deleted from your system until after the next time Windows installs an update. Thankfully, a simple cumulative update—the kind Microsoft releases every month—resulted in the reserved storage being removed after we made the below change. (This may change in the future—Microsoft clearly doesn’t want people removing this.)
在继续之前,请了解这一点:您的更改不会立即生效。 我们对此进行了测试,直到下一次Windows安装更新后,保留的存储才会从系统中删除。 值得庆幸的是,进行了以下更改后,一个简单的累积更新(Microsoft每月发布的一种)导致保留的存储区被删除。 (这种情况将来可能会改变,Microsoft显然不希望人们删除它。)
Now that we’ve got all that out of the way let’s look at how to disable Reserved Storage using the Registry Editor.
现在我们已经解决了所有问题,让我们看看如何使用注册表编辑器禁用保留存储。
Standard Warning:
Registry Editor is a powerful tool and misusing it can render your system unstable or even inoperable. This is a pretty simple hack, and as long as you stick to the instructions, you shouldn’t have any problems. That said, if you’ve never worked with it before, consider reading about
how to use the Registry Editor
before you get started. And definitely
back up the Registry
(and
your computer
!) before making changes.
标准警告:
注册表编辑器是一个功能强大的工具,滥用它会使您的系统不稳定甚至无法运行。 这是一个非常简单的技巧,只要您按照说明进行操作,就不会有任何问题。 也就是说,如果您以前从未使用过它,请在开始之前考虑阅读有关
如何使用注册表编辑器的信息
。 并在进行更改之前一定要
备份注册表
(和
您的计算机
!)。
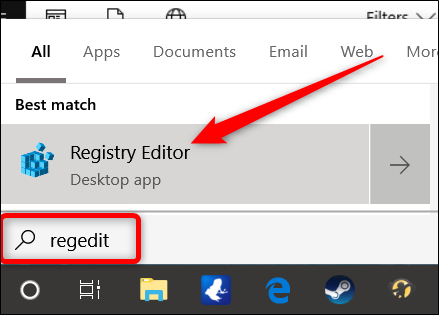
Open the Registry Editor by hitting Start and typing “
regedit
.” Press Enter to open the Registry Editor and then permit it to make changes to your PC.
通过单击开始并键入“
regedit
”,打开注册表编辑器。 按Enter打开注册表编辑器,然后允许它对您的PC进行更改。
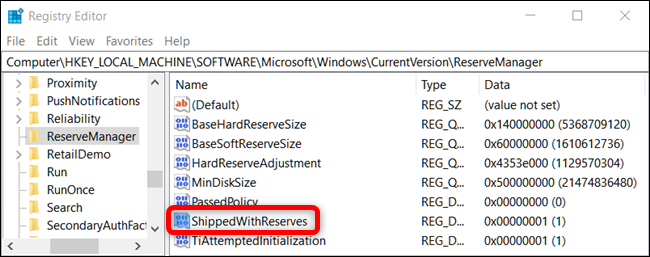
In the Registry Editor, use the left sidebar to navigate to the following key. You can also copy and paste it into the Registry Editor’s address bar.
在注册表编辑器中,使用左侧边栏导航到以下项。 您也可以将其复制并粘贴到注册表编辑器的地址栏中。
HKEY_LOCAL_MACHINE\SOFTWARE\Microsoft\Windows\CurrentVersion\ReserveManager
Once here, locate
ShippedWithReserves
and double-click on it.
ShippedWithReserves
此处后,找到
ShippedWithReserves
并双击它。
Change the number under “Value Data” from a 1 to 0, then click “OK.”
将“数值数据”下的数字从1更改为0,然后单击“确定”。
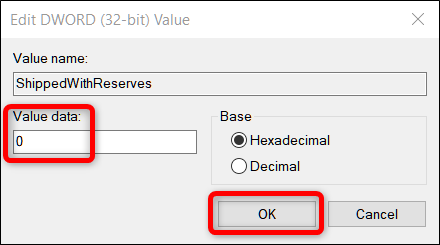
That’s it. Close Registry Editor, then reboot Windows to apply the changes.
而已。 关闭注册表编辑器,然后重新启动Windows以应用更改。
Your change is now made, but you may have to wait a few weeks before Windows installs an update and deletes the reserved storage.
现在进行了更改,但是您可能需要等待几周,Windows才会安装更新并删除保留的存储。
下载我们的一键式注册表黑客
(
Download Our One-click Registry Hack
)
(
)
If you don’t feel comfortable diving into Registry Editor yourself, we’ve created a registry hack you can use instead. Just download and extract the following Zip file:
如果您自己不满意进入注册表编辑器,我们创建了一个注册表黑客,您可以使用它。 只需下载并解压缩以下Zip文件:
Disable Reserved StorageRegistry Hack
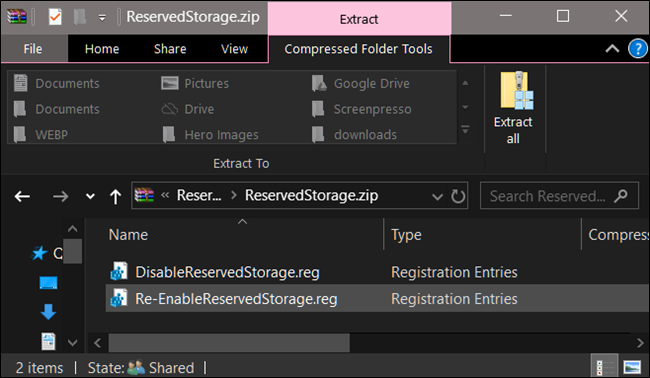
Inside you’ll find a
REG file
for disabling the Windows forced reserved storage, along with a second file to re-enable it. Once extracted, double-click the file you want and accept the prompts asking whether you’re sure you want to make changes to your Registry.
在内部,您将找到一个
REG文件,
用于禁用Windows强制保留存储,以及另一个文件以重新启用该文件。 解压缩后,双击所需的文件并接受提示,询问您是否确定要对注册表进行更改。
This hack changes the value of
ShippedWithReserves
to 0, just like we talked about in the previous section. The other hack included re-enabled reserved storage by changing the “Value Data” back to 1, reverting it to how it was before. If you enjoy fiddling with the Registry, it’s worth taking the time to learn
how to make your own Registry hacks
.
就像我们在上一节中讨论的那样,此hack将
ShippedWithReserves
的值更改为0。 另一个黑客包括通过将“ Value Data”更改为1重新启用保留的存储,将其还原为以前的状态。 如果您喜欢使用注册表,则值得花时间学习
如何制作自己的注册表黑客
。
翻译自:
https://www.howtogeek.com/425563/how-to-disable-reserved-storage-on-windows-10/
禁用windows10更新