
目录【未更新完】
1、实验环境
# centos7系统服务器3台、 一台作为监控服务器, 两台台作为被监控节点,
# 配置好yum源、 防火墙关闭、 各节点时钟服务同步、 各节点之间可以通过主机名互相通信。

# zabbix-server:192.168.37.111
# zabbix-agent1:192.168.37.122
# zabbix-agent2:192.168.37.133

# 约定
# 1、[root@all ~]# 三台服务器都需要执行
# 2、[root@zabbix-server ~]# zabbix服务端执行
# 3、[root@zabbix-agent ~]# zabbix客户端服务器执行
# 4、[root@zabbix-agent1 ~]# 只需要zabbix-agent1服务器执行
# 5、[root@zabbix-agent2 ~]# 只需要zabbix-agent2服务器执行
2、关闭防火墙和 selinux
# 关闭防火墙
[root@all ~]# systemctl stop firewalld
[root@all ~]# systemctl status firewalld
[root@all ~]# systemctl disable firewalld

# 关闭selinux
[root@all ~]# ed -i 's/SELINUX=enforcing/SELINUX=disabled' /etc/selinux/config
3、更新 yum 仓库
# 准备工具
[root@all ~]# yum -y install wget vim

# 更换阿里源yum
[root@all ~]# mv /etc/yum.repos.d/CentOS-Base.repo /etc/yum.repos.d/CentOS-Base.repo_bak
[root@all ~]# wget -O /etc/yum.repos.d/CentOS-Base.repo http://mirrors.aliyun.com/repo/Centos-7.repo
[root@all ~]# yum clean all
[root@all ~]# yum makecache
[root@all ~]# yum repolist

# 安装yum的zabbix仓库
[root@all ~]# wget https://mirrors.aliyun.com/zabbix/zabbix/4.4/rhel/7/x86_64/zabbix-release-4.4-1.el7.noarch.rpm
[root@all ~]# rpm -ivh zabbix-release-4.4-1.el7.noarch.rpm
4、zabbix-server服务端配置
# zabbix服务端插件安装
[root@zabbix-server ~]# yum -y install epel-release.noarch
[root@zabbix-server ~]# yum -y install zabbix-agent zabbix-get zabbix-sender zabbix-server-mysql zabbix-web zabbix-web-mysql
# 安装设置数据库
[root@zabbix-server ~]# cat > /etc/yum.repos.d/mariadb.repo << EOF
[mariadb]
name = MariaDB
baseurl = https://mirrors.ustc.edu.cn/mariadb/yum/10.4/centos7-amd64
gpgkey=https://mirrors.ustc.edu.cn/mariadb/yum/RPM-GPG-KEY-MariaDB
gpgcheck=1
EOF
[root@zabbix-server ~]# yum install -y MariaDB-server MariaDB-clien
# 配置数据库
[root@zabbix-server ~]# vim /etc/my.cnf.d/server.cnf
[mysqld]
skip_name_resolve = ON # 跳过主机名解析
innodb_file_per_table = ON # 开启独立表空间
innodb_buffer_pool_size = 256M # 缓存池大小
max_connections = 2000 # 最大连接数
log-bin = master-log # 开启二进制日志
# 重启数据库
[root@zabbix-server ~]# systemctl restart mariadb
[root@zabbix-server ~]# systemctl enable mariadb
# 初始化mariadb
[root@zabbix-server ~]# mysql_secure_installation
NOTE: RUNNING ALL PARTS OF THIS SCRIPT IS RECOMMENDED FOR ALL MariaDB
SERVERS IN PRODUCTION USE! PLEASE READ EACH STEP CAREFULLY!
In order to log into MariaDB to secure it, we'll need the current
password for the root user. If you've just installed MariaDB, and
haven't set the root password yet, you should just press enter here.
Enter current password for root (enter for none):
OK, successfully used password, moving on...
Setting the root password or using the unix_socket ensures that nobody
can log into the MariaDB root user without the proper authorisation.
You already have your root account protected, so you can safely answer 'n'.
Switch to unix_socket authentication [Y/n] y
Enabled successfully!
Reloading privilege tables..
... Success!
You already have your root account protected, so you can safely answer 'n'.
Change the root password? [Y/n] n
... skipping.
By default, a MariaDB installation has an anonymous user, allowing anyone
to log into MariaDB without having to have a user account created for
them. This is intended only for testing, and to make the installation
go a bit smoother. You should remove them before moving into a
production environment.
Remove anonymous users? [Y/n] y
... Success!
Normally, root should only be allowed to connect from 'localhost'. This
ensures that someone cannot guess at the root password from the network.
Disallow root login remotely? [Y/n] n
... skipping.
By default, MariaDB comes with a database named 'test' that anyone can
access. This is also intended only for testing, and should be removed
before moving into a production environment.
Remove test database and access to it? [Y/n] y
- Dropping test database...
... Success!
- Removing privileges on test database...
... Success!
Reloading the privilege tables will ensure that all changes made so far
will take effect immediately.
Reload privilege tables now? [Y/n] y
... Success!
Cleaning up...
All done! If you've completed all of the above steps, your MariaDB
installation should now be secure.
Thanks for using MariaDB!
# 创建数据库并授权账号
[root@zabbix-server ~]# mysql -uzbxuser -h192.168.37.111 -p
MariaDB [(none)]> create database zabbix charset utf8 collate utf8_bin;# 创建zabbix数据库
MariaDB [(none)]> grant all on zabbix.* to 'zbxuser'@'192.168.37.%' identified by 'keer';# 注意授权网段
MariaDB [(none)]> flush privileges;# 刷新授权
MariaDB [(none)]> exit
# 使用 create.sql.gz 生成所需要的表
[root@zabbix-server ~]# rpm -ql zabbix-server-mysql | grep create.sql.gz
[root@zabbix-server ~]# gzip -d /usr/share/doc/zabbix-server-mysql-4.4.10/create.sql.gz
[root@zabbix-server ~]# ls /usr/share/doc/zabbix-server-mysql-4.4.10/
# 把所需表导入数据库
[root@zabbix-server ~]# mysql -uzbxuser -h192.168.37.111 -p zabbix < /usr/share/doc/zabbix-server-mysql-4.4.10/create.sql
Enter password:
# 进去数据库查看
[root@zabbix-server ~]# mysql -uzbxuser -h192.168.37.111 -p
Enter password:
MariaDB [(none)]> show databases;
MariaDB [(none)]> use zabbix;
MariaDB [zabbix]> show tables;
# 修改 zabbix-server服务端的配置文件
[root@zabbix-server ~]# cd /etc/zabbix/
[root@zabbix-server zabbix ~]# ls
web zabbix_agentd.conf zabbix_agentd.d zabbix_server.conf
[root@qfedu.com zabbix]# cp zabbix_server.conf{,.bak}
[root@qfedu.com zabbix]# vim zabbix_server.conf
ListenPort=10051 # 默认监听端口
SourceIP=192.168.37.111 # 发采样数据请求的 IP
DBHost=192.168.37.111 #数据库对外的主机
DBName=zabbix #数据库名称
DBUser=zbxuser #数据库用户
DBPassword=keer #数据库密码
DBPort=3306 #数据库启动端口
# 启动zbbix-server服务端的服务
[root@zabbix-server zabbix]# systemctl start zabbix-server.service
[root@zabbix-server zabbix]# systemctl status zabbix-server.service
[root@zabbix-server zabbix]# systemctl enable zabbix-server.service
[root@server zabbix]# ss -nutl |grep 10051
tcp LISTEN 0 128 *:10051 *:*
tcp LISTEN 0 128 :::10051 :::*
# 创建快捷方式
Alias /zabbix /usr/share/zabbix
# 时区配置
vim /etc/httpd/conf.d/zabbix.conf
# php_value date.timezone Asia/Shanghai
vim /etc/php.ini
[Date]
; Defines the default timezone used by the date functions
; http://php.net/date.timezone
date.timezone = Asia/Shanghai
# 启动网页服务
[root@zabbix-server ~]# systemctl enable httpd
[root@zabbix-server ~]# systemctl start httpd
[root@zabbix-server zabbix]# ps -ef | grep httpd
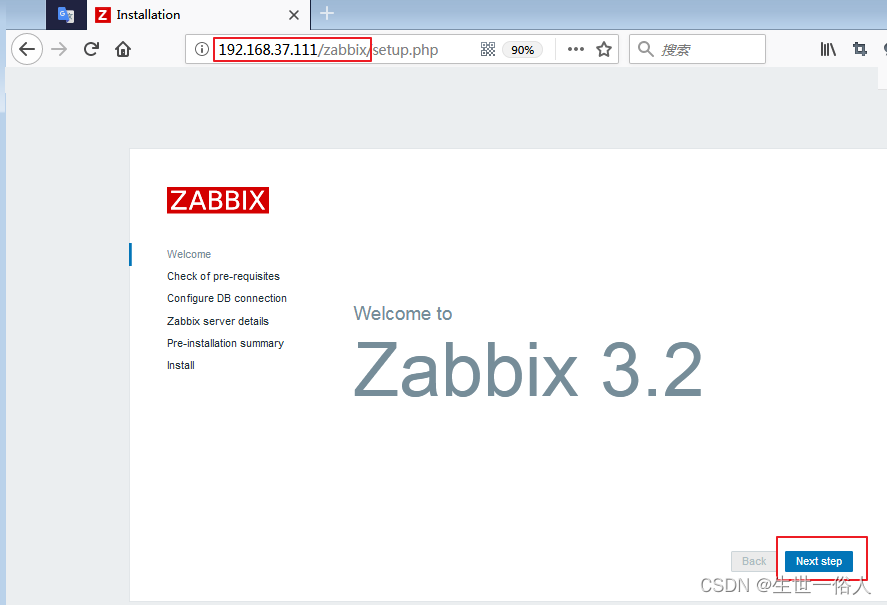
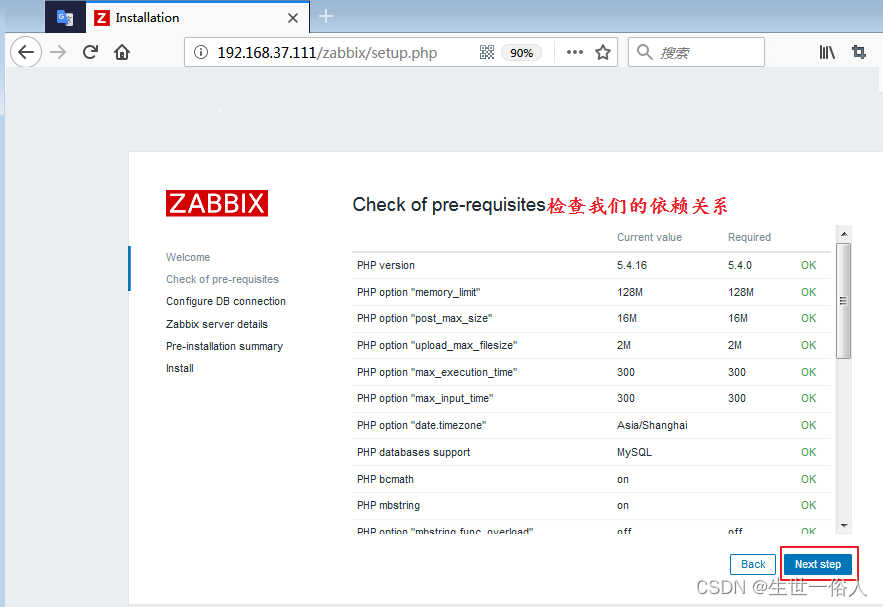
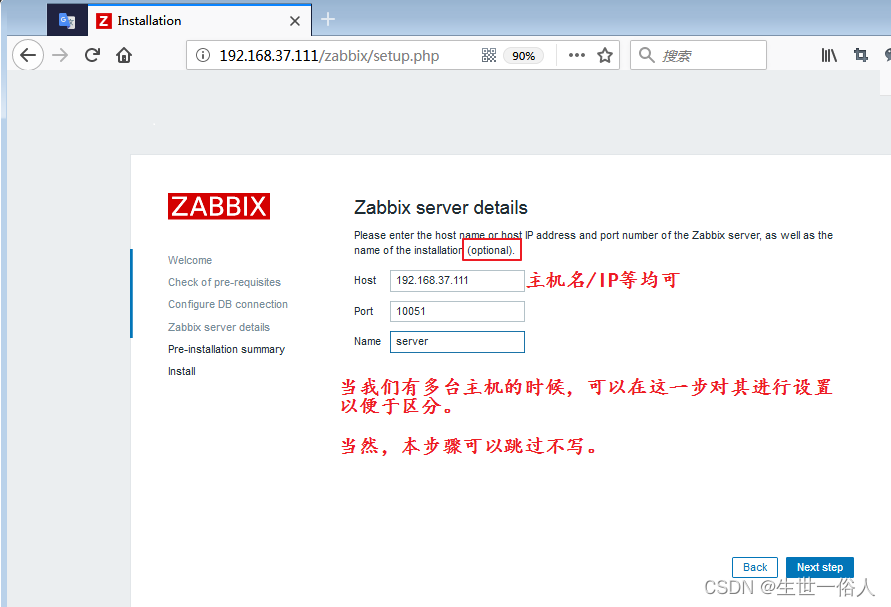
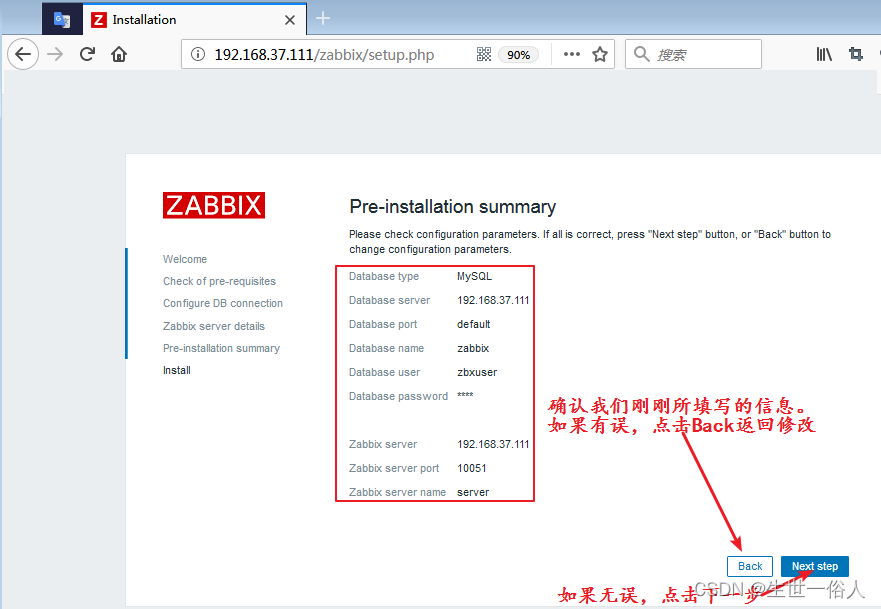
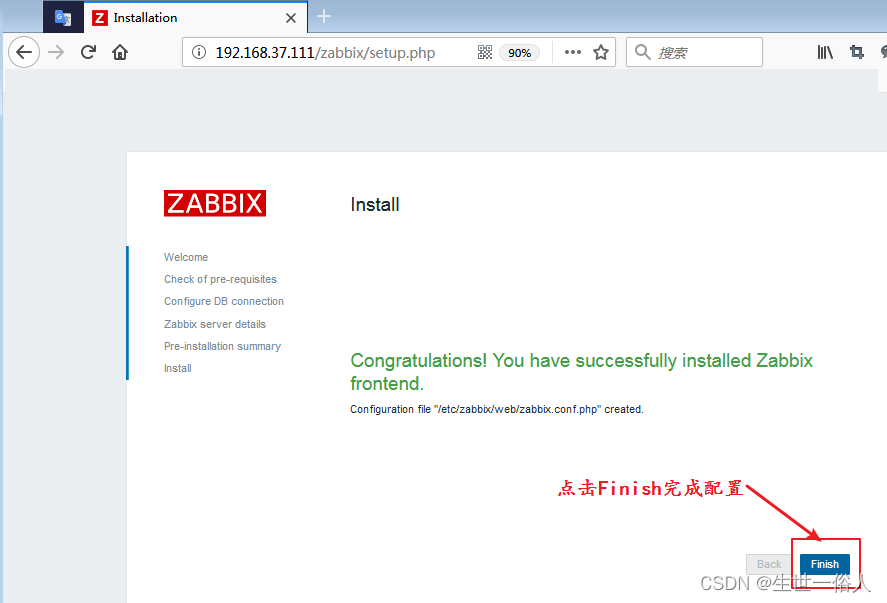
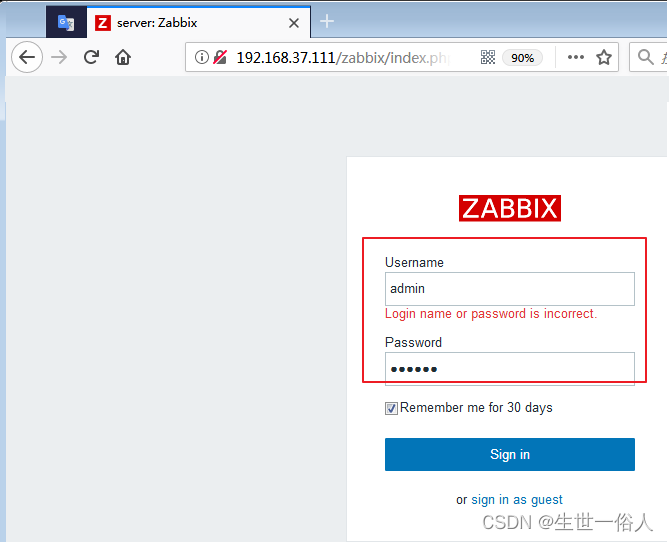
# 浏览器访问http://192.168.37.111/zabbix
5、配置 zabbix-agent 端
# 安装 zabbix 安装源
wget https://repo.zabbix.com/zabbix/4.2/rhel/7/x86_64/zabbix-release-4.4-1.el7.noarch.rpm
rpm -ivh zabbix-release-4.4-1.el7.noarch.rpm
yum -y install epel-release.noarch
yum install zabbix-agent zabbix-sender -y

# 修改/etc/zabbix/zabbix_agentd.conf配置文件
[root@zabbix-server zabbix]# cd /etc/zabbix/
[root@zabbix-server zabbix]# cp zabbix_agentd.conf{,.bak}
[root@zabbix-server zabbix]# vim zabbix_agentd.conf
Server=192.168.37.111       # zabbix-server的IP(被动模式)
ListenPort=10050            # 自己监听的端口
ListenIP=0.0.0.0            # 自己监听的地址,0.0.0.0表示本机所有地址
StartAgents=3               # 优化时使用的
ServerActive=192.168.37.111 # zabbix-server的IP(主动模式)
Hostname=zabbix-server     # 自己能被server端识别的名称

# 启动服务
[root@zabbix-agent]# systemctl start zabbix-agent.service
[root@zabbix-agent]# systemctl status zabbix-agent.service
[root@zabbix-agent]# systemctl enable zabbix-agent.service
[root@zabbix-agent]# ss -ntul |grep 10050
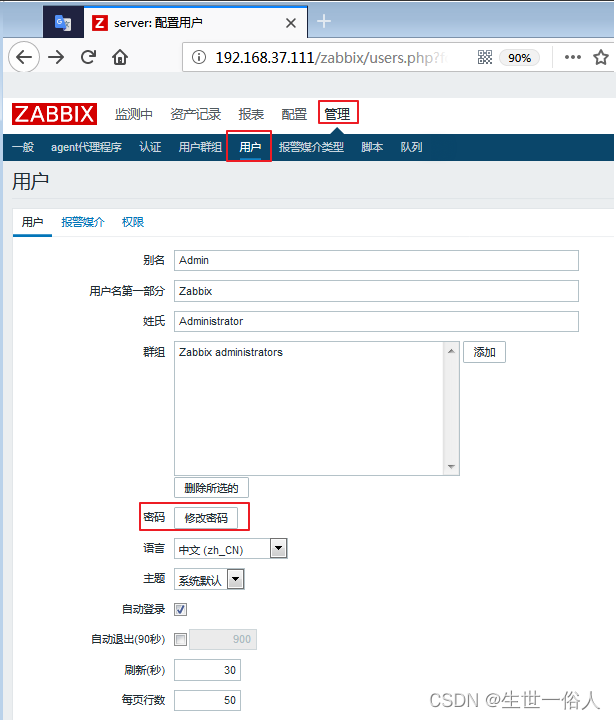
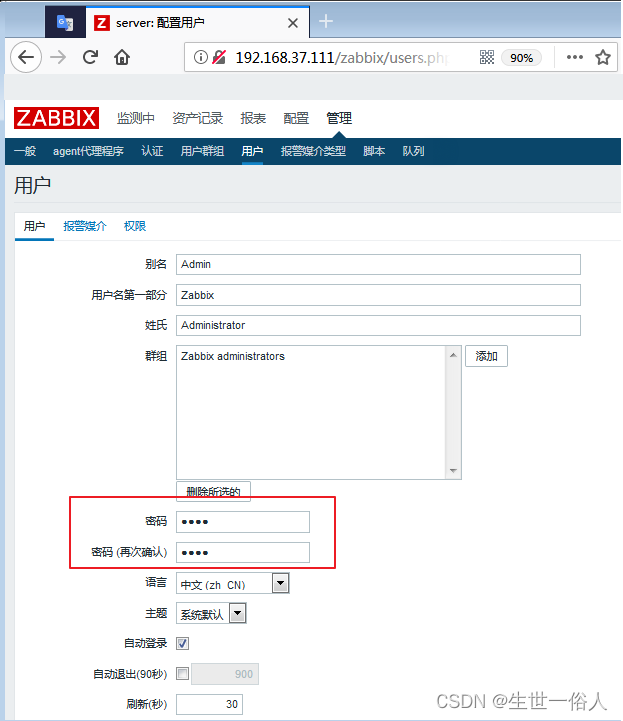
6、修改密码及修改网页为中文版
(1)在Administration找到Users,在User的选项页的Language选择
Chinese(zh_CN)
,最后点击updtae即可


(2)在Administration找到Users,在User的选项页的密码选择
修改密码
,再填入对应密码,最后点击updtae即可
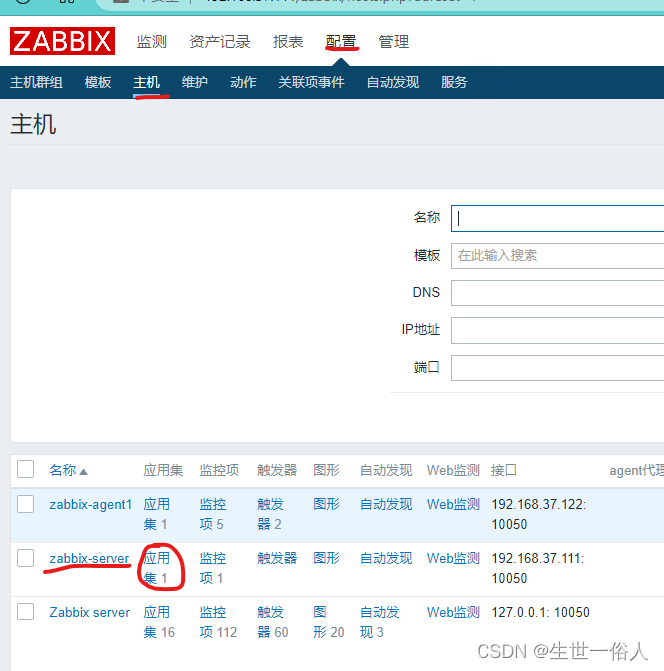
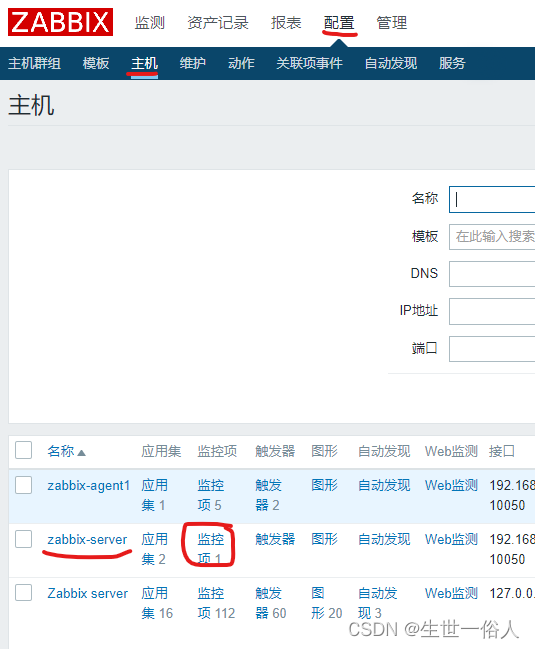
7、创建主机及主机群组
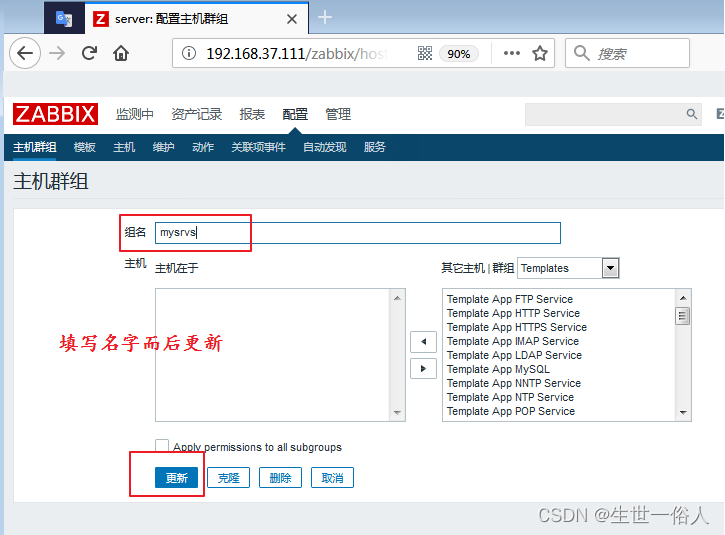
(1)创建一个主机群组
在“配置”选项中的“主机群组”找到==“创建主机群组”==
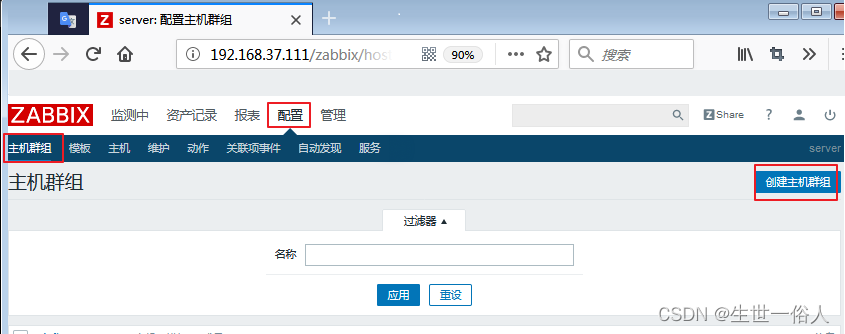
写上“组名”,再点“更新”
(2)添加一个主机
在“配置”选项中的“主机”找到==“创建主机”==

填上“主机名称”、“可见名称”、选择“群组”、填写agent代理程序的接口ip和端口、描述(选填),勾选启用、点击添加
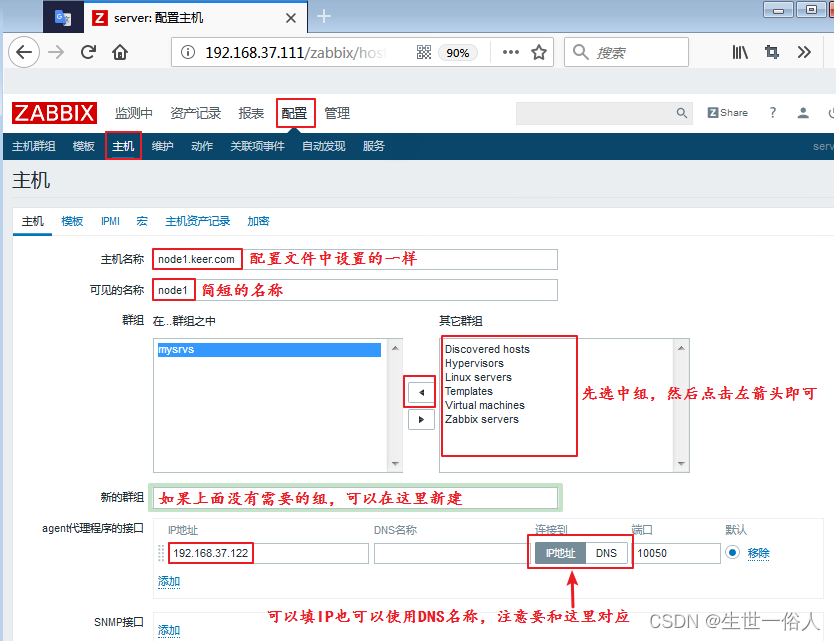
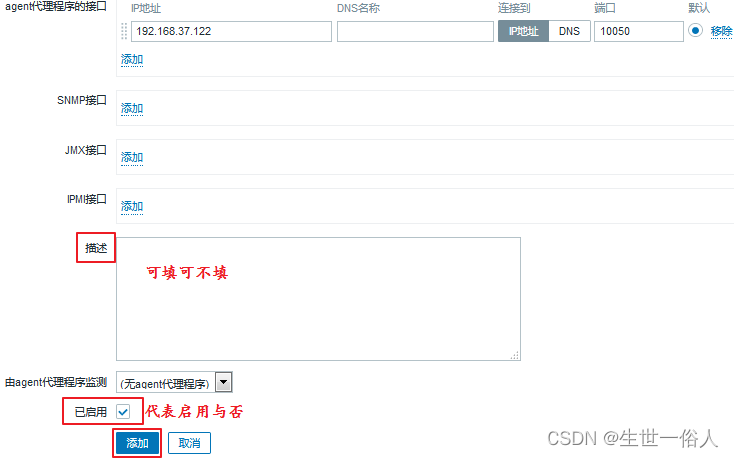
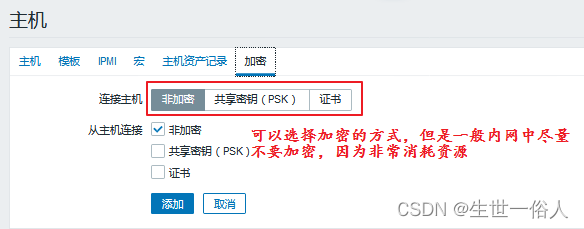
可选主机加密
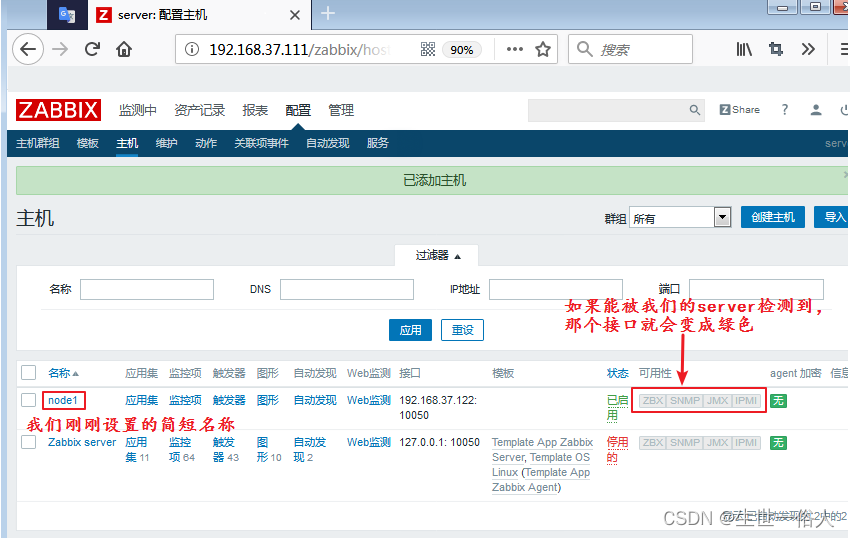
最终效果如下
8、监控项 (items)
(1)创建应用集
- 配置
- 主机
- zabbix-server
- 应用集
- 创建应用集
- 填写名称
-
添加


(2)创建监控项
- 配置
- 主机
- zabbix-server
- 监控项
- 创建监控项
- (监控项)填写内容:名称、类型键值、主机接口、更新间隔、应用集,,,记得点击更新
- (进程)填写内容:每秒更改(实验环境要求快就好了)、更新

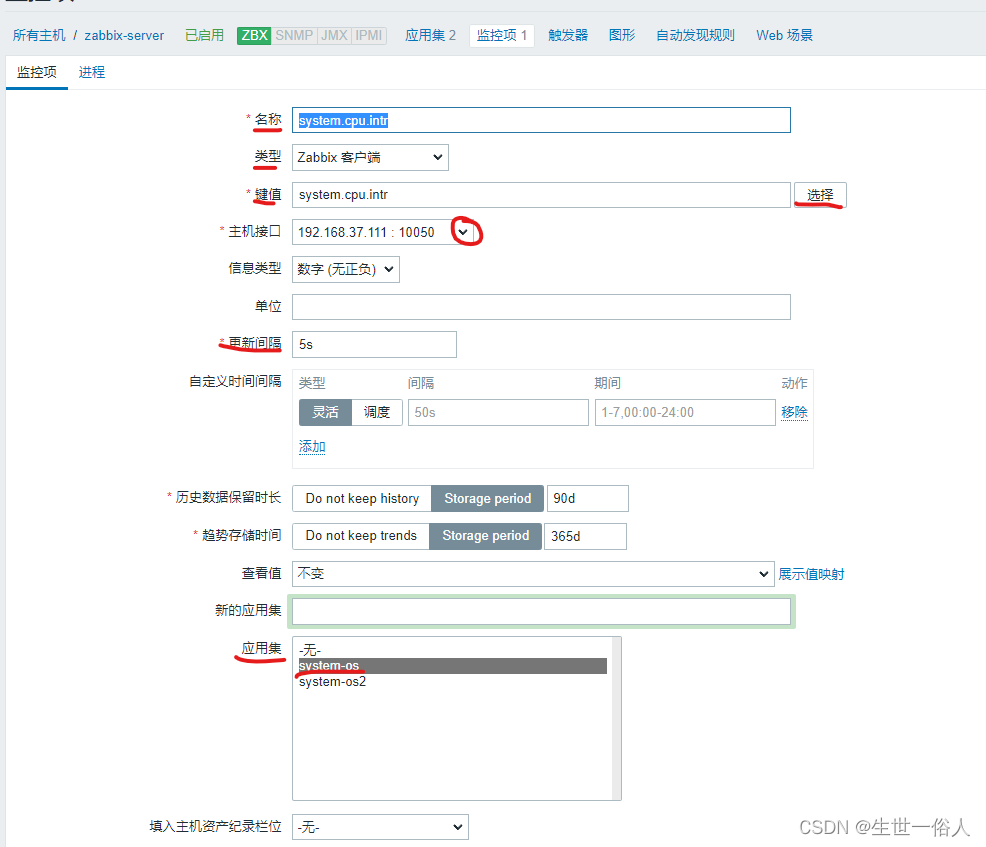


效果如下:
# 可以用命令行命令(手动执行)来获取
[root@zabbix-server ~]#  zabbix_get -s 192.168.37.111 -p 10050 -k "system.cpu.intr"


(3)查看监控的最新数据
(4)定义带参数的监控项
(5)中文乱码解决方法
(6)触发器(trigger)
(7)定义媒介【qq邮箱】
(8)定义动作(action)
版权声明:本文为qq_52572989原创文章,遵循 CC 4.0 BY-SA 版权协议,转载请附上原文出处链接和本声明。