本文已经过csdn认证,请放心食用

什么是单元测试?
单元测试(unit testing)是指对软件中的最小可测试单元进行检查和验证。它是软件测试中的一种基本方法,也是软件开发过程中的一个重要步骤。
单元测试的目的是在于确保软件的每个独立模块都被正确地测试,并且没有潜在的缺陷或漏洞。在单元测试中,需要对每个模块进行测试,以确保它们能够按照预期的方式工作,并且没有任何错误或漏洞。
单元测试通常包括以下几个步骤:
确定测试范围:在开始测试之前,需要确定测试的范围,即要测试的功能或模块。
编写测试用例:根据确定的测试范围,编写测试用例,这些用例应该覆盖软件中的每个模块。
执行测试用例:使用测试工具(如JUnit、TestNG、Mock等)执行测试用例,以确保每个模块都按照预期的方式工作。
分析测试结果:在测试完成后,需要分析测试结果,以确定是否存在缺陷或漏洞。
修复缺陷或漏洞:如果发现缺陷或漏洞,需要修复它们,以确保软件的质量。
单元测试的意义
提高代码质量:通过编写单元测试,可以发现代码中的错误和漏洞,从而提高代码的质量。
提高开发效率:通过编写单元测试,可以快速地发现代码中的问题,从而减少测试时间,提高开发效率。
降低维护成本:通过编写单元测试,可以及早地发现代码中的问题,从而减少维护成本,提高代码的可维护性。
提高代码可靠性:通过编写单元测试,可以检查代码中的错误和漏洞,从而提高代码的可靠性,减少故障的发生。
前言
看完上面的就知道什么时候或者为什么要编写单元测试了。其他的我们不多说了,直接进入实战操作,这次使用的是springboot+Mockito框架,在最后会指出一些小技巧和bug。
实战
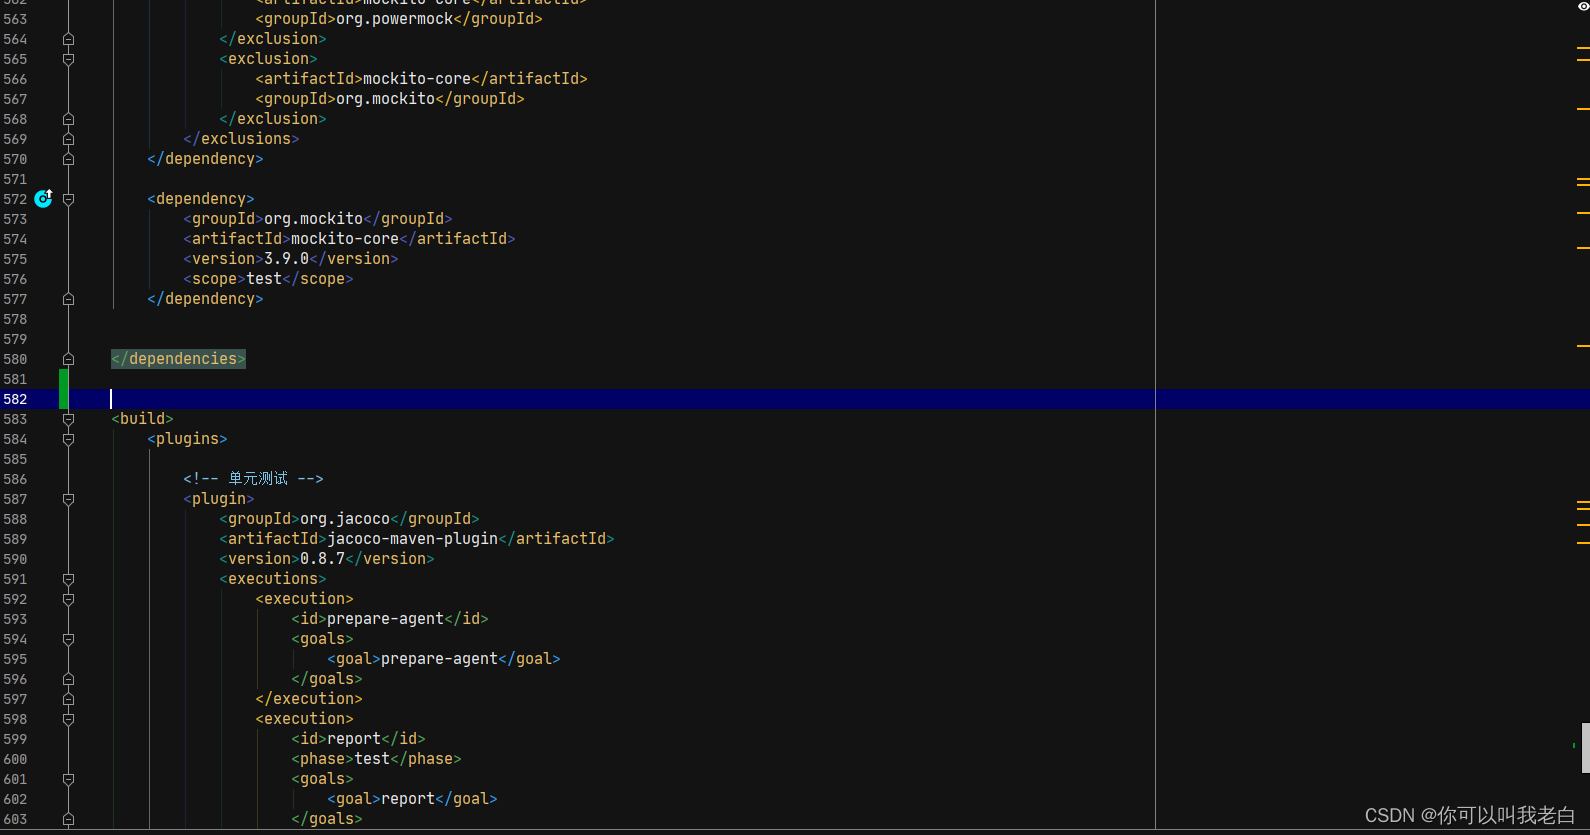
一.Mockito的jar包导入
<dependencies>
  <!-- 单元测试 -->
		<dependency>
			<groupId>org.jmockit</groupId>
			<artifactId>jmockit</artifactId>
			<version>1.38</version>
			<scope>test</scope>
		</dependency>
		<dependency>
			<groupId>junit</groupId>
			<artifactId>junit</artifactId>
			<version>4.12</version>
			<scope>test</scope>
		</dependency>
		<dependency>
			<groupId>org.powermock</groupId>
			<artifactId>powermock-module-junit4</artifactId>
			<version>2.0.2</version>
			<scope>test</scope>
			<exclusions>
				<exclusion>
					<groupId>junit</groupId>
					<artifactId>junit</artifactId>
				</exclusion>
				<exclusion>
					<groupId>org.objenesis</groupId>
					<artifactId>objenesis</artifactId>
				</exclusion>
			</exclusions>
		</dependency>
		<dependency>
			<groupId>org.powermock</groupId>
			<artifactId>powermock-api-mockito2</artifactId>
			<version>2.0.2</version>
			<scope>test</scope>
			<exclusions>
				<exclusion>
					<artifactId>mockito-core</artifactId>
					<groupId>org.powermock</groupId>
				</exclusion>
				<exclusion>
					<artifactId>mockito-core</artifactId>
					<groupId>org.mockito</groupId>
				</exclusion>
			</exclusions>
		</dependency>

		<dependency>
			<groupId>org.mockito</groupId>
			<artifactId>mockito-core</artifactId>
			<version>3.9.0</version>
			<scope>test</scope>
		</dependency>
  </dependencies>
<build>
		<plugins>
  <!-- 单元测试 -->
			<plugin>
				<groupId>org.jacoco</groupId>
				<artifactId>jacoco-maven-plugin</artifactId>
				<version>0.8.7</version>
				<executions>
					<execution>
						<id>prepare-agent</id>
						<goals>
							<goal>prepare-agent</goal>
						</goals>
					</execution>
					<execution>
						<id>report</id>
						<phase>test</phase>
						<goals>
							<goal>report</goal>
						</goals>
					</execution>
				</executions>
			</plugin>
			<plugin>
				<groupId>org.apache.maven.plugins</groupId>
				<artifactId>maven-surefire-plugin</artifactId>
				<version>2.12.2</version>
				<configuration>
					<testFailureIgnore>true</testFailureIgnore>
				</configuration>
			</plugin>

</plugins>
		<!-- 修改对应名称 -->
		<finalName>iot-open-api</finalName>
	</build>
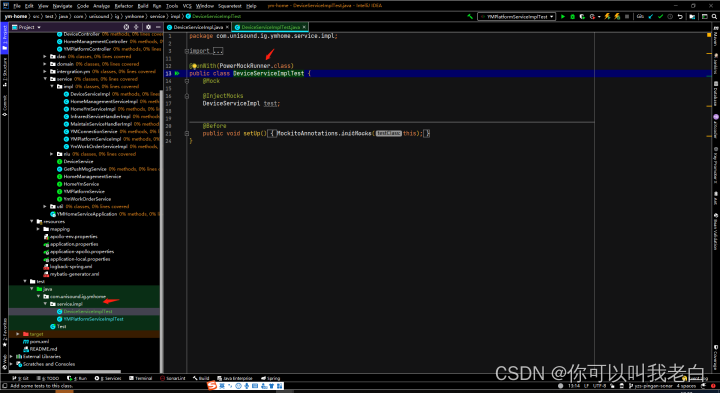
二.创建单元测试类
package com.shimao.iot.iotopenapi.service.impl;
import com.shimao.iot.common.bean.AttributesEntity;
import com.shimao.iot.common.bean.DeviceDataEntity;
import com.shimao.iot.common.bean.DeviceEntity;
import com.shimao.iot.common.bean.DeviceTypeEntity;
import com.shimao.iot.common.bean.device.UpdateBatchDeviceAttributeReq;
import com.shimao.iot.common.bean.member.EditShimaoFaceReq;
import com.shimao.iot.common.bean.member.ShimaoFaceReq;
import com.shimao.iot.common.elk.entity.DeviceReportEntity;
import com.shimao.iot.common.entity.ResultVO;
import com.shimao.iot.common.model.device.req.DeviceReportHeartReq;
import com.shimao.iot.common.model.device.req.DeviceReportInfoReq;
import com.shimao.iot.common.model.face.req.AlarmInfo;
import com.shimao.iot.common.model.face.req.DeviceStateReq;
import com.shimao.iot.common.model.face.req.FaceCollectInfoReq;
import com.shimao.iot.common.model.face.req.FaceCollectReq;
import com.shimao.iot.common.model.face.req.PassRecord;
import com.shimao.iot.iotopenapi.bean.dto.device.DeviceExtDataEntity;
import com.shimao.iot.iotopenapi.kafka.KafkaProducer;
import com.shimao.iot.iotopenapi.serviceFeign.DeviceFeignService;
import com.shimao.iot.iotopenapi.serviceFeign.ElkClient;
import com.shimao.iot.iotopenapi.serviceFeign.MemberClient;
import com.shimao.iot.iotopenapi.serviceFeign.OssService;
import org.junit.Assert;
import org.junit.Before;
import org.junit.Test;
import org.junit.runner.RunWith;
import org.mockito.InjectMocks;
import org.mockito.Mock;
import org.mockito.Mockito;
import org.mockito.MockitoAnnotations;
import org.powermock.modules.junit4.PowerMockRunner;
import org.springframework.beans.factory.annotation.Value;
import java.util.ArrayList;
import java.util.Arrays;
import java.util.List;
/**
*
* @author zhangtonghao
* @create 2023-01-31 14:41
*/
@RunWith(PowerMockRunner.class)
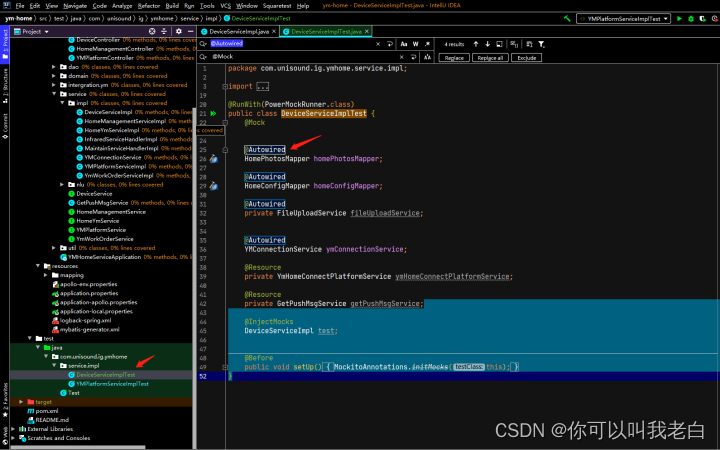
public class DeviceReportServiceImplTest {
@Mock
private DeviceFeignService deviceFeignService;
@Mock
private OssService ossService;
@InjectMocks
com.shimao.iot.iotopenapi.service.Impl.DeviceReportServiceImpl deviceReportServiceImpl;
static {
System.setProperty("env", "baseline");
}
@Before
public void setUp() {
MockitoAnnotations.openMocks(this);
}
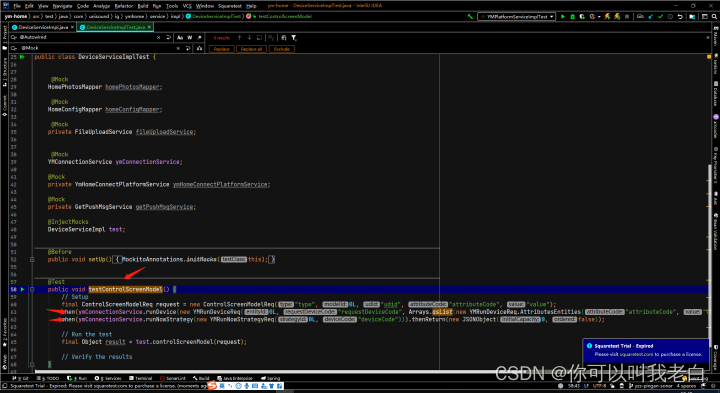
@Test
public void testDeviceLockState() {
// Setup
DeviceStateReq req = new DeviceStateReq();
req.setEntityCode("entityCode");
req.setGwCode("gwCode");
req.setTimestamp("timestamp");
req.setReqId("reqId");
req.setTypeCode("typeCode");
req.setOpt("opt");
req.setMsgType("msgType");
//存取code
AlarmInfo alarmInfo = new AlarmInfo();
alarmInfo.setCode("10000");
alarmInfo.setMessage("message");
alarmInfo.setPictureUrl("pictureUrl");
req.setAlarmInfo(alarmInfo);
req.setAttributesEntities(Arrays.asList(new AttributesEntity(0L, 0L, "attributeCode", "value")));
PassRecord passRecord = new PassRecord();
passRecord.setId("id");
passRecord.setRecordId("recordId");
passRecord.setName("name");
passRecord.setPassPhoto("passPhoto");
passRecord.setPassMode("passMode");
passRecord.setResultType(0);
passRecord.setPassTime("passTime");
passRecord.setCode("10000");
passRecord.setPersonType(0);
req.setPassRecords(Arrays.asList(passRecord));
// Configure DeviceFeignService.queryDeviceInfoByDeviceCode(...).
DeviceExtDataEntity deviceExtDataEntity = getDeviceExtDataEntity();
Mockito.when(deviceFeignService.queryDeviceInfoByDeviceCode(Mockito.any())).thenReturn(deviceExtDataEntity);
Mockito.when(deviceFeignService.updateAttributesById(Mockito.any())).thenReturn(ResultVO.ok(null));
Mockito.when(ossService.uploadByBase64(Mockito.any())).thenReturn(ResultVO.ok(null));
// Run the test
ResultVO result = deviceReportServiceImpl.deviceLockState(req);
// Verify the results
Assert.assertNotNull(result);
}
private DeviceExtDataEntity getDeviceExtDataEntity() {
AttributesEntity attributesEntity = new AttributesEntity();
attributesEntity.setEntityId(11L);
attributesEntity.setAttributeCode("11L");
attributesEntity.setValue("11");
List<AttributesEntity> attributes = new ArrayList<>();
attributes.add(attributesEntity);
DeviceExtDataEntity deviceExtDataEntity = new DeviceExtDataEntity();
deviceExtDataEntity.setChannel(1);
deviceExtDataEntity.setSpaceId(11L);
deviceExtDataEntity.setTypeCode("1");
deviceExtDataEntity.setComdTopic("1");
deviceExtDataEntity.setDeviceCode("11");
deviceExtDataEntity.setDeviceId(11L);
deviceExtDataEntity.setDeviceName("11L");
deviceExtDataEntity.setDiff("11");
deviceExtDataEntity.setPanType("11");
deviceExtDataEntity.setSourcePlatform("11");
deviceExtDataEntity.setSpaceId(11L);
deviceExtDataEntity.setIconUrl("11");
deviceExtDataEntity.setRootSpaceId(11L);
deviceExtDataEntity.setAttributesEntities(attributes);
deviceExtDataEntity.setStatus(1);
return deviceExtDataEntity;
}
}
三.常用注解了解
简洁版
@InjectMocks:通过创建一个实例,它可以调用真实代码的方法,其余用@Mock(或@Spy)注解创建的mock将被注入到用该实例中。
@Mock:对函数的调用均执行mock(即虚假函数),不执行真正部分。
@Spy:对函数的调用均执行真正部分。(几乎不会使用)
Mockito.when( 对象.方法名() ).thenReturn( 自定义结果 ):后面自定返回结果,需要和方法返回结果类型一致,
Mockito.any():用于匹配任意类型的参数
详细版
@RunWith(PowerMockRunner.class)
是JUnit的一个Runner,PowerMockRunner通过使用Java Instrumentation API和字节码操作库ByteBuddy,使得Java类和对象避免了Java单继承和final类限制,能够进行更灵活的mock测试。在JUnit中使用@RunWith(PowerMockRunner.class)来运行单元测试,可以使用PowerMock框架进行Mocking、Stubbing和Verification等操作,它可以完全模拟一个无法模拟的对象,如静态方法、final类、private类等。此外,PowerMockRunner还支持EasyMock和Mockito等常见的Mock技术。
@Mock
所谓的mock就是创建一个类的虚假的对象,在测试环境中,用来替换掉真实的对象,以达到两大目的:
验证这个对象的某些方法的调用情况,调用了多少次,参数是什么等等
指定这个对象的某些方法的行为,返回特定的值,或者是执行特定的动作
是一个Mockito框架中的注解,它可以用于创建一个模拟对象。使用@Mock注解可以使测试代码更简洁并且便于阅读,无需手动创建模拟对象。
具体来说,@Mock注解通常用于测试类中需要测试的类所依赖的对象。当我们使用@Mock注解标注一个对象时,这个对象的行为可以被模拟,以便对测试目标类进行测试。在对模拟对象进行测试时,我们可以设定模拟对象的返回值或行为,并用这些值来测试测试目标类的行为。
需要注意的是,使用@Mock注解必须先使用Mockito.mock()初始化Mock对象。通常,我们会在测试类的setUp()方法中使用@Mock注解来初始化Mock对象,这样测试类的每个测试方法都可以使用它。
同时还需要注意,@Mock注解只是用于创建一个模拟对象,在使用这个对象进行测试时,需要手动设定其返回值或行为。
@InjectMocks
是Mockito框架中的注解。它可以自动为测试类中声明的变量注入被mock的对象。使用@InjectMocks注解可以让测试代码更加简洁和易读,无需手动创建对象。
具体来说,@InjectMocks注解通常用于注入一个类的成员变量,这个成员变量通常是另外一个类的实例(被mock的对象)。在测试类实例化时,Mockito会自动查找这个被mock对象的实例,然后把它注入到@InjectMocks注解标识的变量中。
需要注意的是,@InjectMocks注解仅仅用于自动注入成员变量。如果需要mock类的方法,应该使用@Mock注解。
同时,如果一个类里面有多个同类型的成员变量,需要手动使用@Qualifier注解来指定需要注入的对象。当然你也可以通过不同名称来区分同一类型的变量。
Mockito.when()
是Mockito框架中的一个方法,它可以被用于设定模拟对象的行为。该方法通常和@Mock或@Spy注解一起使用,用于模拟对象的行为并指定返回值或者其他行为。
具体来说,Mockito.when()方法接受两个参数,一个是模拟对象的方法调用,另一个是指定的行为或返回值。当模拟对象的方法被调用时,Mockito就会按照when()方法中指定的方式进行处理。例如,可以使用Mockito.when()方法来模拟一个方法的返回值.
需要注意的是,Mockito.when()方法并不会真正地执行方法,而是返回了一个指定的返回值或设定的行为,用于在测试中进行验证。同样需要注意的是,如果模拟对象的方法参数不是一个基本类型或String,则需要手动匹配参数。
Mockito.any()
它可以用于匹配任意类型的参数。在测试代码中,当需要匹配方法的参数但不关心具体的参数值时,可以使用Mockito.any()方法来匹配参数。
具体来说,Mockito.any()方法可以用于模拟对象的方法调用或验证方法调用时的参数匹配。
需要注意的是,当使用Mockito.any()方法时,需要确保模拟方法的返回值与模拟方法的参数类型兼容。
常用的 Mockito 方法
Mockito的使用,一般有以下几种组合:
do/when:包括doThrow(…).when(…)/doReturn(…).when(…)/doAnswer(…).when(…)

given/will:包括given(…).willReturn(…)/given(…).willAnswer(…)

when/then: 包括when(…).thenReturn(…)/when(…).thenAnswer(…)/when(…).thenThrow(…)
Mockito 的多种匹配函数,部分如下:
any()所有对象类型

anyInt()基本类型 int、非 null 的 Integer 类型

anyChar()基本类型 char、非 null 的 Character 类型

anyShort()基本类型 short、非 null 的 Short 类型

anyBoolean()基本类型 boolean、非 null 的 Boolean 类型

anyDouble()基本类型 double、非 null 的 Double 类型

anyFloat()基本类型 float、非 null 的 Float 类型

anyLong()基本类型 long、非 null 的 Long 类型

anyByte()基本类型 byte、非 null 的 Byte 类型

anyString()String 类型(不能是 null)

anyList()List<T> 类型(不能是 null)

anyMap()Map<K, V>类型(不能是 null)
四:常见问题
1.我自己明明已经模拟了方法,为什么还无法走通?
mock中模拟Mockito.when( 对象.方法名() ).thenReturn( 自定义结果 ),方法名()中参数有的人会使用实际的参数,这样会导致模拟是无法找到正确的结果。所以我们需要使用Mockito.any()去替代,让mock自己去模拟。以及thenReturn中返回的值要符合业务逻辑才能保证业务能够走通。参考:
Mockito.when(deviceFeignService.queryDeviceInfoByDeviceCode(Mockito.any())).thenReturn(deviceExtDataEntity);
2.为什么有时候使用Mockito.any()模拟方法时会报错?
这个是因为有时模拟时的参数类型不正确的原因,参考:Mockito 的多种匹配函数。如果还是报错,建议使用准确值,比如参数为int=1。但就会出现问题一无法返回结果。有知道的大佬可以评论。
3.有时候需要启动参数或者需要连接真实配置(一般junit需要同适用)怎么办?
代表启动参数或者是使用的某个配置文件,注解和代码选择其中之一。参考下图
@ActiveProfiles("baseline")

或者

static {

System.setProperty("env", "baseline");

}
4.有的代码中需要判断常量值才能继续往下走,如何模拟?
说实话,这个问题很恶心,麻烦了很久。后来查到可以使用映射测试模拟类,参考:
ReflectionTestUtils.setField()方法接受三个参数:要设置属性值的对象、属性名称和属性值。通过这个方法,我们可以方便地通过反射去设置一个对象的私有变量值,从而在测试代码中控制这个对象的行为。需要注意的是,如果想要通过ReflectionTestUtils.setField()方法修改的变量是静态的,那么第一个参数应为null,因为静态变量属于类级别的而不是实例级别的。
ReflectionTestUtils.setField(deviceServiceImpl, "deviceTypeCodes", "1000");
5.代码比较老旧,或者有的需要通过连接redis等组件返回结果,业务才能继续往下走?
因为返回的对象无法正常new,我们可以通过Mockito.mock()方法可以创建类或接口的模拟对象。比如
// redisTemplate写法
ListOperations<String, String> listOperations = Mockito.mock(ListOperations.class);

Mockito.when(redisTemplate.opsForList()).thenReturn(listOperations);Mockito.when(listOperations.size(Mockito.any())).thenReturn(10L);
//JDBC写法
你可以直接带@Before方法中去先初始化模拟
@Mock
DbUtils openCustomDbUtils;

@Mock
DbUtils newCustomDbUtils;

@InjectMocks
NluDataDao test;


@Before
public void setUp() {
    MockitoAnnotations.openMocks(this);
    getTestByOne();
}

private void getTestByOne() {
    try {
        Connection conn = Mockito.mock(Connection.class);
        conn.setAutoCommit(true);
        PreparedStatement ps = Mockito.mock(PreparedStatement.class);
        ResultSet rs = Mockito.mock(ResultSet.class);
        ps.setString(1, "1");
        int i = ps.executeUpdate();

        PowerMockito.when(conn.prepareStatement(Mockito.any())).thenReturn(ps);
        PowerMockito.when(ps.getGeneratedKeys()).thenReturn(rs);
        PowerMockito.when(ps.executeUpdate()).thenReturn(1);
        PowerMockito.when(openCustomDbUtils.getConn()).thenReturn(conn);
    } catch (Exception e) {

    }

}

@Test
public void testLoadAllAppVOs() {
    // Setup
    getTestByOne();
    getTestByFour();
    // Run the test
   test.loadAllAppVOs();
}
test.loadAllAppVOs()方法代码:
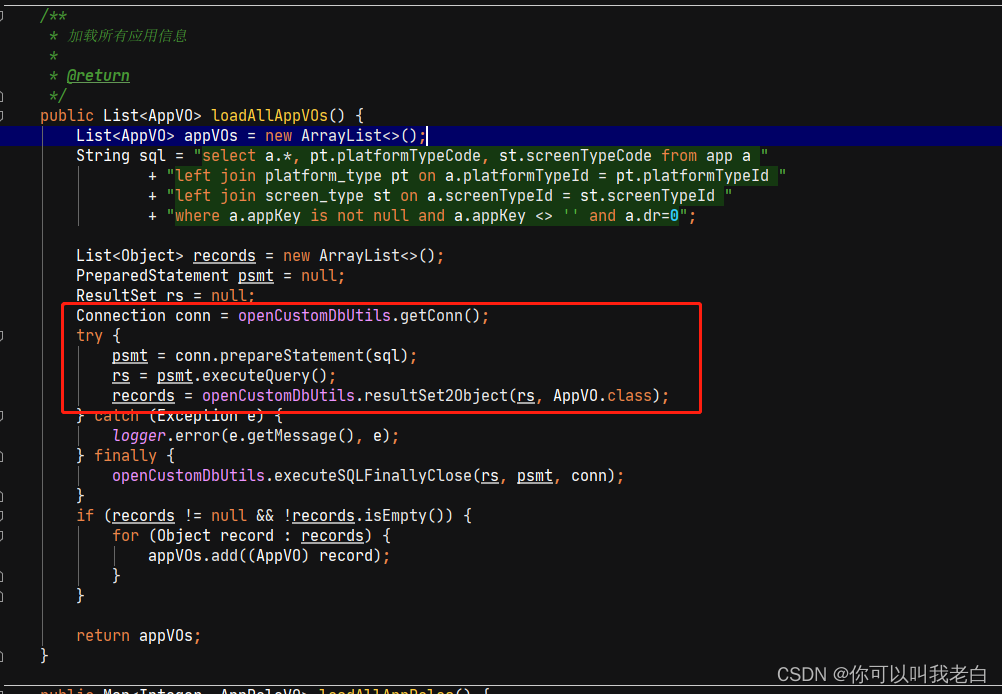
6.有得使用了一些框架或者工具类去查询数据,比如mybatiesPlus。代码走不下去怎么办?
其实这也是我为什么讨厌有的人炫技的原因之一。下列报错:

解决方法:
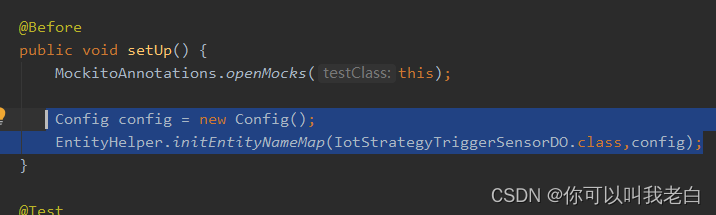
Config config = new Config();EntityHelper.initEntityNameMap(IotStrategyTriggerSensorDO.class,config);
jar包选择:
import tk.mybatis.mapper.entity.Config;import tk.mybatis.mapper.mapperhelper.EntityHelper;
五:小技巧
有的工程师写完以后想看一下自己覆盖率的多少,以idea为例有两种方法。(方法2通用)
1.
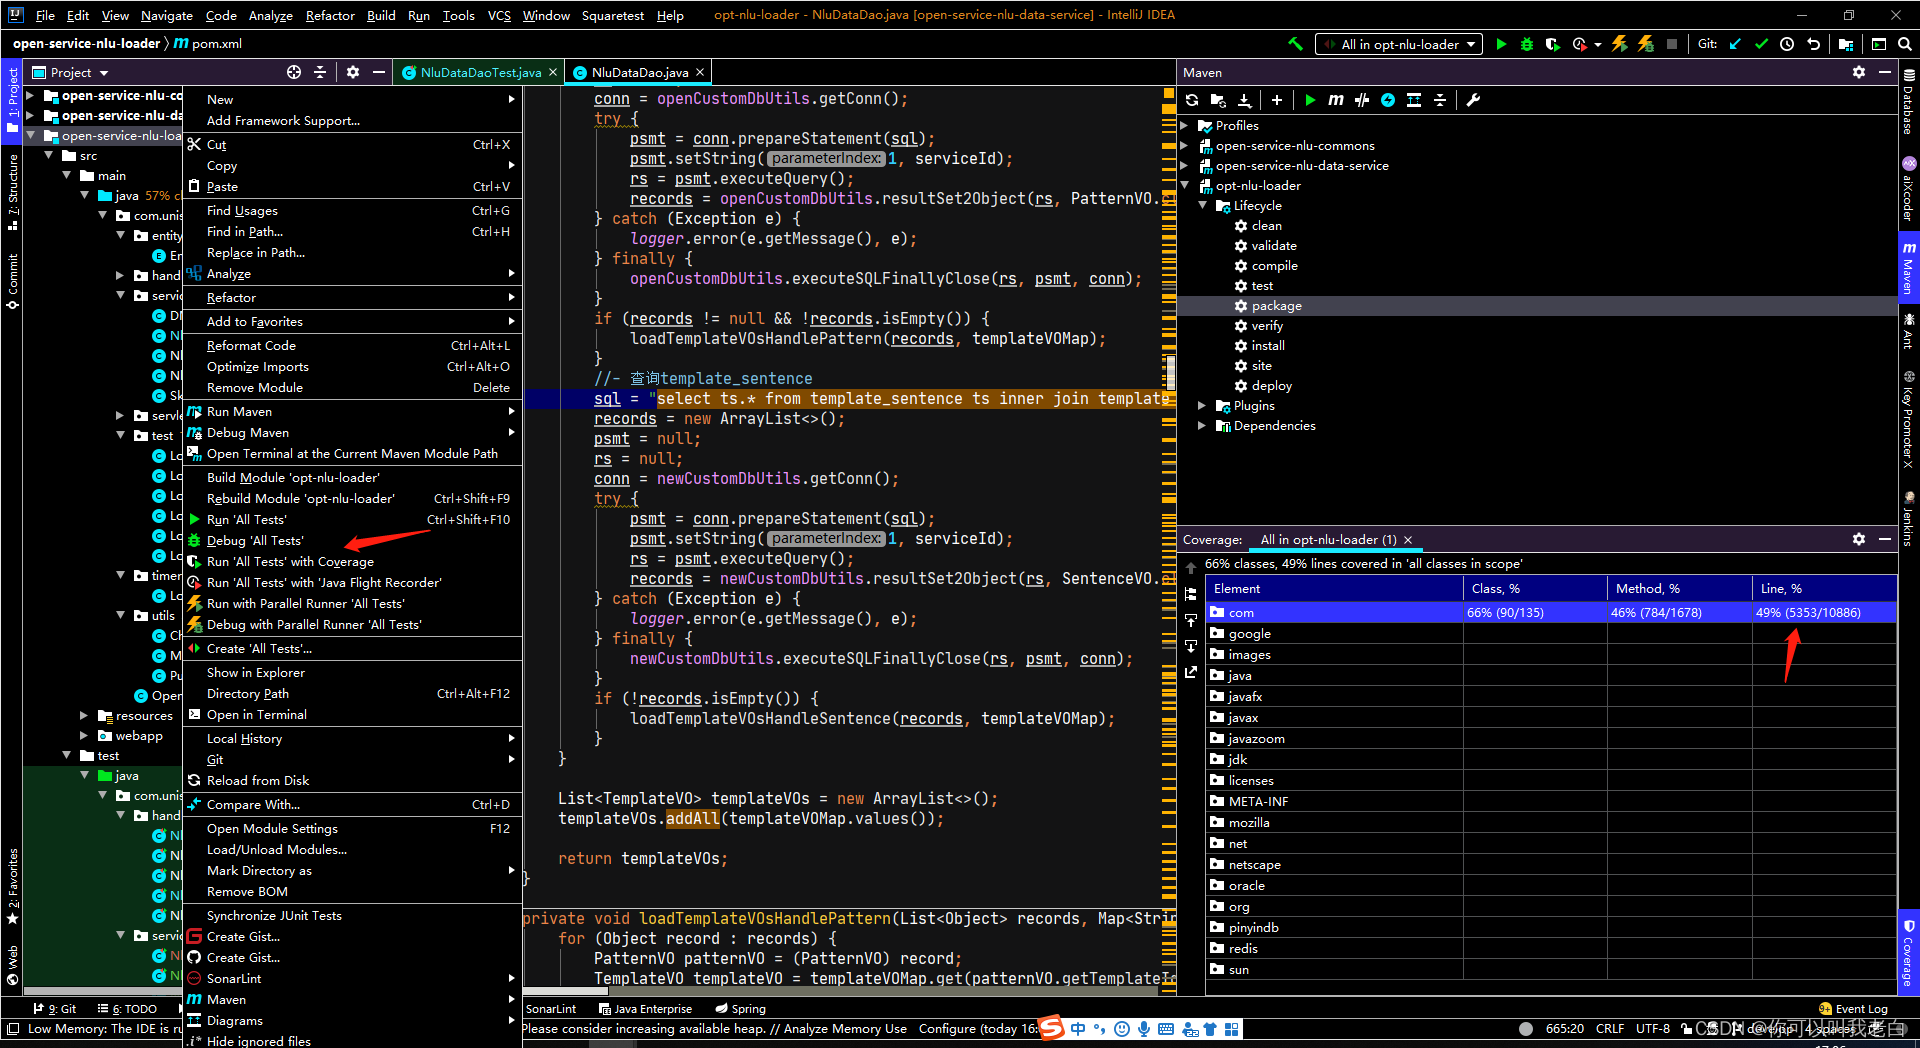
2.
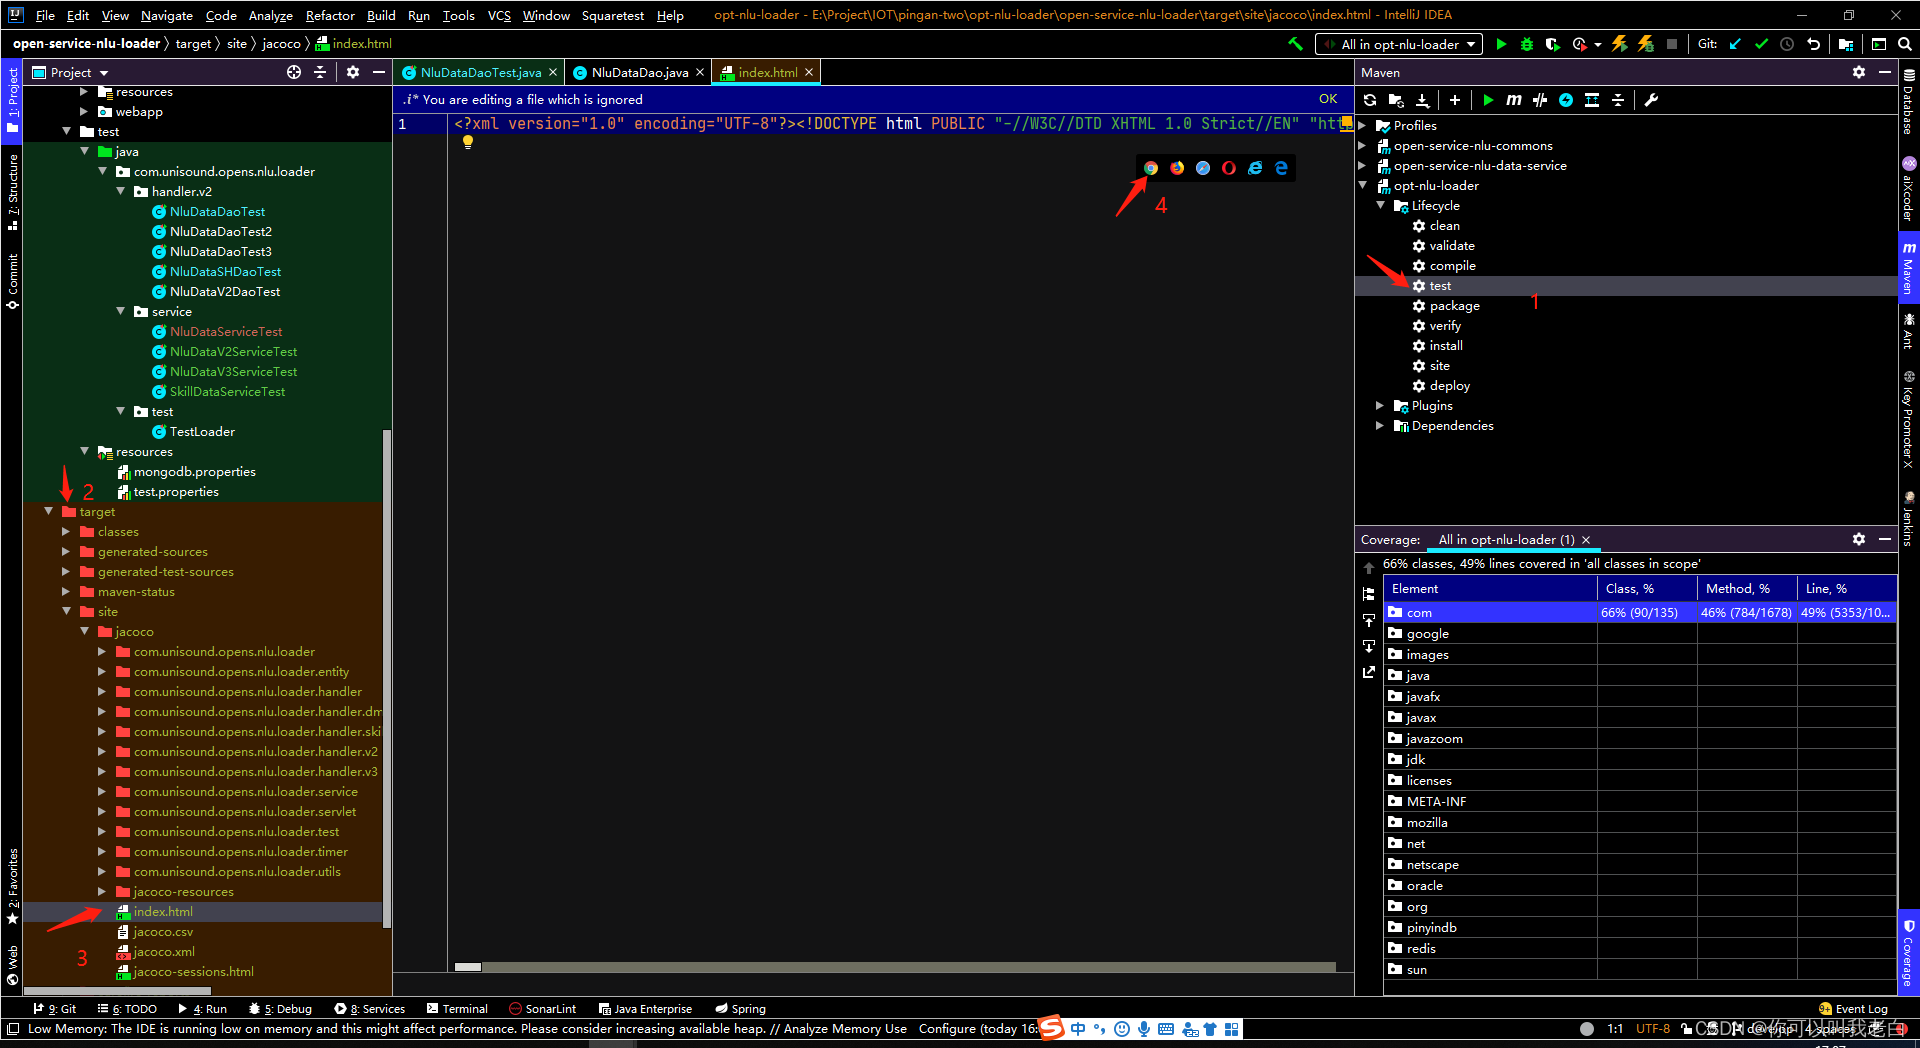
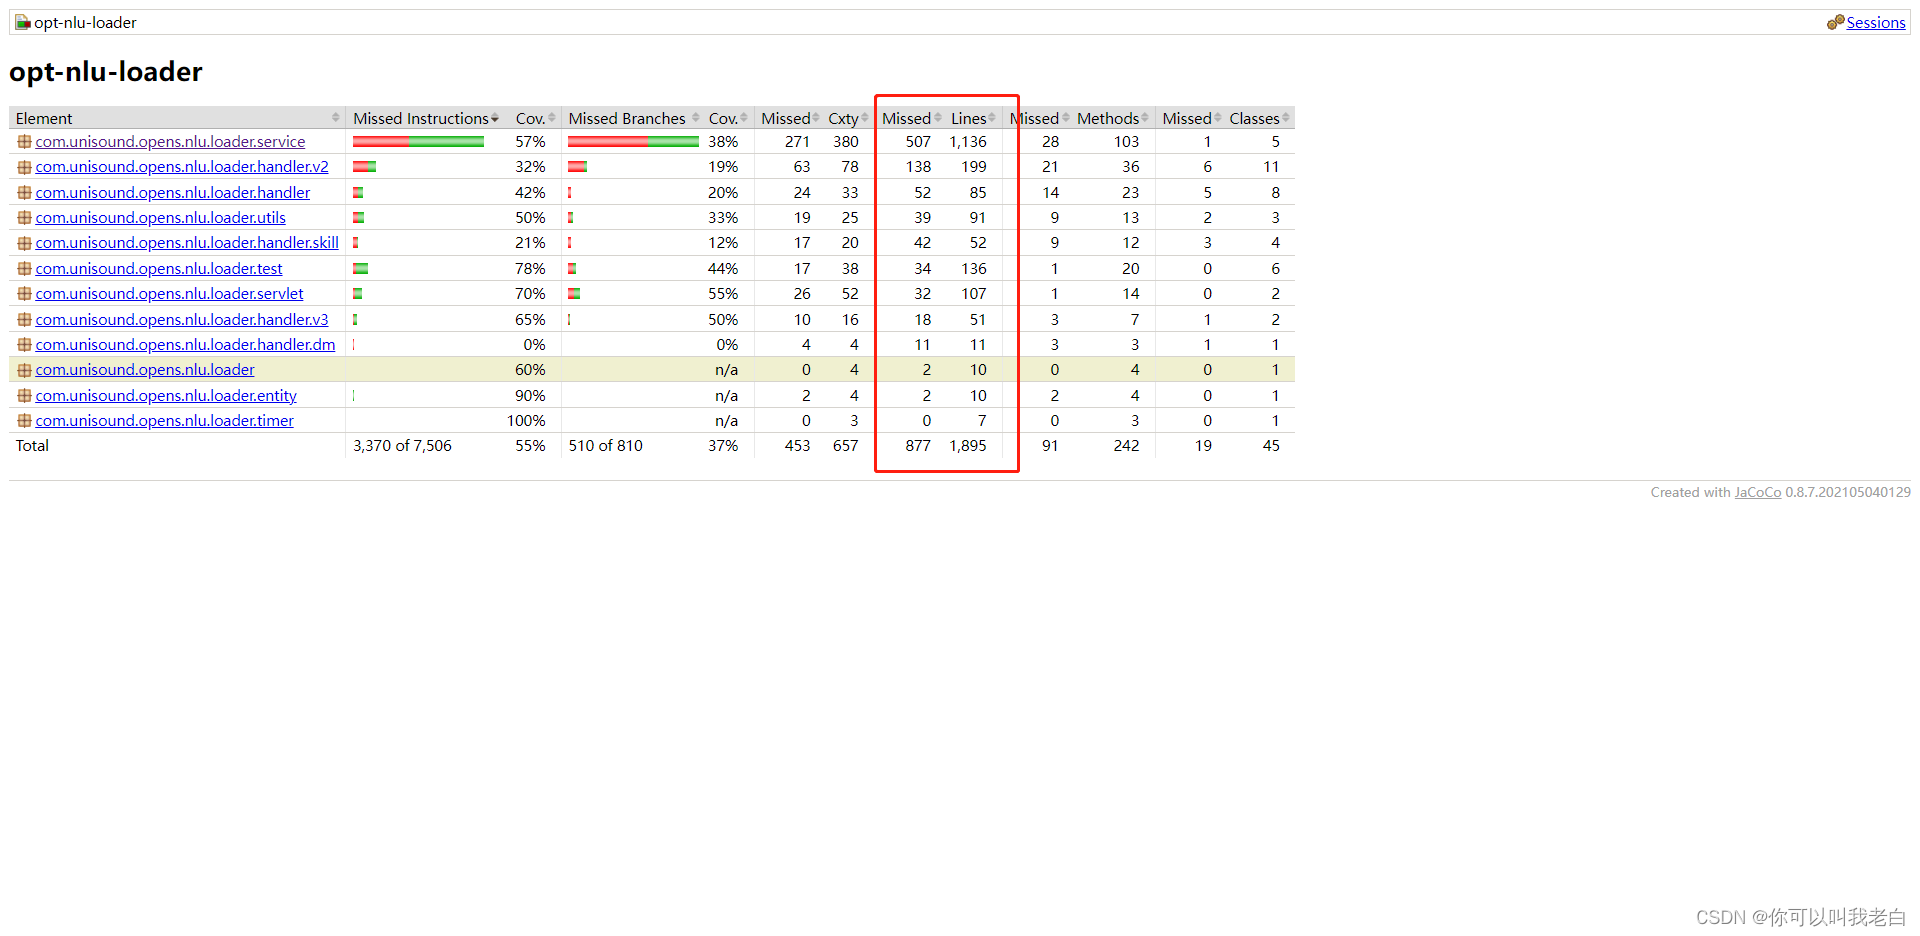
第二种相当于执行mvn test命令。有的时候测试报告和idea扫描的会有不同,需要以自己环境为准.
idea插件:Squaretest
帮助自动生成单元测试类。选择第二种使用。注意:生成后的需要修改,别忘了上面碰到的问题。
自建模板
一些网友反映说插件生成的代码很多重复的处理有些费劲,然后网上收集了一些信息后,提供了一个类模板供大家使用。下面是教程:
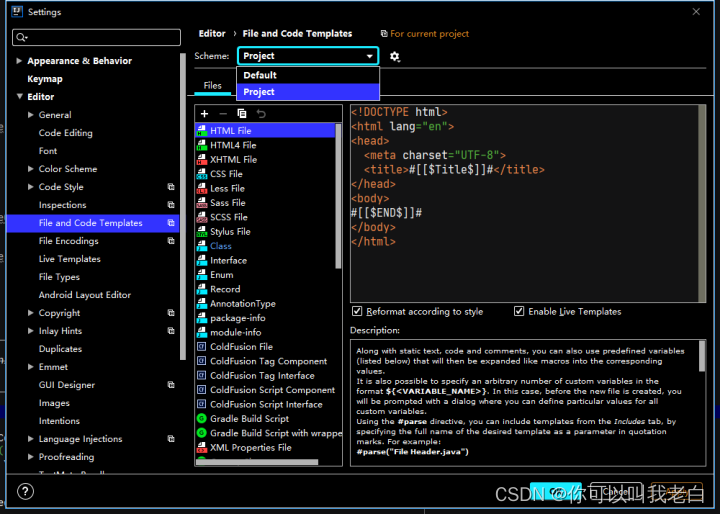
1.替换类生成模板直接复制粘贴即可,如果你长期写就选择Default,否则就选择Project
#if (${PACKAGE_NAME} && ${PACKAGE_NAME} != "")package ${PACKAGE_NAME};#end
#parse("File Header.java")
import org.junit.Assert;
import org.junit.Before;
import org.junit.Test;
import org.junit.runner.RunWith;
import org.mockito.InjectMocks;
import org.mockito.Mock;
import org.mockito.MockitoAnnotations;
import org.powermock.modules.junit4.PowerMockRunner;


@RunWith(PowerMockRunner.class)
public class ${NAME}Test {
  @Mock

  @InjectMocks
    ${NAME} test;


  @Before
    public void setUp() {
        MockitoAnnotations.initMocks(this);
    }
}
2.生成测试类,直接复制要生成的类名
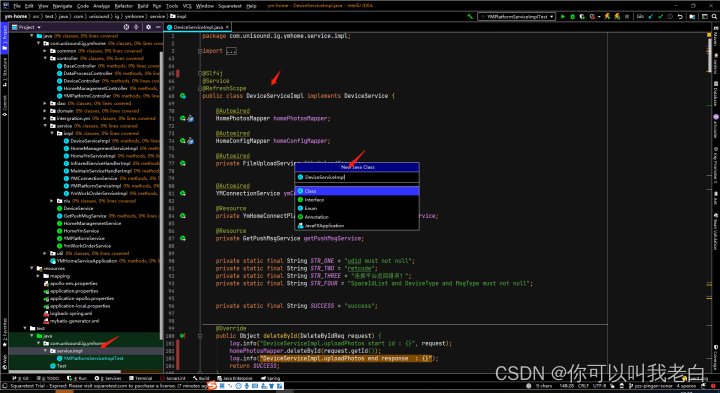
3.注意我们首先要把需要模拟的类先拿过来,否则我们后面生成代码时会发现没有生成模拟的方法。比如下面的

错误的:

正确的:
以上就是大致的演示,有其他好的方法的可以评论下。
创作不易,感觉不错的话请给点个赞吧!我是老白,我们下期再见!