参考:
https://csp1999.blog.csdn.net/article/details/116331409
https://blog.csdn.net/javazejian/article/details/75043422
你知道怎么实现多线程同步问题吗?join不算,还知道吗 – 知乎 (zhihu.com)
https://www.cnblogs.com/javastack/p/9698229.html
学习多线程一段时间后,视野中出现了各式各样的“锁”,起初是眼花缭乱的,但是仔细整理一下发现还是有规律可循的。
现在我理解的大致基础向并发编程学习思路就是
1 多线程基础,包括线程状态,线程状态切换,以及常见的方法
2 线程的内存模型,知道线程有自己的栈内存,而堆内存中的对象可以被所有线程访问(引发安全问题)
3 线程同步的办法,了解并发基石CAS相关基础
4 了解常见锁(如synchronized 自旋锁 可重入锁等),AQS相关
5 ConcurrentHashMap源码,以及线程的原理
6 netty框架
我曾尝试跳过中间步骤直接去看偏后的知识,当场自闭,学习就应该一步一步来,适当回顾
关于ReetrantLock的简单介绍
我们常使用synchronized锁来控制多线程状态下的数据安全性,synchronized是一种隐式锁,在使用的时候我们无需也无法关心锁的获取与释放,而ReetrantLock锁的获取与释放都是由我们手动编写加以控制,是显式锁。ReetrantLock实现了concurrent并发包下的lock接口,其方法较为丰富
以下代码段引自
https://blog.csdn.net/javazejian/article/details/75043422
这个大佬很久不写博客了,他的文章都很硬核,感慨下失去了一个重要学习途径
public interface Lock {
    //加锁
    void lock();

    //解锁
    void unlock();

    //可中断获取锁,与lock()不同之处在于可响应中断操作,即在获
    //取锁的过程中可中断,注意synchronized在获取锁时是不可中断的
    void lockInterruptibly() throws InterruptedException;

    //尝试非阻塞获取锁,调用该方法后立即返回结果,如果能够获取则返回true,否则返回false
    boolean tryLock();

    //根据传入的时间段获取锁,在指定时间内没有获取锁则返回false,如果在指定时间内当前线程未被中并断获取到锁则返回true
    boolean tryLock(long time, TimeUnit unit) throws InterruptedException;

    //获取等待通知组件,该组件与当前锁绑定,当前线程只有获得了锁
    //才能调用该组件的wait()方法,而调用后,当前线程将释放锁。
    Condition newCondition();
//查询当前线程保持此锁的次数。
int getHoldCount()
//返回目前拥有此锁的线程,如果此锁不被任何线程拥有,则返回 null。
protected Thread getOwner();
//返回一个 collection,它包含可能正等待获取此锁的线程,其内部维持一个队列,这点稍后会分析。
protected Collection<Thread> getQueuedThreads();
//返回正等待获取此锁的线程估计数。
int getQueueLength();
// 返回一个 collection,它包含可能正在等待与此锁相关给定条件的那些线程。
protected Collection<Thread> getWaitingThreads(Condition condition);
//返回等待与此锁相关的给定条件的线程估计数。
int getWaitQueueLength(Condition condition);
// 查询给定线程是否正在等待获取此锁。
boolean hasQueuedThread(Thread thread);
//查询是否有些线程正在等待获取此锁。
boolean hasQueuedThreads();
//查询是否有些线程正在等待与此锁有关的给定条件。
boolean hasWaiters(Condition condition);
//如果此锁的公平设置为 true,则返回 true。
boolean isFair()
//查询当前线程是否保持此锁。
boolean isHeldByCurrentThread()
//查询此锁是否由任意线程保持。
boolean isLocked() 可以看到,它的实现方法更加丰富,获取锁都可以响应中断,在synchronized上这是不存在的,synchronized锁获取锁不响应中断
说到手动控制锁的获取与释放,之前看的自旋锁也是可以这样的,对于自旋锁的入门,可以看这里
自旋锁的简单介绍_future_xiaowu的博客-CSDN博客
关于线程的中断和阻塞我之前一直有些疑问,解惑看这里
https://www.cnblogs.com/javastack/p/9698229.html
ReetrantLock基于AQS组件实现,想要了解ReetrantLock就必须先了解AQS原理,我们现在姑且知道,ReetrantLock是一种可重入锁,这一点和synchronized类似,简易的使用例子如下
感兴趣的可以粘贴运行一下,虽然线程访问了共享变量,但是由于加锁,其输出仍旧是有序的,且最终结果是正确的。
package com.example.service.impl;

import java.util.concurrent.locks.ReentrantLock;

public class RetrantLockDemo implements Runnable{
    private int count = 100;
    ReentrantLock lock = new ReentrantLock();
    @Override
    public void run() {
        try {
            //重入锁,重入几次就要解锁几次
            lock.lock();
            lock.lock();
            for(int i = 0; i < 25; i++){
                count--;
                System.out.println(count);
            }
        } finally {
            lock.unlock();
            lock.unlock();
        }
    }

    public static void main(String[] args) {
        RetrantLockDemo demo = new RetrantLockDemo();
        for(int i = 0;i < 4; i++){
            Thread thread = new Thread(demo);
            thread.start();
        }
    }
}
关于AQS的介绍
AbstractQueuedSynchronizer又称为队列同步器(简称AQS),AQS是十分重要的并发编程基础组件,网上介绍也是一抓一把,了解其它常用的并发编程工具如 CountDownLatch 之前必须先了解AQS的实现原理。
其内部维护两种队列和一个锁状态关键字,当state值为0的时候说明锁没有被线程占有,而当state值为1的时候则说明有线程在使用锁,其它线程需要进入同步队列等待锁被释放。
除了同步队列,还有一种等待队列(可以存在多个)
AQS通过内部类Node构建一个FIFO的队列(双向链表)来安排线程获取锁的排队工作,通过内部类ConditionObject构建等待队列,调用Condition.wait()方法后,线程将进入等待队列,调用Condition.signal()方法后,线程将从等待队列进入同步队列竞争锁,而调用Condition.await()方法后线程又会进入等待队列排队
Node内部类结构如下
static final class Node {
    //共享模式
    static final Node SHARED = new Node();
    //独占模式
    static final Node EXCLUSIVE = null;

    //标识线程已处于结束状态
    static final int CANCELLED =  1;
    //等待被唤醒状态
    static final int SIGNAL    = -1;
    //条件状态,
    static final int CONDITION = -2;
    //在共享模式中使用表示获得的同步状态会被传播
    static final int PROPAGATE = -3;

    //等待状态,存在CANCELLED、SIGNAL、CONDITION、PROPAGATE 4种
    volatile int waitStatus;

    //同步队列中前驱结点
    volatile Node prev;

    //同步队列中后继结点
    volatile Node next;

    //请求锁的线程
    volatile Thread thread;

    //等待队列中的后继结点,这个与Condition有关,稍后会分析
    Node nextWaiter;

    //判断是否为共享模式
    final boolean isShared() {
        return nextWaiter == SHARED;
    }

    //获取前驱结点
    final Node predecessor() throws NullPointerException {
        Node p = prev;
        if (p == null)
            throw new NullPointerException();
        else
            return p;
    }

}
CANCELLED:值为1,在同步队列中等待的线程等待超时或被中断,需要从同步队列中取消该Node的结点,其结点的waitStatus为CANCELLED,即结束状态,进入该状态后的结点将不会再变化。
SIGNAL:值为-1,被标识为该等待唤醒状态的后继结点,当其前继结点的线程释放了同步锁或被取消,将会通知该后继结点的线程执行。说白了,就是处于唤醒状态,只要前继结点释放锁,就会通知标识为SIGNAL状态的后继结点的线程执行。
CONDITION:值为-2,与Condition相关,该标识的结点处于等待队列中,结点的线程等待在Condition上,当其他线程调用了Condition的signal()方法后,CONDITION状态的结点将从等待队列转移到同步队列中,等待获取同步锁。
PROPAGATE:值为-3,与共享模式相关,在共享模式中,该状态标识结点的线程处于可运行状态。
0状态:值为0,代表初始化状态。
这里可以和之前的公平自旋锁做一个比较,同样是队列,自旋锁只有一个等待队列,排好了队就获取锁,执行完了,就释放锁,然后队列下一节点获取锁。
AbstractQueuedSynchronizer最重要的作用就是给我们提供了管理线程的队列实现,并提供了获取锁 释放锁的默认实现,但其实获取锁tryAcquire()和释放锁tryRelease()方法主要还是需要子类自己去实现,所以AQS主要作用就是提供一个通用的模板。
ReentrantLock与AQS的关系
前面提到AQS是并发编程的基础组件,而ReentrantLock是基于AQS实现的
zejian大佬有现成的图,我直接使用了,这里图片和描述来自
https://blog.csdn.net/javazejian/article/details/75043422
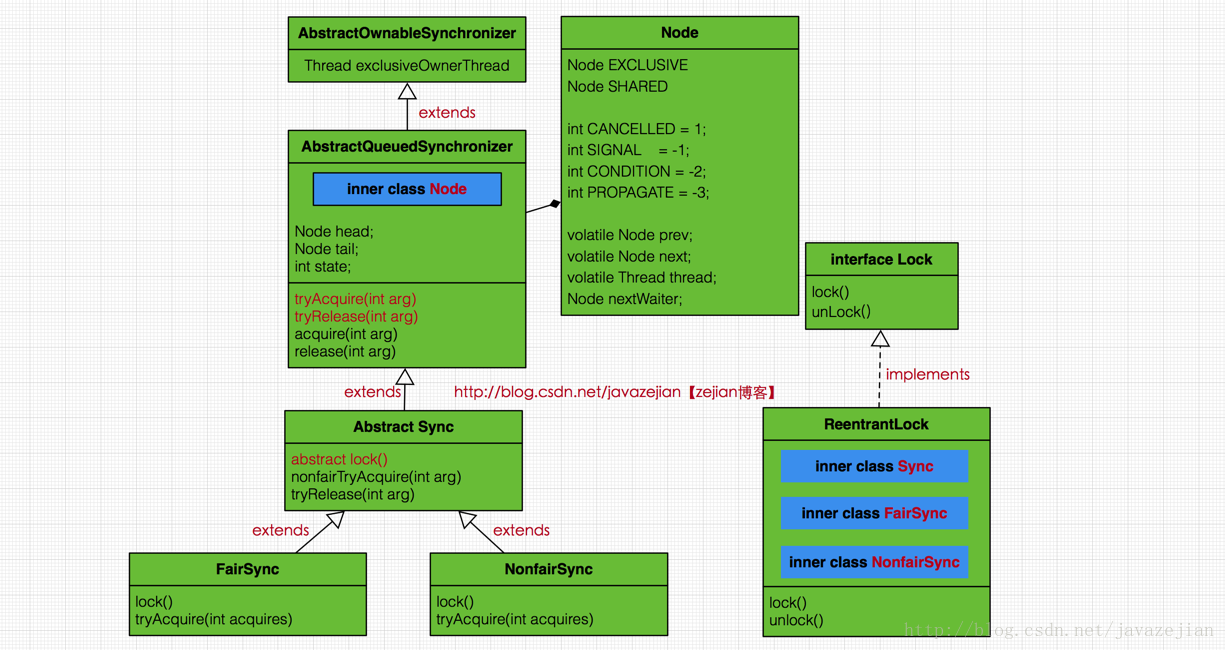
AbstractOwnableSynchronizer:抽象类,定义了存储独占当前锁的线程和获取的方法
AbstractQueuedSynchronizer:抽象类,AQS框架核心类,其内部以虚拟队列的方式管理线程的锁获取与锁释放,其中获取锁(tryAcquire方法)和释放锁(tryRelease方法)并没有提供默认实现,需要子类重写这两个方法实现具体逻辑,目的是使开发人员可以自由定义获取锁以及释放锁的方式。
Node:AbstractQueuedSynchronizer 的内部类,用于构建虚拟队列(链表双向链表),管理需要获取锁的线程。
Sync:抽象类,是ReentrantLock的内部类,继承自AbstractQueuedSynchronizer,实现了释放锁的操作(tryRelease()方法),并提供了lock抽象方法,由其子类实现。
NonfairSync:是ReentrantLock的内部类,继承自Sync,非公平锁的实现类。
FairSync:是ReentrantLock的内部类,继承自Sync,公平锁的实现类。
ReentrantLock:实现了Lock接口的,其内部类有Sync、NonfairSync、FairSync,在创建时可以根据fair参数决定创建NonfairSync(默认非公平锁)还是FairSync。
锁按可以多线程共享和只能单线程拥有被分为共享锁和独占锁,AQS设计之初的目的就是作为一个公共的组件抽象类来为这两种锁提供默认的公共实现,共享模式和独占模式 其加锁 释放锁的逻辑和方式一定不同,所以AQS为它们抽象出了父方法,子类可以进行重写实现,如ReentrantLock需要自己实现tryAcquire()方法和tryRelease()方法,而实现共享模式的Semaphore,则需要实现tryAcquireShared()方法和tryReleaseShared()方法
//AQS中提供的主要模板方法,由子类实现。
public abstract class AbstractQueuedSynchronizer
    extends AbstractOwnableSynchronizer{

    //独占模式下获取锁的方法
    protected boolean tryAcquire(int arg) {
        throw new UnsupportedOperationException();
    }

    //独占模式下解锁的方法
    protected boolean tryRelease(int arg) {
        throw new UnsupportedOperationException();
    }

    //共享模式下获取锁的方法
    protected int tryAcquireShared(int arg) {
        throw new UnsupportedOperationException();
    }

    //共享模式下解锁的方法
    protected boolean tryReleaseShared(int arg) {
        throw new UnsupportedOperationException();
    }
    //判断是否为持有独占锁
    protected boolean isHeldExclusively() {
        throw new UnsupportedOperationException();
    }

}
先前提过AQS实现了一个FIFO的双向链表队列,即同步队列,线程获取锁失败就会被包装成一个node节点并进入阻塞状态,当锁被释放(state == 0),会唤醒链表头节点中的线程尝试获取锁
以非公平锁为例,研究学习AQS和可重入锁
public ReentrantLock() {
    sync = new NonfairSync();
}
//根据入参决定创建公平\非公平锁
public ReentrantLock(boolean fair) {
    sync = fair ? new FairSync() : new NonfairSync();
}

//获取锁方法
public void lock() {
     sync.lock();
}
这是非公平锁的定义
    static final class NonfairSync extends Sync {
        private static final long serialVersionUID = 7316153563782823691L;

        /**
         * Performs lock.  Try immediate barge, backing up to normal
         * acquire on failure.
         */
        final void lock() {
            //修改同步状态
            if (compareAndSetState(0, 1))
                //这里不必担心线程安全,只有一个线程执行CAS能成功
                //设置锁的持有线程,只能有一个(独占锁)
                setExclusiveOwnerThread(Thread.currentThread());
            else
                //获取锁失败,尝试重新获取锁或者加入队列
                acquire(1);
        }

    }


    /**
     * Sets the thread that currently owns exclusive access.
     * A {@code null} argument indicates that no thread owns access.
     * This method does not otherwise impose any synchronization or
     * {@code volatile} field accesses.
     * @param thread the owner thread
     */
    //这个方法位于AbstractOwnableSynchronizer抽象类中,对当前可执行线程进行设置
    protected final void setExclusiveOwnerThread(Thread thread) {
        exclusiveOwnerThread = thread;
    }

    //这个方法对中断不敏感,即使中断了,也不会从队列中移除(中断前已经加入队列)
    public final void acquire(int arg) {
        //这里的Node.EXCLUSIVE用来表示独占锁,ReentrantLock是独占锁
        //tryAcquire在当前调用的是Sync内部类中的nonfairTryAcquire()
        //addWaiter加入同步队列
        if (!tryAcquire(arg) &&
            acquireQueued(addWaiter(Node.EXCLUSIVE), arg))
            //将当前线程中断
            selfInterrupt();
    }

    //将当前线程中断状态设置为中断
    static void selfInterrupt() {
        Thread.currentThread().interrupt();
    }
我们先看tryAcquire调用的Sync内部类中的方法
        /**
         * Performs non-fair tryLock.  tryAcquire is implemented in
         * subclasses, but both need nonfair try for trylock method.
         */
        final boolean nonfairTryAcquire(int acquires) {
            //拿到当前线程
            final Thread current = Thread.currentThread();
            //state使用vlolatile修饰,每次操作都是CAS,直接调用get方法获取同步状态即可
            int c = getState();
            //c == 0,目前没有线程占有锁,可以直接获取
            if (c == 0) {
                //CAS重置同步状态,并将当前线程置为可执行线程,返回方法
                if (compareAndSetState(0, acquires)) {
                    setExclusiveOwnerThread(current);
                    return true;
                }
            }
            //当前线程已经持有锁,属于是重入锁,将state值加1
            //注意这里当前执行线程的判断,其它线程是无法进入的
            else if (current == getExclusiveOwnerThread()) {
                int nextc = c + acquires;
                //获取锁次数超过int类型表示范围,内存溢出
                if (nextc < 0) // overflow
                    throw new Error("Maximum lock count exceeded");
                //这是持有锁的线程设置值,其余的线程不会走到这里,直接调用set方法即可
                //重置state,返回
                setState(nextc);
                return true;
            }
            //获取锁失败
            return false;
        }
到这里可以概括一下lock()方法的大致流程:
尝试直接获取锁,如果失败则调用acquire(1)
acquire会尝试获取锁,并判断state状态,如果已经获取过了,则走重入锁的逻辑,否则走获取锁逻辑
如果上述获取锁或者重入锁的逻辑都失败了,将当前线程的信息封装成节点加入队列中,并调用acquireQueue方法,如果这两个操作都失败,说明当前这个线程已经不中用了,我们就把它中断吧。
关于获取锁 重入锁的逻辑代码很简单,我们关注一下获取锁失败之后,执行构建节点和加入队列的操作吧
先看加入队列的线程,再次通过CAS操作构建出一个队列来,并在acquireQueue方法中自旋,直到符合条件结束自旋,离开队列获取锁
    /**
     * Creates and enqueues node for current thread and given mode.
     *
     * @param mode Node.EXCLUSIVE for exclusive, Node.SHARED for shared
     * @return the new node
     */
    //方法描述。按照当前线程和指定模板创建队列中的节点
    private Node addWaiter(Node mode) {
        //上面传参mode是Node.EXCLUSIVE,表示独占锁
        Node node = new Node(Thread.currentThread(), mode);
        // Try the fast path of enq; backup to full enq on failure
        //如果队列尾节点为空,说明队列为空
        Node pred = tail;
        if (pred != null) {
            //队列非空,将尾节点置为当前节点前驱节点
            //这里节点其实代表当前线程,而下面的CAS操作,改变的是队列
            //这也是为什么,操作node.prev可以直接赋值。而操作队列时候需要CAS
            node.prev = pred;
            //CAS将当前线程节点放置在尾节点
            if (compareAndSetTail(pred, node)) {
                pred.next = node;
                return node;
            }
        }
        //队列为空,或者加入队列失败
        enq(node);
        return node;
    }

    /**
     * Inserts node into queue, initializing if necessary. See picture above.
     * @param node the node to insert
     * @return node's predecessor
     */
    //
    private Node enq(final Node node) {
        //死循环,每次插入节点都需要判断队列是否进行了初始化
        for (;;) {
            Node t = tail;
            //队列为空,初始化队列,新建一个节点为头节点,并使头尾相同
            if (t == null) { // Must initialize
                if (compareAndSetHead(new Node()))
                    tail = head;
            } else {
                //同之前方法的逻辑,将当前线程节点置为尾节点,并构建链表
                node.prev = t;
                if (compareAndSetTail(t, node)) {
                    t.next = node;
                    //注意这里的t,仍旧是之前旧的队列尾巴
                    return t;
                }
            }
        }
    }
有的人可能会对返回的t产生疑惑,我已经用CAS将队列尾巴设置成了当前node,为什么返回的还是之前的tail?
生成队列的时候为什么返回的不是当前Node?
看下面示例
package com.example.service.impl;

import java.util.concurrent.locks.ReentrantLock;

public class RetrantLockDemo {
    private String name;
    public String getName() {
        return name;
    }

    public void setName(String name) {
        this.name = name;
    }

    public static void main(String[] args) {
        RetrantLockDemo demo = new RetrantLockDemo();
        demo.setName("zhangsan");
        RetrantLockDemo demo1 = demo;
        RetrantLockDemo demo2 = new RetrantLockDemo();
        demo2.setName("lisi");
        System.out.println(demo1.getName());
        demo = demo2;
        System.out.println(demo1.getName());
    }
}


输出:
zhangsan
zhangsan
看了会让人有点头疼,如果你调用demo.set方法修改name,demo1的name会跟着改变,但是如果你将demo的引用指向demo2,此时demo1指向的仍旧是老的demo指向的那个对象
你将引用A = B,B = C,其实此时A引用仍旧指向B的旧属性,但是此时打印B的属性,你会发现和C的对象属性一致。
为什么会这样我也不太懂···,但是对象属性确实没有传递到A上
这也解释了,为什么上面的代码能将node插入链表中
插入队列之后执行了acquireQueue方法,我们看一看这个方法
 /**
     * Acquires in exclusive uninterruptible mode for thread already in
     * queue. Used by condition wait methods as well as acquire.
     *
     * @param node the node
     * @param arg the acquire argument
     * @return {@code true} if interrupted while waiting
     */
    final boolean acquireQueued(final Node node, int arg) {
        boolean failed = true;
        try {
            boolean interrupted = false;
            for (;;) {
                //获取前驱节点
                final Node p = node.predecessor();
                //如果当前节点是头节点,尝试获取锁,符合FIFO规则
                if (p == head && tryAcquire(arg)) {
                    //如果当前线程节点获取到了锁,将当前节点设置为队列头
                    //将当前节点设置为头节点
                    setHead(node);
                    //此时旧的头节点已经无用,因为当前线程已经获取锁并成为新的头节点
                    //这里,原本的头节点是新建的对象,只有一个next属性是当前node,清空,GC
                    p.next = null; // help GC
                    failed = false;
                    return interrupted;
                }
                //如果不是头节点,判断是否挂起并尝试挂起
                if (shouldParkAfterFailedAcquire(p, node) &&
                    parkAndCheckInterrupt())
                    interrupted = true;
            }
        } finally {
            if (failed)
                //取消获取锁操作
                cancelAcquire(node);
        }
    }

//将node设置为头节点并删除不必要数据
private void setHead(Node node) {
        head = node;
        //清空结点数据
        node.thread = null;
        node.prev = null;
}
acquireQueue方法中,节点在被加入队列之后在此方法中自旋(通过死循环),在循环中不断判断当前线程节点的前驱节点是否为头节点(是否满足获取锁条件),如果满足条件将会获取锁,获取锁后将执行run方法进入执行状态,此时node中的唯一有价值的属性将是next(用于判断下一节点是否能获取锁),其余属性不再被使用,直接赋值null,释放占有的内存空间
上面描述的,是当前节点的前驱节点是头节点的处理思想,也是当前节点能获取锁的逻辑,那么前驱节点如果不是头节点或者获取锁失败呢?
    /**
     * Checks and updates status for a node that failed to acquire.
     * Returns true if thread should block. This is the main signal
     * control in all acquire loops.  Requires that pred == node.prev.
     *
     * @param pred node's predecessor holding status
     * @param node the node
     * @return {@code true} if thread should block
     */
    //前驱节点为头节点的逻辑在之前的方法中已经进行过判断了
    //线程节点获取锁失败的时候会对其状态进行一个修改
    //如果线程应当被阻塞,这个方法就会返回true
    //判断前驱节点的status
    private static boolean shouldParkAfterFailedAcquire(Node pred, Node node) {
        //当前节点的前驱节点处理待唤醒状态,说明前驱节点没有获取到锁,而是等待唤醒
        int ws = pred.waitStatus;
        //当前节点的前驱节点没有获取到锁,当前节点线程是可以被安全的阻塞
        //我的理解是,如果前驱线程已经或者即将获取锁,那么它可能释放锁,则当前线程不应该中断
        if (ws == Node.SIGNAL)
            /*
             * This node has already set status asking a release
             * to signal it, so it can safely park.
             */
            return true;
        if (ws > 0) {
            /*
             * Predecessor was cancelled. Skip over predecessors and
             * indicate retry.
             */
            //前驱线程已经结束了节点也离开了队列,
            //遍历寻找当前节点的前驱节点,直到遇到未结束的前驱线程节点
            do {
                node.prev = pred = pred.prev;
            } while (pred.waitStatus > 0);
            //将当前节点拼接在找到的未结束的节点之后
            pred.next = node;
        } else {
            /*
             * waitStatus must be 0 or PROPAGATE.  Indicate that we
             * need a signal, but don't park yet.  Caller will need to
             * retry to make sure it cannot acquire before parking.
             */
            //status只有四种,不是上面两种就只剩下0 和PROPAGATE
            //这意味着,我们需要确认一下,其前驱节点能否更改为待唤醒状态
            //如果不可以,则当前线程允许block,如果可以,则进入死循环,等待前驱节点释放锁
            //循环一直执行,最后前驱节点就会都变成signal状态
            compareAndSetWaitStatus(pred, ws, Node.SIGNAL);
        }
        return false;
    }


    /**
     * Convenience method to park and then check if interrupted
     *
     * @return {@code true} if interrupted
     */
    //阻塞线程的便捷方法,执行后检查线程是否被中断
    //这里是先阻塞再检查中断状态,无论是否中断,都会执行阻塞方法,对中断不敏感
    private final boolean parkAndCheckInterrupt() {
        LockSupport.park(this);
        return Thread.interrupted();
    }
从上面代码不难看出,线程获取锁acquire方法对中断不敏感,addWaiter加入队列时,线程中断标识为true不会被移出队列,当前线程无需获取锁需要阻塞时,线程标识为true也还是会执行阻塞方法。
也就是说,lock方法不响应中断
前面提过,与synchronized不同点就是,重入锁可以响应中断
lockInterruptibly()实现了这个可响应中断的获取锁操作,它调用了doAcquireInterruptibly()方法 /**
* Acquires in exclusive interruptible mode.
* @param arg the acquire argument
*/
private void doAcquireInterruptibly(int arg)
throws InterruptedException {
final Node node = addWaiter(Node.EXCLUSIVE);
boolean failed = true;
try {
for (;;) {
final Node p = node.predecessor();
if (p == head && tryAcquire(arg)) {
setHead(node);
p.next = null; // help GC
failed = false;
return;
}
//区别处在这里,没有获取锁,尝试阻塞(挂起)的时候
//如果线程中断标识为true,则直接抛出异常,该线程后续获取锁的请求会被中断
//对于已经获取锁的线程,就无法中断了
if (shouldParkAfterFailedAcquire(p, node) &&
parkAndCheckInterrupt())
throw new InterruptedException();
}
} finally {
if (failed)
cancelAcquire(node);
}
}到这里,ReentrantLock可中断与不可中断获取锁的方式就看完了线程要在获取锁之后才能释放锁,我们看看释放锁的方法
    public void unlock() {
        sync.release(1);
    }

    public final boolean release(int arg) {
        if (tryRelease(arg)) {
            Node h = head;
            if (h != null && h.waitStatus != 0)
                unparkSuccessor(h);
            return true;
        }
        return false;
    }

        //尝试释放锁
        protected final boolean tryRelease(int releases) {
            //锁次数减一
            int c = getState() - releases;
            //如果不是当前执行线程调用该方法,抛出异常
            //其余线程是无法执行之后的逻辑的
            if (Thread.currentThread() != getExclusiveOwnerThread())
                throw new IllegalMonitorStateException();
            boolean free = false;
            if (c == 0) {
                free = true;
                //将当前线程置为null
                setExclusiveOwnerThread(null);
            }
            setState(c);
            return free;
        }
线程释放锁以后,要操作队列,inparkSuccessor方法是AQS中的方法
    private void unparkSuccessor(Node node) {
        /*
         * If status is negative (i.e., possibly needing signal) try
         * to clear in anticipation of signalling.  It is OK if this
         * fails or if status is changed by waiting thread.
         */
        //这里node参数是头节点
        //但其实一般都是当前线程节点,回顾acquireQueue方法,你会发现
        //死循环中,获取锁的线程成为了头节点,没获取的后续节点线程都阻塞了或者执行死循环
        int ws = node.waitStatus;
        if (ws < 0)
            compareAndSetWaitStatus(node, ws, 0);

        /*
         * Thread to unpark is held in successor, which is normally
         * just the next node.  But if cancelled or apparently null,
         * traverse backwards from tail to find the actual
         * non-cancelled successor.
         */
        //唤醒头节点之后的节点线程,一般来说就是头节点后继节点
        //若后记节点狗带或者被取消了,就改为从队列尾部倒叙遍历
        Node s = node.next;
        if (s == null || s.waitStatus > 0) {
            s = null;
            //从队列尾部往前遍历,唤醒所有的有效节点线程
            for (Node t = tail; t != null && t != node; t = t.prev)
                if (t.waitStatus <= 0)
                    s = t;
        }
        if (s != null)
            LockSupport.unpark(s.thread);
    }
到这里流程就比较清晰了:
1线程尝试获取锁,如果获取失败就再尝试一次,
2 如果还是失败就尝试加入队列,虽然后accquire方法中自旋,获取锁的节点将成为头节点,而所有前驱节点为待唤醒状态的节点或者获取锁失败的节点,都将被阻塞
3 获取锁的头节点释放锁之后,唤醒所有队列中依然在有效的节点,再次循环
前面说的一直都是非公平锁,接下来看看公平锁
     //释放锁
     protected final boolean tryAcquire(int acquires) {
            final Thread current = Thread.currentThread();
            int c = getState();
            if (c == 0) {
                //只有当队列不为空,且当前线程为head节点的下一节点时候才尝试获取锁
                if (!hasQueuedPredecessors() &&
                    compareAndSetState(0, acquires)) {
                    setExclusiveOwnerThread(current);
                    return true;
                }
            }
            else if (current == getExclusiveOwnerThread()) {
                int nextc = c + acquires;
                if (nextc < 0)
                    throw new Error("Maximum lock count exceeded");
                setState(nextc);
                return true;
            }
            return false;
        }

    public final boolean hasQueuedPredecessors() {
        // The correctness of this depends on head being initialized
        // before tail and on head.next being accurate if the current
        // thread is first in queue.
        Node t = tail; // Read fields in reverse initialization order
        Node h = head;
        Node s;
        //队列已经不存在或者当前线程就是队列中的head节点的next节点
        return h != t &&
            ((s = h.next) == null || s.thread != Thread.currentThread());
    }
synchronized锁在虚拟机层面已经有了优化,过去的synchronized效率是要低于重入锁的,但现在性能差距已经不大,应用场景需要具体到各个需求,ReentrantLock提供了多样化的同步特性,如超时获取锁、可以被中断获取锁(synchronized的同步是不能中断的)、等待唤醒机制的多个条件变量(Condition)等,因此当我们确实需要使用到这些功能时,可以选择ReentrantLock,一般情况下synchronized已经完全可以满足我们的需求了。
Condition接口
ConditionObject是Condition接口的实现类,也是AQS内部类,通过调用await和signal方法我们可以实现线程的阻塞与唤醒,也是AQS中等待队列的实现者,同步队列是用来管理竞争锁的线程的,而等待队列是用来管理等待进入同步队列参与锁竞争的队列。
等待队列可以存在多个,如果一个锁上存在多个condition实例,每个Condition对象都可以视为一个等待队列。
这里先举出一个例子说明Condition的使用场景,基于一个生产者与消费者案例,有两个生产者线程和两个消费者线程,消费者必须等待生产者产出之后才能消费,生产者必须等待消费者将产品消费之后才能继续生产,不能积压生产,简而言之,产出和消费必须是间隔有序且数量相同的
package com.example.service.impl;

import java.util.concurrent.locks.Condition;
import java.util.concurrent.locks.Lock;
import java.util.concurrent.locks.ReentrantLock;

public class ConditionDemo {
    private String name;
    private int count = 1;
    private boolean flag = false;

    //创建一个锁对象。
    Lock lock = new ReentrantLock();

    //通过已有的锁获取两组监视器,一组监视生产者,一组监视消费者。
    Condition producer_con = lock.newCondition();
    Condition consumer_con = lock.newCondition();

    /**
     * 生产
     * @param name
     */
    public  void product(String name)
    {
        lock.lock();
        try
        {
            while(flag){
                //存在产品时,生产线程不能生产
                try{producer_con.await();}catch(InterruptedException e){}
            }
            this.name = name + count;
            count++;
            System.out.println(Thread.currentThread().getName()+"...生产者5.0..."+this.name);
            flag = true;
            consumer_con.signal();//直接唤醒消费线程
        }
        finally
        {
            lock.unlock();
        }
    }

    /**
     * 消费
     */
    public  void consume()
    {
        lock.lock();
        try
        {
            while(!flag){
                try{consumer_con.await();}catch(InterruptedException e){}
            }
            System.out.println(Thread.currentThread().getName()+"...消费者.5.0......."+this.name);
            flag = false;
            producer_con.signal();//直接唤醒生产线程
        }
        finally
        {
            lock.unlock();
        }
    }

    public static void main(String[] args) {
        ConditionDemo c = new ConditionDemo();
        Producer pro = new Producer(c);
        Consumer con = new Consumer(c);
        //生产者线程
        Thread t0 = new Thread(pro);
        Thread t1 = new Thread(pro);
        //消费者线程
        Thread t2 = new Thread(con);
        Thread t3 = new Thread(con);
        //启动线程
        t0.start();
        t1.start();
        t2.start();
        t3.start();
    }
}


package com.example.service.impl;
//生产者线程
public class Producer implements Runnable {
    private ConditionDemo c;

    Producer(ConditionDemo c) {
        this.c = c;
    }

    public void run() {
        while (true) {
            c.product("产品");
        }
    }
}


package com.example.service.impl;

public class Consumer implements Runnable {
    private ConditionDemo c;

    Consumer(ConditionDemo c) {
        this.c = c;
    }

    public void run() {
        while (true) {
            c.consume();
        }
    }
}


部分运行结果
Thread-1...生产者5.0...产品208385
Thread-2...消费者.5.0.......产品208385
Thread-0...生产者5.0...产品208386
Thread-3...消费者.5.0.......产品208386
Thread-1...生产者5.0...产品208387
Thread-2...消费者.5.0.......产品208387
线程在调用对应的生产或者消费方法之后都会获取到锁,随后判断flag(是否有产品)
有产品 生产者就阻塞,生产结束后唤醒消费者消费并释放锁
没有产品,消费则就阻塞,直到有产品,消费掉,然后唤醒生产者去生产
这里对阻塞和唤醒的线程进行了更细致的控制,单独唤醒的只是生产 或者 消费线程,这一点synchronized是无法做到的,因为其内部只有一个等待队列。
看下这个模型的synchronized版本
package com.example.service.impl;

import java.util.concurrent.locks.Condition;
import java.util.concurrent.locks.Lock;
import java.util.concurrent.locks.ReentrantLock;

public class ConditionDemo {
    private String name;
    private int count = 1;
    private boolean flag = false;

    /**
     * 生产
     * @param name
     */
    public synchronized void  product(String name)
    {
        while(flag){
            //此时有烤鸭,等待
            try {
                this.wait();
            } catch (InterruptedException e) {
                e.printStackTrace();
            }
        }
        this.name=name+count;
        count++;
        System.out.println(Thread.currentThread().getName()+"...生产者..."+this.name);
        flag=true;//有产品后改变标志
        notifyAll();//通知消费线程可以消费了
    }

    /**
     * 消费
     */
    public synchronized void consume()
    {
        while(!flag){//没有产品,等待
            try{this.wait();}catch(InterruptedException e){}
        }
        System.out.println(Thread.currentThread().getName()+"...消费者........"+this.name);//消费
        flag = false;
        notifyAll();//通知生产者生产
    }


    public static void main(String[] args) {
        ConditionDemo c = new ConditionDemo();
        Producer pro = new Producer(c);
        Consumer con = new Consumer(c);
        //生产者线程
        Thread t0 = new Thread(pro);
        Thread t1 = new Thread(pro);
        //消费者线程
        Thread t2 = new Thread(con);
        Thread t3 = new Thread(con);
        //启动线程
        t0.start();
        t1.start();
        t2.start();
        t3.start();
    }
}
也可以实现线程安全和有序执行,但是等待队列中既有生产者线程也有等待者线程,调用notify或者notifyAll方法无法确定唤醒的到底是哪个线程,这也是与Condition的区别所在。
Condition的实现原理
    public class ConditionObject implements Condition, java.io.Serializable {
        private static final long serialVersionUID = 1173984872572414699L;
        /** First node of condition queue. */
        private transient Node firstWaiter;
        /** Last node of condition queue. */
        private transient Node lastWaiter;
}
属性上,只有第一个节点firstWaiter和最后一个节点lastWaiter,和之前的同步队列看起来完全不同,且等待队列中的Node只有两种属性,CANCELLED和CONDITION,前者标识线程已经结束需要从队列移除,后者标识等待唤醒。上面的例子中,先阻塞线程再唤醒线程,我们看一看阻塞和唤醒的流程
添加至队列并阻塞方法,await()
        //这都是在获取锁之后的操作,是线程安全的
        //可中断的阻塞方法,如果中断就会抛出异常
        public final void await() throws InterruptedException {
            if (Thread.interrupted())
                throw new InterruptedException();
            //添加至队列并返回
            Node node = addConditionWaiter();
            //释放锁,调用Reentrantlock的释放方法
            int savedState = fullyRelease(node);
            int interruptMode = 0;
            //判断节点是否在同步队列中,即是否被唤醒
            while (!isOnSyncQueue(node)) {
                //不在同步队列,阻塞当前线程
                //到这里,线程释放了锁,离开了同步队列,进入等待队列并阻塞
                LockSupport.park(this);
                //如果线程中断跳出循环
                //返回 0 未中断 THROW_IE唤醒前中断,另一个时唤醒后中断
                if ((interruptMode = checkInterruptWhileWaiting(node)) != 0)
                    break;
            }
            //已被添加至同步队列后,自旋获取锁,且线程被唤醒前没有被中断
            if (acquireQueued(node, savedState) && interruptMode != THROW_IE)
                //走出了上面的循环,说明是唤醒后中断
                interruptMode = REINTERRUPT;
            if (node.nextWaiter != null) // clean up if cancelled
                //清理等待队列中的节点
                unlinkCancelledWaiters();
            if (interruptMode != 0)
                //执行wait后,线程被中断了
                //这个方法不贴了,唤醒前中断抛异常,唤醒后中断将中断值设置为true
                reportInterruptAfterWait(interruptMode);
        }


        /**
         * Adds a new waiter to wait queue.
         * @return its new wait node
         */
        //在等待队列中加入一个节点
        private Node addConditionWaiter() {
            //获取队尾
            Node t = lastWaiter;
            // If lastWaiter is cancelled, clean out.
            //队尾被取消,删除
            if (t != null && t.waitStatus != Node.CONDITION) {
                //删除节点
                unlinkCancelledWaiters();
                t = lastWaiter;
            }
            //新建节点并添加至队尾
            Node node = new Node(Thread.currentThread(), Node.CONDITION);
            //如果队列为空,node就是首个节点
            if (t == null)
                firstWaiter = node;
            else
                //队列不为空将node添加至队尾
                t.nextWaiter = node;
            lastWaiter = node;
            //返回
            return node;
        }

        //删除被取消节点,清理多余节点方法
        private void unlinkCancelledWaiters() {
            Node t = firstWaiter;
            Node trail = null;
            //从头节点往下遍历,删除失效节点
            //队列存在才需要做
            while (t != null) {
                Node next = t.nextWaiter;
                if (t.waitStatus != Node.CONDITION) {
                    t.nextWaiter = null;
                    if (trail == null)
                        firstWaiter = next;
                    else
                        trail.nextWaiter = next;
                    if (next == null)
                        lastWaiter = trail;
                }
                else
                    //当头节点没有被移除,而是等待唤醒,将标记引用赋值为头节点
                    trail = t;
                t = next;
            }
        }


    //判断节点是否在同步队列方法
    final boolean isOnSyncQueue(Node node) {
        //状态为等待队列状态或者没有prev
        if (node.waitStatus == Node.CONDITION || node.prev == null)
            return false;
        //有prev,又又next,说明是同步队列的双向链表
        if (node.next != null) // If has successor, it must be on queue
            return true;
        /*
         * node.prev can be non-null, but not yet on queue because
         * the CAS to place it on queue can fail. So we have to
         * traverse from tail to make sure it actually made it.  It
         * will always be near the tail in calls to this method, and
         * unless the CAS failed (which is unlikely), it will be
         * there, so we hardly ever traverse much.
         */
        //从同步队列的队尾向前遍历寻找当前node是否在同步队列上
        //确认CAS成功将节点添加到同步队列
        return findNodeFromTail(node);
    }
//如果没有中断返回0
private int checkInterruptWhileWaiting(Node node) {
return Thread.interrupted() ?
(transferAfterCancelledWait(node) ? THROW_IE : REINTERRUPT) :
0;
}
//即便线程被中断,还是会加入同步队列
final boolean transferAfterCancelledWait(Node node) {
//唤醒操作(signal方法)前被中断了,此时重置CAS可以成功,因为还未加入同步队列
//加入同步队列
if (compareAndSetWaitStatus(node, Node.CONDITION, 0)) {
enq(node);
return true;
}
/*
* If we lost out to a signal(), then we can't proceed
* until it finishes its enq(). Cancelling during an
* incomplete transfer is both rare and transient, so just
* spin.
*/
//如果我们执行唤醒操作失败,在线程被加入同步队列之前我们什么也不能做
//就让线程在这里自旋
while (!isOnSyncQueue(node))
Thread.yield();
//唤醒操作后中断
return false;
}
在这里花了我不少时间去看,wait方法做了如下几件事
1 新建节点加入等待队列
2 释放当前线程持有的锁
3 当线程不在同步队列上,判断是否有中断,如果有,就设置好中断,如果线程被中断,会被添加至同步队列
从这里可以看出signal不响应中断
接下来看看唤醒的方法
 public final void signal() {
     //判断是否持有独占锁,如果不是抛出异常
   if (!isHeldExclusively())
          throw new IllegalMonitorStateException();
      Node first = firstWaiter;
      //唤醒等待队列第一个结点的线程
      if (first != null)
          doSignal(first);
 }

 private void doSignal(Node first) {
     do {
             //移除条件等待队列中的第一个结点,
             //如果后继结点为null,那么说没有其他结点将尾结点也设置为null
            if ( (firstWaiter = first.nextWaiter) == null)
                 lastWaiter = null;
             first.nextWaiter = null;
          //如果被通知节点没有进入到同步队列并且条件等待队列还有不为空的节点,则继续循环通知后续结点
         } while (!transferForSignal(first) &&
                  (first = firstWaiter) != null);
        }

//transferForSignal方法
final boolean transferForSignal(Node node) {
    //尝试设置唤醒结点的waitStatus为0,即初始化状态
    //如果设置失败,说明当期结点node的waitStatus已不为
    //CONDITION状态,那么只能是结束状态了,因此返回false
    //返回doSignal()方法中继续唤醒其他结点的线程,注意这里并
    //不涉及并发问题,所以CAS操作失败只可能是预期值不为CONDITION,
    //而不是多线程设置导致预期值变化,毕竟操作该方法的线程是持有锁的。
    if (!compareAndSetWaitStatus(node, Node.CONDITION, 0))
         return false;

        //加入同步队列并返回前驱结点p
        Node p = enq(node);
        int ws = p.waitStatus;
        //判断前驱结点是否为结束结点(CANCELLED=1)或者在设置
        //前驱节点状态为Node.SIGNAL状态失败时,唤醒被通知节点代表的线程
        if (ws > 0 || !compareAndSetWaitStatus(p, ws, Node.SIGNAL))
            //唤醒node结点的线程
            LockSupport.unpark(node.thread);
        return true;
    }
这里
signal()
方法做了两件事,一是判断当前线程是否持有独占锁,没有就抛出异常,从这点也可以看出只有独占模式先采用等待队列,而共享模式下是没有等待队列的,也就没法使用Condition。二是唤醒等待队列的第一个结点,即执行
doSignal(first)
注释说得很明白了,这里我们简单整体说明一下,doSignal(first)方法中做了两件事,从条件等待队列移除被唤醒的节点,然后重新维护条件等待队列的firstWaiter和lastWaiter的指向。二是将从等待队列移除的结点加入同步队列(在transferForSignal()方法中完成的),如果进入到同步队列失败并且条件等待队列还有不为空的节点,则继续循环唤醒后续其他结点的线程。到此整个signal()的唤醒过程就很清晰了,即signal()被调用后,先判断当前线程是否持有独占锁,如果有,那么唤醒当前Condition对象中等待队列的第一个结点的线程,并从等待队列中移除该结点,移动到同步队列中,如果加入同步队列失败,那么继续循环唤醒等待队列中的其他结点的线程,如果成功加入同步队列,那么如果其前驱结点是否已结束或者设置前驱节点状态为Node.SIGNAL状态失败,则通过LockSupport.unpark()唤醒被通知节点代表的线程,到此signal()任务完成,注意被唤醒后的线程,将从前面的await()方法中的while循环中退出,因为此时该线程的结点已在同步队列中,那么while (!isOnSyncQueue(node))将不在符合循环条件,进而调用AQS的acquireQueued()方法加入获取同步状态的竞争中,这就是等待唤醒机制的整个流程实现原理,流程如下图所示(注意无论是同步队列还是等待队列使用的Node数据结构都是同一个,不过是使用的内部变量不同罢了)
AQS流程如下图
