HybridCLR
的推广已经做得相当好了,而且热更领域突然杀出一匹黑马,热度很高,不再多做介绍,可以点击进入HybridCLR开源地址了解详情。
在此之前用过tolua和xlua热更框架, 因为C#开发方式实在太爽,想支持热更又不想使用弱类型语言,于是对ILRuntime和HybridCLR进行了评估,了解后毫不犹豫选择了HybridCLR方案,尽管它还比较新。选它的原因很简单,它最接近于原生C#开发方式,虽然性能相比原生AOT还有一定差距,但是与其它热更方案相比,绝对是热更领域颠覆性的存在,尤其是近期解决了泛型元数据补充、桥接函数生成的痛点,非常的好用!
感谢HybridCLR作者让我赶上了一个好时代,远离lua屎山?
下面记录一下Windows Unity2021.3.12f1环境下UGF + HybridCLR热更接入过程。
GameFramework接入HybridCLR,维护五年以上的自用游戏框架,工作流完善,适合快速开发,已无私共享:
GitHub – sunsvip/GF_HybridCLR
HybridCLR接入非常非常非常简单! 而且把已完成的纯C#开发游戏接入HybridCLR实现热更也同样简单。总得来说接入HybridCLR只需要以下步骤:
1,把代码分离成非热更程序集和热更程序集;
2,把热更程序集打成dll,作为资源以供下载更新.
3,下载更新热更dll,加载热更dll,调用HybridCLR函数为AOT补充泛型元数据。
4,通过反射进入热更逻辑,Over.
0. 环境准备
① git环境,用于下载更新hybridclr
② C++编译库,在VisualStudio Install面板勾选C++开发. 用于编译il2cpp
[2022.11.1更新]: 最新正式版HybridCLR接入流程:
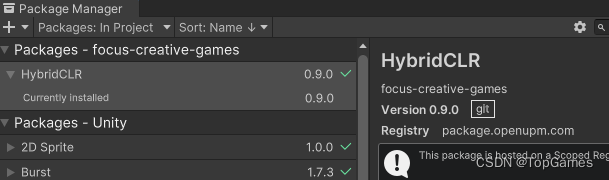
HybridCLR已经正式发布了Unity Package Manager版本插件,进一步规范化工作流。相比之前版本的接入方式有些改变,当前最新版本0.9.0接入方式如下:
HybridCLR UPM版地址:
https://github.com/focus-creative-games/hybridclr_unity.git
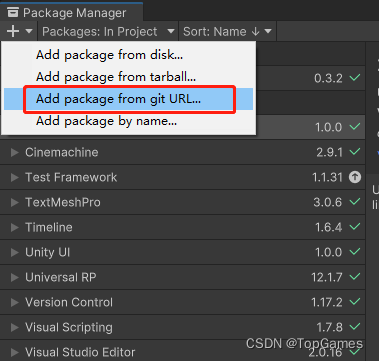
①打开Package Manager通过 git URL添加插件,把https://github.com/focus-creative-games/hybridclr_unity.git粘贴进去即可:
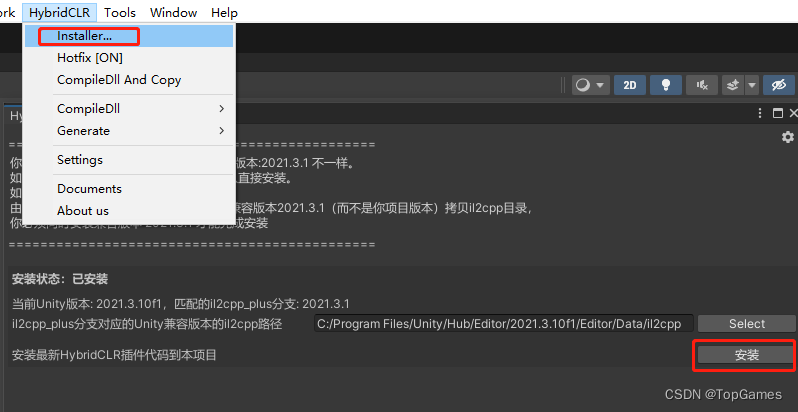
②点击顶部菜单HybridCLR->Installer安装HybridCLR
③点击顶部菜单HybridCLR->Settings添加热更程序集:

④配置热更程序集:
首先要明白什么是热更新程序集,HybridCLR会把热更新程序集打成一个dll文件,在游戏运行时注入这个热更dll,然后就能执行热更dll中的逻辑了。
我们需要先把代码分离开,分成两个程序集,一个是内置程序集(Builtin),一个是热更程序集(Hotfix)。把内置代码和热更代码分别放到不同的文件夹,然后在内置程序所在文件夹创建一个名为Builtin的Assembly Definition文件,在热更程序文件夹创建一个名为Hotfix的Assembly Definition文件。注意,Hotfix程序集可以引用Builtin程序集,但是Builtin不能直接引用Hotfix程序集。
内置程序集也就是逻辑比较靠前,无法热更,必须打进包体的代码。内置程序集逻辑主要包含下载更新资源(包括热更dll资源)、调用System.Reflection.Assembly.Load(hotfixDll.bytes)载入热更dll的二进制数据,然后通过反射调用Hotfix程序集中的函数进入热更新逻辑。
程序集拆分为内置程序集(Builtin)和热更程序集(Hotfix)后,将热更新程序集拖入HybridCLR->Settings->Hot Update Assembly Definitions;
Hot Update Assemblies不需要配置,它默认返回Hot Update Assembly Definitions中配置的程序集名字列表;
Output Link File是HybridCLR工具自动生成代码裁剪配置文件link.xml;
Output AOT Generic Reference File是HybridCLR自动生成AOT泛型元数据补充;
⑤AOT元数据补充:
由于编译成热更dll后会丢失值类型泛型的数据类型,所以需要把Hotfix中用到的值类型泛型数据提前补充到AOT里,在元数据共享机制下,Hotfix程序就能正确识别那些值类型泛型数据。
HybridCLR Settings里预留了Patch AOT Assemblies字段,用于配置AOT dll文件补充元数据。此字段HybridCLR没有用到,只是预留给用户使用的空白字段。
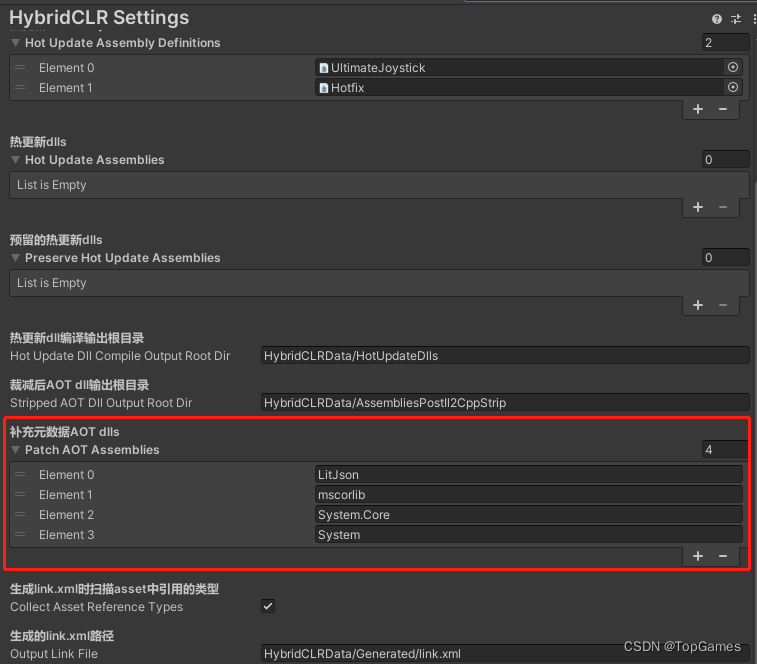
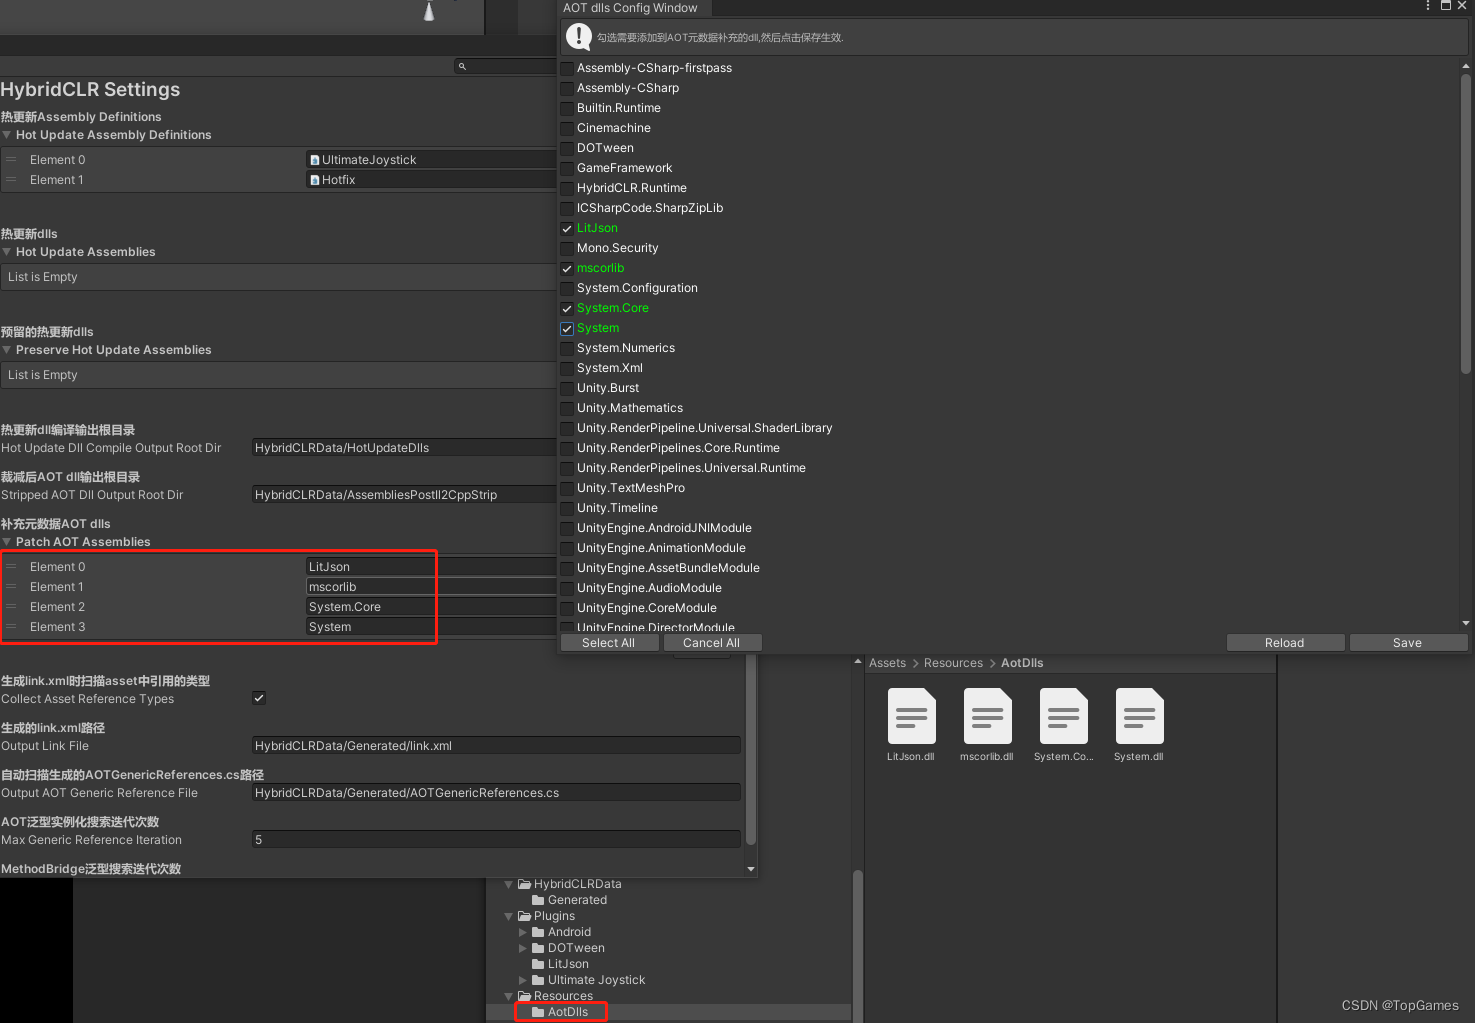
AOT 补充元数据需要用户调用接口自行补充。补充AOT元数据没有先后顺序要求,因此可以写一个小工具便于把AOT dll名字添加到Patch AOT Assemblies列表:
勾选AOT Dll点击Save会自动添加到Patch AOT Assemblies列表,并将对应dll文件移动到Resources/AotDlls下,然后运行时通过Resources.LoadAll<TextAsset>(“AotDlls”)加载全部AOT DLL然后调用RuntimeApi.LoadMetadataForAOTAssembly进行AOT元数据补充;
工具代码:
using System;
using System.Collections;
using System.Collections.Generic;
using UnityEngine;
using UnityEditor;
using UnityEngine.UIElements;
internal enum ConfigEditorMode
{
    StripLinkConfig,
    AotDllConfig
}
public class StripLinkConfigWindow : EditorWindow
{
    private class ItemData
    {
        public bool isOn;
        public string dllName;
        public ItemData(bool isOn, string dllName)
        {
            this.isOn = isOn;
            this.dllName = dllName;
        }
    }
    private Vector2 scrollPosition;
    private string[] selectedDllList;
    private List<ItemData> dataList;
    private GUIStyle normalStyle;
    private GUIStyle selectedStyle;

    ConfigEditorMode mode;
    private void OnEnable()
    {
        normalStyle = new GUIStyle();
        normalStyle.normal.textColor = Color.white;

        selectedStyle = new GUIStyle();
        selectedStyle.normal.textColor = Color.green;
        dataList = new List<ItemData>();
        RefreshListData();
    }
    internal void SetEditorMode(ConfigEditorMode mode)
    {
        this.mode = mode;
        RefreshListData();
    }
    private void OnGUI()
    {
        EditorGUILayout.BeginVertical();
        if (dataList.Count <= 0)
        {
            EditorGUILayout.HelpBox("未找到程序集,请先Build项目以生成程序集.", MessageType.Warning);
        }
        else
        {
            switch (mode)
            {
                case ConfigEditorMode.StripLinkConfig:
                    EditorGUILayout.HelpBox("勾选需要添加到Link.xml的程序集,然后点击保存生效.", MessageType.Info);
                    break;
                case ConfigEditorMode.AotDllConfig:
                    EditorGUILayout.HelpBox("勾选需要添加到AOT元数据补充的dll,然后点击保存生效.", MessageType.Info);
                    break;
            }
        }
        scrollPosition = EditorGUILayout.BeginScrollView(scrollPosition, false, true);
        for (int i = 0; i < dataList.Count; i++)
        {
            EditorGUILayout.BeginHorizontal();
            var item = dataList[i];
            item.isOn = EditorGUILayout.ToggleLeft(item.dllName, item.isOn, item.isOn ? selectedStyle : normalStyle);
            EditorGUILayout.EndHorizontal();
        }
        EditorGUILayout.EndScrollView();
        EditorGUILayout.BeginHorizontal();
        if (GUILayout.Button("Select All", GUILayout.Width(100)))
        {
            SelectAll(true);
        }
        if (GUILayout.Button("Cancel All", GUILayout.Width(100)))
        {
            SelectAll(false);
        }
        GUILayout.FlexibleSpace();

        if (GUILayout.Button("Reload", GUILayout.Width(120)))
        {
            RefreshListData();
        }
        if (GUILayout.Button("Save", GUILayout.Width(120)))
        {
            switch (mode)
            {
                case ConfigEditorMode.StripLinkConfig:
                    if (MyGameTools.Save2LinkFile(GetCurrentSelectedList()))
                    {
                        EditorUtility.DisplayDialog("Strip LinkConfig Editor", "Update link.xml success!", "OK");
                    }
                    break;
                case ConfigEditorMode.AotDllConfig:
                    if (MyGameTools.Save2AotDllList(GetCurrentSelectedList()))
                    {
                        EditorUtility.DisplayDialog("AOT dlls Editor", "Update AOT dll List success!", "OK");
                    }
                    break;
            }
        }
        EditorGUILayout.EndHorizontal();
        EditorGUILayout.EndVertical();
    }
    private void SelectAll(bool isOn)
    {
        foreach (var item in dataList)
        {
            item.isOn = isOn;
        }
    }
    private string[] GetCurrentSelectedList()
    {
        List<string> result = new List<string>();
        foreach (var item in dataList)
        {
            if (item.isOn)
            {
                result.Add(item.dllName);
            }
        }
        return result.ToArray();
    }
    private void RefreshListData()
    {
        dataList.Clear();

        switch (mode)
        {
            case ConfigEditorMode.StripLinkConfig:
                selectedDllList = MyGameTools.GetSelectedAssemblyDlls();
                break;
            case ConfigEditorMode.AotDllConfig:
                selectedDllList = MyGameTools.GetSelectedAotDlls();
                break;
        }
        foreach (var item in MyGameTools.GetProjectAssemblyDlls())
        {
            dataList.Add(new ItemData(IsInSelectedList(item), item));
        }
    }
    private bool IsInSelectedList(string dllName)
    {
        return ArrayUtility.Contains(selectedDllList, dllName);
    }
}
自定义一个菜单用于一键编译dll并把热更dll和AOT泛型补充dll复制到Assets指定目录以便打包dll到AssetBundle做热更:
/// <summary>
    /// 把热更新dll拷贝到指定目录
    /// </summary>
    /// <param name="target">平台</param>
    /// <param name="desDir">拷贝到目标目录</param>
    /// <param name="copyAotMeta">是否同时拷贝AOT元数据补充dll</param>
    /// <returns></returns>
    public static string[] CopyHotfixDllTo(BuildTarget target, string desDir, bool copyAotMeta = true)
    {
        List<string> failList = new List<string>();
        string hotfixDllSrcDir = HybridCLR.Editor.SettingsUtil.GetHotUpdateDllsOutputDirByTarget(target);

        foreach (var dll in HybridCLR.Editor.SettingsUtil.PatchingHotUpdateAssemblyFiles)
        {
            string dllPath = UtilityBuiltin.ResPath.GetCombinePath(hotfixDllSrcDir, dll);
            if (File.Exists(dllPath))
            {
                string dllBytesPath = UtilityBuiltin.ResPath.GetCombinePath(desDir, Utility.Text.Format("{0}.bytes", dll));
                File.Copy(dllPath, dllBytesPath, true);
            }
            else
            {
                failList.Add(dllPath);
            }
        }

        var aotDlls = HybridCLRSettings.Instance.patchAOTAssemblies.Select(dll => dll + ".dll").ToArray();
        if (copyAotMeta)
        {
            var failNames = CopyAotDllsToProject(target);
            failList.AddRange(failNames);
        }
        var hotfixListFile = UtilityBuiltin.ResPath.GetCombinePath(Application.dataPath, ConstBuiltin.HOT_FIX_DLL_DIR, "HotfixFileList.txt");
        File.WriteAllText(hotfixListFile, UtilityBuiltin.Json.ToJson(HybridCLR.Editor.SettingsUtil.HotUpdateAssemblyFiles.ToArray()), System.Text.Encoding.UTF8);
        AssetDatabase.Refresh();
        return failList.ToArray();
    }
    public static string[] CopyAotDllsToProject(BuildTarget target)
    {
        List<string> failList = new List<string>();
        var aotDlls = HybridCLRSettings.Instance.patchAOTAssemblies.Select(dll => dll + ".dll").ToArray();
        string aotDllDir = HybridCLR.Editor.SettingsUtil.GetAssembliesPostIl2CppStripDir(target);
        string aotSaveDir = UtilityBuiltin.ResPath.GetCombinePath(Application.dataPath, "Resources", ConstBuiltin.AOT_DLL_DIR);
        if (Directory.Exists(aotSaveDir))
        {
            Directory.Delete(aotSaveDir,true);
        }
        Directory.CreateDirectory(aotSaveDir);
        foreach (var dll in aotDlls)
        {
            string dllPath = UtilityBuiltin.ResPath.GetCombinePath(aotDllDir, dll);
            if (!File.Exists(dllPath))
            {
                Debug.LogWarning($"ab中添加AOT补充元数据dll:{dllPath} 时发生错误,文件不存在。裁剪后的AOT dll在BuildPlayer时才能生成,因此需要你先构建一次游戏App后再打包。");
                failList.Add(dllPath);
                continue;
            }
            string dllBytesPath = UtilityBuiltin.ResPath.GetCombinePath(aotSaveDir, Utility.Text.Format("{0}.bytes", dll));
            File.Copy(dllPath, dllBytesPath, true);
        }

        return failList.ToArray();
    }
⑥ 加载并补充AOT元数据:
var aotMetaDlls = Resources.LoadAll<TextAsset>("AotDlls");
foreach (var dll in aotMetaDlls)
{
    var success = RuntimeApi.LoadMetadataForAOTAssembly(dll.bytes, HomologousImageMode.SuperSet) == LoadImageErrorCode.OK;
}
什么情况下需要把dll添加到Patch AOT Assemblies进行AOT元数据补充?
AOT元数据补充,顾名思义是为AOT补充元数据,元数据补充dll一定是AOT dll而不是热更dll。
例如,项目用到了LitJson插件,插件放到了非热更部分(AOT),LitJson有很多方法用到了值类型泛型T,当热更dll中的逻辑调用了AOT里带有值类型泛型的函数就会报错,因此需要将LitJson.dll添加到补充Patch AOT Assemblies列表里,游戏启动后先进行AOT元数据补充,热更dll再调用值类型泛型函数就不会报错了。
AOT元数据补充dll只需要出包时打进包里就行,不要作为热更资源。
GF接入HybridCLR:
1. 下载
hybridclr_trial
示例工程并导入UGF框架
HybridCLR目前还不是以Unity插件的形式提供,需要下载hybridclr_trial示例工程提取提供的Dll生成工具和桥接函数生成工具, 以及HybridCLR Runtime接口。
2. 安装配置HybridCLR环境
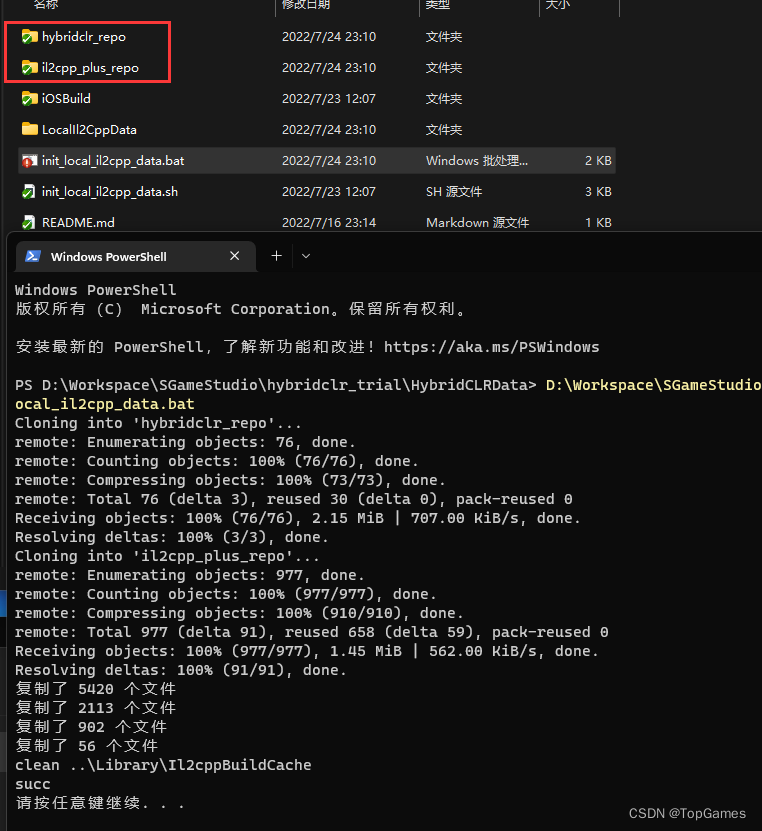
首先找到hybridclr_trial\HybridCLRData\init_local_il2cpp_data.bat, 以文本方式打开,并做如下配置。
@echo off

set IL2CPP_BRANCH=2021.3.1    //这里Unity2020.3.x填2020.3.33; Unity2021.3.x填2021.3.1
...
...
set IL2CPP_PATH=C:\Program Files\Unity\Hub\Editor\2021.3.1f1\Editor\Data\il2cpp  //填自己Unity安装目录下的il2cpp文件夹所在路径

......
目前HybridCLR支持的Unity版本为Unity2020.3系列和2021.3系列,即Unity2020.3.x使用il2cpp 2020.3.33分支,Unity2021.3.x使用il2cpp 2021.3.1分支。然后把IL2CPP_PATH配置为自己Unity安装目录下il2cpp所在路径。
对应关系:
Unity 2020.x => 使用HybridCLR il2cpp 2020.3.33分支;IL2CPP_PATH配置为Unity2020.3.33安装目录下的il2cpp
Unity 2021.x => 使用HybridCLR il2cpp 2021.3.1分支;L2CPP_PATH配置为Unity2021.3.1安装目录下的il2cpp
建议:
HybridCLR魔改了Unity 2020.3.33和Unity 2021.3.1两个版本的il2cpp,分别兼容Unity 2020.x和Unity 2021.x.
建议il2cpp和HybridCLR魔改版il2cpp的Unity版本保持一致,即如果你是用Unity2020.x开发,就把IL2CPP_PATH设置为Unity2020.3.33安装目录下的il2cpp,使用Unity2021.x开发就把
IL2CPP_PATH设置为Unity2021.3.1安装目录下的il2cpp. il2cpp版本不一致否则很有可能遇到奇怪的bug.
为了方便可以把Unity2020.3.33和Unity2021.3.1的il2cpp文件夹提取出来放到项目里。
修改完成后右键以管理员方式运行init_local_il2cpp_data.bat
,win11下先右键打开Windows PowerShell终端,然后在终端中运行。.bat会自动从git下载hybridclr和魔改后支持dll动态加载的il2cpp库,并将IL2CPP_PATH配置的Unity原生il2cpp库与魔改后的il2cpp文件合并。Unity使用魔改过的il2cpp编译也就从底层支持了C#热更新。
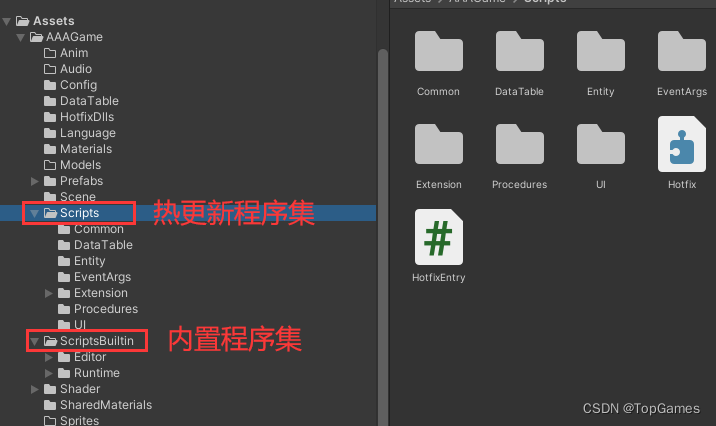
3. 程序集分离,划分为Builtin.Runtime(内置)程序集和Hotfix(热更)程序集。
为什么要分离程序集?
正如你不能自己把自己举起来,所以需要一个起到桥梁作用的内置程序负责初始化一些比较靠前的逻辑,比如启动游戏后需要先把热更新逻辑Hotfix.dll从资源服务器下载下来,并加载程序集。加载完成后通过反射调用Hotfix.dll中的入口函数切换到热更新逻辑。
程序集拆分为Builtin.Runtime和Hitfix,即内置程序集和热更新程序集两个即可,把内置程序和热更新程序分离到不同的文件夹,在两个文件夹下创建分别创建Assembly Definition. 然后将热更新程序集引用内置程序集。
4. 热更逻辑入口HotfixEntry
由于Hotfix程序集是以热更资源的形式存在,不会被编译成.so进入安装包,所以Builtin程序集不能直接调用Hotfix程序集,否则编译时会报错。这就需要一个HotfixEntry作为进入热更逻辑的入口,使用反射的方式进入Hotfix程序集。
为了尽可能把逻辑放到热更新以达到更大可控性,Builtin程序集只处理比较靠前的逻辑,比如更新资源和热更dll,初始化热更dll. 热更dll初始化完成后就进入热更程序集把所有逻辑交由热更新程序集完成。由于GF不支持动态追加Procedure,所以进入热更程序集流程时需要重新为热更新Procedure创建有限状态机,并切换到热更新流程。在Builtin程序集初始化完热更dll后通过反射调用HotfixEntry.StartHotfixLogic()进入热更新逻辑。
        //加载热更新Dll完成,进入热更逻辑
        if (loadedProgress >= totalProgress)
        {
            Log.Info("热更dll加载完成, 开始进入HotfixEntry");
            loadedProgress = -1;
#if !DISABLE_HYBRIDCLR
            var hotfixDll = GFBuiltin.Hotfix.GetHotfixClass("HotfixEntry");
            if (hotfixDll == null)
            {
                Log.Error("获取热更入口类HotfixEntry失败!");
                return;
            }
            hotfixDll.GetMethod("StartHotfixLogic").Invoke(null, new object[] { true });
#else
            HotfixEntry.StartHotfixLogic(false);
#endif
using GameFramework;
using GameFramework.Fsm;
using GameFramework.Procedure;
using UnityGameFramework.Runtime;
/// <summary>
/// 热更逻辑入口
/// </summary>
public class HotfixEntry
{
public static void StartHotfixLogic(bool enableHotfix)
{
Log.Info("Hotfix Enable:{0}", enableHotfix);
GFBuiltin.Fsm.DestroyFsm<IProcedureManager>();
var fsmManager = GameFrameworkEntry.GetModule<IFsmManager>();
var procManager = GameFrameworkEntry.GetModule<IProcedureManager>();
//手动把热更新程序集的流程添加进来
ProcedureBase[] procedures = new ProcedureBase[]
{
new PreloadProcedure(),
new ChangeSceneProcedure(),
new MenuProcedure(),
new GameProcedure(),
new GameOverProcedure()
};
procManager.Initialize(fsmManager, procedures);
procManager.StartProcedure<PreloadProcedure>();//默认启动热更新程序集的预加载流程
}
}
5. 打包流程及注意事项
0.通过HybridCLR内置工具生成桥接函数(MethodBridge)、生成dll(CompileDll):

1. HybridCLR必须要先Build工程,目的是Build时生成代码裁剪后的dll以供HybridCLR进行AOT元数据补充。
由于il2cpp编译后泛型函数的原始函数体元数据会丢失,无法创建出AOT泛型函数的实例就会导致报错。AOT有泛型共享机制,利用这一特性,我们只需要在内置程序集中实例化的类中添加泛型函数的调用,该泛型函数的元数据就会建立并共享。
HybridCLR已经默认在RefTypes.cs中补充了常用的泛型元数据:
(最新版HybridCLR做了优化,已经没了)
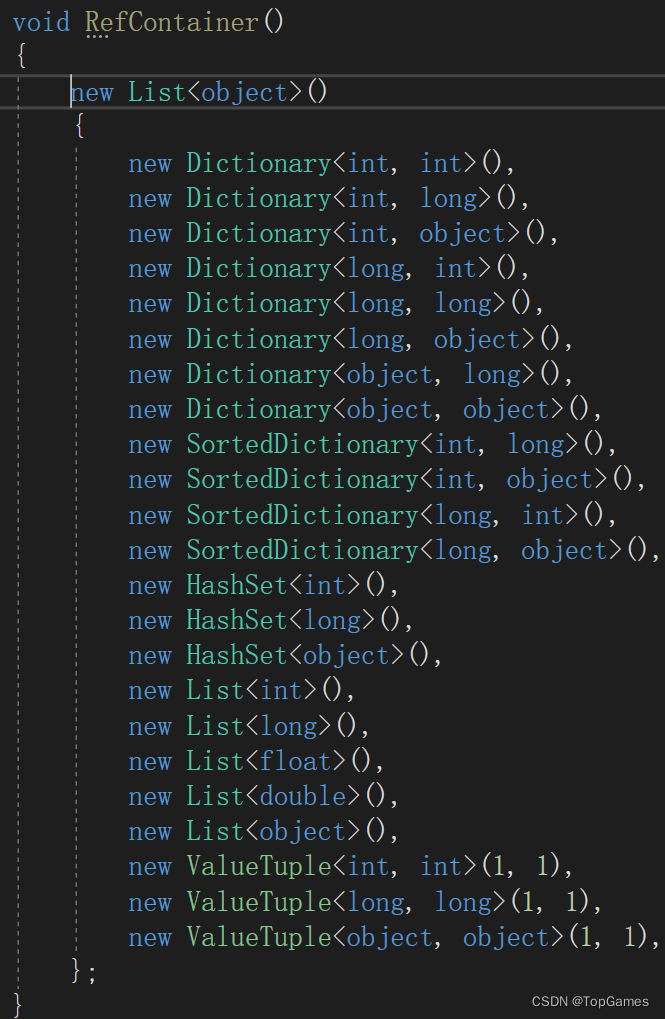
泛型函数在开发中使用非常频繁,自己写的泛型值类型函数必须提前注册到AOT以泛型共享, 如下示例,只需在会实例化的类中添加这些泛型函数调用,RefBuiltinAOT()和RefLitJson()无需有任何地方调用。泛型元数据问题也是目前HybridCLR最大的痛点,HybridCLR官方RoadMap不久后就会出一个自动扫描添加泛型函数的工具以解决这一痛点。
(官方已经解决了这个痛点)
HybridCLR还支持通过dll自动补充元数据, 例如, 我项目里内置了LitJson插件,可以通过HybridCLR.RuntimeApi.LoadMetadataForAOTAssembly() 从LitJson.dll自动补充AOT元数据
#region 提前把热更新使用到的值类型泛型注册到AOT,否则报错
    /// <summary>
    /// 注册元数据到AOT
    /// </summary>
    void RefBuiltinAOT()
    {
        var param = RefParams.Acquire();
        param.GetValue<bool>(default, default);
        param.GetValue<int>(default, default);
        param.GetValue<float>(default, default);
        param.GetValue<double>(default, default);
        param.GetValue<Vector2>(default, default);
        param.GetValue<Vector3>(default, default);
        param.GetValue<Vector4>(default, default);
        param.GetValue<Vector2Int>(default, default);
        param.GetValue<Vector3Int>(default, default);
        param.GetValue<Quaternion>(default, default);
        param.GetValue<Rect>(default, default);
        param.GetValue<Bounds>(default, default);
        param.GetValue<Color>(default, default);
        param.GetValue<Color32>(default, default);


        param.TryGetValue<bool>(default, out bool _);
        param.TryGetValue<int>(default, out int _);
        param.TryGetValue<float>(default, out float _);
        param.TryGetValue<double>(default, out double _);
        param.TryGetValue<Vector2>(default, out Vector2 _);
        param.TryGetValue<Vector3>(default, out Vector3 _);
        param.TryGetValue<Vector4>(default, out Vector4 _);
        param.TryGetValue<Vector2Int>(default, out Vector2Int _);
        param.TryGetValue<Vector3Int>(default, out Vector3Int _);
        param.TryGetValue<Quaternion>(default, out Quaternion _);
        param.TryGetValue<Rect>(default, out Rect _);
        param.TryGetValue<Bounds>(default, out Bounds _);
        param.TryGetValue<Color>(default, out Color _);
        param.TryGetValue<Color32>(default, out Color32 _);
    }
    void RefLitJson()
    {
        LitJson.JsonMapper.RegisterExporter<Vector2>(default);
        LitJson.JsonMapper.RegisterExporter<Vector3>(default);
        LitJson.JsonMapper.RegisterExporter<Vector2Int>(default);
        LitJson.JsonMapper.RegisterExporter<Vector3Int>(default);
        LitJson.JsonMapper.RegisterExporter<Vector4>(default);
        LitJson.JsonMapper.RegisterExporter<Quaternion>(default);
        LitJson.JsonMapper.RegisterExporter<Color>(default);
        LitJson.JsonMapper.RegisterExporter<Color32>(default);
        LitJson.JsonMapper.RegisterExporter<Bounds>(default);
        LitJson.JsonMapper.RegisterExporter<Rect>(default);
    }
    #endregion
2. 桥接函数丢失
如果运行时遇到报错ExecutionEngineException: GetManaged2NativeMethodPointer not support. signature:xxx(签名),需要把手动补充到HybridCLR\Editor\HybridCLR\Generators\GeneratorConfig.cs中,这也是HybridCLR最大的痛点之一,好在官方刚刚完善了桥接函数的问题,后续还会完善桥接函数生成工具以彻底消除此问题。
/// <summary>
        /// 如果提示缺失桥接函数,将提示缺失的签名加入到下列列表是简单的做法。
        /// 这里添加64位App缺失的桥接函数签名
        /// </summary>
        /// <returns></returns>
        public static List<string> PrepareCustomMethodSignatures64()
        {
            return new List<string>
            {
                "vi8i8",
                "i4i8i8i4i4i8i8",
                "i8i8S12",
                "S12i8S12",
                "S12i8S12S12",
                "i16i8i16i16",
            };
        }

        /// <summary>
        /// 如果提示缺失桥接函数,将提示缺失的签名加入到下列列表是简单的做法。
        /// 这里添加32位App缺失的桥接函数签名
        /// </summary>
        /// <returns></returns>
        public static List<string> PrepareCustomMethodSignatures32()
        {
            return new List<string>
            {
                "vi4i4",
                "S12i4S12S12",
            };
        }
3. 把Build后生成的Strip(裁剪)过的dll打包成AssetBundle
Build后HybridCLR会将Strip后的dll复制到项目根目录的HybridCLRData\AssembliesPostIl2CppStrip下。
可以写个工具监听Build进程,Build完成后自动把Strip后的dll复制到Assets指定目录,并修改为Unity支持的资源扩展名以供打包AB:
#if UNITY_EDITOR
using System.Collections;
using System.Collections.Generic;
using UnityEngine;
using UnityEditor;
using UnityEditor.Build;
using UnityEditor.Build.Reporting;
using HybridCLR;
using System.IO;
using GameFramework;

public class BuildAppListener : IPostprocessBuildWithReport, IPreprocessBuildWithReport, IPostBuildPlayerScriptDLLs
{
    public int callbackOrder => 100;

    public void OnPostBuildPlayerScriptDLLs(BuildReport report)
    {
        //Debug.LogFormat("OnPostBuildPlayerScriptDLLs:{0}", report.name);

    }

    public void OnPostprocessBuild(BuildReport report)
    {
        Debug.Log("OnPostprocessBuild:");
        BuildTarget target = report.summary.platform;
        //CompileDllHelper.CompileDll(target);
        var hotfixDllDir = UtilityExt.Path.GetCombinePath(Application.dataPath, ConstBuiltin.HOT_FIX_DLL_DIR);
        try
        {
            if (!Directory.Exists(hotfixDllDir))
            {
                Directory.CreateDirectory(hotfixDllDir);
            }
            else
            {
                var dllFils = Directory.GetFiles(hotfixDllDir);
                for (int i = dllFils.Length - 1; i >= 0; i--)
                {
                    File.Delete(dllFils[i]);
                }
            }
            CopyHotfixDllTo(target, hotfixDllDir);
        }
        catch (System.Exception e)
        {
            Debug.LogErrorFormat("生成热更新dll文件失败:{0}", e.Message);
            throw;
        }

    }

    public void OnPreprocessBuild(BuildReport report)
    {

        Debug.Log("OnPreprocessBuild:");
    }
    public static void CopyHotfixDllTo(BuildTarget target, string desDir, bool copyAotMeta = true)
    {
        string hotfixDllSrcDir = BuildConfig.GetHotFixDllsOutputDirByTarget(target);
        foreach (var dll in BuildConfig.AllHotUpdateDllNames)
        {
            string dllPath = UtilityExt.Path.GetCombinePath(hotfixDllSrcDir, dll);
            if (File.Exists(dllPath))
            {
                string dllBytesPath = UtilityExt.Path.GetCombinePath(desDir, Utility.Text.Format("{0}.bytes", dll));
                File.Copy(dllPath, dllBytesPath, true);
            }
        }
        if (copyAotMeta)
        {
            string aotDllDir = BuildConfig.GetAssembliesPostIl2CppStripDir(target);
            foreach (var dll in BuildConfig.AOTMetaDlls)
            {
                string dllPath = UtilityExt.Path.GetCombinePath(aotDllDir, dll);
                if (!File.Exists(dllPath))
                {
                    Debug.LogError($"ab中添加AOT补充元数据dll:{dllPath} 时发生错误,文件不存在。裁剪后的AOT dll在BuildPlayer时才能生成,因此需要你先构建一次游戏App后再打包。");
                    continue;
                }
                string dllBytesPath = UtilityExt.Path.GetCombinePath(desDir, Utility.Text.Format("{0}.bytes", dll));
                File.Copy(dllPath, dllBytesPath, true);
            }
        }
        AssetDatabase.Refresh();
    }
}
#endif
3. 把热更dll添加到GF的AB打包工具并打包AB
4. Build项目并测试。
GF_HybridCLR
https://github.com/sunsvip/GF_HybridCLR
GF_HybridCLR是已经集成好的GameFramework + HybridCLR开发框架,有着一整套完善的工作流。包含对GameFramework的扩展,数据表生成工具、代码生成工具、热更新工作流,AssetBundle加密解密。并且针对HybridCLR增加了傻瓜式的安装、更新工具,支持一键开关HybridCLR热更新。
使用方法:
1. 首先要确保安装了git环境:
Git下载
2. 下载GF_HybridCLR工程,点击Unity菜单栏HybridCLR->Setup 自动配置HybridCLR环境;
3. 点击HybridCLR->Update一键更新HybridCLR到最新版本
2022.8.21更新:
官方也新增了一键安装HybridCLR功能,我直接移植过来了。另外为了使用方便,提取了Unity 2021.3.1版本的il2cpp放在项目里,增加了一键从il2cpp压缩文件安装HybridCLR的功能。
使用方法如图:

工具默认会根据当前Unity版本去查找匹配的HybridCLR il2cpp版本(2020.3.3或2021.3.1),如果你没有安装这两个版本就会使用当前Unity安装目录下的il2cpp, 但是il2cpp版本不匹配很有可能出现兼容问题。
所以我以压缩包的形式内置了Unity 2021.3.1版本的il2cpp,点击Use Buitin il2cpp程序会自动解压并使用,然后点击install安装即可。(注,如果用的是Unity 2020.x,需要自行提取Unity 2020.3.33版本的il2cpp,压缩为il2cpp_Unity2020_3_33.zip放到项目的HybridCLRData目录下)
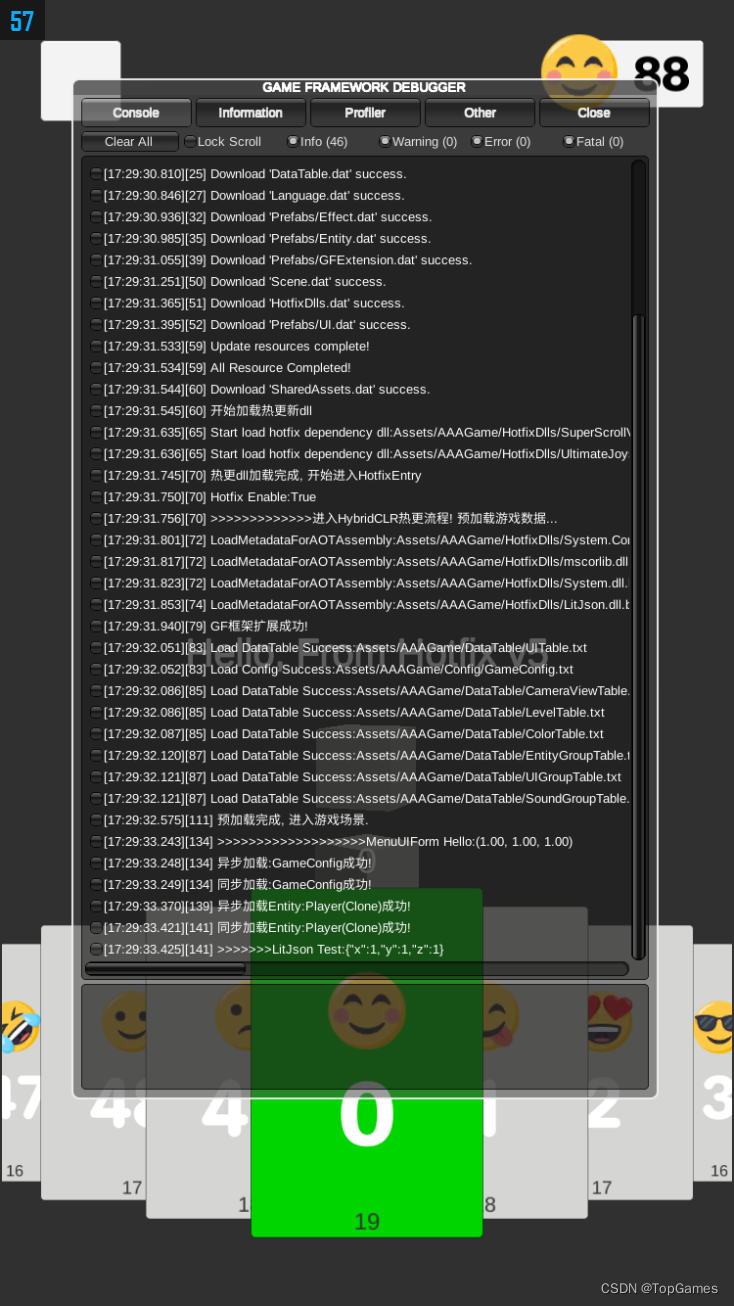
手机端热更实测: