1、archlinux的基本安装
1.1、停止reflector服务 禁止自动更新服务器列表
systemctl stop reflector.service
1.2、检查电脑是否支持UEFI引导模式
ls /sys/firmware/efi/efivars
# 提示:如果没有报错就是支持UEFI
1.3、连接网络
1.3.1、有线连接
直接插上网线就可以自动联网了
1.3.1、无线网络(wifi)
#是否启用了网络接口
ip link
#执行iwctl命令,进入交互式命令行
iwctl
#列出设备名,比如无线网卡看到叫 wlan0
device list
#用wlan0网卡扫描网络
station wlan0 scan
#列出网络
station wlan0 get-networks
#连接网络名字 输入密码
station wlan0 connect 无线网名字
#成功后退出
exit或者quit
连接成功后ping一下百度是否有网
ping baidu.com
1.4、同步时间
#同步网络时间
timedatectl set-ntp true
#提示:检查是否成功 看到(system clock synchronized :yes)这一句就是成功了
timedatectl status
.
1.5、修改软件源
- 打中国的源放在头部
vim /etc/pacman.d/mirrorlist
-
10 dd 剪切10行
-
p 粘贴
1.6、分区
1.6.1、fdisk分区
#查看磁盘分区
lsblk
#分区
fdisk  /dev/sda
1.6.2、cfdisk分区
cfdisk /dev/sda
一般分区都有跟分区(/)、交换分区(swap)、引导分区(boot)
1.6.3、格式化分区
EFI分区
	mkfs.vfat /dev/sda1
	或者mkfs.fat -F32 /dev/sda1
swap分区
	mkswap /dev/sda2
	swapon /dev/sda2  请用swap分区
普通分区
	mkfs.ext4 /dev/sda3
1.7、挂载分区
- 根据自己的分区情况进行挂载分区(尽量不要把usr目录挂载出去,如果挂载出去不能开机(网上也有教程是可以挂载的,我没有试过)),一般挂载第三方应用安装目录(opt)、临时文件目录(tmp)
#挂载
#必须先挂载根目录 才能挂载其他目录
mount /dev/sda3 /mnt
mkdir /mnt/boot
mount /dev/sda1 /mnt/boot
1.8、安装
#往/mnt目录里安装系统
#其中最基础的四个包是base base-devel linux linux-firmware
#linux-lts (lts:稳定版)
# 如果内核安装了稳定版,那么独显也要是稳定版的,要不然就会发生问题(我也不知道什么问题)
pacstrap /mnt base base-devel linux linux-firmware
[外链图片转存失败,源站可能有防盗链机制,建议将图片保存下来直接上传(img-DofAIe04-1664722086497)(/home/tnt/Desktop/assets/image-20220924005039396.png)]
1.9、配置系统
1.9.1、Fstab
# 生成 fstab文件 (用 `-U` 或 `-L` 选项设置 UUID 或卷标)
genfstab -U /mnt >> /mnt/etc/fstab
强烈建议
在执行完以上命令后,检查一下生成的
/mnt/etc/fstab
文件是否正确。
1.9.2、Chroot
# chroot到新安装的系统
arch-chroot /mnt
1.9.3、设置时区
# ln -sf /usr/share/zoneinfo/Region(地区名)/City(城市名) /etc/localtime
# 设置上海时区
ln -sf /usr/share/zoneinfo/Asia/Shanghai /etc/localtime
hwclock --systohc
1.9.4、本地化
程序和库如果需要本地化文本,都依赖区域设置,后者明确规定了地域、货币、时区日期的格式、字符排列方式和其他本地化标准。
需在这两个文件设置:
locale.gen
与
locale.conf
。
编辑
/etc/locale.gen
,然后取消掉
en_US.UTF-8 UTF-8
和其他需要的 区域设置前的注释#。
接着执行
locale-gen
以生成 locale 信息:
# 更新locale
locale-gen
然后创建 locale.conf 文件,并编辑设定 LANG 变量,比如:
vim /etc/locale.conf
LANG=en_US.UTF-8
警告:
不推荐在此设置任何中文 locale,会导致 tty 乱码。
例子:
en_US.UTF-8 UTF-8
zh_CN.UTF-8 UTF-8
zh_SG.UTF-8 UTF-8
1.9.5、网络配置
创建hostname文件:
vim /etc/hostname
myhostname(主机名)
创建hosts文件:
vim /etc/hosts
127.0.0.1   localhost
::1         localhost
127.0.1.1   arch.localhost	arch
1.9.6、Root 密码
# passwd
1.10、安装引导程序
1.10.1、安装 cpu微码和引导软件
pacman -S intel-ucode  grub efibootmgr os-prober
#如果是intel的cpu 则输入amd-ucode
#os-prober查找已安装的操作系统 推荐实体机上安装
1.10.2、安装grub引导
#安装grub引导
grub-install --target=x86_64-efi --efi-directory=/boot --bootloader-id=GRUB

说明

grub-install *安装grub*

--target=x86_64-efi      *目标架构x86架构64位 efi启动方式  若不确定使用uname -a 可以查看*

--efi-directory=/boot      *就是我sda1挂载的/boot位置*

--bootloader-id=GRUB     *这里的GRUB名字可以自行更改 甚至这一段都可以不用写*
-
提示
:接下来编辑/etc/default/grub 文件,去掉GRUB_CMDLINE_LINUX_DEFAULT一行中最后的 quiet 参数,同时把 log level 的数值从 3 改成 5。这样是为了后续如果出现系统错误,方便排错。同时在同一行加入 nowatchdog 参数,这可以显著提高开关机速度。
1.10.3、生成grub
mkdir /boot/grub
# 生成grub
grub-mkconfig -o /boot/grub/grub.cfg
1.11、安装软件
# 连接网络相关的包
dhcpcd iwd networkmanager
# 编辑器
vim
#
sudo
# 命令补全工具
bash-completion
# 网络工具
iproute2
# 查看命令的用法

#
zsh
#
fish
#查看系统信息命令
neofetch


#安装
pacman -S dhcpcd iwd networkmanager vim sudo neofetch man iproute2

#开机启动 网络管理
systemctl enable NetworkManager
1.12、退出
#输入 exit 或按 Ctrl+d 退出 chroot 环境。
exit
#卸载被挂载的分区
umount -R /mnt
#重启
reboot
2、安装后的配置
2.1、配置中国源和开启32位软件包
vim /etc/pacman.d/mirrorlist
# 在头部添加阿里源
Server = http://mirrors.aliyun.com/archlinux/$repo/os/$arch
# 中科大源
Server = https://mirrors.ustc.edu.cn/archlinux/$repo/os/$arch
# 清华源
Server = https://mirrors.tuna.tsinghua.edu.cn/archlinux/$repo/os/$arch
# 华为源
Server = https://repo.huaweicloud.com/archlinux/$repo/os/$arch
# 163源 (i686 和 x86_64)
Server = http://mirrors.163.com/archlinux/$repo/os/i686

#开启32位软件包
vim /etc/pacman.conf
#取消掉 # 号
[multilib]
Include = /etc/pacman.d/mirrorlist
#在最后面添加
[archlinuxcn]
Server = https://mirrors.ustc.edu.cn/archlinuxcn/$archs
Server = https://mirrors.tuna.tsinghua.edu.cn/archlinuxcn/$arch
Server = http://mirrors.163.com/archlinux-cn/$arch
Server = https://mirrors.aliyun.com/archlinuxcn/$arch
# 更新软件包缓存
pacman -Syy
# 安装GPG key
pacman -S archlinuxcn-keyring
2.2、添加一个普通用户
#新建用户名arch 可自行更改用户名
useradd -m -G wheel -s /bin/bash arch

#设置arch用户名的密码
passwd arch

#编辑arch用户的权限
EDITOR=vim visudo

找到# %wheel ALL=(ALL:ALL)ALL 并把 # 号去掉
2.3、安装软件源(AUR)
# 可以选择两个都安装,也可以只安装一个
pacman -S yay paru
2.4、开机启动numlock
首先创造在相关 TTY 上设置 numlock 的脚本:
vim /usr/local/bin/numlock
#!/bin/bash

for tty in /dev/tty{1..6}
do
    /usr/bin/setleds -D +num < "$tty";
done
创建好文件后,修改为 可执行(chmod +x /usr/local/bin/numlock),这样才能运行脚本。
然后创建并 设置开机自动启动服务:
vim /etc/systemd/system/numlock.service
[Unit]
Description=numlock

[Service]
ExecStart=/usr/local/bin/numlock
StandardInput=tty
RemainAfterExit=yes

[Install]
WantedBy=multi-user.target

# 设置开机自动启动
systemctl enable numlock.service
dwm
:如果你使用startx来启动X window会话,只需安装
numlockx
软件包并将其加入到
~/.xinitrc
中
exec
之前:
#!/bin/sh
#
# ~/.xinitrc
#
# Executed by startx (run your window manager from here)
#

numlockx &
exec your_window_manager(你使用的窗口管理器)
2.5、安装字体
# 英文字体
pacman -S ttf-dejavu
# 文泉驿正黑矢量字体
pacman -S wqy-zenhei
#
pacman -S wqy-microhei
# Emoji 字体
pacman -S noto-fonts-emoji
2.6、安装中文输入法
# fcitx5-im : 基础包和模块
# fcitx5-chinese-addons :中文输入法引擎
#
# 输入法模块 1、qt程序:fcitx5-qt 2、gtk程序 : fcitx5-gtk
pacman -S fcitx5-im  fcitx5-chinese-addons
# 配置
vim /etc/environment
GTK_IM_MODULE=fcitx
QT_IM_MODULE=fcitx
XMODIFIERS=@im=fcitx
SDL_IM_MODULE=fcitx
GLFW_IM_MODULE=ibus

# 配置完成之后重启电脑

# 安装词库
# fcitx5-pinyin-zhwiki : 中文维基百科创建的词库
pacman -S fcitx5-pinyin-zhwiki fcitx5-pinyin-moegirl
2.7、安装工具
# udisk2 udiskie : 自动挂载U盘修改
# ntfs-3g : 读取ntfs格式磁盘
# dolphin : 文件管理器
pacman -S udisks2 udiskie ntfs-3g  dolphin

# 开机自启自动挂载U盘
systemctl enable udisks2
3、dwm(窗口管理器)的安装
3.1、安装x窗口管理系统
# xorg 包含 xorg-server 和 xorg-apps
pacman -S xorg

# 用来启动xorg
pacman -S xorg-xinit

# 安装完xorg-xinit之后把配置文件复制到普通用户目录下
cp /etc/X11/xinit/xinitrc ~/.xinitrc
# 启动
startx
3.2、安装dwm全家桶
3.2.1、安装dwm
# 下载dwm
git clone https://git.suckless.org/dwm
cd dwm
# 编译
make
# 安装
make install
3.2.2、安装st
# 下载st (alacritty 终端)
git clone https://git.suckless.org/st
cd st
# 编译
make
# 安装
make install
3.2.3、安装dmenu
# 下载dmenu (rofi)
git clone https://git.suckless.org/dmenu
cd qmenu
# 编译
make
# 先清除在安装
make clean install
3.2.4、安装slstaus
# 下载安装 slstatus
git clone https://git.suckless.org/slstatus
cd slstatus
make
make clean install

# 在 ~/.xinitrc 中加入 exec slstatus
3.3、启动
3.3.1、设置中文界面
# 在 ~/.xintrx 中加入
# 注意 : 一定要加在 exec dwm 前
export LANG=zh_CN.UTF-8
export LANGUAGE=zh_CN:en_US
3.3.2、启动dwm
在
~/.xinitrc
文件末尾添加
exec dwm
,并保存退出,使用
startx
来启动窗口管理器。
3.3.2、设置分辨率
# 查看分辨率
xrandr -q

# 设置分辨率
# Virtual-1  : 显示器名称
# 1920x1080  : 分辨率
# 144.00 : 赫兹
xrandr --output Virtual-1 --mode 1920x1080 --rate 144.00
注意:如果使用
xrandr -q
查看的结果中没有符合自己显示的分辨率就需要自己创建一个
# 创建一个分辨率
cvt 1920 1080 144
xrandr --newmode ....
# 添加到显示器上
xrandr --addmode 显示器名称 "1920x1080_144.00"
# 修改分辨率
xrandr --output 显示器名称 --mode '分辨率'

4、dwm的美化
4.1、修改关键的键为win键
cd dwm
vim config.h
#修改
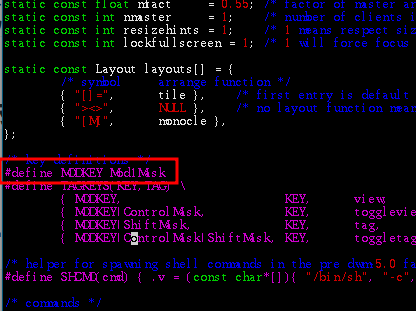
#define MDDKEY MOD4Msk
4.2、修改st的字体大小
cd st
vim config.h
#修改

4.3、设置背景图片
# feh 图形工具
# archlinux-wallpaper 壁纸
pacman -S feh archlinux-wallpaper
# 设置壁纸
# --bg-fill : 全屏显示
# --randomize :随即显示
cd /usr/share/backgrounds/archlinux
feh --bg-fill --randomize /usr/share/backgrounds/archlinux/*
# 设置开机自启
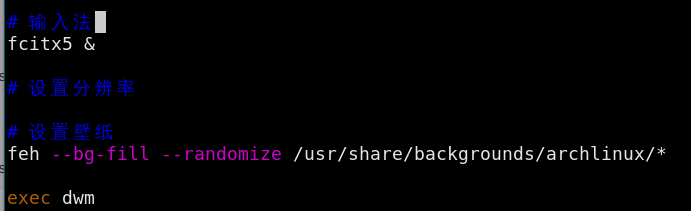
vim ~/.xinitrc
feh --bg-fill --randomize /usr/share/backgrounds/archlinux/*
# 刷新背景图片
while feh --bg-fill --randomize /usr/share/backgrounds/archlinux/*
do
sleep 60 # 睡多少秒
done &
4.4、修改tab显示图标
4.4.1、设置中英文字体大小相同
# 安装矢量图标
pacman -S ttf-nerd-fonts-symbols-2048-em
# 进入dwm目录下编写 config.h 文件
cd dwm
vim config.h
# 查看文泉驿字体
fc-list |grep WenQuanYi
# 在config.h中添加配置
# antialias autohint : 抗锯齿
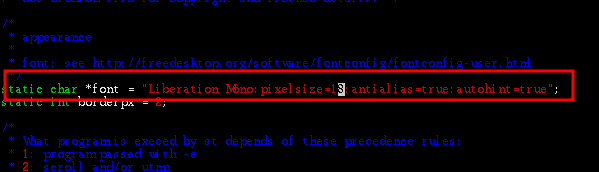
“WenQuanYi Micro Hei:size=10:type=Regular:antialias=true:autohint=true”
# 查看矢量图标
fc-list |grep Nerd
“Symbols Nerd Font:pixelsize=14:type=2048-em:antialias=true:autohint=true”


4.4.2、设置tag图标
# 图标网址
https://www.nerdfonts.com/cheat-sheet

# terminal  终端
# google  浏览器
# java   java编程
# markdown 笔记
# folder  文件管理
# office 文档
# music  音乐
# steam  游戏
# cube   虚拟机

# video  录屏


# 设置完成后重新编译安装
make && sudo make clean install


4.5、设置状态栏
使用音量要安装alsa-utils包
:
pacman -S alsa-utils
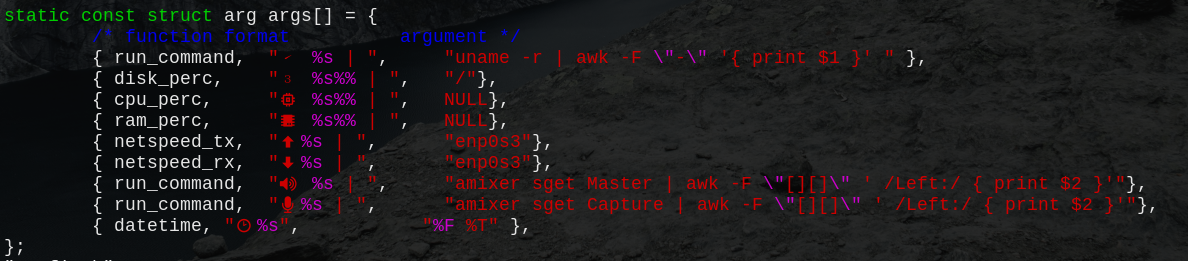
# ==============图标==================#
# 启动版本号
archlinux
# 硬盘
disk
# cpu
memory
# 内存
nf-mdi-chip
nf-fa-microchip
# 上传网速
nf-mdi-arrow_up_bold
# 下载网速
nf-mdi-arrow_down_bold
# 音量
volume
# 麦克风
microphone
# 时间
time
#=====================================#
#==================命令===================#
如图片
4.6、设置快捷键
4.6.1、设置音量快捷键
# 切换音量状态(静音、非静音)
amixer sset Master toggle

# 最小步长是3,设置5一下都是以3个音量增加或减少
# 减少音量
amixer sset Master 5%- unmute
# 增大音量
amixer sset Master 5%+ unmute
# 进入 dwm 的目录
cd dwm
# 创建存放脚本的目录
mkdir script
# 进入 script 目录
cd script
# 编写加音量的脚本
vim volup.sh
#! /bin/bash
amixer sset Master 3%+ unmute
# 编写减音量的脚本
vim voldown.sh
#! /bin/bash
amixer sset Master 3%- unmute
# 编写切换音量状态的脚本
vim voltoggle.sh
#! /bin/bash
amixer sset Master toggle

# 编写完脚本之后给脚本可执行的权限
chmod +x volup.sh voldown.sh voltoggle.sh

# 注意 : 把 script 目录归到普通用户组
5、dwm打补丁
- 配置git
# 下载 git ,推荐使用git打补丁,可以进行回退配置
# kdiff3 : 对比 git 冲突的图形化页面
pacman -S git kdiff3
# 配置用户名和邮箱
git config --global user.name roukaixin
git config --global user.email "a3427173515@163.com"
# 设置全局查看分支冲突软件
git config --global merge.tool kdiff3
- 下载补丁
- git 操作
# 查看当前在那个分支
git branch
# 创建一个分支 config : 分支名
git branch config
# 切换分支
git checkout config
# 添加文件
git add 文件名
# commit
git commit -m 描述信息
# 融合分支 config :分支ming 123:描述信息
git merge config -m 123

# 清除到原始的状态
make clean && rm -rf config.h && git reset --hard origin/master

-
# 打补丁的命令 # -F 0 取消模糊匹配 patch -F 0 补丁名字 # 打补丁失败的是生成一个 .dej 为结尾的文件,要自己手动去决定 vim .rej # 打开一个vim的tab栏 :tabnew # 打开(文件) :e 文件名- 在.rej 文件里,前端有 + 号的就是表示要加进去,- 号就表示删除掉
- 注意:函数的函数名不要删除掉
5.1、picom合成器
# 安装 picom
pacman -S picom
# picom-ibhagwan-git(毛玻璃效果)
# 虚拟机下要是 picom 生效要进行配置
# ~/.config/picom/picom.conf
vim /etc/xdg/picom.conf
# 注释掉 vsync= true


vim ~/.xinitrc
exec picom -CGb &
注意
: 基本都是把全局的配置文件负责到当前用户下的
.config/picom
目录下。命令:
cp /etc/xdg/picom.conf ~/.config/picom/picom.conf
-
picom.conf
配置文件 -
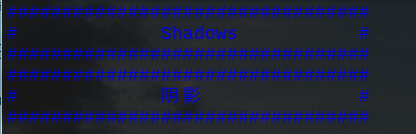
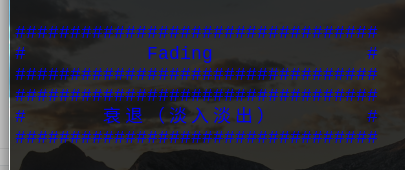
#################################
#         Shadows( 阴影 )      #
#################################

# Enabled client-side shadows on windows. Note desktop windows
# (windows with '_NET_WM_WINDOW_TYPE_DESKTOP') never get shadow,
# unless explicitly requested using the wintypes option.
#
# shadow = false
shadow = true;

# The blur radius for shadows, in pixels. (defaults to 12)
# shadow-radius = 12
shadow-radius = 7;

# The opacity of shadows. (0.0 - 1.0, defaults to 0.75)
# shadow-opacity = .75

# The left offset for shadows, in pixels. (defaults to -15)
# shadow-offset-x = -15
shadow-offset-x = -7;

# The top offset for shadows, in pixels. (defaults to -15)
# shadow-offset-y = -15
shadow-offset-y = -7;

# Red color value of shadow (0.0 - 1.0, defaults to 0).
# shadow-red = 0

# Green color value of shadow (0.0 - 1.0, defaults to 0).
# shadow-green = 0

# Blue color value of shadow (0.0 - 1.0, defaults to 0).
# shadow-blue = 0

# Hex string color value of shadow (#000000 - #FFFFFF, defaults to #000000). This option will override options set shadow-(red/green/blue)
# shadow-color = "#000000"

# Specify a list of conditions of windows that should have no shadow.
#
# examples:
#   shadow-exclude = "n:e:Notification";
#
# shadow-exclude = []
shadow-exclude = [
  "name = 'Notification'",
  "class_g = 'Conky'",
  "class_g ?= 'Notify-osd'",
  "class_g = 'Cairo-clock'",
  "_GTK_FRAME_EXTENTS@:c"
];

# Specify a list of conditions of windows that should have no shadow painted over, such as a dock window.
# clip-shadow-above = []

# Specify a X geometry that describes the region in which shadow should not
# be painted in, such as a dock window region. Use
#    shadow-exclude-reg = "x10+0+0"
# for example, if the 10 pixels on the bottom of the screen should not have shadows painted on.
#
# shadow-exclude-reg = ""

# Crop shadow of a window fully on a particular Xinerama screen to the screen.
# xinerama-shadow-crop = false


#################################
#    Fading(衰退(淡入淡出))    #
#################################


# Fade windows in/out when opening/closing and when opacity changes,
#  unless no-fading-openclose is used.
# fading = false
fading = true;

# Opacity change between steps while fading in. (0.01 - 1.0, defaults to 0.028)
# fade-in-step = 0.028
fade-in-step = 0.03;

# Opacity change between steps while fading out. (0.01 - 1.0, defaults to 0.03)
# fade-out-step = 0.03
fade-out-step = 0.03;

# The time between steps in fade step, in milliseconds. (> 0, defaults to 10)
fade-delta = 2

# Specify a list of conditions of windows that should not be faded.
# fade-exclude = []

# Do not fade on window open/close.
# no-fading-openclose = false

# Do not fade destroyed ARGB windows with WM frame. Workaround of bugs in Openbox, Fluxbox, etc.
# no-fading-destroyed-argb = false


###########################################
#Transparency(透明度) / Opacity(不透明度) #
###########################################


# Opacity of inactive windows. (0.1 - 1.0, defaults to 1.0)
# inactive-opacity = 1
inactive-opacity = 0.95;

# Opacity of window titlebars and borders. (0.1 - 1.0, disabled by default)
# frame-opacity = 1.0
frame-opacity = 0.9;

# Let inactive opacity set by -i override the '_NET_WM_WINDOW_OPACITY' values of windows.
# inactive-opacity-override = true
inactive-opacity-override = false;

# Default opacity for active windows. (0.0 - 1.0, defaults to 1.0)
# active-opacity = 1.0

# Dim inactive windows. (0.0 - 1.0, defaults to 0.0)
# inactive-dim = 0.0

# Specify a list of conditions of windows that should never be considered focused.
# focus-exclude = []
focus-exclude = [ "class_g = 'Cairo-clock'" ];

# Use fixed inactive dim value, instead of adjusting according to window opacity.
# inactive-dim-fixed = 1.0

# Specify a list of opacity rules, in the format `PERCENT:PATTERN`,
# like `50:name *= "Firefox"`. picom-trans is recommended over this.
# Note we don't make any guarantee about possible conflicts with other
# programs that set '_NET_WM_WINDOW_OPACITY' on frame or client windows.
# example:
#    opacity-rule = [ "80:class_g = 'URxvt'" ];
#
# opacity-rule = []


#################################
#          Corners (圆角)      #
#################################

# Sets the radius of rounded window corners. When > 0, the compositor will
# round the corners of windows. Does not interact well with
# `transparent-clipping`.
corner-radius = 9;

# Exclude conditions for rounded corners.
# 派出不使用圆角的程序 例如:dwm、输入法(fcitx)
rounded-corners-exclude = [
  "class_g *= 'dwm'",
  "class_g *= 'fcitx'",
  "window_type = 'dock'",
  "window_type = 'desktop'"
];


#################################
# Background-Blurring(背景模糊 )#
#################################


# Parameters for background blurring, see the *BLUR* section for more information.
# blur-method =
# blur-size = 12
#
# blur-deviation = false
#
# blur-strength = 5

# Blur background of semi-transparent / ARGB windows.
# Bad in performance, with driver-dependent behavior.
# The name of the switch may change without prior notifications.
#
# blur-background = false

# Blur background of windows when the window frame is not opaque.
# Implies:
#    blur-background
# Bad in performance, with driver-dependent behavior. The name may change.
#
# blur-background-frame = false


# Use fixed blur strength rather than adjusting according to window opacity.
# blur-background-fixed = false


# Specify the blur convolution kernel, with the following format:
# example:
#   blur-kern = "5,5,1,1,1,1,1,1,1,1,1,1,1,1,1,1,1,1,1,1,1,1,1,1,1,1";
#
# blur-kern = ""
blur-kern = "3x3box";


# Exclude conditions for background blur.
# blur-background-exclude = []
blur-background-exclude = [
  "window_type = 'dock'",
  "window_type = 'desktop'",
  "_GTK_FRAME_EXTENTS@:c"
];

#################################
#   General Settings(基本设置)  #
#################################

# Daemonize process. Fork to background after initialization. Causes issues with certain (badly-written) drivers.
# daemon = false

# Specify the backend to use: `xrender`, `glx`, or `xr_glx_hybrid`.
# `xrender` is the default one.
#
#
backend = "glx";
#backend = "xrender";

# Enable/disable VSync.
# vsync = false
# vsync = true;

# Enable remote control via D-Bus. See the *D-BUS API* section below for more details.
# dbus = false

# Try to detect WM windows (a non-override-redirect window with no
# child that has 'WM_STATE') and mark them as active.
#
# mark-wmwin-focused = false
mark-wmwin-focused = true;

# Mark override-redirect windows that doesn't have a child window with 'WM_STATE' focused.
# mark-ovredir-focused = false
mark-ovredir-focused = true;

# Try to detect windows with rounded corners and don't consider them
# shaped windows. The accuracy is not very high, unfortunately.
#
# detect-rounded-corners = false
detect-rounded-corners = true;

# Detect '_NET_WM_WINDOW_OPACITY' on client windows, useful for window managers
# not passing '_NET_WM_WINDOW_OPACITY' of client windows to frame windows.
#
# detect-client-opacity = false
detect-client-opacity = true;

# Use EWMH '_NET_ACTIVE_WINDOW' to determine currently focused window,
# rather than listening to 'FocusIn'/'FocusOut' event. Might have more accuracy,
# provided that the WM supports it.
#
# use-ewmh-active-win = false

# Unredirect all windows if a full-screen opaque window is detected,
# to maximize performance for full-screen windows. Known to cause flickering
# when redirecting/unredirecting windows.
#
# unredir-if-possible = false

# Delay before unredirecting the window, in milliseconds. Defaults to 0.
# unredir-if-possible-delay = 0

# Conditions of windows that shouldn't be considered full-screen for unredirecting screen.
# unredir-if-possible-exclude = []

# Use 'WM_TRANSIENT_FOR' to group windows, and consider windows
# in the same group focused at the same time.
#
# detect-transient = false
detect-transient = true;

# Use 'WM_CLIENT_LEADER' to group windows, and consider windows in the same
# group focused at the same time. This usually means windows from the same application
# will be considered focused or unfocused at the same time.
# 'WM_TRANSIENT_FOR' has higher priority if detect-transient is enabled, too.
#
# detect-client-leader = false

# Resize damaged region by a specific number of pixels.
# A positive value enlarges it while a negative one shrinks it.
# If the value is positive, those additional pixels will not be actually painted
# to screen, only used in blur calculation, and such. (Due to technical limitations,
# with use-damage, those pixels will still be incorrectly painted to screen.)
# Primarily used to fix the line corruption issues of blur,
# in which case you should use the blur radius value here
# (e.g. with a 3x3 kernel, you should use `--resize-damage 1`,
# with a 5x5 one you use `--resize-damage 2`, and so on).
# May or may not work with *--glx-no-stencil*. Shrinking doesn't function correctly.
#
# resize-damage = 1

# Specify a list of conditions of windows that should be painted with inverted color.
# Resource-hogging, and is not well tested.
#
# invert-color-include = []

# GLX backend: Avoid using stencil buffer, useful if you don't have a stencil buffer.
# Might cause incorrect opacity when rendering transparent content (but never
# practically happened) and may not work with blur-background.
# My tests show a 15% performance boost. Recommended.
#
glx-no-stencil = true;

# GLX backend: Avoid rebinding pixmap on window damage.
# Probably could improve performance on rapid window content changes,
# but is known to break things on some drivers (LLVMpipe, xf86-video-intel, etc.).
# Recommended if it works.
#
# glx-no-rebind-pixmap = false

# Disable the use of damage information.
# This cause the whole screen to be redrawn everytime, instead of the part of the screen
# has actually changed. Potentially degrades the performance, but might fix some artifacts.
# The opposing option is use-damage
#
# no-use-damage = false
use-damage = true;

# Use X Sync fence to sync clients' draw calls, to make sure all draw
# calls are finished before picom starts drawing. Needed on nvidia-drivers
# with GLX backend for some users.
#
# xrender-sync-fence = false

# GLX backend: Use specified GLSL fragment shader for rendering window contents.
# See `compton-default-fshader-win.glsl` and `compton-fake-transparency-fshader-win.glsl`
# in the source tree for examples.
#
# glx-fshader-win = ""

# Force all windows to be painted with blending. Useful if you
# have a glx-fshader-win that could turn opaque pixels transparent.
#
# force-win-blend = false

# Do not use EWMH to detect fullscreen windows.
# Reverts to checking if a window is fullscreen based only on its size and coordinates.
#
# no-ewmh-fullscreen = false

# Dimming bright windows so their brightness doesn't exceed this set value.
# Brightness of a window is estimated by averaging all pixels in the window,
# so this could comes with a performance hit.
# Setting this to 1.0 disables this behaviour. Requires --use-damage to be disabled. (default: 1.0)
#
# max-brightness = 1.0

# Make transparent windows clip other windows like non-transparent windows do,
# instead of blending on top of them.
#
# transparent-clipping = false

# Set the log level. Possible values are:
#  "trace", "debug", "info", "warn", "error"
# in increasing level of importance. Case doesn't matter.
# If using the "TRACE" log level, it's better to log into a file
# using *--log-file*, since it can generate a huge stream of logs.
#
# log-level = "debug"
log-level = "warn";

# Set the log file.
# If *--log-file* is never specified, logs will be written to stderr.
# Otherwise, logs will to written to the given file, though some of the early
# logs might still be written to the stderr.
# When setting this option from the config file, it is recommended to use an absolute path.
#
# log-file = "/path/to/your/log/file"

# Show all X errors (for debugging)
# show-all-xerrors = false

# Write process ID to a file.
# write-pid-path = "/path/to/your/log/file"

# Window type settings
#
# 'WINDOW_TYPE' is one of the 15 window types defined in EWMH standard:
#     "unknown", "desktop", "dock", "toolbar", "menu", "utility",
#     "splash", "dialog", "normal", "dropdown_menu", "popup_menu",
#     "tooltip", "notification", "combo", and "dnd".
#
# Following per window-type options are available: ::
#
#   fade, shadow:::
#     Controls window-type-specific shadow and fade settings.
#
#   opacity:::
#     Controls default opacity of the window type.
#
#   focus:::
#     Controls whether the window of this type is to be always considered focused.
#     (By default, all window types except "normal" and "dialog" has this on.)
#
#   full-shadow:::
#     Controls whether shadow is drawn under the parts of the window that you
#     normally won't be able to see. Useful when the window has parts of it
#     transparent, and you want shadows in those areas.
#
#   clip-shadow-above:::
#     Controls wether shadows that would have been drawn above the window should
#     be clipped. Useful for dock windows that should have no shadow painted on top.
#
#   redir-ignore:::
#     Controls whether this type of windows should cause screen to become
#     redirected again after been unredirected. If you have unredir-if-possible
#     set, and doesn't want certain window to cause unnecessary screen redirection,
#     you can set this to `true`.
#
wintypes:
{
  tooltip = { fade = true; shadow = true; opacity = 0.75; focus = true; full-shadow = false; };
  dock = { shadow = false; clip-shadow-above = true; }
  dnd = { shadow = false; }
  popup_menu = { opacity = 0.8; }
  dropdown_menu = { opacity = 0.8; }
};


5.2、dwn推荐的补丁
-
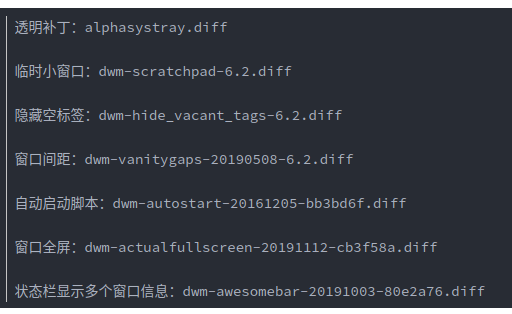
透明补丁(alpha)
-
状态栏显示多个窗口信息(awesomebar)
-
临时小窗口(scratchpad)
-
屏幕和状态栏的间隙(barpadding)
-
状态栏托盘(systray)
-
窗口间距(vanitygaps)
-
gappih
:窗户之间的内部水平间隙 -
gappiv
:窗口之间的内部垂直间隙 -
gappoh
:窗口和屏幕边缘之间的水平外部间隙 -
gappov
:窗口和屏幕边缘之间的垂直外部间隙 -

-
5.3、st推荐补丁
- 终端半透明(alpha)
-
去除终端的白边(anysize)
- 打开多个终端就会出项这个问题
-
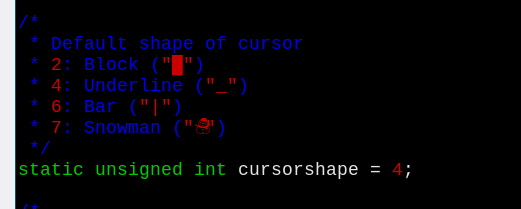
终端中的输入下划线(blinking_cursor)
-
闪动的下划线
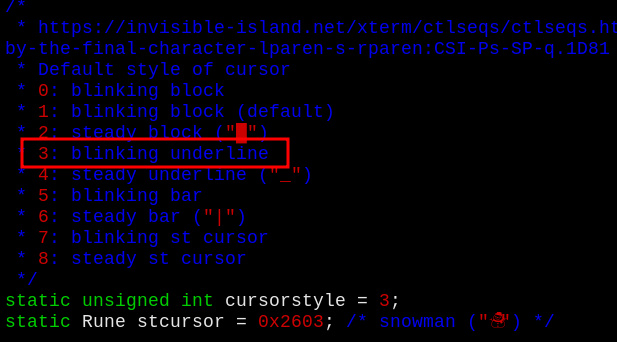
-
闪动的下划线
-
主题颜色(xresources)
- 保留多个主颜色