一、idea跑datax
1、首先去官网拉取datax项目代码,地址
https://gitee.com/mirrors/DataX.git
选择克隆/下载的地址。

2、进入准备好的下载目录,右键选择git base here进行下载(自己下载好就行)。
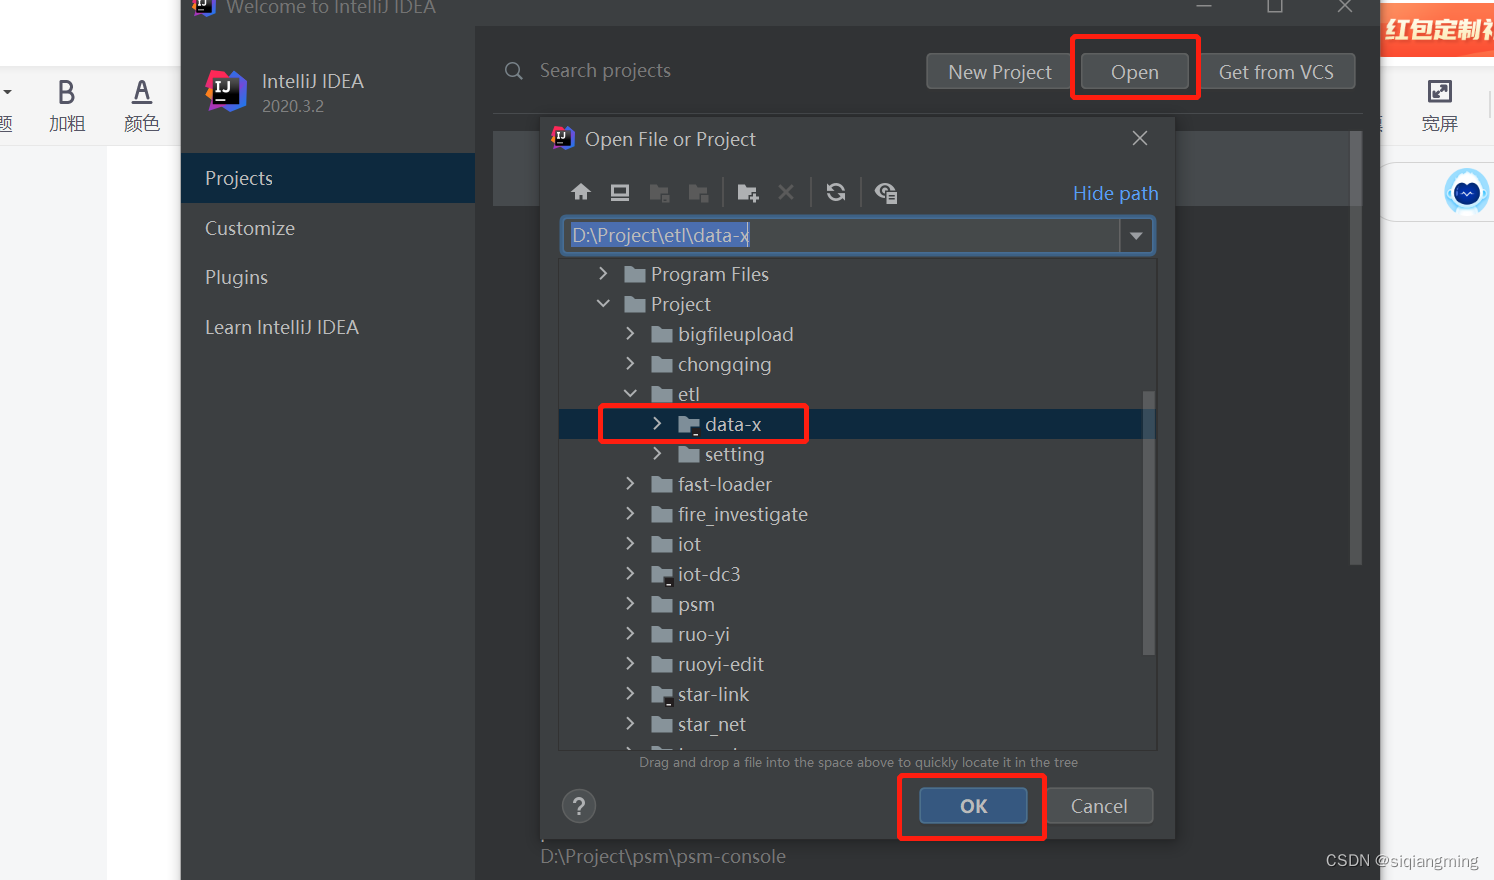
3、打开idea,导入下载好的datax项目
4、会加载一段时间,等待就行了,前提条件是maven配置好,联网哦

5、在maven中,项目根目录下先clean,勾选跳过test,再package。clean速度快,package要等一会的,完成后可以看到target目录,将core中的datax复制出来,要进行配置,clean就清除了。

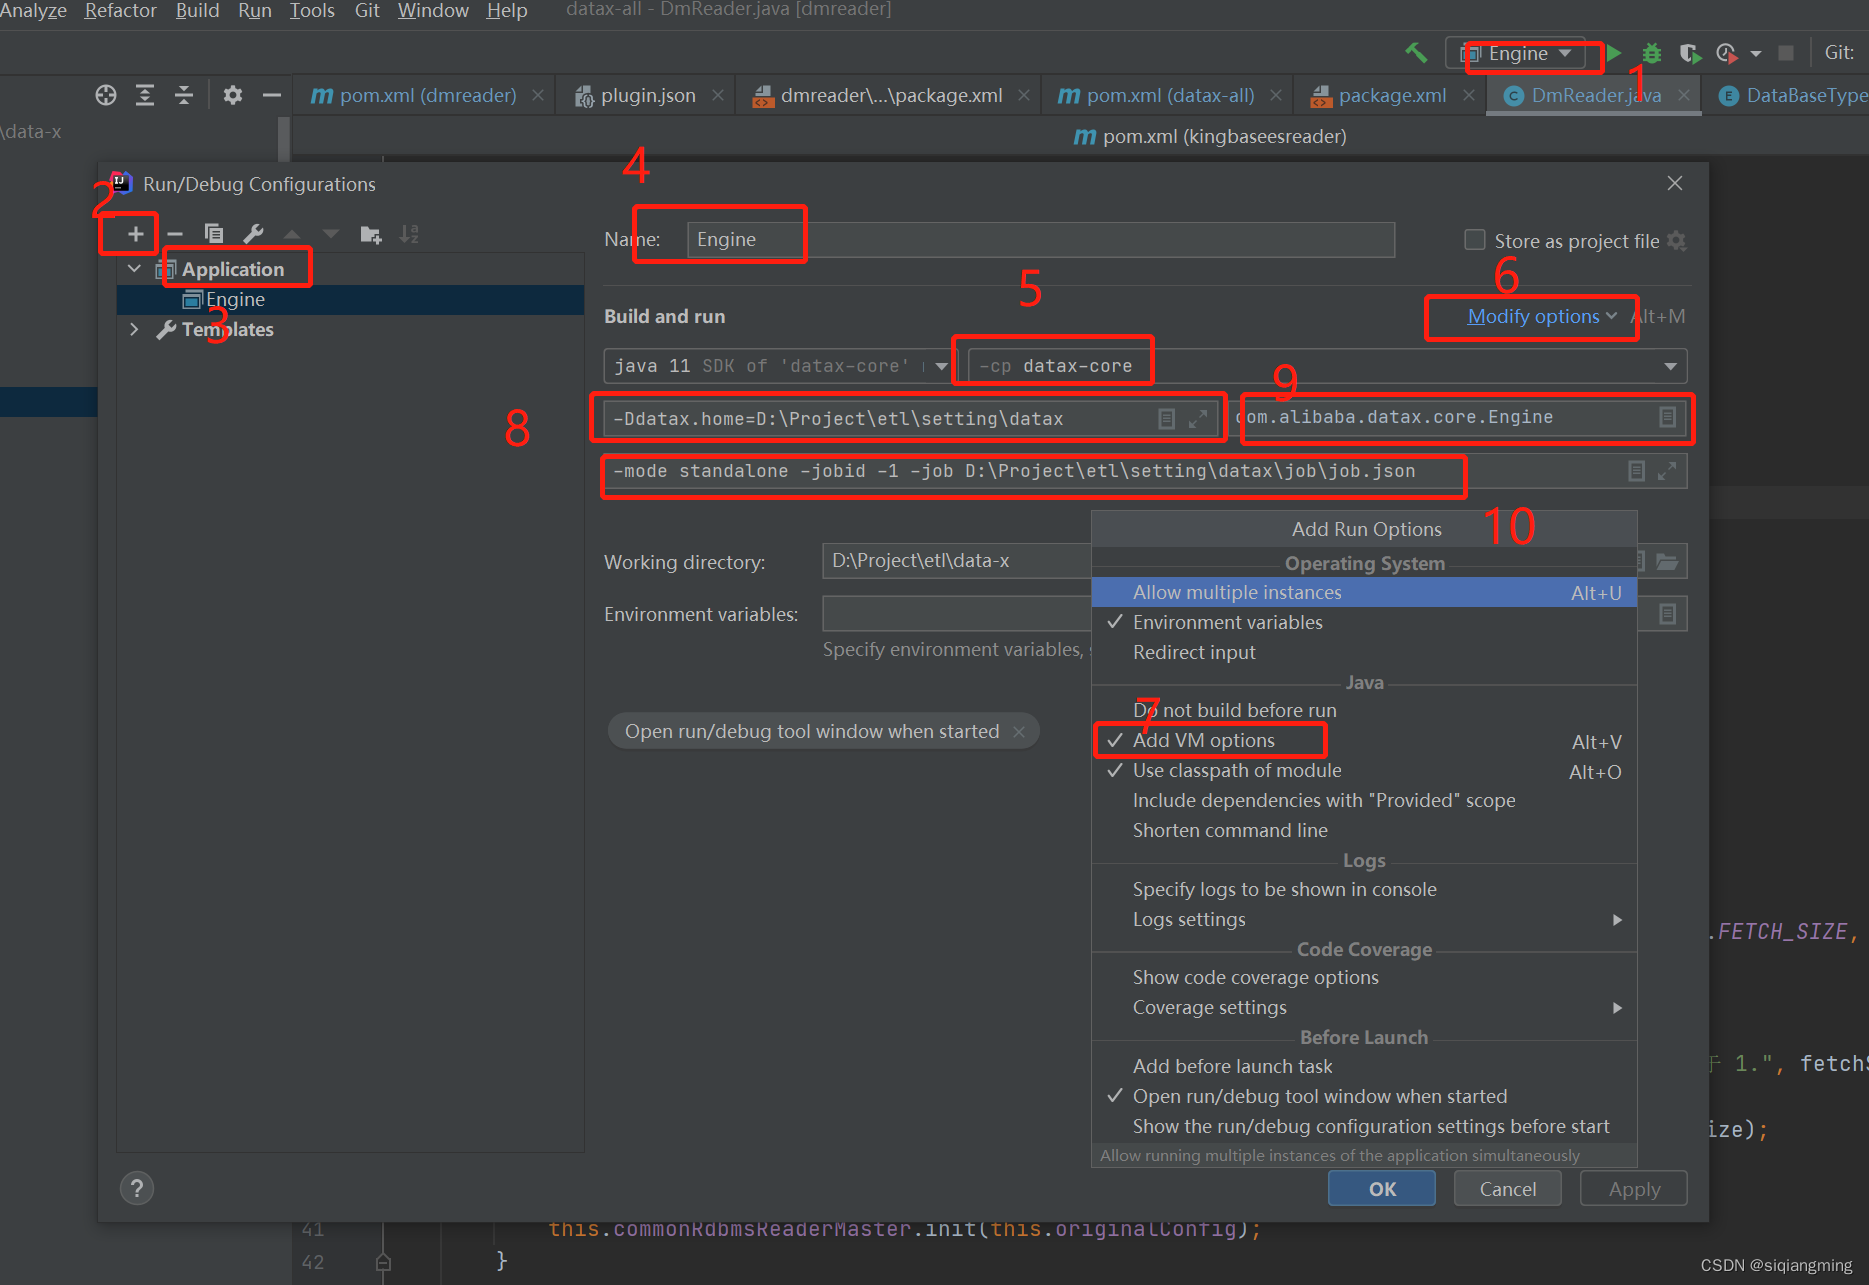
6、进行项目启动配置,我这里已经配置好了,根据图上的标识,把对应的参数配置上去。
VM options:
-Ddatax.home=D:\Project\etl\setting\datax
Program arguments:
-mode standalone -jobid -1 -job D:\Project\etl\setting\datax\job\job.json
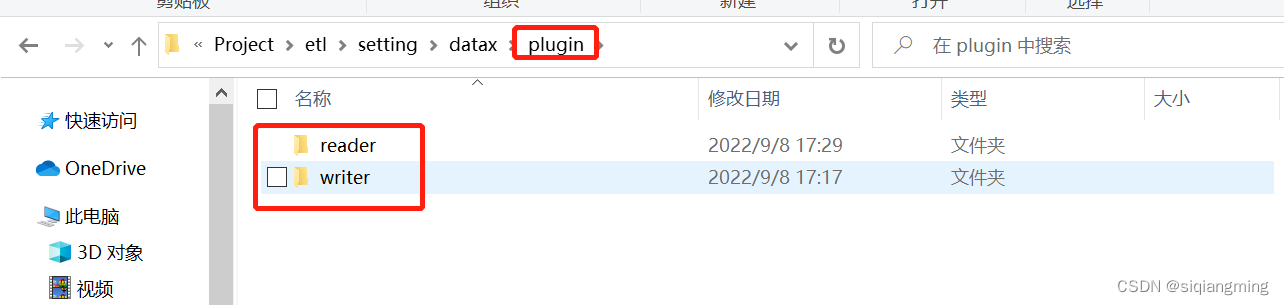
7、在datax下面新建plugin插件目录,在下面新增reader目录,存放读取插件。writer目录存放写入插件。
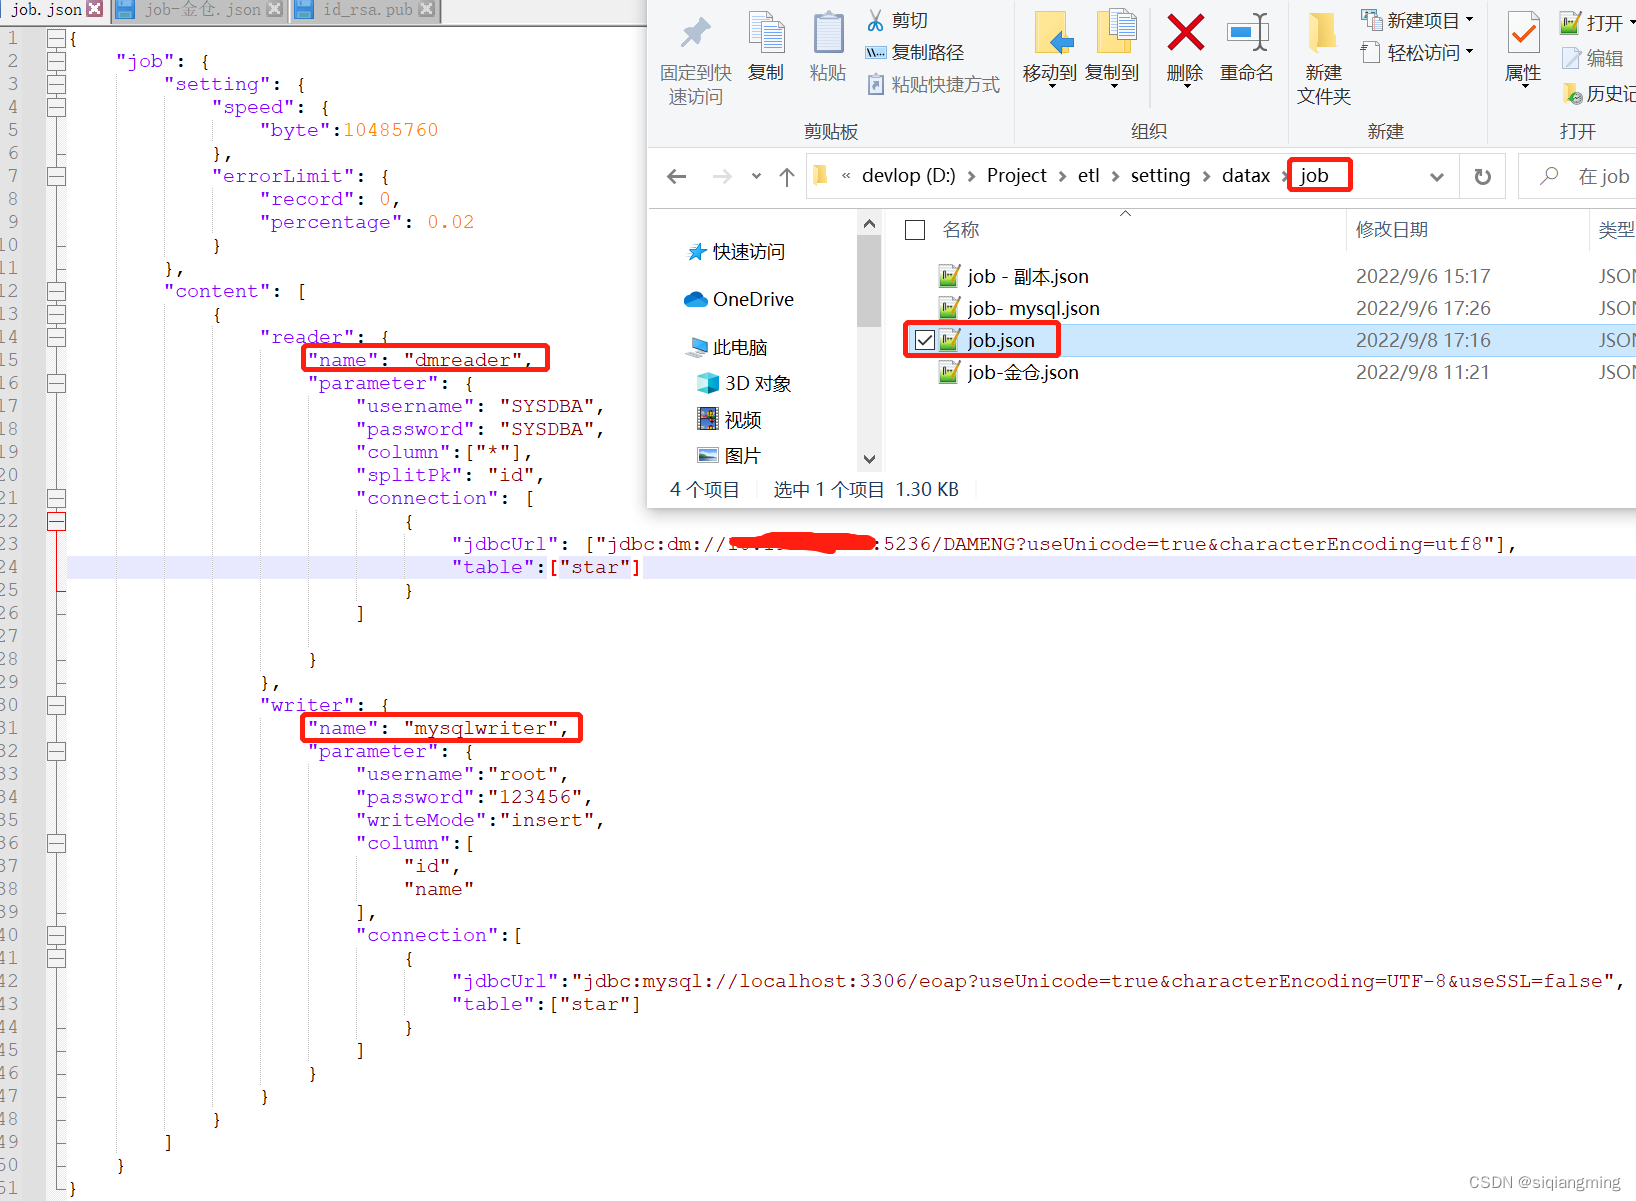
8、datax下面的job目录存放job任务配置,包含使用的插件,数据库链接,用户名密码,要操作的表等,这一块可以问度娘,我这里是一个最简单的
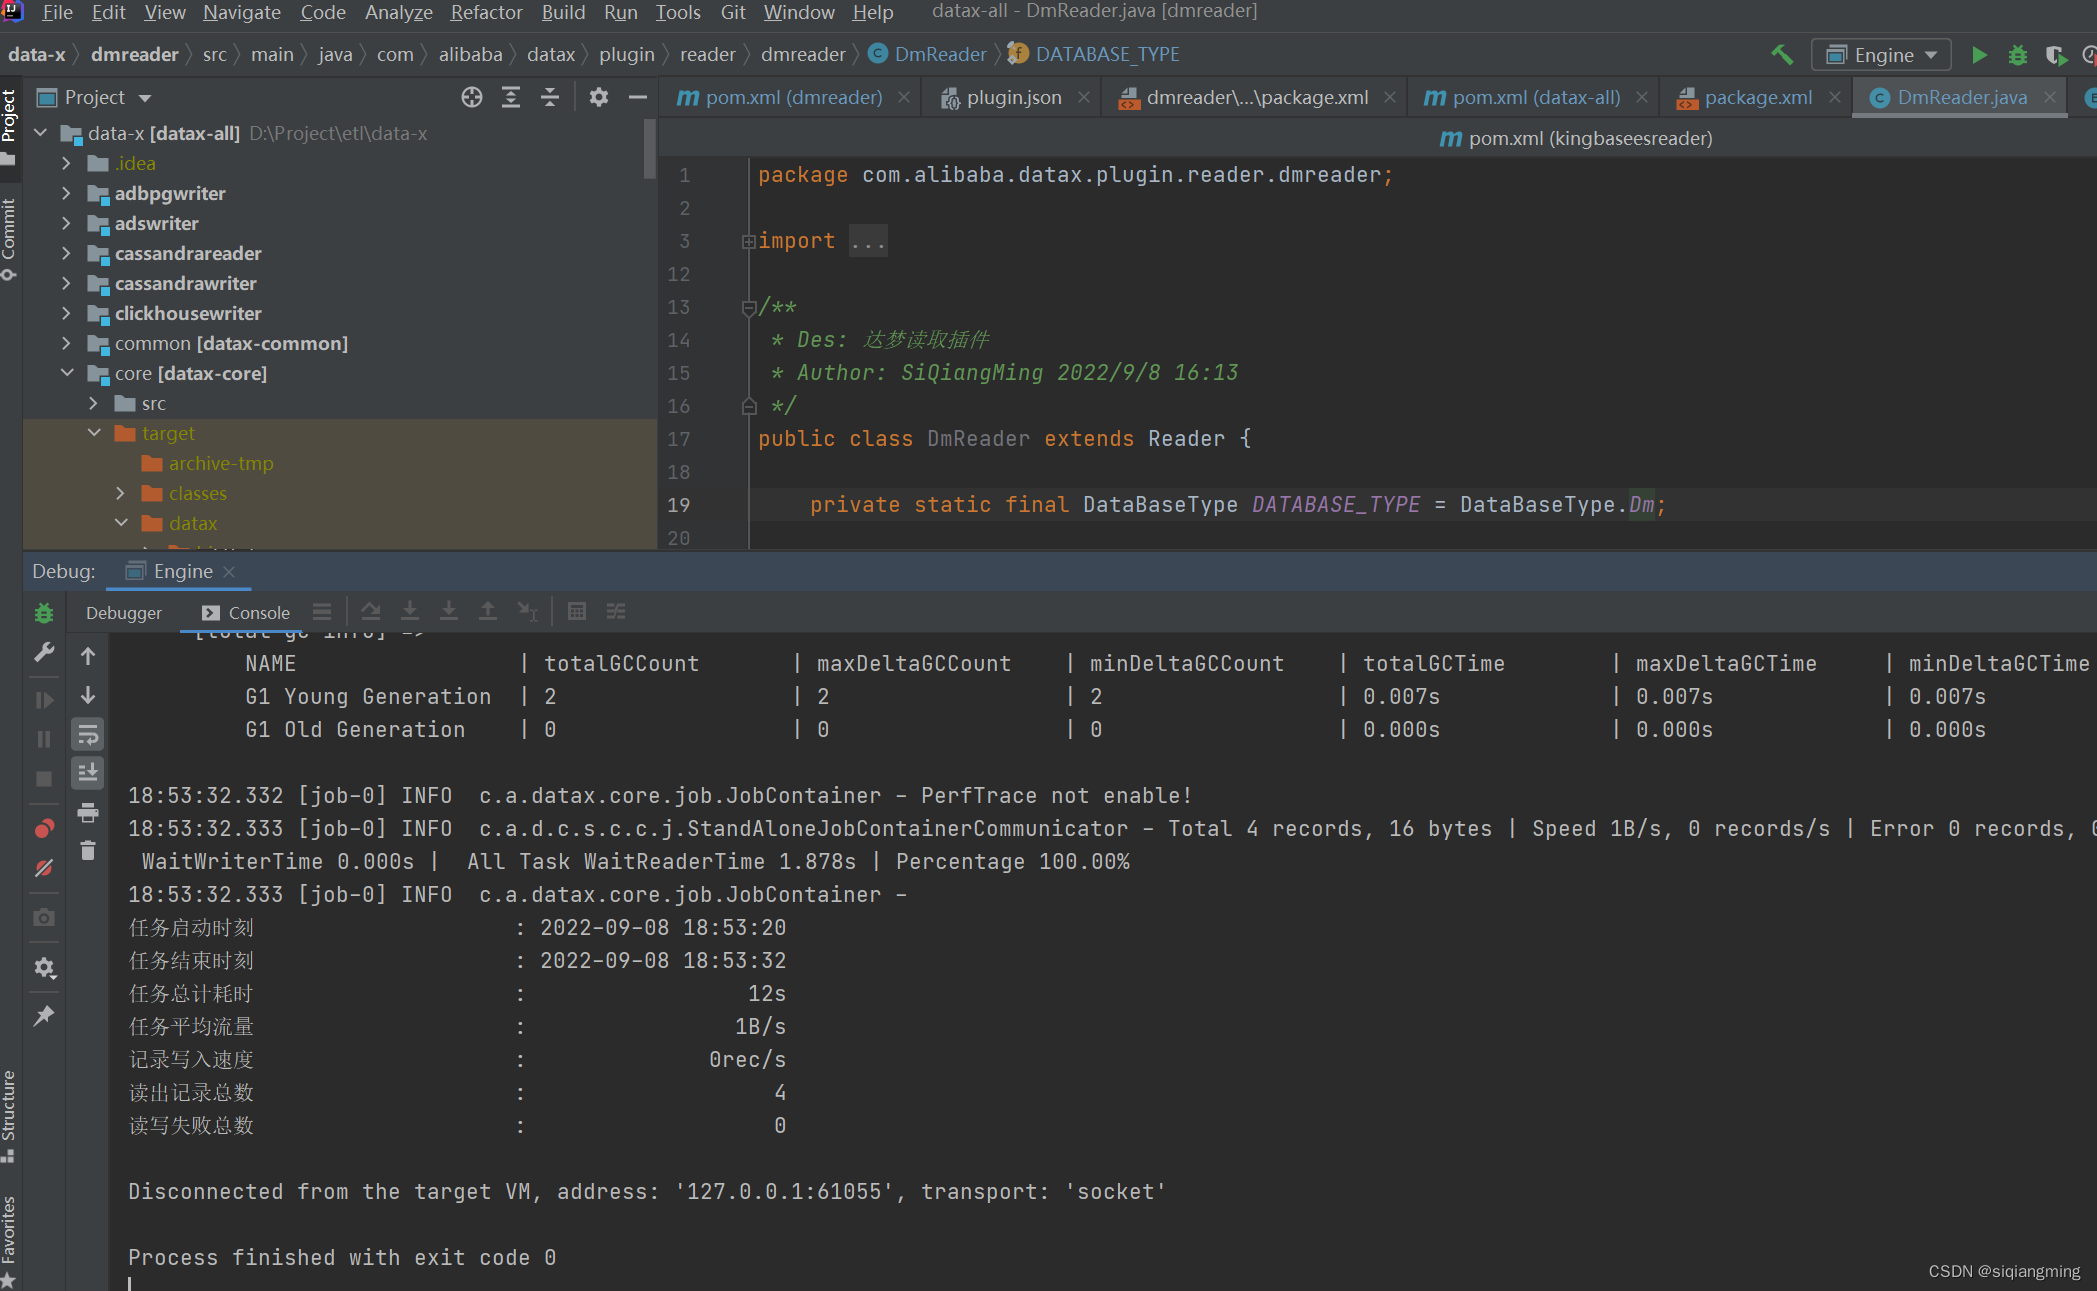
9、上面配置好就可以启动了。这里跑一下
二、达梦插件开发
1、在datax项目右键new -》Module,选择Maven,其他什么不用勾选,next

2、在窗口中填写模块名称,这里用dmreader,然后next

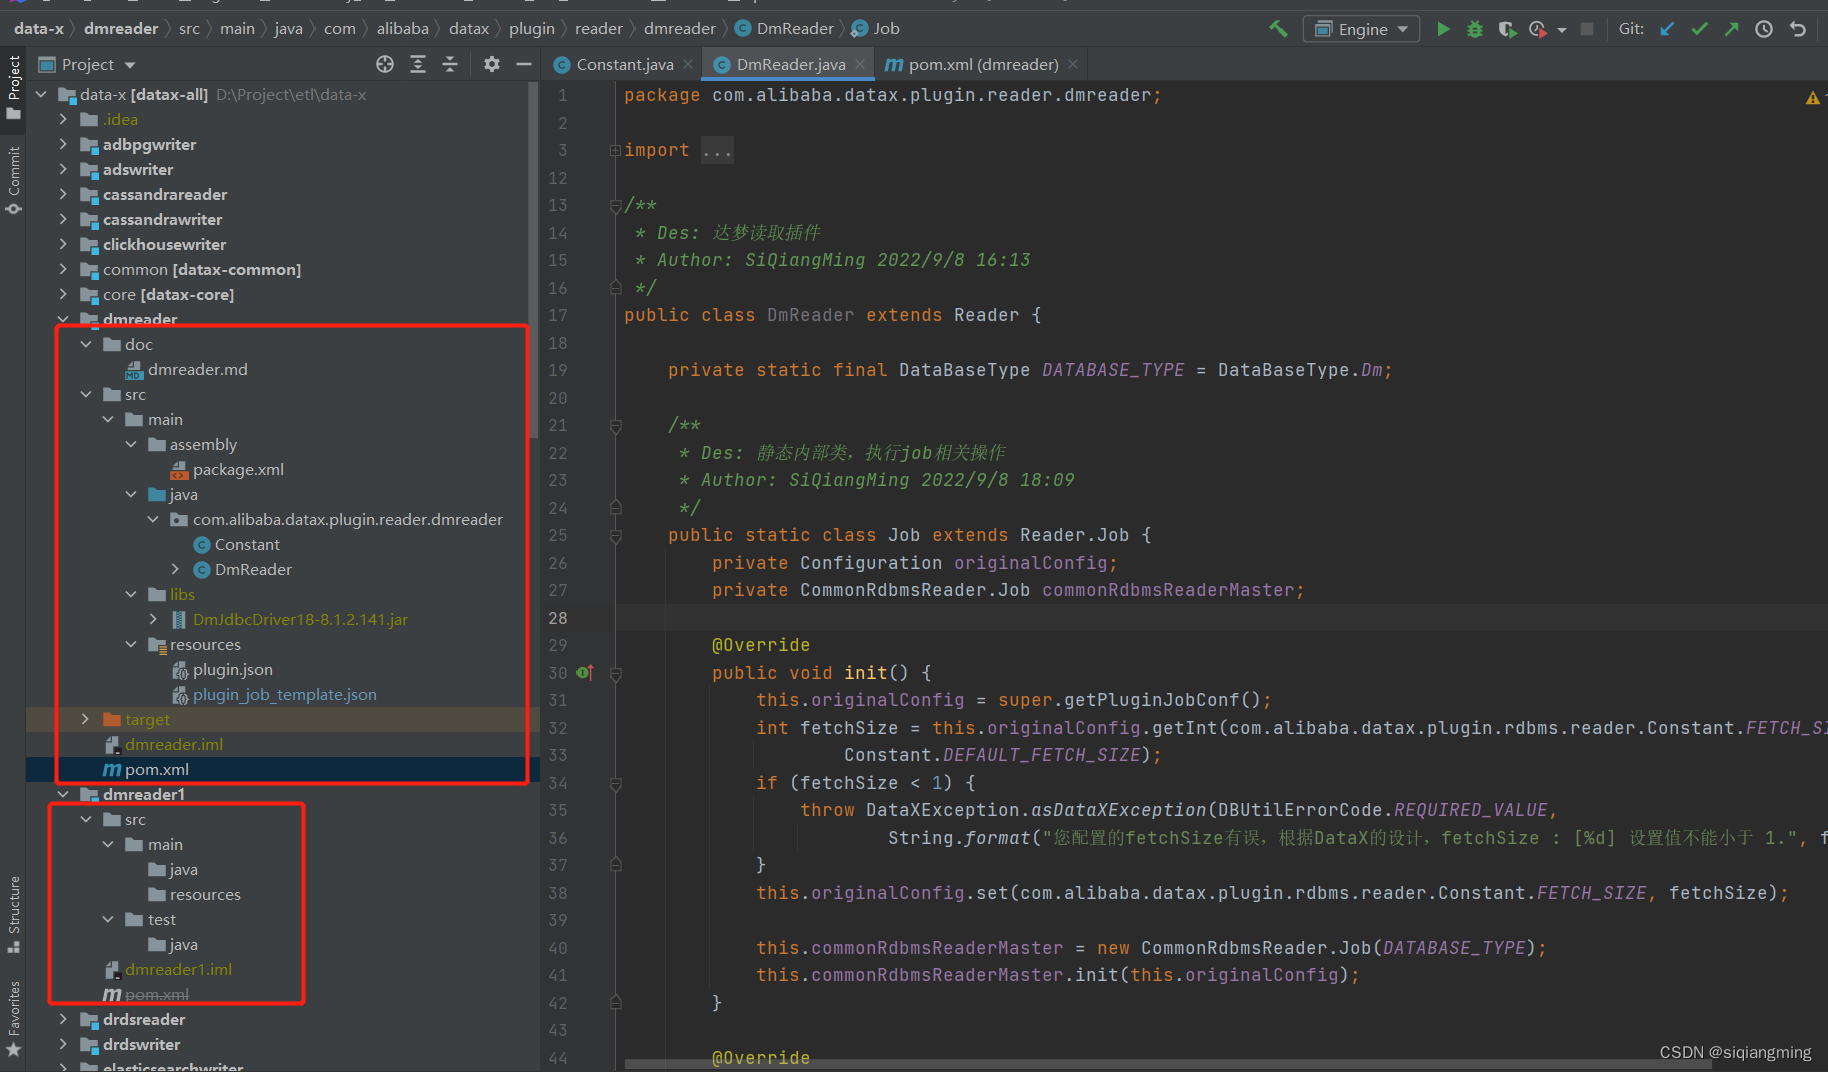
3、创建完成后,是下面的一个空的模块(因为我有dmreader了,这里用dmreader1),删除test,仿照mysqlreader新增对应文件。
4、pom.xml
<?xml version="1.0" encoding="UTF-8"?>
<project xmlns="http://maven.apache.org/POM/4.0.0"
         xmlns:xsi="http://www.w3.org/2001/XMLSchema-instance"
         xsi:schemaLocation="http://maven.apache.org/POM/4.0.0 http://maven.apache.org/xsd/maven-4.0.0.xsd">
    <parent>
        <artifactId>datax-all</artifactId>
        <groupId>com.alibaba.datax</groupId>
        <version>0.0.1-SNAPSHOT</version>
    </parent>
    <modelVersion>4.0.0</modelVersion>

    <artifactId>dmreader</artifactId>
    <name>dmreader</name>
    <packaging>jar</packaging>

    <dependencies>
        <dependency>
            <groupId>com.alibaba.datax</groupId>
            <artifactId>datax-common</artifactId>
            <version>${datax-project-version}</version>
            <exclusions>
                <exclusion>
                    <artifactId>slf4j-log4j12</artifactId>
                    <groupId>org.slf4j</groupId>
                </exclusion>
            </exclusions>
        </dependency>

        <dependency>
            <groupId>org.slf4j</groupId>
            <artifactId>slf4j-api</artifactId>
        </dependency>

        <dependency>
            <groupId>ch.qos.logback</groupId>
            <artifactId>logback-classic</artifactId>
        </dependency>

        <dependency>
            <groupId>com.alibaba.datax</groupId>
            <artifactId>plugin-rdbms-util</artifactId>
            <version>${datax-project-version}</version>
        </dependency>

        <!-- 达梦模块 siqm -->
        <dependency>
            <groupId>com.dameng</groupId>
            <artifactId>DmJdbcDriver18</artifactId>
            <version>8.1.2.141</version>
            <scope>system</scope>
            <systemPath>${basedir}/src/main/libs/DmJdbcDriver18-8.1.2.141.jar</systemPath>
        </dependency>

    </dependencies>

    <build>
        <plugins>
            <!-- compiler plugin -->
            <plugin>
                <artifactId>maven-compiler-plugin</artifactId>
                <configuration>
                    <source>${jdk-version}</source>
                    <target>${jdk-version}</target>
                    <encoding>${project-sourceEncoding}</encoding>
                </configuration>
            </plugin>
            <!-- assembly plugin -->
            <plugin>
                <artifactId>maven-assembly-plugin</artifactId>
                <configuration>
                    <descriptors>
                        <descriptor>src/main/assembly/package.xml</descriptor>
                    </descriptors>
                    <finalName>datax</finalName>
                </configuration>
                <executions>
                    <execution>
                        <id>dwzip</id>
                        <phase>package</phase>
                        <goals>
                            <goal>single</goal>
                        </goals>
                    </execution>
                </executions>
            </plugin>
        </plugins>
    </build>

</project>
5、Constant这常量类其实和其他的一样。
package com.alibaba.datax.plugin.reader.dmreader;

/**
 * Des: 常量
 * Author: SiQiangMing 2022/9/8 18:09
 */
public class Constant {

    public static final int DEFAULT_FETCH_SIZE = 1000;

}
6、新增达梦的配置,可以参考MySql进行配置,这里有9个地方,注意别忘改了
dm.jdbc.driver.DmDriver
。

7、DmReader主要是继承Reader,还有Job和Task两个内部类,还有DATABASE_TYPE这个常量别忘修改为DM对应。
package com.alibaba.datax.plugin.reader.dmreader;

import com.alibaba.datax.common.exception.DataXException;
import com.alibaba.datax.common.plugin.RecordSender;
import com.alibaba.datax.common.spi.Reader;
import com.alibaba.datax.common.util.Configuration;
import com.alibaba.datax.plugin.rdbms.reader.CommonRdbmsReader;
import com.alibaba.datax.plugin.rdbms.util.DBUtilErrorCode;
import com.alibaba.datax.plugin.rdbms.util.DataBaseType;

import java.util.List;

/**
 * Des: 达梦读取插件
 * Author: SiQiangMing 2022/9/8 16:13
 */
public class DmReader extends Reader {

    private static final DataBaseType DATABASE_TYPE = DataBaseType.Dm;

    /**
     * Des: 静态内部类,执行job相关操作
     * Author: SiQiangMing 2022/9/8 18:09
     */
    public static class Job extends Reader.Job {
        private Configuration originalConfig;
        private CommonRdbmsReader.Job commonRdbmsReaderMaster;

        @Override
        public void init() {
            this.originalConfig = super.getPluginJobConf();
            int fetchSize = this.originalConfig.getInt(com.alibaba.datax.plugin.rdbms.reader.Constant.FETCH_SIZE,
                    Constant.DEFAULT_FETCH_SIZE);
            if (fetchSize < 1) {
                throw DataXException.asDataXException(DBUtilErrorCode.REQUIRED_VALUE,
                        String.format("您配置的fetchSize有误,根据DataX的设计,fetchSize : [%d] 设置值不能小于 1.", fetchSize));
            }
            this.originalConfig.set(com.alibaba.datax.plugin.rdbms.reader.Constant.FETCH_SIZE, fetchSize);

            this.commonRdbmsReaderMaster = new CommonRdbmsReader.Job(DATABASE_TYPE);
            this.commonRdbmsReaderMaster.init(this.originalConfig);
        }

        @Override
        public void post() {
            this.commonRdbmsReaderMaster.post(this.originalConfig);
        }

        @Override
        public void destroy() {
            this.commonRdbmsReaderMaster.destroy(this.originalConfig);
        }

        @Override
        public List<Configuration> split(int adviceNumber) {
            return this.commonRdbmsReaderMaster.split(this.originalConfig, adviceNumber);
        }
    }

    /**
     * Des: 静态内部类,执行job相关操作
     * Author: SiQiangMing 2022/9/8 18:11
     */
    public static class Task extends Reader.Task {
        private Configuration readerSliceConfig;
        private CommonRdbmsReader.Task commonRdbmsReaderSlave;

        @Override
        public void init() {
            this.readerSliceConfig = super.getPluginJobConf();
            this.commonRdbmsReaderSlave = new CommonRdbmsReader.Task(DATABASE_TYPE, super.getTaskGroupId(), super.getTaskId());
            this.commonRdbmsReaderSlave.init(this.readerSliceConfig);
        }

        @Override
        public void startRead(RecordSender recordSender) {
            int fetchSize = this.readerSliceConfig.getInt(com.alibaba.datax.plugin.rdbms.reader.Constant.FETCH_SIZE);

            this.commonRdbmsReaderSlave.startRead(this.readerSliceConfig, recordSender,
                    super.getTaskPluginCollector(), fetchSize);
        }

        @Override
        public void post() {
            this.commonRdbmsReaderSlave.post(this.readerSliceConfig);
        }

        @Override
        public void destroy() {
            this.commonRdbmsReaderSlave.destroy(this.readerSliceConfig);
        }
    }
}
8、plugin.json,这里面的name就是插件名,别和其他的重复了就行,后面要用
{
    "name": "dmreader",
    "class": "com.alibaba.datax.plugin.reader.dmreader.DmReader",
    "description": "useScene: prod. mechanism: Jdbc connection using the database, execute select sql, retrieve data from the ResultSet. warn: The more you know about the database, the less problems you encounter.",
    "developer": "SiQiangMing"
}
9、package.xml这个是打包的配置,从mysql那边拷贝过来后,修改target和outputDirectory值
<assembly
        xmlns="http://maven.apache.org/plugins/maven-assembly-plugin/assembly/1.1.0"
        xmlns:xsi="http://www.w3.org/2001/XMLSchema-instance"
        xsi:schemaLocation="http://maven.apache.org/plugins/maven-assembly-plugin/assembly/1.1.0 http://maven.apache.org/xsd/assembly-1.1.0.xsd">
    <id></id>
    <formats>
        <format>dir</format>
    </formats>
    <includeBaseDirectory>false</includeBaseDirectory>
    <fileSets>
        <fileSet>
            <directory>src/main/resources</directory>
            <includes>
                <include>plugin.json</include>
                <include>plugin_job_template.json</include>
            </includes>
            <outputDirectory>plugin/reader/dmreader</outputDirectory>
        </fileSet>
        <fileSet>
            <directory>target/</directory>
            <includes>
                <include>dmreader-0.0.1-SNAPSHOT.jar</include>
            </includes>
            <outputDirectory>plugin/reader/dmreader</outputDirectory>
        </fileSet>
        <fileSet>
            <directory>src/main/libs</directory>
            <includes>
                <include>*.*</include>
            </includes>
            <outputDirectory>plugin/reader/dmreader/libs</outputDirectory>
        </fileSet>
    </fileSets>

    <dependencySets>
        <dependencySet>
            <useProjectArtifact>false</useProjectArtifact>
            <outputDirectory>plugin/reader/dmreader/libs</outputDirectory>
            <scope>runtime</scope>
        </dependencySet>
    </dependencySets>
</assembly>
10、然后修改doc/dmreader.md和resource/plugin_job_template.json,这都不是重点了。这样就完事了,后来发现他们好像rdbmsreader就支持达梦,不过我没有使用,你们可以试试。
三、生成环境运行与调试
1、上传datax压缩包datax.tar到linux服务器
2、解压datax压缩包到/usr/local下
tar -xvf /路径/datax.tar -C /usr/local
3、删除隐藏文件
rm -rf /usr/local/datax/plugin/*/._*
4、验证datax是否部署成功
cd /usr/local/datax/bin
python datax.py ../job/job.json
四、调试过程遇到的问题
在调试过程中遇到过一些问题,记不太清了,简单记录一下
1、读取表的时候字段不要写类型,
2、hdfs写入用户权限的问题,变量传递到job.json的问题。
4、写入hdfs分区表的时候,需要load加载数据
load data inpath “/user/hive/warehouse/hdfswriter.db/star/day=2022-09″ into table star partition(day=”day=2022-09”);