Linux磁盘概念及其管理工具fdisk:
http://www.linuxidc.com/Linux/2016-08/134664.htm
一、
进入linux虚拟机 右键 open in terminal
su 输入密码切换为root用户
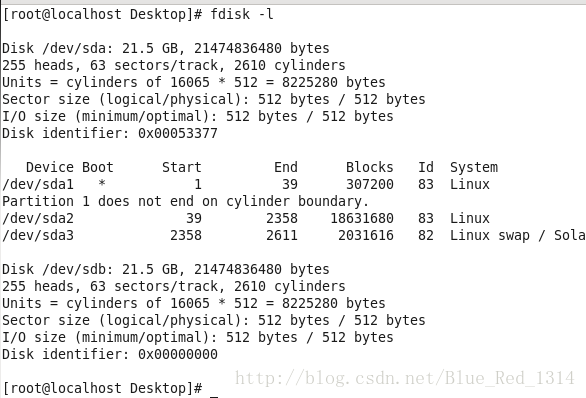
fdisk -l 查看磁盘情况
我的目前只有sda一个磁盘
添加sdb磁盘:关机,菜单栏中找到虚拟机—设置,点击硬盘—添加,按步骤走就可以了,启动虚拟机,就有sdb了
二、
虽然硬盘分区表中最多能存储四个分区,但我们实际使用时一般只分为两个分区,一个是主分区(Primary Partion)一个是扩展分区(extended partition)两种,主分区可以马上被使用但不能再分区,扩展分区必须再进行分区后才能使用,也就是说它必须还要进行二次分区。那么由扩充分区再分下去的是什么呢?它就是逻辑分区(Logical Partion),况且逻辑分区没有数量上限制。 对习惯于使用Dos或Windows的朋友来说,有几个分区就有几个驱动器,并且每个分区都会获得一个字母标识符,然后就可以选用这个字母来指定在这个分区上的文件和目录,它们的文件结构都是独立的,非常好理解。
但是初上手Red Hat Linux吗,可就有点恼人了。因为对Linux用户来说无论有几个分区,分给哪一目录使用,它归根结底就只有一个根目录,一个独立且唯一的文件结构。Red Hat Linux中每个分区都是用来组成整个文件系统的一部分,因为它采用了一种叫“挂载点”的处理方法,它的整个文件系统中包含了一整套的文件和目录,且将一个分区和一个目录联系起来。这时要载入的一个分区将使它的存储空间在一个目录下获得。
1、 fdisk -l 查看磁盘情况
2、 下面对/dev/sdb 进行分区:
[root@localhost Desktop]# fdisk /dev/sdb
Device contains neither a valid DOS partition table, nor Sun, SGI or OSF disklabel
Building a new DOS disklabel with disk identifier 0x1949791c.
Changes will remain in memory only, until you decide to write them.
After that, of course, the previous content won't be recoverable.

Warning: invalid flag 0x0000 of partition table 4 will be corrected by w(rite)

WARNING: DOS-compatible mode is deprecated. It's strongly recommended to
         switch off the mode (command 'c') and change display units to
         sectors (command 'u').

Command (m for help): m                //输入m查看帮助文档
Command action
   a   toggle a bootable flag
   b   edit bsd disklabel
   c   toggle the dos compatibility flag
   d   delete a partition
   l   list known partition types
   m   print this menu
   n   add a new partition              //添加一个新的分区
   o   create a new empty DOS partition table
   p   print the partition table
   q   quit without saving changes
   s   create a new empty Sun disklabel
   t   change a partition's system id
   u   change display/entry units
   v   verify the partition table
   w   write table to disk and exit
   x   extra functionality (experts only)

#fdisk选中/dev/sdb 输入m所有基本选项都出现,输入n新建分区
Command (m for help): n
Command action
   e   extended     //扩展分区
   p   primary partition (1-4)    //主分区
-
1
-
2
-
3
-
4
-
5
-
6
-
7
-
8
-
9
-
10
-
11
-
12
-
13
-
14
-
15
-
16
-
17
-
18
-
19
-
20
-
21
-
22
-
23
-
24
-
25
-
26
-
27
-
28
-
29
-
30
-
31
-
32
-
33
-
34
-
35
-
36
-
37
3、有扩展分区和主分区,逻辑分区在扩展分区中建立。注意到括号中的1-4,最多只能建四个主分区(包括扩展分区)。先建一个主分区:
Command (m for help): n
Command action
e extended
p primary partition (1-4)
p
Partition number (1-4): 1
First cylinder (1-2610, default 1):
Using default value 1
Last cylinder, +cylinders or +size{K,M,G} (1-2610, default 2610): +2G
Command (m for help): p
Disk /dev/sdb: 21.5 GB, 21474836480 bytes
255 heads, 63 sectors/track, 2610 cylinders
Units = cylinders of 16065 * 512 = 8225280 bytes
Sector size (logical/physical): 512 bytes / 512 bytes
I/O size (minimum/optimal): 512 bytes / 512 bytes
Disk identifier: 0x1949791c
Device Boot Start End Blocks Id System
/dev/sdb1 1 262 2104483+ 83 Linux
-
1
-
2
-
3
-
4
-
5
-
6
-
7
-
8
-
9
-
10
-
11
-
12
-
13
-
14
-
15
-
16
-
17
-
18
-
19
-
20
-
21
-
22
-
23
-
24
-
25
4、同上所述建立扩展分区:
Command (m for help): n
Command action
   e   extended
   p   primary partition (1-4)
e
Partition number (1-4): 4
First cylinder (263-2610, default 263):
Using default value 263
Last cylinder, +cylinders or +size{K,M,G} (263-2610, default 2610): +4G

Command (m for help): p

Disk /dev/sdb: 21.5 GB, 21474836480 bytes
255 heads, 63 sectors/track, 2610 cylinders
Units = cylinders of 16065 * 512 = 8225280 bytes
Sector size (logical/physical): 512 bytes / 512 bytes
I/O size (minimum/optimal): 512 bytes / 512 bytes
Disk identifier: 0x1949791c

   Device Boot      Start         End      Blocks   Id  System
/dev/sdb1               1         262     2104483+  83  Linux
/dev/sdb4             263         785     4200997+   5  Extended
-
1
-
2
-
3
-
4
-
5
-
6
-
7
-
8
-
9
-
10
-
11
-
12
-
13
-
14
-
15
-
16
-
17
-
18
-
19
-
20
-
21
-
22
-
23
5、扩展分区建好就可以在扩展分区建立逻辑分区了
Command (m for help): n
Command action
   l   logical (5 or over)
   p   primary partition (1-4)
l   #创建逻辑分区
First cylinder (263-785, default 263):
Using default value 263
Last cylinder, +cylinders or +size{K,M,G} (263-785, default 785): +2G

Command (m for help): p

Disk /dev/sdb: 21.5 GB, 21474836480 bytes
255 heads, 63 sectors/track, 2610 cylinders
Units = cylinders of 16065 * 512 = 8225280 bytes
Sector size (logical/physical): 512 bytes / 512 bytes
I/O size (minimum/optimal): 512 bytes / 512 bytes
Disk identifier: 0x1949791c

   Device Boot      Start         End      Blocks   Id  System
/dev/sdb1               1         262     2104483+  83  Linux
/dev/sdb4             263         785     4200997+   5  Extended
/dev/sdb5             263         524     2104483+  83  Linux
-
1
-
2
-
3
-
4
-
5
-
6
-
7
-
8
-
9
-
10
-
11
-
12
-
13
-
14
-
15
-
16
-
17
-
18
-
19
-
20
-
21
-
22
-
23
6、上面显示已经建好一个主分区,一个逻辑分区,但是这些现在还没有生效,需要保存退出。
Command (m for help): w
The partition table has been altered!
Calling ioctl() to re-read partition table.
Syncing disks.
7、退出后查看:
[root@localhost Desktop]# fdisk -l

Disk /dev/sda: 21.5 GB, 21474836480 bytes
255 heads, 63 sectors/track, 2610 cylinders
Units = cylinders of 16065 * 512 = 8225280 bytes
Sector size (logical/physical): 512 bytes / 512 bytes
I/O size (minimum/optimal): 512 bytes / 512 bytes
Disk identifier: 0x00053377

   Device Boot      Start         End      Blocks   Id  System
/dev/sda1   *           1          39      307200   83  Linux
Partition 1 does not end on cylinder boundary.
/dev/sda2              39        2358    18631680   83  Linux
/dev/sda3            2358        2611     2031616   82  Linux swap / Solaris

Disk /dev/sdb: 21.5 GB, 21474836480 bytes
255 heads, 63 sectors/track, 2610 cylinders
Units = cylinders of 16065 * 512 = 8225280 bytes
Sector size (logical/physical): 512 bytes / 512 bytes
I/O size (minimum/optimal): 512 bytes / 512 bytes
Disk identifier: 0x1949791c

   Device Boot      Start         End      Blocks   Id  System
/dev/sdb1               1         262     2104483+  83  Linux
/dev/sdb4             263         785     4200997+   5  Extended
/dev/sdb5             263         524     2104483+  83  Linux
-
1
-
2
-
3
-
4
-
5
-
6
-
7
-
8
-
9
-
10
-
11
-
12
-
13
-
14
-
15
-
16
-
17
-
18
-
19
-
20
-
21
-
22
-
23
-
24
-
25
-
26
-
27
8、这时需要给它设置文件系统并进行格式化。
mkfs -t ext3 /dev/sdb5
给它设置ext3的文件系统,并格式化。
[root@localhost Desktop]# mkfs -t ext3 /dev/sdb5
mke2fs 1.41.12 (17-May-2010)
Filesystem label=
OS type: Linux
Block size=4096 (log=2)
Fragment size=4096 (log=2)
Stride=0 blocks, Stripe width=0 blocks
131648 inodes, 526120 blocks
26306 blocks (5.00%) reserved for the super user
First data block=0
Maximum filesystem blocks=541065216
17 block groups
32768 blocks per group, 32768 fragments per group
7744 inodes per group
Superblock backups stored on blocks:
    32768, 98304, 163840, 229376, 294912

Writing inode tables: done
Creating journal (16384 blocks): done
Writing superblocks and filesystem accounting information: done

This filesystem will be automatically checked every 26 mounts or
180 days, whichever comes first.  Use tune2fs -c or -i to override.
-
1
-
2
-
3
-
4
-
5
-
6
-
7
-
8
-
9
-
10
-
11
-
12
-
13
-
14
-
15
-
16
-
17
-
18
-
19
-
20
-
21
-
22
-
23
-
24
9、在新建个目录,mkdir /data15 ;
用来挂载这个分区。mount /dev/sdb5 /data15 ;
[root@localhost Desktop]
[root@localhost Desktop]
10、查看是否挂载成功:df -TH /data15/
[root@localhost Desktop]# df -TH /data15/
Filesystem     Type  Size  Used Avail Use% Mounted on
/dev/sdb5      ext3  2.2G   71M  2.0G   4% /data15
11、这样就可以正常使用了。可是重启之后又要手动挂载怎么办?
很简单,我们只要配置一下就OK了。
vim /etc/fstab
编辑文件 将/dev/sdb5 /data15 ext3 defaults 0 0加入即可
#
# /etc/fstab
# Created by anaconda on Mon Oct 24 02:05:13 2016
#
# Accessible filesystems, by reference, are maintained under '/dev/disk'
# See man pages fstab(5), findfs(8), mount(8) and/or blkid(8) for more info
#
UUID=147a6e0f-8fa6-4bb5-a27a-91aaa7cf178f /                       ext4    defaults        1 1
UUID=410da4b5-ac87-43e3-ab4a-b33df31e38cf /boot                   ext4    defaults        1 2
UUID=d0c4ed83-d5d3-4245-af14-1434f4b3438f swap                    swap    defaults        0 0
tmpfs                   /dev/shm                tmpfs   defaults        0 0
devpts                  /dev/pts                devpts  gid=5,mode=620  0 0
sysfs                   /sys                    sysfs   defaults        0 0
proc                    /proc                   proc    defaults        0 0
/dev/sdb5 /data15 ext3 defaults 0 0
~
~
~
~
"/etc/fstab" 16L, 841C
-
1
-
2
-
3
-
4
-
5
-
6
-
7
-
8
-
9
-
10
-
11
-
12
-
13
-
14
-
15
-
16
-
17
-
18
-
19
-
20
【o】 英文小写字母o,在目前光标所在行的下一行处插入新的一行并开始插入
【O】 英文大写字母O,在目前光标所在行的上一行处插入新的一行并开始插入
:wq保存退出
11、查看
[root@localhost Desktop]
/data15:
lost+found
重复以上操作,对sdb1进行挂载
[root@localhost Desktop]
mke2fs 1.41.12 (17-May-2010)
Filesystem label=
OS type: Linux
Block size=4096 (log=2)
Fragment size=4096 (log=2)
Stride=0 blocks, Stripe width=0 blocks
131648 inodes, 526120 blocks
26306 blocks (5.00%) reserved for the super user
First data block=0
Maximum filesystem blocks=541065216
17 block groups
32768 blocks per group, 32768 fragments per group
7744 inodes per group
Superblock backups stored on blocks:
32768, 98304, 163840, 229376, 294912
Writing inode tables: done
Creating journal (16384 blocks): done
Writing superblocks and filesystem accounting information: done
This filesystem will be automatically checked every 22 mounts or
180 days, whichever comes first. Use tune2fs -c or -i to override.
[root@localhost Desktop]
[root@localhost Desktop]
Filesystem Type Size Used Avail Use% Mounted on
/dev/sdb1 ext3 2.2G 71M 2.0G 4% /data5
[root@localhost Desktop]
[root@localhost Desktop]
/data15:
lost+found
/data5:
lost+found
[root@localhost Desktop]
Filesystem Size Used Avail Use% Mounted on
/dev/sda2 18G 4.0G 13G 24% /
tmpfs 491M 372K 491M 1% /dev/shm
/dev/sda1 291M 34M 242M 13% /boot
/dev/sdb5 2.0G 68M 1.9G 4% /data15
/dev/sdb1 2.0G 68M 1.9G 4% /data5
-
1
-
2
-
3
-
4
-
5
-
6
-
7
-
8
-
9
-
10
-
11
-
12
-
13
-
14
-
15
-
16
-
17
-
18
-
19
-
20
-
21
-
22
-
23
-
24
-
25
-
26
-
27
-
28
-
29
-
30
-
31
-
32
-
33
-
34
-
35
-
36
-
37
-
38
-
39
-
40
-
41
-
42
-
43
-
44
-
45
-
46
同上,又创建了一个逻辑分区
[root@localhost Desktop]# fdisk /dev/sdb
WARNING: DOS-compatible mode is deprecated. It's strongly recommended to
switch off the mode (command 'c') and change display units to
sectors (command 'u').
Command (m for help): m
Command action
a toggle a bootable flag
b edit bsd disklabel
c toggle the dos compatibility flag
d delete a partition
l list known partition types
m print this menu
n add a new partition
o create a new empty DOS partition table
p print the partition table
q quit without saving changes
s create a new empty Sun disklabel
t change a partition's system id
u change display/entry units
v verify the partition table
w write table to disk and exit
x extra functionality (experts only)
Command (m for help): n
Command action
l logical (5 or over)
p primary partition (1-4)
l
First cylinder (525-785, default 525):
Using default value 525
Last cylinder, +cylinders or +size (525-785, default 785): 4G
Value out of range.
Last cylinder, +cylinders or +size (525-785, default 785): 3G
Value out of range.
Last cylinder, +cylinders or +size (525-785, default 785): 1G
Value out of range.
Last cylinder, +cylinders or +size (525-785, default 785):
Using default value 785
Command (m for help): p
Disk /dev/sdb: 21.5 GB, 21474836480 bytes
255 heads, 63 sectors/track, 2610 cylinders
Units = cylinders of 16065 * 512 = 8225280 bytes
Sector size (logical/physical): 512 bytes / 512 bytes
I/O size (minimum/optimal): 512 bytes / 512 bytes
Disk identifier: 0x1949791c
Device Boot Start End Blocks Id System
/dev/sdb1 1 262 2104483+ 83 Linux
/dev/sdb4 263 785 4200997+ 5 Extended
/dev/sdb5 263 524 2104483+ 83 Linux
/dev/sdb6 525 785 2096451 83 Linux
Command (m for help): w
The partition table has been altered!
Calling ioctl() to re-read partition table.
WARNING: Re-reading the partition table failed with error 16: Device or resource busy.
The kernel still uses the old table. The new table will be used at
the next reboot or after you run partprobe(8) or kpartx(8)
Syncing disks.
-
1
-
2
-
3
-
4
-
5
-
6
-
7
-
8
-
9
-
10
-
11
-
12
-
13
-
14
-
15
-
16
-
17
-
18
-
19
-
20
-
21
-
22
-
23
-
24
-
25
-
26
-
27
-
28
-
29
-
30
-
31
-
32
-
33
-
34
-
35
-
36
-
37
-
38
-
39
-
40
-
41
-
42
-
43
-
44
-
45
-
46
-
47
-
48
-
49
-
50
-
51
-
52
-
53
-
54
-
55
-
56
-
57
-
58
-
59
-
60
-
61
-
62
-
63
-
64
-
65