思维导图


ke’y
PostgreSQL 的历史演进:
PostgreSQL 起源于加州大学分校,此分校有一个 stonebraker 教授,他在 1997 年的
时候领导了关系数据库 ingres 的研究项目。
1982 年他离开了此分校,并将 ingres 商业化,使之成为了 RT 公司的一个产品,此
后 RT 公司被 CA 公司收购。
2004 年 CA 公司在开源许可下发布了 ingres release 3,此后 CA 公司继续开发 ingres。
stonebraker 教授在此后返回 UCB 之后,又开始了一项叫做 post-ingres 计划,该计
划就是解决基于关系模型的数据库管理系统的局限性,这就是 postgres 的开端(还不是
现在的 PostgreSQL)。
1986 年开始,Stonebraker 教授发表了一系列论文,引入对象关系理念,探讨了新
的数据库的结构设计和扩展设计。
1986
年被视为
PostgreSQL
发展史的元年。
1988 年他提出 PostgreSQL 的第一个原型设计并发布第一个版本,此后又连续发布了
两个版本,并在最后一个版本中改进了规则系统,增加了对多种存储系统的支持,并改进
了查询引擎。
1993 年起,Postgres 用户越来越多,由于特性需求也急促增加,后来升级了第 4 个
版本,之后 Postgres 项目正式停止。
1994 年,有两个研究生 Andrew yu 和 Jolly Chen 增加了对 SQL 语言的支持,建立
Postgres95,并发行到了互联网。
1996 年,该计划重新命名为 PostgreSQL,许多世界各地数据库开发者以及志愿者参
与进来,并发行了 PostgreSQL 第一个版本 6.0,自此之后 PostgreSQL 开始持续稳定的发
布新版本,在新版本中有很多改进。
2008 年发布了 PostgreSQL8.0,从这个版本开始支持 Windows 操作系统。
2010 年底,PostgreSQL 发行了 9.0 版本。
2020 年 9 月份发布了 13 版本。
第
2
章
安装和配置:
1. 4 种安装方式:
1.1. yum
安装:
① 下载地址:
https://www.postgresql.org/download/linux/redhat/
② 系统优化:
#
关闭
selinux
:
setenforce 0
sed -i ‘s/SELINUX=enforcing/SELINUX=disabled/g’ /etc/selinux/config
cat /etc/selinux/config
#
关闭防火墙:
systemctl status firewalld.service
systemctl stop firewalld.service
systemctl disable firewalld.service
#
关闭
NetworkManager
:
systemctl stop NetworkManager
systemctl disable NetworkManager
③ 安装数据库:
#
配置数据库的
yum
源:
yum install -y https://download.postgresql.org/pub/repos/yum/reporpms/EL-7-
x86_64/pgdg-redhat-repo-latest.noarch.rpm
#
创建用户
(
也可以不创建
postgres
用户,
yum
安装会自动生成
postgres
用户,
su
切
换用户后会显示
-bash-4.2$)
:
useradd postgres
#
安装数据库:
yum install -y postgresql13-server
#
修改环境变量:
vim /etc/profile
export PATH=/usr/pgsql-13/bin/:$PATH
source /etc/profile
# root
用户下初始化数据库:
/usr/pgsql-13/bin/postgresql-13-setup initdb
#
默认初始化数据库路径:
/var/lib/pgsql/13/data
#
启动数据库:
systemctl enable postgresql-13
systemctl start postgresql-13
1.2.
编译安装:
#
下载并解压:
wget https://ftp.postgresql.org/pub/source/v13.3/postgresql-13.3.tar.gz
tar xf postgresql-13.3.tar.gz
#
安装依赖:
yum install -y bison flex readline-devel zlib-deve1 zlib zlib-devel gcc openssl-devel
#
创建用户并授权:
useradd postgres
mkdir /PGCCC/postgresql -p
#
进行编译:
cd postgresql-13.3/
./configure –prefix=/PGCCC/postgresql –with-openssl
gmake world && gmake install-world
#
进行授权:
chown -R postgres. /PGCCC/postgresql
#
配置环境变量:
vim /etc/profile
export PATH=/PGCCC/postgresql/bin:$PATH
export PGDATA=/PGCCC/postgresql/data
source /etc/profile
#
初始化:
su – postgres
initdb -D $PGDATA
# postgres
用户下使用
pg_ctl
进行启动:
pg_ctl -D $PGDATA start
#
使用
system
进行管理:
vim /usr/lib/systemd/system/postgresql-13.service
[Unit]
Description=PostgreSQL database server
After=network.target
[Service]
Type=forking
User=postgres
Group=postgres
Environment=PGPORT=5432
Environment=PGDATA=/PGCCC/postgresql/data/
OOMScoreAdjust=-1000
ExecStart=/PGCCC/postgresql/bin/pg_ctl start -D ${PGDATA} -s -o “-p ${PGPORT}” –
w -t 300
ExecStop=/PGCCC/postgresql/bin/pg_ctl stop -D ${PGDATA} -s -m fast
ExecReload=/PGCCC/postgresql/bin/pg_ctl reload -D ${PGDATA} -s
TimeoutSec=300
[Install]
WantedBy=multi-user.target
#
加载
system
配置:
systemctl daemon-reload
#
使用
systemctl
启动:
systemctl start postgresql-13.service
systemctl enable postgresql-13.service
1.3.
初始化参数说明:
-D
指定数据目录
-U
指定数据库超级用户名字
-E
指定数据库编码
-n
错误后不清理文件
-W
初始化时给数据库设置密码
-x
预写日志目录位置
–wal-segsize=SIZE
指定
WAL
段大小(单位
M
),默认是
16M
,最大
1G
1.4.
数据库启动与关闭:
①
使用
system
进行管理:
systemctl start postgresql-13
systemctl enable postgresql-13
systemctl status postgresql-13
systemctl stop postgresql-13
②
使用
postgresql
自带的命令进行管理:
pg_ctl start
pg_ctl stop
pg_ctl status
pg_ctl -D $PGDATA stop -m smart
pg_ctl -D $PGDATA stop -m fast
pg_ctl -D $PGDATA stop -m immediate
③
如果启停有问题可以查看日志:
vim /var/lib/pgsql/13/data/log/postgresql-Mon.log
1.5.
注意事项:
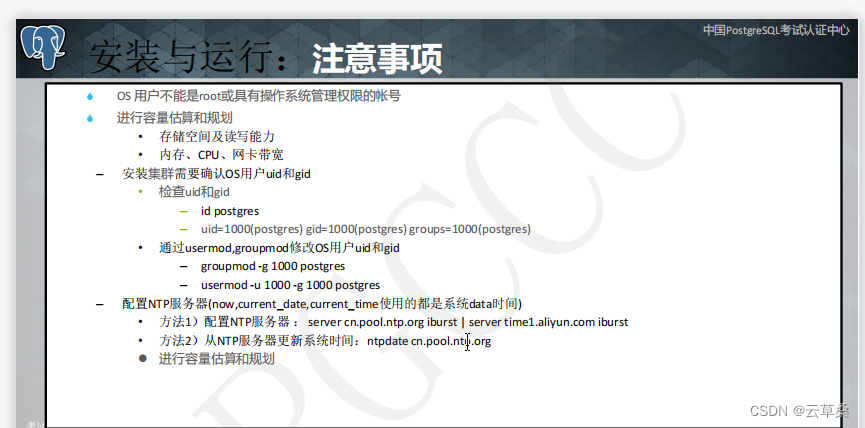
①
OS
用户不能是
root
或具有操作系统管理权限的账号。
PGCCC
中国 PostgreSQL 考试认证中心
www.pgccc.com.cn
② 进行容量估算和规划:
#
存储空间及读写能力。
#
内存、
cpu
、网卡宽带。
③ 安装集群需要确认
OS
用户
UID
和
GID
。
④ 配置时间同步:
#
服务端配置:
yum -y install ntp
vim /etc/ntp.conf
#
给与本机所有权限
restrict 127.0.0.1
restrict ::1
#
授权下述网段上所有的机器允许从
ntp
服务器上查询和同步时间
restrict 10.0.0.0 mask 255.255.255.0 nomodify notrap
#
增加下述几个时间服务器列表
,
除了
0.asia.pool.ntp.org
还会有很多时间服务器
.
比如
0.cn.pool.ntp.org
或者
time.nist.gov
或者
server 0.asia.pool.ntp.org iburst
server 1.asia.pool.ntp.org iburst
server 2.asia.pool.ntp.org iburst
server 3.asia.pool.ntp.org iburst
#
这两行内容表示当外部时间不可用时,使用本地时间
server 127.127.1.0 iburst
fudge 127.127.1.0 stratum 10
#
设置开机自启动:
systemctl enable ntpd
systemctl start ntpd
systemctl enable ntpdate
systemctl start ntpdate
#
查看
ntp
情况:
ntpq -p
#
解释:
remote:
即
NTP
主机的
IP
或主机名称
.
注意最左边是
+
表示目前正在起作用的上层
NTP,
如
果是
*
表示这个也连接上了
,
不过是作为次要联机的
NTP
主机
refid:
参考的上一层
NTP
主机的地址
st:
即
stratum
阶层
t:
是连接类型
. u
代表单播
(unicast) l
代表本地
(local) ,
其他的还有多播
(multicast),
广
播
(broadcast)
when:
这个时间之前刚刚做过时间同步
poll:
下次更新在几秒之后
reach:
已经向上层
NTP
服务器要求更新的次数
delay:
网络传输过程中的延迟时间
offset:
时间补偿的结果
jitter:Linux
系统时间和
Bios
硬件时间的差异时间
#
与硬件时间进行同步:
hwclock -w
#
测试:
ntpstat
#
客户端配置:
yum -y install ntp ntpdate
方法一:
#
重启服务以使配置生效
,
之后大概要等
10
分钟左右
,
才会同步成功
echo “server 192.168.10.200” >/etc/ntp.conf
systemctl enable ntpd
systemctl restart ntpd
hwclock -w
方法二:
systemctl enable ntpdate
/usr/sbin/ntpdate -u 10.0.0.63
hwclock -w
crontab -e
10 23 * * * (/usr/sbin/ntpdate -u 192.168.10.200 && /sbin/hwclock -w) &>
/var/log/ntpdate.log
⑤ 在
Linux
上作为一个后台进程,在
windows
上作为一个服务:
#
查看
postgres
进程:
ps -ef|grep postgres
#
查看
postgres
端口号:
netstat -lntup|grep postgres
netstat -lntup|grep postgres
#
根据端口号查看某个服务:
lsof -i:5432
⑥
OS
用户不能是
root
或具有操作系统管理权限的账号。
⑦ 环境变量说明:
# $PGHOME
指向
PG
可执行程序的路径(安装路径)。
# $PGDATA
指向数据库目录。
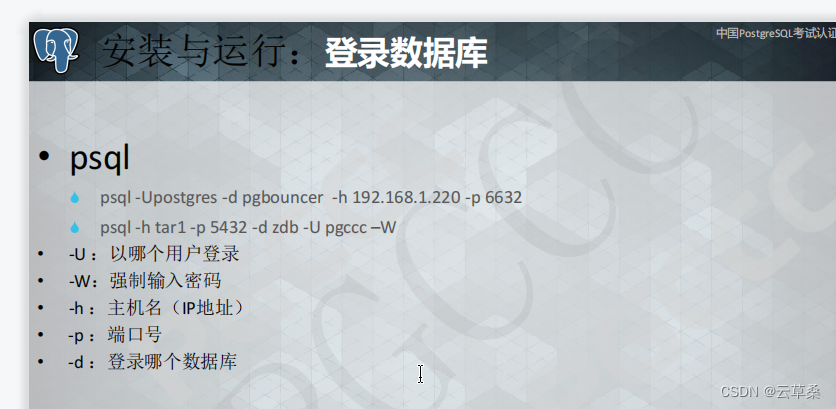
2. psql 登录参数说明:
2.1.
参数说明:
-U
以哪个用户登录
-W
强制输入密码
-h
主机名
/IP
地址
-p
端口号
-d
登录哪个数据库
2.2. PostgreSQL
实践:
① 连接参数实践:
psql -h 10.0.0.62 -p 5432 -U postgres -d postgres
psql -h 10.0.0.62 -p 5432 -d postgres -U postgres -W
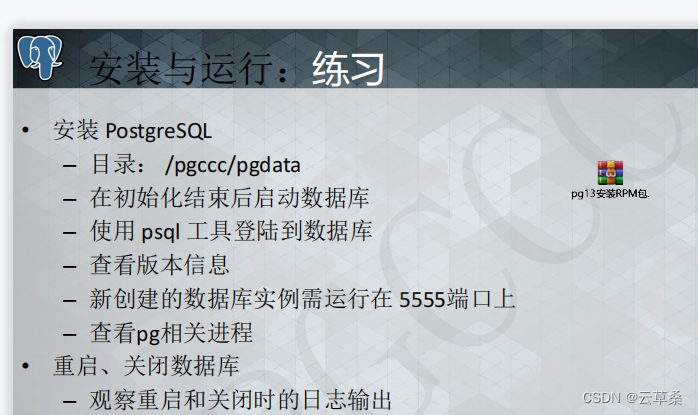
② 安装
PostgreSQL
后实践:
#
安装目录:
/pgccc/pgdata
:
#
在初始化结束后启动数据库:
#
使用
psql
工具登录数据库:
#
查看版本信息:
psql –version
select version();
#
在
5555
端口上创建数据库实例:
#
查看
pg
相关进程:
#
重启关闭数据库,并观察日志的输出。
3. 参数配置:
3.1.
参数配置基础:
① 配置文件的位置:
$ PGDATA/postgresql.conf
#
参数文件存在才会进行加载
include_if_exists = ”
#
加载目录下的参数文件
include_dir = ”
#
无论参数文件是否存在都会加载
include = ”
② 配置文件详解:
# alter system
修改后的参数配置,会覆盖
postgresql.conf
的值
postgresql.auto.conf
# pg12
已经不存在这个文件,已经将此文件的参数合并到了
postgresql.conf
中:
recovery.conf
#
客户端认证配置文件:
pg_hba.conf
#
客户端认证映射文件:
pg_ident.conf
3.2.
全局参数修改:
① 全局参数的修改:
alter system set port=5433;
② 查看参数配置:
select name,setting from pg_settings where name = ‘port’;
select current_setting(‘port’);
show port;
③ 修改参数后,使参数生效的方法:
select pg_reload_conf();
pg_ctl -D $PGDATA restart
3.3.
非全局参数修改:
① 库级别修改和重置:
alter database postgres set timezone = ‘utf8’;
alter database postgres reset timezone;
②
session
级别修改和重置:
set timezone = ‘utf8’;
reset timezone;
③
role
级别的配置:
alter role postgres in database postgres set timezone = ‘utf8’;
alter role postgres in database postgres reset timezone;
4. PG 防火墙(pg_hba.conf):
4.1.pg_hba.conf
配置文件讲解
4.1.1. 第一列连接方式:
local
使用
Unix
域套接字的连接,如果没有
TYPE
为
local
的条目则不允许通过
Unix
域
套接字连接
host
匹配使用
TCP/IP
建立的连接,同时匹配
SSL
和非
SSL
连接
hostssl
匹配必须是使用
SSL
的
TCP/IP
进行连接。
配置
hostssl
有
3
个条件:
① 客户端和服务端都安装
openssl
② 编译时要指定
–with-openssl
打卡
ssl
支持
①
在
postgresql.conf
中配置
ssl = on
hostnossl
只匹配使用非
SSL
的
TCP/IP
连接
4.1.2. 第二列目标数据库:
DATABASE
列标识该行设置对哪个数据库生效。
4.1.3. 第三列目标用户:
USER
列标识该行设置对哪个数据库用户生效。
4.1.4. 第四列访问来源:
ADDRESS
列标识该行设置对哪个
IP
地址或
IP
地址段生效。
4.1.5. 第五列认证方式:
reject
无条件拒绝连接
md5
和
password
双重
md5
加密和明文加密。
scram-sha-256
postgresql10
中新增最安全的加密方式。
trust
无条件的允许连接
cert
使用
SSL
客户端证书认证
peer
本地操作系统的当前用户名和数据库的用
户名一致时,可以直接使用此用户名登录
而不需要密码
ident
用户映射文件
4.2.pg_ident.conf
配置文件详细说明:
例子:当
OS
用户是
zhang
时,允许它以数据库用户
postgres
进行连接:
vim pg_hba.conf
local all all ident
map=yingshe
vim pg_ident.conf
yingshe zhang postgres
4.3.
练习题:
① 如果要使所有可提供有效密码的用户均能从以
10
开头的地址连接到
PostgreSQL
实例中的任何数据库,则需要向
pg_hba.conf
文件添加与与下面的行内容类似的行:
host all all 10.0.0.0/8 md5
② 允许
IP
地址为
10.10.56.17
的所有用户可以通过
MD5
的密码验证方式连接主机上所
有的数据库:
host all all 10.10.56.17/32 md5
③ 即表示允许地址为
10.10.56.17
的用户
pgtest
通过
MD5
方式 加密的密码方式连
接主机上的
test
数据库:
host test pgtest 10.10.56.17/32 md5
④ 即表示允许 任意
iP
通过用户名为
pgtest
和
md5
的 密码 验证方式连接主机上
test
的数据库:
host test pgtest 0.0.0.0/0 md5
① 表示任意
IP
地址的用户
pgtest
无需密码验证可直接连接访问该主机的
test
数据库
host test pgtest 0.0.0.0/0 trust
4.4.
最安全的认证方式
① 查看当前加密方式:
show password_encryption;
② 修改加密方式:
#
修改配置文件或直接使用命令修改如下参数:
alter system set password_encryption = ‘scram-sha-256’;
#
重新加载配置文件:
select pg_reload_conf();
#
重置用户密码:
\password 123456
#
修改
pg_hba.conf
验证方式:
host all all 10.0.0.62/32 scram-sha-256
#
重新加载配置文件:
select pg_reload_conf();
5. 客户端连接工具:
\?
获得
psql
的帮助
\h
获取语法的帮助
psql -c
在
shell
中执行命令
psql <
通过
psql
执行
sql
文件,用来恢复数据
\l
查看有哪些数据库
\c
切换数据库
\d
显示每个匹配关系(表、视图、索引、序列)信息
\timing on
显示
SQL
执行的时间
\timing off
关闭计时功能
\dn
列出所有的
schema
\db
显示所有的表空间
\du
列出所有的角色或用户
\dp
显示权限分配情况
\x
行列互换显示
\set AUTOCOMMIT off
将自动提交功能关闭
6. 数据库管理:
① 创建数据库:
方法一:
create database testdb;
方法二:
createdb testdb
② 连接数据库:
psql testdb
③ 删除数据库:
方法一:
drop database testdb;
方法二:
dropdb testdb
第
3
章
体系结构初探:
1.
数据库集群(Database Cluster)的概念:
① 一个数据库集簇(
database cluster
)
=
一个数据库实例(简称“实例”)
② 每个数据库实例由数据库目录组成,目录中包含了所有的数据文件和配置文件
③ 不同的实例可以通过两种方式引用:
数据目录的位置
端口号
④
一个服务器可以管理多个数据库实例
2.
内存结构:
shared_buffers
共享内存
work_mem
当使用
order by
或
distinct
操作对元组仅
从排序时会使用这部分内存
wal_buffer
wal
缓存
3.
进程结构:
background wirter
进程将
shared buffer pool
中的脏数据写到磁盘,检
查点总能出发这个进程
checkpointer
检查点会触发产生这个进程
autovacuum launcher
autovacuum
的守护进程,周期性调用
autovacuum
worker
进程。
autovacuum
的作用:
① 删除或重用无效元组的磁盘空间
② 更新数据统计信息,保证执行计划更优
③ 更新
visibility map
,加速
index-only scans
④ 避免
XID
回卷造成的数据丢失
WAL writer
周期行的从
wal buffer
刷新数据到磁盘
stats collector
收集统计信息进程(表和索引进行了多少次插入,更
新,删除操作,磁盘块读写次数及行的读写次数)
logging collector (logger)
将错误信息写入到日志
archiver
将日志归档进程
postgremaster
监听
4.
物理结构:
数据目录
base
表和索引文件存放目录
global
影响全局的系统表存放目录
pg_commit_ts
事务提交时间戳数据存放目录
pg_stat
统计子系统信息永久文件
pg_wal
事务日志(预写日志)
相关文件
PG_VERSION
版本号文件
pg_hba.conf
客户端认证控制文件
postgresql.conf
参数文件
postgresql.auto.conf
参数文件,只保存
ALTER SYSTEM
命令修改的
参数
postmaster.opts
记录服务器最后一次启动时使用的命令行参数
pg_ident.conf
控制
postgresql
用户名映射文件
postmaster.pid
记录数据库进程编号、
PGDATA
、端口等
第
4
章
故障排查:
① 查看操作系统错误日志
/var/log/message
系统启动后的信息和错误日志,是
Red Hat Linux
中最常用的日志之
一
② 查看数据库错误日志
查看文件
$PGDATA/log
默认情况下,一天产生一个日志
第
5
章
SQL
入门:
1. 在 postgresql 中的转义:
① 方法一:
postgres=# select E’I\’m student’;
?column?
————-
I’m student
② 方法二:
postgres=# select $$’I’m student’$$;
?column?
—————
‘I’m student’
2. 数据类型:
2.1.
数字类型:
2.1.1. 数字类型列表:
类型名称
存储长度
描述
范围
smallint(int2)
2
字节
小范围整数类型
-32 768
到
+32 767
integer(int4)
4
字节
整数类型
-2 147 483 648
到
+2 147 483 647
bigint(int8)
8
字节
大范围整数类型
-9 223 372 036 854 775 808
到
+9
223 372 036 854 775 807
decimal
可变
用户指定精度
小数点前
131 072
位;小数点后
16 383
位
numeric
可变
用户指定精度
小数点前
131 072
位;小数点后
16 383
位
real
4
字节
变长,不精确
6
位十进制精度
double
precision
8
字节
变长,不精确
15
位十进制精度
smallserial
2
字节
smallint
自增序列
1
到
32 767
serial
4
字节
integer
自增序列
1
到
2 147 483 647
bigserial
8
字节
bigint
自增序列
1
到
9 223 372 036 854 775 807
money
8
字节
货币金额
-92233720368547758.08
到
+92233720368547758.07
2.1.2. 数字类型详细说明:
①
smallint
、
integer
、
bigint
类型详细说明:
smallint
、
integer
、
bigint
都是整数类型,例如定义
integer
类型的表:
create table test_integer (id1 integer,id2 int4);
②
decimal
和
numeric
类型详细说明:
decimal
和
numeric
是等效的,可以存储指定精度的多位数据,比如带小数位的数据,适
用于要求计算准确的数值运算,语法如下:
numeric (precision,scale)
#
例如:
decimal(6,2)
中的
6
指的是整数部分加小数部分的总长度,
2
表示小数部分的位数。
③
real
和
double precision
是浮点数据类型
④
smallserial
、
serial
和
bigserial
类型是自增
serial
类型,如下创建一张测试表:
postgres=# create table test_serial (id serial,flag text);
CREATE TABLE
postgres=# insert into test_serial (flag) values (‘a’);
INSERT 0 1
postgres=# insert into test_serial (flag) values (‘b’);
INSERT 0 1
postgres=# insert into test_serial (flag) values (‘c’);
INSERT 0 1
postgres=# select * from test_serial;
id | flag
—-+——
1 | a
2 | b
3 | c
(3 rows)
2.2.
时间
/
日期类型:
2.2.1. 时间日期类型列表:
字符类型名称
存储长度
描述
timestamp[ (p) ] [without time zone]
8
字节
包括日期和时间,不带时
区,简写
timestamp
timestamp[ (p) ] with time zone
8
字节
包括日期和时间,带时区,
简写成
timestamptz
date
4
字节
日期,但不包含一天中的时
间
time[ (p) ] [without time zone]
8
字节
一天中的时间,不包含日
期,不带时区
time[ (p) ] [with time zone]
12
字节
一天中的时间,不包含日
期,带时区
interval[ fields ] [ (p) ]
16
字节
时间间隔
2.2.2. 时间类型的转换:
① 系统自带的
now()
函数,默认返回的类型为
timestamp [ (p) ] with time zone
类型,
PGCCC
中国 PostgreSQL 考试认证中心
www.pgccc.com.cn
如下所示:
postgres=# select now();
now
——————————-
2021-06-02 16:31:14.928476+08
② 将
timestimep[ (p) ] with time zone
类型转换为
timestimep without time zone
类
型:
postgres=# select now()::timestamp without time zone;
now
—————————-
2021-06-02 16:36:26.466071
③ 转换成
date
类型:
postgres=# select now()::date;
now
————
2021-06-02
④ 转换成
time without time zone
类型:
postgres=# select now()::time without time zone;
now
—————–
16:42:01.058327
⑤ 转换成
time with time zone
类型:
postgres=# select now()::time with time zone;
now
——————–
16:44:01.389454+08
2.3.
字符类型:
2.3.1. 字符类型列表:
字符类型名称
描述
character varying(n),varchar(n)
变长,字符最大数有限制
character(n),char(n)
定长,字符数没达到最大值则使用空白填
充
text
变长,无长度限制
2.3.2. 字符类型详细说明:
① 创建一张测试表,并插入一条测试数据:
create table test_char(col1 varchar(4),col2 character(4));
insert into test_char(col1,col2) values(‘a’,’a’);
② 查看两个字段值的字符串长度:
postgres=# select char_length(col1),char_length(col2) from test_char;
char_length | char_length
————-+————-
1 | 1
③ 查看两个字段实际占用的物理空间大小:
postgres=# select octet_length(col1),octet_length(col2) from test_char;
octet_length | octet_length
————–+————–
1 | 4
(1 row)
2.4.
范围类型:
2.4.1. 范围类型列表:
int4range
integer
范围类型
int8range
bigint
范围类型
numrange
numeric
范围类型
tsrange
timestamp
范围类型
tstzrange
timestamp
范围类型
daterange
date
范围类型
2.4.2. 实践说明:
① 用户可以通过
create type
自定义范围类型,
integer
范围类型举例:

②
daet
范围类型举例:

2.4.3. 范围类型操作符:
① 计算交叉:
① 提取上边界:
② 提取下边界:
2.5.
布尔类型:
2.5.1. 布尔类型列表:
字符类型名称
存储长度
描述
boolean
1
字节
状态为
true
或
false
2.5.2. 演示说明:
①
true
状态的有效值可以是
TRUE
、
t
、
true
、
y
、
yes
、
on
、
1
;
false
状态的有效值为
FALSE
、
f
、
fase
、
n
、
no
、
off
、
0
:
#
删除库下所有表:
DO $$
DECLARE
r RECORD;
PGCCC
中国 PostgreSQL 考试认证中心
www.pgccc.com.cn
BEGIN
— if the schema you operate on is not”current”, you will want to
— replace current_schema() in query with ‘schematodeletetablesfrom’
— *and* update the generate ‘DROP…’ accordingly.
FOR
r
IN
(
SELECT
tablename
FROM
pg_tables
WHERE
schemaname
=
current_schema()) LOOP
EXECUTE
‘DROP TABLE IF EXISTS ‘
||
quote_ident(r.tablename)
||
‘
CASCADE’
;
END
LOOP;
END
$$;
#
创建表并插入数据:
create table test_boolean(cola boolean,colb boolean);
insert into test_boolean (cola,colb) values (‘true’,’false’);
insert into test_boolean (cola,colb) values (‘t’,’f’)
insert into test_boolean (cola,colb) values (‘TRUE’,’FALSE’);
insert into test_boolean (cola,colb) values (‘yes’,’no’);
insert into test_boolean (cola,colb) values (‘y’,’n’);
insert into test_boolean (cola,colb) values (‘1′,’0’);
insert into test_boolean (cola,colb) values (null,null);
#
以上插入的是
TRUE
、
t
、
true
、
y
、
yes
、
on
、
1
和
FALSE
、
f
、
fase
、
n
、
no
、
off
、
0
,
但最终显示结果都会以
t
或
f
进行显示,而插入的
null
值,则为空:
PGCCC
中国 PostgreSQL 考试认证中心
www.pgccc.com.cn
3.2. SQL
标准:
SQL 89
SQL 92 *****
SQL 99
SQL 03
3.3.
常用分类:
DDL
数据定义语言,用来定义库和表
DCL
数据控制语言
DML
数据操作语言
DQL
数据查询语言
4. 基础 SQL
4.1.
常见约束说明
not null
非空约束,不能为空
unique
唯一不能重复
primary key
主键,非空且唯一
check
检查约束
null
在创建记录时可以留空
4.2.
库的定义:
4.2.1. 创建库:
①
使用
SQL
语句来创建:
create database test;
②
使用命令创建:
createdb -U postgres test
③
使用工具创建库:
略
PGCCC
中国 PostgreSQL 考试认证中心
www.pgccc.com.cn
4.2.2. 数据库的切换及删除:
①
数据库切换:
\c test;
②
数据库的删除:
#
删除数据库,如果不存在则报错:
drop database test;
#
删除数据库,如果不存不会报错,而是发出提示信息:
drop database if exists test;
#
也可以用工具进行删除:
略
4.3.
表的定义:
①
创建数据库表格:
create table student(id int2 not null primary key,sname varchar(10) not null,age int2
not null);
②
删除数据库表格:
drop table student;
4.4.
模式的定义及删除:
①
创建模式:
create schema schema1;
②
查看当前所有模式:
SELECT * FROM information_schema.schemata;
③
切换模式:
SET search_path TO myschema,schema1;
④
删除模式:
drop schema schema1;
⑤
删除模式及模式中所有对象:
drop schema schema1 cascade;
PGCCC
中国 PostgreSQL 考试认证中心
www.pgccc.com.cn
4.5.
插入多行数据:
①
最规范用法:
insert into student(id,sname,age) values(1,’zhangsan’,19);
②
多行录入:
insert into student(id,sname,age) values(1,’zhangsan’,19),( 2,’lisi’,19 );
③
最简约方式录入:
insert into student values(1,’zhangsan’,19);
4.6. select
语句的使用:
4.6.1. 查询列:
①
例如查询
id
列和
name
列:
#
首先创建表格,并插入数据:
create table student(id int2 not null primary key,sname varchar(10) not null,age int2
not null);
insert into student(id,sname,age) values(1,’zhangsan’,19),( 2,’lisi’,19 ),
( 3,’wangwu’,17 ), ( 4,’liu4′,20 ), ( 5,’aqing’,21 );
#
查询
id
列和
name
列:
select id,sname from student;
②
例如查询所有列的内容:
select * from student;
PGCCC
中国 PostgreSQL 考试认证中心
www.pgccc.com.cn
4.6.2. 运算符:
①
算数运算符
+ – * /
的使用:
#
运算符在
select
语句中的使用:
select * from student where id=2+1;
select * from student where id=2-1;
……
#
运算符在
update
语句中的使用:
update student set sname=’
张学衡
‘ where id=4+1;
#
运算符在
delete
中使用:
delete from student where id=4+1;
②
比较符
> < =
的使用:
#
比较符在
select
语句中使用:
select * from student where id>1;
……
#
比较符在
update
语句中使用:
略
#
比较符在
delete
语句中使用:
略
③
逻辑运算符
and or not
:
#
逻辑运算符在
select
语句中使用:
select * from student where id=1 and sname=’zhangsan’;
select * from student where sname=’zhangsan’ or sname=’wangwu’;
select * from student where not sname=’zhangsan’;
#
逻辑运算符在
update
语句中使用:
update student set sname=’
张学衡
‘ where id=1 and sname=’zhangsan’;
……
#
逻辑运算符在
delete
中使用:
delete from student where not sname=’
张学衡
‘;
④
模糊查询:
#
例如查找
sname
列中不确定的值,比如查找
z
字母开头的:
select * from student where sname like ‘z%’;
#
例如前面的一个字母忘记了,后面的字母都记得,应该如何查询呢?
select * from student where sname like ‘_hangsan’;
4.6.3. limit 子句的使用:
#
例如查看
student
表中的前两行数据:
select * from student limit 2;
#
例如查看
student
表中,从第
2
行开始,第
3
行数据:
PGCCC
中国 PostgreSQL 考试认证中心
www.pgccc.com.cn
select * from student limit 2 offset 3;
4.6.4. order by 子句的使用:
①
例如查询
student
表中年龄小于
21
岁的数据,并且以
id
列为升序:
select * from student where age<21 order by id;
②
例如查询
student
表中年龄小于
21
岁的数据,并且以
id
列为降序:
select * from student where age<21 order by id desc;
③
也可以结合
limit
子句来使用,例如查询年龄小于
21
岁的数据中的倒数第一行数据:
select * from student where age<21 order by id desc limit 1;
4.6.5. group by 子句的使用:
①
环境准备:
#
创建
city
表:
create table city(id bigserial NOT NULL primary key,
姓名
char(35) NOT NULL,
国家代
号
char(3),
地区
char(20),
人口
int);
#
导入数据:
copy city from ‘/opt/city.dat’;
②
group by
子句的使用:
#
统计下中国每个省的城市个数:
select
地区
,count(
人口
) from city where
国家代号
=’CHN’ group by
地区
;
#
统计世界上每个国家的人口数:
select
国家代号
,sum(
人口
) from city group by
国家代号
;
4.6.6. WITH 子句的使用:
①
使用
with
做一个简单的查询:
with test as (select * from student) select * from test;
②
使用
with
子句做递归查询,例如从
1
加到
100
:
with recursive test (x) as (select 1 union select x+1 from test where x<100) select
sum(x) from test;
4.6.7. having 子句的使用:
#
统计中国每个省份的人口总数,只显示总人口数小于
100
万的信息
:
select
地区
,sum(
人口
) from city where
国家代号
=’CHN’ group by
地区
having
sum(
人口
)<1000000;
PGCCC
中国 PostgreSQL 考试认证中心
www.pgccc.com.cn
4.6.8. distinct 关键字的使用:
①
创建环境,创建一张表,并插入几行数据:
create table test (id int not null);
insert into test values (1),(1),(2),(3),(3),(4);
②
使用
distinct
进行去重:
select distinct(id) from test;
4.7.
多表连接
4.7.1. 创建多表连接环境:
CREATE TABLE
学生表
(
学号
int4 NOT NULL PRIMARY KEY,
学生姓名
VARCHAR(20)
NOT NULL,
学生年龄
int2 NOT NULL,
学生性别
varchar(10) NOT NULL);
CREATE TABLE
课程表
(
课程编号
INT NOT NULL PRIMARY KEY,
课程名字
VARCHAR(20) NOT NULL,
教师编号
INT NOT NULL);
CREATE TABLE
成绩表
(
学号
INT4 NOT NULL,
课程编号
INT4 NOT NULL,
成绩
INT8
NOT NULL);
CREATE TABLE
教师表
(
教师编号
INT4 NOT NULL PRIMARY KEY,
教师名字
VARCHAR(20) NOT NULL);
INSERT INTO
学生表
VALUES
(1,’zhang3′,18,’
男
‘),
(2,’zhang4′,18,’
男
‘),
(3,’li4′,18,’
男
‘),
(4,’wang5′,19,’
女
‘),
(5,’zh4′,18,’
男
‘),
(6,’zhao4′,18,’
男
‘),
(7,’ma6′,19,’
女
‘),
(8,’oldboy’,20,’
男
‘),
(9,’oldgirl’,20,’
女
‘),
(10,’oldp’,25,’
男
‘);
INSERT INTO
教师表
VALUES
(101,’oldboy’),
(102,’hesw’),
(103,’oldguo’),
(104,’alex’);
PGCCC
中国 PostgreSQL 考试认证中心
www.pgccc.com.cn
INSERT INTO
课程表
VALUES
(1001,’linux’,101),
(1002,’python’,102),
(1003,’mysql’,103),
(1004,’go’,105);
INSERT INTO
成绩表
VALUES
(1,1001,80),
(1,1002,59),
(2,1002,90),
(2,1003,100),
(3,1001,99),
(3,1003,40),
(4,1001,79),
(4,1002,61),
(4,1003,99),
(5,1003,40),
(6,1001,89),
(6,1003,77),
(7,1001,67),
(7,1003,82),
(8,1001,70),
(9,1003,80),
(10,1003,96);
4.7.2. 多表连接的种类:
①
交叉连接: 生成笛卡尔积
#
例如将教师表与课程表进行关联:
select * from
教师表
cross join
课程表
;
②
内连接:

#
例如将教师表与课程表进行关联:
select * from
教师表
join
课程表
on
教师表
.
教师编号
=
课程表
.
教师编号
;
③ 左外连接:
#
例如将教师表与课程表进行关联:
select * from
教师表
left join
课程表
on
教师表
.
教师编号
=
课程表
.
教师编号
;
④ 右外连接:
#
例如将教师表与课程表进行关联:
select * from
教师表
right join
课程表
on
教师表
.
教师编号
=
课程表
.
教师编号
;
⑤ 全外连接:

#
例如将教师表与课程表进行关联:
select * from
教师表
full join
课程表
on
教师表
.
教师编号
=
课程表
.
教师编号
;
⑥
查询
oldguo
所教的不及格的学生姓名:(小于
60
分不及格)
select
教师表
.
教师名字
,
array_agg(
学生表
.
学生姓名
)
from
教师表
join
课程表
on
教师表
.
教师编号
=
课程表
.
教师编号
join
成绩表
on
课程表
.
课程编号
=
成绩表
.
课程编号
join
学生表
on
成绩表
.
学号
=
学生表
.
学号
where
教师表
.
教师名字
=’oldguo’
and
成绩表
.
成绩
<60
group by
教师表
.
教师名字
;
4.8. union
的使用:
①
例如我想查看
oldguo
和
oldboy
分别交了哪些课程:
select
教师表
.
教师名字
,
课程表
.
课程名字
from
教师表
join
课程表
on
教师表
.
教师编
号
=
课程表
.
教师编号
where
教师表
.
教师名字
=’oldboy’ union select
教师表
.
教师名字
,
课程表
.
课程名字
from
教师表
join
课程表
on
教师表
.
教师编号
=
课程表
.
教师编号
where
教师表
.
教师名字
=’oldguo’;
4.9. as
别名的使用:
①
表别名的使用,以查询不及格的学生为例:
select a.
教师名字
,
array_agg(d.
学生姓名
)
from
教师表
as a
join
课程表
as b
on a.
教师编号
=b.
教师编号
join
成绩表
as c
on b.
课程编号
=c.
课程编号
join
学生表
as d
on c.
学号
=d.
学号
where a.
教师名字
=’oldguo’
and c.
成绩
<60
group by a.
教师名字
;
②
列表明的使用,还是以查询不及格的学生为例:
select
教师表
.
教师名字
as tname,
array_agg(
学生表
.
学生姓名
) as sname
from
教师表
join
课程表
on
教师表
.
教师编号
=
课程表
.
教师编号
join
成绩表
on
课程表
.
课程编号
=
成绩表
.
课程编号
PGCCC
中国 PostgreSQL 考试认证中心
www.pgccc.com.cn
join
学生表
on
成绩表
.
学号
=
学生表
.
学号
where
教师表
.
教师名字
=’oldguo’
and
成绩表
.
成绩
<60
group by
教师表
.
教师名字
;
4.10.
触发器的使用:
4.10.1. 触发器触发的几种方式:
①
在执行操作之前(在检查约束并尝试插入、更新或删除之前)
②
在执行操作之后(在检查约束并插入、更新或删除完成之后)
③
更新操作(在对一个视图进行插入、更新、删除时)
4.10.2. 触发器使用说明:
①
for each row
属性是可选的,如果选中,当操作修改时每行调用一次;相反如果选中
for each statement
属性不管修改了多少行,每个语句标记的触发器只执行一次。
②
BEFORE
或
AFTER
关键字决定何时执行触发器动作,决定是在关联行的插入、修改
或删除之前或者之后执行触发器动作。
4.10.3. 触发器实践:
说明:在这里我们来拿
t1
表来做演示,我们来拿
t1
表中的每一行记录保持审计实验:
①
insert
的场景:
#
创建
t1
表
:
create table t1(id int not null,name varchar(20) not null);
#
创建触发器记录表:
create table cfq(cfq_id int not null,cfq_date text not null);
#
定义
auditlogfunc()
程序:
CREATE OR REPLACE FUNCTION auditlogfunc() RETURNS TRIGGER AS
$example_table$
BEGIN
INSERT INTO cfq(cfq_id, cfq_date) VALUES (new.ID, current_timestamp);
RETURN NEW;
END;
$example_table$ LANGUAGE plpgsql;
#
创建触发器:
CREATE TRIGGER example_trigger AFTER INSERT ON t1 FOR EACH ROW EXECUTE
PROCEDURE auditlogfunc();
#
查看当前表的触发器:
SELECT tgname FROM pg_trigger, pg_class WHERE tgrelid=pg_class.oid AND
PGCCC
中国 PostgreSQL 考试认证中心
www.pgccc.com.cn
relname=’t1′;
#
删除触发器:
drop trigger example_trigger on t1;
②
update
的场景:
CREATE TRIGGER example_trigger AFTER UPDATE OF name ON t1 FOR EACH ROW
EXECUTE PROCEDURE auditlogfunc();
4.11.
索引的创建:
①
单列索引的创建:
#
创建一张表:
create table t3 (id int4 not null,name varchar(40) not null,age int4 not null,shoujihao
int8 not null);
#
插入几行数据:
insert into t3 values
(1,’zhang3′,22,15822067473),(2,’zhang4′,23,15822066473),(3,’zhang5′,19,158220675
73);
#
创建单列索引:
create index idx_name on t3 (name);
#
查看索引:
select * from pg_indexes where tablename=’t3′;
#
删除索引:
drop index idx_name;
②
组合索引的创建:
create index idx_id_name_age on t3 (id,name,age);
③
唯一索引的创建:
create unique index idx_unique_id on t3 (id);
④
隐式索引:
#
隐式索引是在创建对象时,由数据库服务器自动创建的索引。索引自动创建为主键约束
和唯一约束。
4.12.
表结构的修改:
①
首先创建一个表:
create table t1 (id int);
②
在
t1
表中添加
name
列:
alter table t1 add name varchar(20);
PGCCC
中国 PostgreSQL 考试认证中心
www.pgccc.com.cn
③
在
t1
表中删除
name
列:
alter table t1 drop column name;
④
修改
t1
表中
id
列的数据类型:
alter table t1 alter column id type int4;
⑤
给
t1
表中
name
列添加
not null
约束:
#
先添加
name
列:
alter table t1 add name varchar(20);
alter table t1 alter name set not null;
⑥
给
t1
表中
id
列添加
unique
约束:
alter table t1 add constraint unique_id unique (id);
⑦
给
t1
表添加
check
约束
:
#
添加
age
列:
alter table t1 add age int2;
alter table t1 add constraint check_age check (age > 0);
⑧
给
t1
表添加及删除主键:
#
添加主键:
alter table t1 add constraint primarykey_id primary key (id);
#
删除主键:
alter table t1 drop constraint primarykey_id;
4.13. PostgreSQL
三种对表的删除方式:
①
truncate
删除方式:
#
清空表中所有的数据,但不清空表结构,立即释放空间
②
drop
删除方式:
#
删除整张表(包含表结构及数据),立即释放空间。
③
delete
删除方式:
#
删除表中的数据,可以使用
where
条件指定删除,不会降低高水位,不会释放空间。
#
高水位演示:
create table t2 (id bigserial not null,name varchar(20));
insert into t2 (name) values(‘zhang3’);
④
实践说明:
#
创建一张表:
略
#
插入数据:
PGCCC
中国 PostgreSQL 考试认证中心
www.pgccc.com.cn
略
#
查看表的大小:
select pg_size_pretty(pg_relation_size(‘t1’));
4.14. PostgreSQL
视图:
①
创建视图:
create view bjg as
select
教师表
.
教师名字
,
array_agg(
学生表
.
学生姓名
)
from
教师表
join
课程表
on
教师表
.
教师编号
=
课程表
.
教师编号
join
成绩表
on
课程表
.
课程编号
=
成绩表
.
课程编号
join
学生表
on
成绩表
.
学号
=
学生表
.
学号
where
教师表
.
教师名字
=’oldguo’
and
成绩表
.
成绩
<60
group by
教师表
.
教师名字
;
②
使用视图:
select * from bjg;
③
删除视图
:
drop view bjg;
4.15.
事务的核心特性:
③ 事务中都有哪些核心特性:
原子性:
#
事务作为一个整体被执行,包含在其中的堆数据库的操作要么全部被执行,要么都不执
行。
一致性:
#
事务应确保数据库的状态从一个一致性状态转变为另一个一致状态,一致状态的含义
是数据库中的数据应满足完整性约束。
隔离性:
#
多个事务并发执行时,一个事务的执行不应影响其它事务的执行。
持久性:
#
已被提交的事务对数据库的修改应该永久保存在数据库中。
④ 事务的控制:
开始一个事务:
begin
PGCCC
中国 PostgreSQL 考试认证中心
www.pgccc.com.cn
结束一个事务:
commit
在事务期间可以执行回滚操作:
rollback
4.16. lock 锁:
https://cloud.tencent.com/developer/article/1656372
例如给
t1
表加
ACCESS SHARE
模式的锁:
begin;
LOCK TABLE t1 IN ACCESS SHARE MODE;
验证锁冲突的例子:
#
创建一张表:
create table t1(id int not null);
insert into t1 values(1);
①
加列和查询冲突:
会话一:
begin;
select * from t1;
会话二:
alter table t1 add column a int;
会话三,查看锁的状态:
select l.locktype,l.relation,l.pid,l.mode,l.granted,p.query_start,p.query,p.state from
pg_locks l,pg_stat_activity p where l.locktype=’relation’ and l.pid=p.pid and query not
like ‘%pg_stat_activity%’;
②
读写互不阻塞:
会话一:
begin;
update t1 set id=2;
会话二:
begin;
select * from t1;
③
查询和创建索引不阻塞:
PGCCC
中国 PostgreSQL 考试认证中心
www.pgccc.com.cn
会话一:
begin;
select * from t1;
会话二:
create index idx_id on t1(id);
④
update
和创建索引冲突:
会话一:
begin;
update t1 set id=2;
会话二:
create index idx_id on t1(id);
⑤
两个字段同时创建索引不会冲突:
会话一:
begin;
create index on t1(id);
会话二:
begin;
create index on t1(id);
⑥
在线维护类操作自排他:
会话一:
begin;
analyze t1;
会话二:
create index idx_id on t1(id);
4.17.
权限的分配:
① 创建普通用户:
#
创建用户:
create user zhang with password ‘123456’;
#
给用户添加创建数据库的权限:
alter user zhang createdb;
#
回收此用户的权限:
alter user zhang nocreatedb;
② 创建超级用户:
create user zhang superuser password ‘123456’;
③ 权限的赋予与撤销:
#
将
database
进行赋予:
alter database zhang owner to zhang;
#
将
schema
进行赋予:
PGCCC
中国 PostgreSQL 考试认证中心
www.pgccc.com.cn
alter schema abc owner to zhang;
#
将
abc
这个
schema
下的所有表授权给
zhang
用户:
grant select,insert,update,delete on all tables in schema abc to zhang;
#
将
abc
这个
schema
下的
a
张表授权
zhang
用户:
grant select,insert,update,delete on abc.a to zhang;
#
将
t1
表的查询权限赋予给
juese
grant select on t1 to juese;
#
将赋予给
juese
对
t1
表的查询权限进行回收:
revoke select on t1 from juese;
5. 备份及恢复:
5.1.
物理备份:
5.1.1. 全量备份:
① 模拟环境:
#
创建数据:
create table t1(id int not null primary key,name varchar(20) not null);
insert into t1 values(1,’zhnagsan’),(2,’lisi’);
③
进行备份:
pg_basebackup -h 10.0.0.62 -D /PGCCC/backup -P -p 5432 -U postgres
③ 模拟数据库故障:
pg_ctl -D /usr/local/pgsql/data/ stop
rm -rf /usr/local/pgsql/data/*
④ 进行数据恢复:
cd /usr/local/pgsql/backup/
tar xf base.tar.gz -C ../data
5.1.2. 全备结合时间点进行恢复:
#
创建归档目录:
mkdir -p /PGCCC/archive
chown -R postgres. /PGCCC/
#
开启归档,并重启数据库:
wal_level = ‘replica’
archive_mode = ‘on’
PGCCC
中国 PostgreSQL 考试认证中心
www.pgccc.com.cn
archive_command = ‘cp %p /PGCCC/archive/%f’
# wal_level
参数说明:
·
minimal
记录
wal
最少,记录数据库异常关闭需要恢复的
wal
外,其它操作都不记
录。
·
replica
在
minimal
的基础上还支持
wal
归档、复制和备库中启用只读查询等操作所
需的
wal
信息。
·
logical
记录
wal
日志信息最多,包含了支持逻辑解析(
10
版本的新特性,逻辑复制
使用这种模式)所需的
wal
,此参数包含了
minimal
和
replica
所有的记录。
#
重启数据库:
pg_ctl restart
#
执行全量备份
:
pg_basebackup -D /pgccc/backup -P -p 5432 -U postgres
#
如果此时的数据有变化,也可以执行增量备份
:
pg_receivewal -D /pgccc/backup/ -p 5432
#
插入数据:
create table a(id int);
insert into a values (2);
select current_timestamp;
select pg_switch_wal();checkpoint;
#
模拟数据丢失:
drop table a;
#
启动备份实例,进行数据恢复:
vim postgresql.conf
recovery_target_time = ‘2021-07-03 11:55:41.543904+08’
restore_command=’cp /pgccc/archive/%f %p’
recovery_target_action = ‘promote’
#
创建备库标签:
touch recovery.signal
#
启动数据库:
pg_ctl -D /pgccc/backup start
#
关闭读模式:
select pg_wal_replay_resume();
PGCCC
中国 PostgreSQL 考试认证中心
www.pgccc.com.cn
5.1.3. 全量结合还原点进行恢复:
#
创建归档目录:
mkdir -p /pgccc/archive
chown -R postgres. /pgccc/
#
开启归档,并重启数据库:
wal_level = ‘replica’
archive_mode = ‘on’
archive_command = ‘cp %p /pgccc/archive/%f’
#
重启数据库:
pg_ctl restarat
#
执行全量备份
:
pg_basebackup -h 10.0.0.62 -D /PGCCC/backup -P -p 5432 -U postgres
如果有变化的数据,可以执行增量备份
:
pg_receivewal -D /pgccc/backup/ -p 5432
#
插入数据:
create table a(id int);
insert into a values (2);
#
创建还原点:
select pg_create_restore_point(‘huanyuan’);
#
模拟数据丢失:
drop table a;
#
启动备份实例,进行数据恢复:
vim postgresql.conf
recovery_target_name = ‘huanyuan’
restore_command=’cp /pgccc/archive/%f %p’
recovery_target_action = ‘promote’
touch recovery.signal
#
启动数据库:
pg_ctl -D /pgccc/backup start
#
关闭读模式:
select pg_wal_replay_resume();
PGCCC
中国 PostgreSQL 考试认证中心
www.pgccc.com.cn
5.1.4. 全备结合指定事务进行恢复:
#
创建归档目录:
mkdir -p /pgccc/archive
chown -R postgres. /pgccc/
#
开启归档,并重启数据库:
wal_level = ‘replica’
archive_mode = ‘on’
archive_command = ‘cp %p /pgccc/archive/%f’
#
重启数据库:
pg_ctl restarat
#
执行全量备份
:
pg_basebackup -h 10.0.0.62 -D /PGCCC/backup -P -p 5432 -U postgres
#
如果有变化的数据,可以执行增量备份
:
pg_receivewal -D /pgccc/backup/ -p 5432
#
插入数据:
create table a(id int);
insert into a values (2);
select pg_current_xact_id();
select pg_switch_wal();checkpoint;
#
模拟数据丢失:
drop table a;
#
启动备份实例,进行数据恢复:
vim postgresql.conf
recovery_target_xid = ‘487’
restore_command=’cp /pgccc/archive/%f %p’
recovery_target_action = ‘promote’
touch recovery.signal
#
启动数据库:
pg_ctl -D /pgccc/backup start
#
关闭读模式:
select pg_wal_replay_resume();
PGCCC
中国 PostgreSQL 考试认证中心
www.pgccc.com.cn
5.1.5. 全备结合 LSN 号码进行恢复:
#
创建归档目录:
mkdir -p /pgccc/archive
chown -R postgres. /pgccc/
#
开启归档,并重启数据库:
wal_level = ‘replica’
archive_mode = ‘on’
archive_command = ‘cp %p /pgccc/archive/%f’
#
重启数据库:
pg_ctl restarat
#
执行全量备份
:
pg_basebackup -h 10.0.0.62 -D /PGCCC/backup -P -p 5432 -U postgres
#
如果有变化的数据,可以执行增量备份
:
pg_receivewal -D /pgccc/backup/ -p 5432
#
插入数据:
create table a(id int);
insert into a values (2);
select pg_current_wal_lsn();
select pg_switch_wal();checkpoint;
#
模拟数据丢失:
drop table a;
#
启动备份实例,进行数据恢复:
vim postgresql.conf
recovery_target_lsn = ‘0/4011BF8’
restore_command=’cp /pgccc/archive/%f %p’
recovery_target_action = ‘promote’
touch recovery.signal
#
启动数据库:
pg_ctl -D /pgccc/backup start
#
关闭读模式:
select pg_wal_replay_resume();
PGCCC
中国 PostgreSQL 考试认证中心
www.pgccc.com.cn
5.2.
逻辑备份:
5.2.1. pg_dump 的使用:
① 备份及恢复库下所有的数据:
#
备份:
pg_dump -U postgres test >test.sql
#
恢复:
psql
create database test;
psql -U postgres test < test.sql
#
指定格式进行备份:
#
备份:
pg_dump -Fc -U postgres test >test.dmp
#
恢复:
psql
create database test;
pg_restore -d test test.dmp
② 备份库下某个模式所有的表:
#
备份:
pg_dump -U postgres -t ‘schema1.t*’ test >test.sql
#
恢复:
psql -U postgres test < test.sql
③ 备份单个表:
#
例如备份
test
库下的
zhang
表:
#
备份:
pg_dump -t zhang test >dump.sql
#
恢复:
create database test;
psql -U postgres test < dump.sql
5.2.2. pg_dumpall 的使用:
#
全库级别备份:
#
备份:
pg_dumpall -U postgres > dumpall.sql
#
恢复:
psql -U postgres < dumpall.sql
版权声明:本文为cao919原创文章,遵循 CC 4.0 BY-SA 版权协议,转载请附上原文出处链接和本声明。