简介
Ansible是新出现的自动化运维工具,基于Python开发,集合了众多运维工具(puppet、cfengine、chef、func、fabric)的优点。实现了批量系统配置、批量程序部署、批量运行命令等功能。Ansible是基于模块工作的,本身没有批量部署的能力。真正具有批量部署的是Ansible所运行的模块,Ansible只是提供一种框架
Ansible是基于 paramiko 开发的,并且基于模块化工作,本身没有批量部署的能力。真正具有批量部署的是ansible所运行的模块,ansible只是提供一种框架。ansible不需要在远程主机上安装client/agents,因为它们是基于ssh来和远程主机通讯的。ansible目前已经已经被红帽官方收购,是自动化运维工具中大家认可度最高的,并且上手容易,学习简单。是每位运维工程师必须掌握的技能之一
Ansible的优缺点
优点
1、Agentless:去中心化
2、Stupied Simple ,上手简单,学习曲线平滑
3、SSH by default ,安全,无需安装客户端
4、配置简单、功能强大、扩展性强
5、支持API及自定义模块,可通过Python轻松扩展
6、通过Playbooks来定制强大的配置、状态管理
7、提供一个功能强大、操作性强的Web管理界面和REST API接口——AWX平台
8、幂等性:一种操作重复多次结果相同
缺点
1、对windows系统的排斥(服务端无法安装在windows)
2、运行效率较低(task任务是串行运行;多台设备同时运行一个task,有并发数限制)
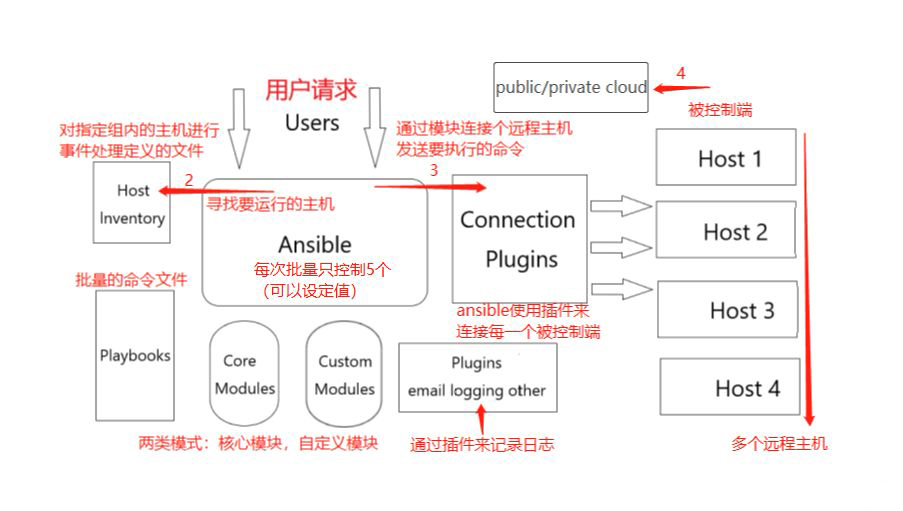
Ansible的架构
| 架构说明 | |
|---|---|
| Ansible | Ansible的核心程序 |
| Host Lnventory | 记录了每一个由Ansible管理的主机信息,信息包括ssh端口,root帐号密码,ip地址等等。可以通过file来加载,可以通过CMDB加载 |
| Playbooks | YAML格式文件,多个任务定义在一个文件中,使用时可以统一调用,“剧本”用来定义那些主机需要调用那些模块来完成的功能 |
| Core Modules | Ansible执行任何管理任务都不是由Ansible自己完成,而是由核心模块完成;Ansible管理主机之前,先调用core Modules中的模块,然后指明管理Host Lnventory中的主机,就可以完成管理主机 |
| Custom Modules | 自定义模块,完成Ansible核心模块无法完成的功能,此模块支持任何语言编写 |
| Connection Plugins | 连接插件,Ansible和Host通信使用 |
一、Ansible的安装及使用
准备环境
| 系统 | IP | 主机名称 | 角色 |
|---|---|---|---|
| CentOS 7.4 | 192.168.2.10 | Ansible | 管理节点 |
| CentOS 7.4 | 192.168.2.11 | node1 | 节点1 |
| CentOS 7.4 | 192.168.2.12 | node2 | 节点2 |
1、安装Ansible
下载ansible源码包:Ansible.rar
下载完成后先在自己电脑里面解压在上传
[root@Ansible ~]# vim /etc/yum.repos.d/centOS7.repo     修改yum源
.......
...

[ansibe]                        #添加内容
baseurl=file:///root/ansible
enabled=1
gpgcheck=0

保存


[root@Ansible ~]# yum -y install ansible
................
.....
..
2、lnventory内置参数
   ansible_ssh_host:               #定义hosts ssh地址

   ansible_ssh_port:               #定义hosts ssh端口

   ansible_ssh_user:               #定义hosts ssh认证用户

   ansible_ssh_pass:               #定义hosts ssh认证密码

   ansible_sudo:                   #定义hosts sudo用户

   ansible_sudo_pass:              #定义hosts sudo密码

   ansible_sudo_exe:               #定义host sudo路径;sudo 命令路径(适用于1.8及以上版本)

   ansible_connection:             #定义hosts连接方式
                                   #与主机的连接类型(比如:local, ssh 或者 paramiko):
                                   #Ansible 1.2 以前默认使用 paramiko.1.2 以后默认使用 'smart'
                                   #'smart' 方式会根据是否支持 ControlPersist, 来判断'ssh' 方式是否可行

  ansible_ssh_private_key_file:    #定义hosts私钥

  ansible_shell_type:              #定义hosts shell类型
                                   #目标系统的shell类型.默认情况下,
                                   #命令的执行使用 'sh' 语法,可设置为 'csh' 或 'fish'

  ansible_python_interpreter:      #定义hosts 任务执行python路径

  ansible_*_interpreter:           #定义hosts其他语言解析路径

  ansible_ssh_private_key_file:   #ssh 使用的私钥文件;适用于有多个密钥,而不使用 SSH 代理的情况

  ansible_python_interpreter       #目标主机的 python 路径
                                   #适用于的情况: 系统中有多个 Python, 或者命令路径不是"/usr/bin/python"
                                   #比如  \*BSD, 或者 /usr/bin/python 不是 2.X 版本的 Python
                                   #不使用 "/usr/bin/env" 机制,因为这要求远程用户的路径设置正确
                                   #且要求 "python" 可执行程序名不可为 python以外的名字(实际有可能名为python26).
                                   #与 ansible_python_interpreter 的工作方式相同,可设定如 ruby 或 perl 的路径....
3、ansible的常用参数
| 参数 | 说明 |
|---|---|
| -m | 要执行的模块,默认为command |
| -a | 指定模块的参数 |
| -u | ssh连接的用户名,默认用root,ansible.cfg中可以配置 |
| -b | –become:变成那个用户身份,不提示密码 |
| -k | 提示输入ssh登录密码,当使用密码验证的时候用 |
| -s | sudo运行 |
| -U | sudo到哪个用户,默认为root |
| -K | 提示输入sudo密码,当不是NOPASSWD模式时使用 |
| -C | 只是测试一下会改变什么内容,不会真正去执行 |
| -c | 连接类型(default=smart) |
| -f | fork多少进程并发处理,默认为5个 |
| -i | 指定hosts文件路径,默认default=/etc/ansible/hosts |
| -I | 指定pattern,对已匹配的主机中再过滤一次 |
| -list-host | 只打印有哪些主机会执行这个命令,不会实际执行 |
| -M | 要执行的模块路径,默认为/usr/share/ansible |
| -o | 压缩输出,摘要输出 |
| –private-key | 私钥路径 |
| -T | ssh连接超时时间,默认是10秒 |
| -t | 日志输出到该目录,日志文件名以主机命名 |
| -v | 显示详细日志 |
4、lnventory文件的配置
4.1、密码连接
            第一次连接需要输入yes,执行以下操作,如不操作会报错
[root@Ansible ~]# vi /etc/ansible/ansible.cfg
............
     62 host_key_checking = False                #让该命令生效删除#号
............

保存
   方式一:
[root@Ansible ~]# vim /etc/ansible/hosts
..............
...........
[node1]
192.168.2.11 ansible_ssh_port=22 ansible_ssh_user=root ansible_ssh_pass=123.com

[node2]
192.168.2.12 ansible_ssh_port=22 ansible_ssh_user=root ansible_ssh_pass=123.com

保存


   方式二:

[node]
192.168.2.11 ansible_ssh_port=22 ansible_ssh_user=root ansible_ssh_pass=123.com
192.168.2.12 ansible_ssh_port=22 ansible_ssh_user=root ansible_ssh_pass=123.com


   方式三:

[node]
192.168.2.[11:12] ansible_ssh_port=22 ansible_ssh_user=root ansible_ssh_pass=123.com

   方式四:  需要配置秘钥才能实现

[node1]
192.168.2.11

[node2]
192.168.2.12
[node:children]      #[名称:children(固定的)]
node1
node2
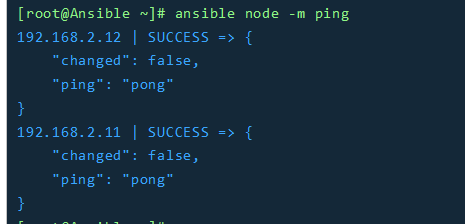
[root@Ansible ~]# ansible node1 -m ping
192.168.2.11 | SUCCESS => {
    "changed": false,
    "ping": "pong"
}
4.2、秘钥连接
生成秘钥并传输给node1,node2
[root@Ansible ~]# ssh-keygen
Generating public/private rsa key pair.
Enter file in which to save the key (/root/.ssh/id_rsa):
/root/.ssh/id_rsa already exists.
Overwrite (y/n)? y
Enter passphrase (empty for no passphrase):
Enter same passphrase again:
Your identification has been saved in /root/.ssh/id_rsa.
Your public key has been saved in /root/.ssh/id_rsa.pub.
The key fingerprint is:
SHA256:qfRxoDOzgmuHxg9WHPGAMcSCrzgJM6uQJaB5kiTlIeI root@Ansible
The key's randomart image is:
+---[RSA 2048]----+
|++*oo            |
|B+oo +           |
|=E. . . .        |
|X +. . . o       |
|o%  o * S .      |
|O  o . B o       |
|oo+.. o .        |
|..=o..           |
| o.o.            |
+----[SHA256]-----+

[root@Ansible ~]# ssh-copy-id -i 192.168.2.11
...........
[root@Ansible ~]# ssh-copy-id -i 192.168.2.12
...........
4.3、输出的颜色进行判断
| Ansible执行的时候根据结果会显示颜色 | |
|---|---|
| 蓝色(或绿色) | 执行成功并且不需要做改变的操作 |
| 黄色 | 执行成功并且对目标主机做变更 |
| 红色 | 执行失败 |
| 紫色 | 警告消息 |
|
颜色的显示与changed的状态相关联,并可以在ansible.cfg中进行定制颜色的设定 其他颜色可以参考官网配置文件介绍 |
|
ansible.cfg配置文件官方详介:Ansible Configuration Settings — Ansible Documentation
[root@Ansible ~]# vi /etc/ansible/ansible.cfg
................
........
[colors]
#highlight = white
#verbose = blue             #详细消息
#warn = bright purple       #警告消息
#error = red                #错误消息
#debug = dark gray          #调试消息
#deprecate = purple         #弃用消息
#skip = cyan                #已跳过任务状态
#unreachable = red          #无法到达
#ok = green                 #正常任务状态
#changed = yellow           #已更改任务状态
#diff_add = green
#diff_remove = red
#diff_lines = cyan
..............
.....

——————————————————————————————

           可以自定义设置颜色 官方已经给很多的颜色可以选择 ;修改完后去掉注释
5、Ansible命令格式
命令语法:ansible < host-pattern > [-m module_name] [-a args]
| 说明 | |
| < host-pattern> |
尖括号表示不可省 1、在资产文件中的组名 2、资产文件中的IP或主机名 3、all文件资产文件中的所有主机 |
| [-m module_name] |
中括号表示此选项可省 此参数为模块名 |
| [-a args] | 模块对应的参数,有些模块没有参数 |
5.1、主机与组的格式
单台主机或组
   -----组
[root@Ansible ~]# ansible node1 -m ping
192.168.2.11 | SUCCESS => {
    "changed": false,
    "ping": "pong"
}

  -------主机
[root@Ansible ~]# ansible 192.168.2.11 -m ping
192.168.2.11 | SUCCESS => {
    "changed": false,
    "ping": "pong"
}
多台主机或组
   -----组
[root@Ansible ~]# ansible node1,node2 -m ping
192.168.2.12 | SUCCESS => {
    "changed": false,
    "ping": "pong"
}
192.168.2.11 | SUCCESS => {
    "changed": false,
    "ping": "pong"
}

   -----主机
[root@Ansible ~]# ansible 192.168.2.11,192.168.2.12 -m ping
192.168.2.11 | SUCCESS => {
    "changed": false,
    "ping": "pong"
}
192.168.2.12 | SUCCESS => {
    "changed": false,
    "ping": "pong"
}
所有目标
[root@Ansible ~]# ansible all -m ping
192.168.2.11 | SUCCESS => {
    "changed": false,
    "ping": "pong"
}
192.168.2.12 | SUCCESS => {
    "changed": false,
    "ping": "pong"
}
5.2、组匹配
查看组信息
  --------查询单个组的主机
[root@Ansible ~]# ansible node1 --list
  hosts (1):
    192.168.2.11

  --------查询全部组的主机
[root@Ansible ~]# ansible all --list
  hosts (2):
    192.168.2.12
    192.168.2.11
匹配node1组中有的,但是node2组中没有的所有主机
[root@Ansible ~]# vim /etc/ansible/hosts
.............
[node1]
192.168.2.11
[node2]
192.168.2.12

保存

[root@Ansible ~]# ansible 'node1:!node2' -m ping -o
192.168.2.11 | SUCCESS => {"changed": false, "ping": "pong"}
匹配node1组和node2组都有的主机(交集)
[root@Ansible ~]# vim /etc/ansible/hosts
...........
.....
[node1]
192.168.2.11
192.168.2.12
[node2]
192.168.2.12

保存

[root@Ansible ~]# ansible 'node1:&node2' -m ping -o
192.168.2.12 | SUCCESS => {"changed": false, "ping": "pong"}
匹配node1与node2两个组的所有主机(并集)
[root@Ansible ~]# ansible 'node1:node2' -m ping -o
192.168.2.11 | SUCCESS => {"changed": false, "ping": "pong"}
192.168.2.12 | SUCCESS => {"changed": false, "ping": "pong"}

  ——————————     同

[root@Ansible ~]# ansible node1,node2 -m ping
192.168.2.12 | SUCCESS => {
    "changed": false,
    "ping": "pong"
}
192.168.2.11 | SUCCESS => {
    "changed": false,
    "ping": "pong"
}
二、Ansible 的常用模块
1、Ansible-doc命令
Ansible-doc用来查询ansible模块文档的说明,类似于man命令,针对每个模块都有详细的用法说明及应用案例介绍
格式:ansible-doc [options] [module……]
[root@Ansible ~]# ansible-doc -l         #列出支持的模块
.........
....

[root@Ansible ~]# ansible-doc -l| wc -l
1852

[root@Ansible ~]# ansible-doc ping      #查询ping模块的说明信息
....
....           # q 退出
2、执行命令相关模块
2.1、command模块
command模块是默认的,用于在给的的节点上运行系统命令,比如echo hello
它不会通过shell处理命令,因此不支持像$HOME这样的变量和,以及<、>、|、;、& 等都是无效的。也就是在command模块中无法使用特殊符号
| 参数 | 必选 | 说明 |
|---|---|---|
| chdir | no | 运行command命令前先cd到这个目录 |
| creates | no | 如果这个参数对应的文件存在,就不运行command |
| free_form | yes | 需要执行的脚本(没有真正的参数为free_form) |
| executable | no | 改变用来执行命令的shell,应该是可执行文件的绝对路径 |
| removes | no | 如果这个参数对应的文件不存在,就不运行command,与creates参数的作用相反 |
| stdin(2.4后新增) | no | 将命令的stdin设置为指定的值 |
例:在node1上执行ls命令,默认是在当前用户的家目录/root 进行执行
[root@Ansible ~]# ansible node1 -a 'ls'
192.168.2.11 | SUCCESS | rc=0 >>
anaconda-ks.cfg
name.sh
yum.sh
chdir参数
切换工作目录,在执行命令,一般在编译时使用
 例:
[root@Ansible ~]# ansible node1 -a 'chdir=/opt pwd'
192.168.2.11 | SUCCESS | rc=0 >>
/opt
creates参数
如果creates指定的文件存在,则不执行后面的操作
 例: opt文件存在所以不执行ls命令
[root@Ansible ~]# ansible node1 -a 'creates=/opt ls /etc/passwd'
192.168.2.11 | SUCCESS | rc=0 >>
skipped, since /opt exists

例:a文件不存在 执行了ls命令
[root@Ansible ~]# ansible node1 -a 'creates=/a ls /etc/passwd'
192.168.2.11 | SUCCESS | rc=0 >>
/etc/passwd
removes参数
如果这个参数对应的文件不存在,就不运行command,与creates参数的作用相反
例:
[root@Ansible ~]# ansible node1 -a 'removes=/a ls /etc/passwd'
192.168.2.11 | SUCCESS | rc=0 >>
skipped, since /a does not exist

[root@Ansible ~]# ansible node1 -a 'removes=/opt ls /etc/passwd'
192.168.2.11 | SUCCESS | rc=0 >>
/etc/passwd
2.2、shell模块
让远程主机在shell进程下执行命令,从而支持shell的特性,如:|、$、<、>、的特殊符号等。与
command模块几乎相同,但在执行命令的时候使用的是/bin/sh
| 参数 | 必选 | 说明 |
|---|---|---|
| chdir | no | 运行command命令前先cd到这个目录 |
| creates | no | 如果这个参数对应的文件存在,就不运行command |
| executable | no | 改变用来执行命令的shell,应该是可执行文件的绝对路径。 |
| free_form | yes | 需要执行的脚本(没有真正的参数为free_form) |
| removes | no | 如果这个参数对应的文件不存在,就不运行command,与creates参数的作用相反 |
| stdin(2.4后新增) | no | 将命令的stdin设置为指定的值 |
   例:
[root@Ansible ~]# ansible node1 -m shell -a 'mkdir /opt/aaa'
 [WARNING]: Consider using the file module with state=directory rather than running mkdir.  If you need to
use command because file is insufficient you can add warn=False to this command task or set
command_warnings=False in ansible.cfg to get rid of this message.

192.168.2.11 | SUCCESS | rc=0 >>

  例:
[root@Ansible ~]# ansible node1 -m shell -a 'ls /opt/'
192.168.2.11 | SUCCESS | rc=0 >>
aaa
每次执行都会更新文件的时间戳
[root@Ansible ~]# ansible node1 -m shell -a 'cd /opt/aaa && touch a.txt && ls'
192.168.2.11 | SUCCESS | rc=0 >>
a.txt
creates参数
例:
[root@Ansible ~]# ansible node1 -m shell -a 'creates=/opt/aaa/a.txt cd /otp/aaa/ && touch a.txt && ls'
192.168.2.11 | SUCCESS | rc=0 >>
skipped, since /opt/aaa/a.txt exists
2.3、script模块
script模块的作用是将本地script传送到远程主机之后执行
给定的脚本将通过远程节点上的shell环境进行处理
script模块在远程系统上不需要python的支持
| 参数 | 必选 | 默认值 | 可选值 | 说明 |
|---|---|---|---|---|
| chdir(2.4后新增) | no | 运行command命令前先cd到这个目录 | ||
| creates | no | 如果这个参数对应的文件存在,就不运行command | ||
| decrypt | no | yes |
yes/no |
此选项控制使用保管库的源文件的自动解密 |
| free_form | yes | 需要执行脚本的本地文件路径(没有真正的参数为free_form) | ||
| removes | no | 如果这个参数对应的文件不存在,就不运行command,与creates参数的作用相反 |
编写a.sh脚本
[root@Ansible ~]# vim a.sh

#!/bin/bash
echo 'hello'
echo $?
在所有主机上执行脚本
[root@Ansible ~]# ansible all -m script -a '/root/a.sh'
192.168.2.11 | SUCCESS => {
    "changed": true,
    "rc": 0,
    "stderr": "Shared connection to 192.168.2.11 closed.\r\n",
    "stderr_lines": [
        "Shared connection to 192.168.2.11 closed."
    ],
    "stdout": "hello\r\n0\r\n",
    "stdout_lines": [
        "hello",
        "0"
    ]
}
192.168.2.12 | SUCCESS => {
    "changed": true,
    "rc": 0,
    "stderr": "Shared connection to 192.168.2.12 closed.\r\n",
    "stderr_lines": [
        "Shared connection to 192.168.2.12 closed."
    ],
    "stdout": "hello\r\n0\r\n",
    "stdout_lines": [
        "hello",
        "0"
    ]
}
注意事项
通常来说,使用Ansible模块比推送脚本更好
当脚本执行时,ssh连接插件将通过-tt强制为tty分配。伪ttys没有stderr通道,所有stderr被发送到标准输出。如果需要标准输出和标准错误分离,请使用到copy模块
3、文件相关模块
3.1、file模块
主要用来设置文件、链接、目录的属性,或者移除文件、链接、目录,很多其他的模块也会包含这种作用,例如copy,assemble和template
|
参数 |
必选 |
默认 |
选项 |
说明 |
|---|---|---|---|---|
|
Follow |
No |
No |
Yes/no |
这个标识说明这是系统链接文件,如果存在,应该遵循 |
|
Force |
No |
No |
Yes/no |
强制创建链接在两种情况下:源文件不存在(过会会存在);目标存在但是是文件(创建链接文件替代) |
|
Group |
No |
|
|
文件所属用户组 |
|
Mode |
No |
|
|
文件所属权限 |
|
Owner |
No |
|
|
文件所属用户 |
|
Path |
Yes |
|
|
要控制文件的路径(目标文件) |
|
Recurse |
No |
No |
Yes/no |
当文件为目录时,是否进行递归设置权限 |
|
Src |
No |
|
|
文件链接路径,只有状态为link的时候,才会设置,可以是绝对相对不存在的路径(源文件) |
|
State
|
No
|
File
|
Directory |
创建目录;如果目录不存在,那么就创建目录或者子目录 |
|
touch |
创建文件;如果文件存在,则修改文件属性 | |||
| Absent | 删除文件或者目录 | |||
| link | 创建软链接,需要和src配合使用 | |||
|
Hard |
创建硬连接,需要和src配合使用 |
案例
创建目录
例:
[root@Ansible ~]# ansible node -m file -a 'path=/opt/a1 state=directory'
192.168.2.12 | SUCCESS => {
    "changed": true,
    "gid": 0,
    "group": "root",
    "mode": "0755",
    "owner": "root",
    "path": "/opt/a1",
    "size": 6,
    "state": "directory",
    "uid": 0
}
192.168.2.11 | SUCCESS => {
    "changed": true,
    "gid": 0,
    "group": "root",
    "mode": "0755",
    "owner": "root",
    "path": "/opt/a1",
    "size": 6,
    "state": "directory",
    "uid": 0
}
创建文件
[root@Ansible ~]# ansible node -m file -a 'path=/opt/a1/b.txt state=touch'
192.168.2.12 | SUCCESS => {
    "changed": true,
    "dest": "/opt/a1/b.txt",
    "gid": 0,
    "group": "root",
    "mode": "0644",
    "owner": "root",
    "size": 0,
    "state": "file",
    "uid": 0
}
192.168.2.11 | SUCCESS => {
    "changed": true,
    "dest": "/opt/a1/b.txt",
    "gid": 0,
    "group": "root",
    "mode": "0644",
    "owner": "root",
    "size": 0,
    "state": "file",
    "uid": 0
}
创建软连接
[root@Ansible ~]# ansible node -m file -a 'src=/opt/a1 path=/opt/a2 state=link'
192.168.2.12 | SUCCESS => {
    "changed": true,
    "dest": "/opt/a2",
    "gid": 0,
    "group": "root",
    "mode": "0777",
    "owner": "root",
    "size": 7,
    "src": "/opt/a1",
    "state": "link",
    "uid": 0
}
192.168.2.11 | SUCCESS => {
    "changed": true,
    "dest": "/opt/a2",
    "gid": 0,
    "group": "root",
    "mode": "0777",
    "owner": "root",
    "size": 7,
    "src": "/opt/a1",
    "state": "link",
    "uid": 0
}
删除文件
[root@Ansible ~]# ansible node -m file -a 'path=/opt/a1/b.txt state=absent'
192.168.2.12 | SUCCESS => {
    "changed": true,
    "path": "/opt/a1/b.txt",
    "state": "absent"
}
192.168.2.11 | SUCCESS => {
    "changed": true,
    "path": "/opt/a1/b.txt",
    "state": "absent"
}
创建文件的同时设置权限、属主及属组
创建目录时可以加 Recurse=yes 递归权限

[root@Ansible ~]# ansible node -m file -a 'path=/opt/a3 state=directory mode=0700 owner=root group=root'
192.168.2.11 | SUCCESS => {
    "changed": true,
    "gid": 0,
    "group": "root",
    "mode": "0700",
    "owner": "root",
    "path": "/opt/a3",
    "size": 6,
    "state": "directory",
    "uid": 0
}
192.168.2.12 | SUCCESS => {
    "changed": true,
    "gid": 0,
    "group": "root",
    "mode": "0700",
    "owner": "root",
    "path": "/opt/a3",
    "size": 6,
    "state": "directory",
    "uid": 0
}
3.2、copy模块
copy模块是将本机中的文件复制到远程主机当中
|
参数 |
必选 |
默认 |
选项 |
说明 |
|---|---|---|---|---|
|
Backup |
否 |
No |
Yes/no |
是否创建备份文件,使用时间戳 |
|
Content |
否 |
|
|
直接在远程主机上被管理的文件中添加内容,会覆盖原来的内容 |
|
Dest |
是 |
|
|
文件复制的目的地(目标路径) |
|
Follow |
否 |
No |
Yes/no |
表示文件系统的链接,如果存在,应该follow |
|
Group |
否 |
|
|
文件所属组,相当于chown |
|
Mode |
否 |
|
|
文件属性 |
|
Owner |
否 |
|
|
文件所属用户 |
|
Directory_mode |
否 |
|
|
设定目录的权限,只有在新建的时候才会使用,不会影响已经存在的目录 |
|
Remote_src |
否 |
True |
True/False |
False表示src文件在本机上 True表示src在远程主机上 |
|
Src |
否 |
|
|
已经存在的目录文件(源路径) |
|
Force |
否 |
No |
Yes/no |
是否覆盖 |
|
Validate |
否 |
|
|
复制前是否需要检验复制的目的地 |
案例
复制文件到node全部主机上并且更改名称
[root@Ansible ~]# ansible node -m copy -a 'src=/root/a.sh dest=/opt/111.sh'
192.168.2.12 | SUCCESS => {
    "changed": true,
    "checksum": "49ad15c79d5ff1bf72fa35791afcd5d20c473145",
    "dest": "/opt/111.sh",
    "gid": 0,
    "group": "root",
    "md5sum": "292f4beb94c0ebfea3fc9a09946b5146",
    "mode": "0644",
    "owner": "root",
    "size": 34,
    "src": "/root/.ansible/tmp/ansible-tmp-1642237704.23-9108012616361/source",
    "state": "file",
    "uid": 0
}
192.168.2.11 | SUCCESS => {
    "changed": true,
    "checksum": "49ad15c79d5ff1bf72fa35791afcd5d20c473145",
    "dest": "/opt/111.sh",
    "gid": 0,
    "group": "root",
    "md5sum": "292f4beb94c0ebfea3fc9a09946b5146",
    "mode": "0644",
    "owner": "root",
    "size": 34,
    "src": "/root/.ansible/tmp/ansible-tmp-1642237704.22-21993743293326/source",
    "state": "file",
    "uid": 0
}
复制文件到node全部主机上,并备份远程文件,安装时间信息备份文件(当更新文件内容后,重新copy时会用到)
[root@Ansible ~]# ansible node -m copy -a 'src=/root/a.sh dest=/opt/b.sh backup=yes'
192.168.2.12 | SUCCESS => {
    "changed": true,
    "checksum": "49ad15c79d5ff1bf72fa35791afcd5d20c473145",
    "dest": "/opt/b.sh",
    "gid": 0,
    "group": "root",
    "md5sum": "292f4beb94c0ebfea3fc9a09946b5146",
    "mode": "0644",
    "owner": "root",
    "size": 34,
    "src": "/root/.ansible/tmp/ansible-tmp-1642238178.85-258091301983785/source",
    "state": "file",
    "uid": 0
}
192.168.2.11 | SUCCESS => {
    "changed": true,
    "checksum": "49ad15c79d5ff1bf72fa35791afcd5d20c473145",
    "dest": "/opt/b.sh",
    "gid": 0,
    "group": "root",
    "md5sum": "292f4beb94c0ebfea3fc9a09946b5146",
    "mode": "0644",
    "owner": "root",
    "size": 34,
    "src": "/root/.ansible/tmp/ansible-tmp-1642238178.83-217262058785903/source",
    "state": "file",
    "uid": 0
}远程node全部主机给b.sh输入内容
[root@Ansible ~]# ansible node -m copy -a 'content="#!/bin/bash\n echo `cat /etc/redhat-release`" dest=/opt/b.sh'
192.168.2.12 | SUCCESS => {
    "changed": true,
    "checksum": "5b1fc0719f1dd663fd4f272e1cfc35746354523b",
    "dest": "/opt/b.sh",
    "gid": 0,
    "group": "root",
    "md5sum": "def73fc62dda729e82b048762a6db9bf",
    "mode": "0644",
    "owner": "root",
    "size": 43,
    "src": "/root/.ansible/tmp/ansible-tmp-1642239607.91-135818175194165/source",
    "state": "file",
    "uid": 0
}
192.168.2.11 | SUCCESS => {
    "changed": true,
    "checksum": "5b1fc0719f1dd663fd4f272e1cfc35746354523b",
    "dest": "/opt/b.sh",
    "gid": 0,
    "group": "root",
    "md5sum": "def73fc62dda729e82b048762a6db9bf",
    "mode": "0644",
    "owner": "root",
    "size": 43,
    "src": "/root/.ansible/tmp/ansible-tmp-1642239607.9-236477129545120/source",
    "state": "file",
    "uid": 0
}复制文件到node使用主机上并设置属主、属组和权限
[root@Ansible ~]# ansible node -m copy -a 'src=/root/a.sh dest=/opt/ccc mode=007 owner=root group=root'
192.168.2.11 | SUCCESS => {
    "changed": true,
    "checksum": "49ad15c79d5ff1bf72fa35791afcd5d20c473145",
    "dest": "/opt/ccc",
    "gid": 0,
    "group": "root",
    "md5sum": "292f4beb94c0ebfea3fc9a09946b5146",
    "mode": "0007",
    "owner": "root",
    "size": 34,
    "src": "/root/.ansible/tmp/ansible-tmp-1642240690.0-124480262597952/source",
    "state": "file",
    "uid": 0
}
192.168.2.12 | SUCCESS => {
    "changed": true,
    "checksum": "49ad15c79d5ff1bf72fa35791afcd5d20c473145",
    "dest": "/opt/ccc",
    "gid": 0,
    "group": "root",
    "md5sum": "292f4beb94c0ebfea3fc9a09946b5146",
    "mode": "0007",
    "owner": "root",
    "size": 34,
    "src": "/root/.ansible/tmp/ansible-tmp-1642240690.01-20937994286590/source",
    "state": "file",
    "uid": 0
}
3.3、fetch模块
文件拉取模块主要是将远程主机中的文件拷贝到本机中,和copy模块的作用恰恰相反,并且在保存的时候使用hostname来进行保存,当文件不存在的时候,会出现错误,除非设置了选项fail_on_missing为yes
|
参数 |
必选 |
默认值 |
选项 |
说明 |
|---|---|---|---|---|
|
Dest |
Yes |
|
|
用来存放文件的目录,例如存放目录为backup,源文件名称为/etc/profile在主机node中,那么保存为/backup/node/etc/profile |
|
Fail_on_missing |
No |
No |
Yes/no |
当源文件不存在的时候,标识为失败 |
|
Flat |
No |
|
|
允许覆盖默认行为从hostname/path到/file的,如果dest以/结尾,它将使用源文件的基础名称 |
|
Src |
Yes |
|
|
在远程拉取的文件,并且必须是一个file,不能是目录 |
|
Validate_checksum |
No |
Yes |
Yes/no |
当文件fetch之后进行md5检查 |
案例
从node全部主机上下载cron日志文件,默认会在Ansible服务器上创建一个目录,并存放
[root@Ansible ~]# ansible node -m fetch -a 'src=/var/log/cron dest=/opt'
192.168.2.11 | SUCCESS => {
    "changed": true,
    "checksum": "cf3981c767e6bd503cb313cbb16147cb437bf8bc",
    "dest": "/opt/192.168.2.11/var/log/cron",
    "md5sum": "6d7dcd7e36a11ba487c6789305779e4b",
    "remote_checksum": "cf3981c767e6bd503cb313cbb16147cb437bf8bc",
    "remote_md5sum": null
}
192.168.2.12 | SUCCESS => {
    "changed": true,
    "checksum": "5fdda945c6052ac5f8b0ab92a05adf782119d4e1",
    "dest": "/opt/192.168.2.12/var/log/cron",
    "md5sum": "8e65148c438e45345fd437ed8c4fb704",
    "remote_checksum": "5fdda945c6052ac5f8b0ab92a05adf782119d4e1",
    "remote_md5sum": null
}


[root@Ansible ~]# yum -y install tree
[root@Ansible ~]# tree /opt/192.168.2.1*
/opt/192.168.2.11
└── var
    └── log
        └── cron
/opt/192.168.2.12
└── var
    └── log
        └── cron

4 directories, 2 files
4、用户相关模块
4.1、user模块
管理被控端用户
|
参数 |
必选 |
默认值 |
选项 |
说明 |
|---|---|---|---|---|
|
Append |
否 |
No |
Yes/no |
如果没有指定group,append设定为yes,那么会添加到用户同名组;append设定为no,那么会添加到user组。如果指定了group,那么都会添加在指定的group组 |
|
Comment |
否 |
用户的备注信息 |
||
|
Force |
否 |
No |
Yes/no |
当状态为absent的时候,相当于userdel -force |
|
generate_ssh_key |
否 |
No |
Yes/no |
是否为相关用户生成ssh密钥。不会覆盖现有的ssh密钥 |
|
Group |
否 |
可选的,设定用户的主组 |
||
|
Groups |
否 |
用逗号分隔的组,当groups设定为空的时候,那么会移除除了主组的其他所有组 设置用户的附加组 |
||
|
Home |
否 |
可选的,设定为用户的home目录 |
||
|
Login_class |
否 |
可选的,设定用户的登录类 FreeBSD, OpenBSD and NetBSD systems. |
||
|
Name |
是 |
用户创建,移除,修改 |
||
|
Create_home |
否 |
No |
Yes/no |
是否为用户创建主目录,yes(Default)、no |
|
Non_unique |
否 |
Yes/no |
可选的,当使用-u选项的时候,将用户的uid设置为non_unique |
|
|
Password |
否 |
设定用户的密码 |
||
|
Remove |
否 |
No |
Yes/no |
当使用状态为state=absent的时候,差不多和userdel –remove(删除所有信息) |
|
Shell |
否 |
为用户设置登陆时的Shell | ||
|
Ssh_key_bits |
否 |
2048 |
设定秘钥的位数 |
|
|
Ssh_key_file |
否 |
.sha/id_rsa |
可以实现ssh密钥改名,或变更存放ssh密钥位置,默认为.ssh/id_rsa | |
|
ssh_key_passphrase |
否 |
Ssh秘钥的密码 |
||
|
Ssh_key_type |
否 |
Rsa |
Ssh秘钥的类型 |
|
|
State |
否 |
Present |
Present Absent |
新增删除 |
|
System |
否 |
No |
Yes/no |
否添加为系统用户,yes:为系统用户,no:不是系统用户,不会改变已经存在的用户 |
|
Uid |
否 |
为用户设定uid |
||
|
Update_password |
否 |
Always |
Always On_create |
Always当用户密码不同,会修改,是否需要修改密码 |
案例
创建用户
[root@Ansible ~]# ansible node -m user -a 'name=admin home=/home/admin uid=1007 group=root'
192.168.2.12 | SUCCESS => {
    "changed": true,
    "comment": "",
    "create_home": true,
    "group": 0,
    "home": "/home/admin",
    "name": "admin",
    "shell": "/bin/bash",
    "state": "present",
    "system": false,
    "uid": 1007
}
192.168.2.11 | SUCCESS => {
    "changed": true,
    "comment": "",
    "create_home": true,
    "group": 0,
    "home": "/home/admin",
    "name": "admin",
    "shell": "/bin/bash",
    "state": "present",
    "system": false,
    "uid": 1007
}


[root@Ansible ~]# ansible node -m shell -a 'id admin && ls -l /home'
192.168.2.11 | SUCCESS | rc=0 >>
uid=1007(admin) gid=0(root) 组=0(root)
总用量 0
drwx------ 2 admin root 62 1月  15 19:53 admin

192.168.2.12 | SUCCESS | rc=0 >>
uid=1007(admin) gid=0(root) 组=0(root)
总用量 0
drwx------ 2 admin root 62 1月  15 19:53 admin
创建用户,不创建家目录以及不让登录
[root@Ansible ~]# ansible node -m user -a 'name=aaa  uid=1007 shell=/bin/nologin uid=1008 create_home=no'
192.168.2.12 | SUCCESS => {
    "changed": true,
    "comment": "",
    "create_home": false,
    "group": 1008,
    "home": "/home/aaa",
    "name": "aaa",
    "shell": "/bin/nologin",
    "state": "present",
    "system": false,
    "uid": 1008
}
192.168.2.11 | SUCCESS => {
    "changed": true,
    "comment": "",
    "create_home": false,
    "group": 1008,
    "home": "/home/aaa",
    "name": "aaa",
    "shell": "/bin/nologin",
    "state": "present",
    "system": false,
    "uid": 1008
}

[root@Ansible ~]# ansible node -m shell -a 'id aaa && tail -1 /etc/passwd'
192.168.2.12 | SUCCESS | rc=0 >>
uid=1008(aaa) gid=1008(aaa) 组=1008(aaa)
aaa:x:1008:1008::/home/aaa:/bin/nologin

192.168.2.11 | SUCCESS | rc=0 >>
uid=1008(aaa) gid=1008(aaa) 组=1008(aaa)
aaa:x:1008:1008::/home/aaa:/bin/nologin
删除用户
[root@Ansible ~]# ansible node -m user -a 'name=aaa state=absent'
192.168.2.11 | SUCCESS => {
    "changed": true,
    "force": false,
    "name": "aaa",
    "remove": false,
    "state": "absent"
}
192.168.2.12 | SUCCESS => {
    "changed": true,
    "force": false,
    "name": "aaa",
    "remove": false,
    "state": "absent"
}
删除用户及家目录
[root@Ansible ~]# ansible node -m user -a 'name=admin state=absent remove=yes'
192.168.2.11 | SUCCESS => {
    "changed": true,
    "force": false,
    "name": "admin",
    "remove": true,
    "state": "absent"
}
192.168.2.12 | SUCCESS => {
    "changed": true,
    "force": false,
    "name": "admin",
    "remove": true,
    "state": "absent"
}
4.2、group模块
管理被控端用户组
| 参数 | 说明 |
|---|---|
| name | 指定创建的组名 |
| gid | 为组设置gid |
| state |
是否将组创建在远程主机上 创建:present(Default) 删除:absent |
| system |
是否创建系统组 创建系统组:yes 不创建系统组:no(Default) |
案例
创建组
[root@Ansible ~]# ansible node -m group -a 'name=admin'
192.168.2.11 | SUCCESS => {
    "changed": true,
    "gid": 1000,
    "name": "admin",
    "state": "present",
    "system": false
}
192.168.2.12 | SUCCESS => {
    "changed": true,
    "gid": 1000,
    "name": "admin",
    "state": "present",
    "system": false
}
创建组并指定gid
[root@Ansible ~]# ansible node -m group -a 'name=aaa gid=1007'
192.168.2.12 | SUCCESS => {
    "changed": true,
    "gid": 1007,
    "name": "aaa",
    "state": "present",
    "system": false
}
192.168.2.11 | SUCCESS => {
    "changed": true,
    "gid": 1007,
    "name": "aaa",
    "state": "present",
    "system": false
}
删除组
[root@Ansible ~]# ansible node -m group -a 'name=aaa state=absent'
192.168.2.11 | SUCCESS => {
    "changed": true,
    "name": "aaa",
    "state": "absent"
}
192.168.2.12 | SUCCESS => {
    "changed": true,
    "name": "aaa",
    "state": "absent"
}
5、yum_repository模块
yum_repository 模块可以帮助我们管理远程主机上的 yum 仓库
| 参数 | 必选 | 选项 | 说明 |
|---|---|---|---|
| name | 是 | 用于指定要操作的唯一的仓库ID,也就是”.repo”配置文件中每个仓库对应的”中括号”内的仓库ID | |
| baseurl | 是 | baseurl | 此参数用于设置 yum 仓库的 file:///aaa yum源文件位置 |
| description | 否 | 用于设置仓库的注释信息,也就是”.repo”配置文件中每个仓库对应的”name字段”对应的内容 | |
| file | 否 | 用于设置仓库的配置文件名称,即设置”.repo”配置文件的文件名前缀,在不使用此参数的情况下,默认以 name 参数的仓库ID作为”.repo”配置文件的文件名前缀,同一个”.repo” 配置文件中可以存在多个 yum 源 | |
| enabled | 否 | yes/no |
用于设置是否激活对应的 yum 源 此参数默认值为 yes,表示启用对应的 yum 源 no 表示不启用对应的 yum 源 |
| gpgcheck | 否 | yes/no |
是否开启 rpm 包验证功能 默认值为 no,表示不启用包验证 yes 表示开启包验证功能 |
| gpgcakey | 否 | yes/no | 设置为 yes 时,需要使用此参数指定验证包所需的公钥 |
| state | 否 | absent/present |
默认值为 present 创建 当是absent 时,表示删除对应的 yum 源 |
案例
在node主机上设置ID为 node 的yum源
[root@Ansible ~]# ansible node -m yum_repository -a 'name=node description="node" baseurl=file:///node enabled=1 gpgcheck=no file=node'
192.168.2.12 | SUCCESS => {
    "changed": true,
    "repo": "node",
    "state": "present"
}
192.168.2.11 | SUCCESS => {
    "changed": true,
    "repo": "node",
    "state": "present"
}


——————————————————————————————————————————————

[root@node1 ~]# cat  /etc/yum.repos.d/node.repo
[node]
baseurl = file:///node
enabled = 1
gpgcheck = 0
name = node
设置自动挂载重启后生效;需要创建文件夹node
[root@Ansible ~]# ansible node -m mount -a "src=/dev/cdrom path=/node fstype=iso9660 state=present"
192.168.2.11 | SUCCESS => {
    "changed": true,
    "dump": "0",
    "fstab": "/etc/fstab",
    "fstype": "iso9660",
    "name": "/node",
    "opts": "defaults",
    "passno": "0",
    "src": "/dev/cdrom"
}
192.168.2.12 | SUCCESS => {
    "changed": true,
    "dump": "0",
    "fstab": "/etc/fstab",
    "fstype": "iso9660",
    "name": "/node",
    "opts": "defaults",
    "passno": "0",
    "src": "/dev/cdrom"
}

[root@node2 ~]# cat /etc/fstab
.......
................
/dev/mapper/centos-swap swap                    swap    defaults        0 0
/dev/sr0 /media/cdrom iso9660 defaults 0 0
/dev/cdrom /node iso9660 defaults 0 0
删除yum仓库及自动挂载
[root@Ansible ~]# ansible node -m yum_repository -a "file=node name=node state=absent"
192.168.2.11 | SUCCESS => {
    "changed": true,
    "repo": "node",
    "state": "absent"
}
192.168.2.12 | SUCCESS => {
    "changed": true,
    "repo": "node",
    "state": "absent"
}
——————————————————————————————————————————
[root@Ansible ~]# ansible node -m mount -a "src=/dev/cdrom path=/node fstype=iso9660 state=absent"
192.168.2.11 | SUCCESS => {
    "changed": true,
    "dump": "0",
    "fstab": "/etc/fstab",
    "fstype": "iso9660",
    "name": "/node",
    "opts": "defaults",
    "passno": "0",
    "src": "/dev/cdrom"
}
192.168.2.12 | SUCCESS => {
    "changed": true,
    "dump": "0",
    "fstab": "/etc/fstab",
    "fstype": "iso9660",
    "name": "/node",
    "opts": "defaults",
    "passno": "0",
    "src": "/dev/cdrom"
}
mount 模板
 语法:
ansible 主机组 -m mount -a "src=设备路径 path=挂载点 fstype=文件系统 state=挂载类型"
| 参数 | 选项 | 说明 |
|---|---|---|
| path | 挂载点 | |
| src | 需要挂载的设备 | |
| fstype | 挂载设备的文件系统 | |
| iso9660 | 光驱 | |
| ext4、xfs、nfs | 系统类型 | |
| cifs samba | 共享文件系统 | |
| opts | notime、noexec、nosuid | 挂载属性 |
| state | 挂载动作 | |
| present | 开机挂载,仅将挂载配置写入/etc/fstab并不会真的挂载 | |
| mounted | 挂载设备,并将配置写入/etc/fstab | |
| unmounted | 卸载设备,不会清除/etc/fstab写入的配置 | |
| absent | 卸载设备,并清理/etc/fstab写入的配置 |
案例上方有
6、软件包相关模块
6.1、yum模块
yum模块可以在远程主机上通过yum源管理软件包的下载、安装、卸载、升级等操作
| 参数 | 必选 | 选项 | 说明 |
|---|---|---|---|
| name | 是 | 指定需要管理的软件包名称;如nginx | |
| disable_gpg_check | 否 | yes/no | 用于禁用对rpm包的公钥gpg验证,默认值为no,表示不禁用验证,设置为yes表示禁用验证,即不验证包,直接安装,在对应的yum源没有开启gpg验证的情况下,需要将此参数的值设置为yes,否则会报错而无法进行安装 |
| enablerepo | 否 | yes/no | 用于指定安装软件包时临时启用的yum源,假如你想要从A源中安装软件,但是你不确定A源是否启用了,你可以在安装软件包时将此参数的值设置为yes,即使A源的设置是未启用,也可以在安装软件包时临时启用A源 |
| list | 否 | installed | 列出所有已经安装的软件包 |
| updates | 列出所有可以更新的软件包 | ||
| repos | 列出所有的yum仓库 | ||
| state | 否 | installed/present | 安装软件包(二选一,选项功能一样) |
| removed/absent | 卸载软件包(二选一,选项功能一样) | ||
| latest | 安装最新的软件包 |
案例
列出所有已经安装的软件包
[root@Ansible ~]# ansible node1 -m yum -a 'list=installed'
192.168.2.11 | SUCCESS => {
    "changed": false,
    "results": [
        {
            "arch": "x86_64",
            "envra": "0:GeoIP-1.5.0-11.el7.x86_64",
            "epoch": "0",
            "name": "GeoIP",
            "release": "11.el7",
            "repo": "installed",
            "version": "1.5.0",
            "yumstate": "installed"
        },
        {
            "arch": "x86_64",
            "envra": "1:NetworkManager-libnm-1.8.0-9.el7.x86_64",
            "epoch": "1",
            "name": "NetworkManager-libnm",
            "release": "9.el7",
            "repo": "installed",
            "version": "1.8.0",
            "yumstate": "installed"
        },
..............................
.....................列出所有的yum仓库
[root@Ansible ~]# ansible node1 -m yum -a 'list=repos'
192.168.2.11 | SUCCESS => {
    "changed": false,
    "results": [
        {
            "repoid": "aaa",
            "state": "enabled"
        }
    ]
}
安装httpd
[root@Ansible ~]# ansible node1 -m yum -a 'name=httpd state=installed'
192.168.2.11 | SUCCESS => {
    "changed": true,
    "msg": "",
    "rc": 0,
    "results": [
..................................
................
.........
————————————————————————————————————————————————————

[root@node1 ~]# netstat -anput| grep 80
tcp6       0      0 :::80                   :::*                    LISTEN      120725/httpd
卸载httpd
[root@Ansible ~]# ansible node1 -m yum -a 'name=httpd state=removed'
192.168.2.11 | SUCCESS => {
    "changed": true,
    "msg": "",
    "rc": 0,
    "results": [
.............................
...................
........
....
安装包组
[root@Ansible ~]# ansible node1 -m yum -a 'name="@Development Tools" state=installed'
192.168.2.11 | SUCCESS => {
    "changed": false,
    "msg": "Warning: Group development does not have any packages to install.\n",
    "rc": 0,
    "results": [
        "Loaded plugins: fastestmirror\nLoading mirror speeds from cached hostfile\nNothing to do\n"
    ]
}
6.2、Service systemd模块
服务模块,用于对服务的管理,进行启动、停止、重启以及设置开机自启等等
| 参数 | 必选 | 选项 | 说明 |
|---|---|---|---|
| name | 是 | 指定要管理的服务名称 | |
| enabled | 否 | yes/no | 开机自启 |
| state | 是 | started | 启动服务 |
| stopped | 停止服务 | ||
| restarted | 重启服务 | ||
| reloaded | 重载服务 |
案例
启动crond服务,设置开机自启
[root@Ansible ~]# ansible node -m service -a 'name=crond state=started enabled=yes'
192.168.2.11 | SUCCESS => {
    "changed": false,
    "enabled": true,
    "name": "crond",
    "state": "started",
    "status": {
        "ActiveEnterTimestamp": "六 2022-01-15 00:37:32 CST",
        "ActiveEnterTimestampMonotonic": "2781295",
        "ActiveExitTimestampMonotonic": "0",
        "ActiveState": "active",
...................
..........
...
7、计划任务相关模块
管理被控端计划任务
| 参数 | 说明 |
|---|---|
| name | 定时任务基本描述 |
| job | 定时任务要执行的命令 |
| minute | 分 |
| hour | 小时 |
| day | 日 |
| month | 月 |
| weekday | 周 |
| disabled |
yes:禁用计划任务;no:启用计划任务 |
| absent:删除计划任务 |
创建计划任务添加描述
[root@Ansible ~]# ansible node -m cron -a 'name="测试" minute=* hour=* day=* month=* weekday=* job="/bin/bash/root/a.sh"'
192.168.2.11 | SUCCESS => {
    "changed": true,
    "envs": [],
    "jobs": [
        "测试"
    ]
}
192.168.2.12 | SUCCESS => {
    "changed": true,
    "envs": [],
    "jobs": [
        "测试"
    ]
}
————————————————————————————————————————————————————————————————
[root@Ansible ~]# ansible node -m shell -a 'crontab -l'
192.168.2.11 | SUCCESS | rc=0 >>
#Ansible: 测试
* * * * * /bin/bash/root/a.sh

192.168.2.12 | SUCCESS | rc=0 >>
#Ansible: 测试
* * * * * /bin/bash/root/a.sh
创建没有描述的计划任务
[root@Ansible ~]# ansible node -m cron -a 'job="/bin/bash/root/a.sh"'
192.168.2.11 | SUCCESS => {
    "changed": true,
    "envs": [],
    "jobs": [
        "测试",
        "None"
    ]
}
192.168.2.12 | SUCCESS => {
    "changed": true,
    "envs": [],
    "jobs": [
        "测试",
        "None"
    ]
}
删除计划任务
[root@Ansible ~]# ansible node -m cron -a 'name=None job="/bin/bash/root/b.sh" state=absent'
192.168.2.12 | SUCCESS => {
    "changed": true,
    "envs": [],
    "jobs": [
        "测试"
    ]
}
192.168.2.11 | SUCCESS => {
    "changed": true,
    "envs": [],
    "jobs": [
        "测试"
    ]
}
8、系统信息相关模块
setup模块
获取系统信息
案例
查看系统所有的信息
[root@Ansible ~]# ansible node -m setup
192.168.2.11 | SUCCESS => {
    "ansible_facts": {
        "ansible_all_ipv4_addresses": [
            "192.168.2.11"
        ],
        "ansible_all_ipv6_addresses": [
            "fe80::d989:a794:f391:8d68"
        ],
        "ansible_apparmor": {
            "status": "disabled"
        },
........................
................
..........
使用参数 filter 进行过滤
[root@Ansible ~]# ansible node -m setup -a 'filter=ansible_all_ipv4_addresses'
192.168.2.11 | SUCCESS => {
    "ansible_facts": {
        "ansible_all_ipv4_addresses": [
            "192.168.2.11"
        ]
    },
    "changed": false
}
192.168.2.12 | SUCCESS => {
    "ansible_facts": {
        "ansible_all_ipv4_addresses": [
            "192.168.2.12"
        ]
    },
    "changed": false
}
————————————————————       常用过滤参数

ansible_all_ipv4_addresses            #仅显示ipv4的信息
ansible_date_time                     #系统时间
ansible_devices                       #仅显示磁盘设备信息
ansible_distribution                  #显示是什么系统,例:centos,suse等
ansible_distribution_major_version    #显示是系统主版本
ansible_distribution_version          #仅显示系统版本
ansible_machine                       #显示系统类型,例:32位,还是64位
ansible_eth33                         #仅显示eth0的信息
ansible_domain                        #系统所在域
ansible_fqdn                          #系统的主机名
ansible_hostname                      #显示主机名,简写
ansible_kernel                        #仅显示内核版本
ansible_lvm                           #显示lvm相关信息
ansible_memtotal_mb                   #显示系统总内存
ansible_memfree_mb                    #显示可用系统内存
ansible_memory_mb                     #详细显示内存情况
ansible_swaptotal_mb                  #显示总的swap内存
ansible_swapfree_mb                   #显示swap内存的可用内存
ansible_mounts                        #显示系统磁盘挂载情况
ansible_processor                     #显示cpu个数(具体显示每个cpu的型号)
ansible_processor_count               #cpu的颗数
ansible_processor_vcpus               #显示cpu个数(只显示总的个数)
ansible_python_version                #显示python版本
9、find模块
find 模块在被管理主机中查找符合条件的文件
| 参数 | 必选 | 选项 | 说明 |
|---|---|---|---|
| paths | 是 | 指定查找的目录,可以指定多个路径,路径之间用逗号隔开。别名:name、path(即用name、path和paths相同 |
|
| recurse | 否 | yes/no | 默认情况下只会在指定的目录中查找,也就是说如果指定目录中还有目录,ansible不递归查找;如果要递归查找,recurse设置为yes |
| hidden | 否 | yes/no | 默认不查找隐藏文件,如果要查找隐藏文件,hidden设置为yes |
| file_type | 否 | any/directory/file/link |
文件类型,默认只查找文件(file)。文件类型可以指定为:any、directory、file、link |
| patterns | 否 | yes/no | 使用 shell 匹配对应的文件名,如果使用 python 的正则去匹配文件名,需要将 use_regex 的值设置为 yes |
| use_regex | 否 | yes/no | 是否用正则表达式,默认no,表示contains、patterns、excludes使用shell通配符;如果指定为yes,则contains、patterns、excludes使用正则表达式 |
| contains | 否 | 使用此参数可以根据文章内容查找文件,此参数的值为一个正则表达式,find 模块会根据对应的正则表达式匹配文件内容 | |
| age | 否 | 据时间范围查找文件,默认以文件的 mtime 为准与指定的时间进行对比,查找 mtime 在3天之前的文件,设置 age=3d,查找 mtime 在3天以内的文件,设置 age=-3d(单位:s秒、m分、h时、d天、w星期) | |
| age_stamp | 否 | atime/ctime/mtime | 指定以哪个时间种类为准,当根据时间查找文件时,默认mtime |
| size | 否 | 根据文件大小查找文件,查找大于3M的文件,设置 size=3m,查找小于50k的文件,设置 size=-50k,可以使用的单位有 t、g、m、k、b | |
| get_checksum | 否 | 当有符合查找条件的文件被找到时,会同时返回对应文件的 sha1校验码,如果要查找的文件比较大,那么生成校验码的时间会比较长 |
案例
查找 /etc 目录中进行查找文件内容包含 abc 字符串的文件(隐藏文件会被忽略,不进行递归查询)
[root@Ansible ~]# ansible node -m find -a 'paths=/etc contains=".*abc.*"'
192.168.2.11 | SUCCESS => {
    "changed": false,
    "examined": 186,
    "files": [
        {
            "atime": 1642316881.60291,
            "ctime": 1635178093.345999,
            "dev": 64768,
..................
..........
.....
查找 /etc 目录以及子目录中进行查找文件内容包含 abc 字符串的文件(隐藏文件会被忽略)
[root@Ansible ~]# ansible node -m find -a 'paths=/etc contains=".*abc.*" recurse=yes'
192.168.2.11 | SUCCESS => {
    "changed": false,
    "examined": 2366,
    "files": [
        {
            "atime": 1642316881.60291,
            "ctime": 1635178093.345999,
            "dev": 64768,
            "gid": 0,
            "gr_name": "root",
            "inode": 67161041,
            "isblk": false,
            "ischr": false,
            "isdir": false,
................................
.........................
............
..
在node主机的 /root 目录在查找以 .sh 结尾的,包含隐藏文件,不包含目录和其他文件类型,不进行递归查询
[root@Ansible ~]# ansible node -m find -a 'paths=/root/ patterns="*.sh" hidden=yes'
192.168.2.11 | SUCCESS => {
    "changed": false,
    "examined": 13,
    "files": [
        {
            "atime": 1635178467.2444892,
            "ctime": 1635178467.2424893,
            "dev": 64768,
            "gid": 0,
            "gr_name": "root",
            "inode": 100663377,
            "isblk": false,
            "ischr": false,
            "isdir": false,
            "isfifo": false,
            "isgid": false,
            "islnk": false,
..............................
.................
........
...
在node主机的 /root 目录在查找以 .sh 结尾的,包含隐藏文件,包含目录和其他文件类型,不进行递归查询
[root@Ansible ~]# ansible node -m find -a 'paths=/root/ patterns="*.sh" hidden=yes file_type=any'
192.168.2.12 | SUCCESS => {
    "changed": false,
    "examined": 13,
    "files": [
        {
            "atime": 1635178606.2782254,
            "ctime": 1635178606.2772255,
            "dev": 64768,
            "gid": 0,
            "gr_name": "root",
            "inode": 100663377,
            "isblk": false,
            "ischr": false,
            "isdir": false,
            "isfifo": false,
            "isgid": false,
..........................
.............
.......
在node主机的 /root 目录中以及子目录中进行查找 Mtime 在1天以内的文件,不包含隐藏文件,不包含目录或软连接等文件类型
[root@Ansible ~]# ansible node -m find -a 'paths=/root/ age=-1d recurse=yes'
192.168.2.11 | SUCCESS => {
    "changed": false,
    "examined": 37,
    "files": [
        {
            "atime": 1642240588.4289799,
            "ctime": 1642240588.39398,
            "dev": 64768,
            "gid": 0,
            "gr_name": "root",
            "inode": 67554039,
            "isblk": false,
            "ischr": false,
            "isdir": false,
            "isfifo": false,
................................
....................
...........
在node主机的 / 目录中以及子目录中进行查找 大于 2g 的文件,不包含隐藏文件,不包含目录或软连接等文件类型
[root@Ansible ~]# ansible node -m find -a 'paths=/ size=2g recurse=yes'
192.168.2.11 | SUCCESS => {
    "changed": false,
    "examined": 137218,
    "files": [
        {
            "atime": 1642323085.108872,
            "ctime": 1642323085.108872,
            "dev": 3,
            "gid": 0,
            "gr_name": "root",
            "inode": 4026532033,
            "isblk": false,
            "ischr": false,
            "isdir": false,
            "isfifo": false,
            "isgid": false,
            "islnk": false,
            "isreg": true,
            "issock": false,
            "isuid": false,
......................
.................
.........
在node主机的 /root 目录中以及子目录中进行查找以 .sh 结尾的文件,并且返回符合条件的shal 校验码,包含隐藏文件
[root@Ansible ~]# ansible node -m find -a 'paths=/root patterns=*.sh get_checksum=yes hidden=yes recurse=yes'
192.168.2.11 | SUCCESS => {
    "changed": false,
    "examined": 37,
    "files": [
        {
            "atime": 1635178467.2444892,
            "checksum": "6cc4f696bdc8ff528688cc945b9b50634cf37073",
            "ctime": 1635178467.2424893,
            "dev": 64768,
            "gid": 0,
            "gr_name": "root",
            "inode": 100663377,
            "isblk": false,
            "ischr": false,
            "isdir": false,
            "isfifo": false,
            "isgid": false,
            "islnk": false,
            "isreg": true,
            "issock": false,
............................................
........................
..........
10、replace模块
replace模块可以根据我们指定的正则表达式替换文件中的字符串,文件中所有被正则匹配到的字符串都会被替换
| 参数 | 必选 | 说明 |
|---|---|---|
| path | 是 | 指定要操作的文件 |
| regexp | 是 | 指定一个python正则表达式,文件中与正则匹配的字符串将会被替换 |
| replace | 否 | 指定最终要替换成的字符串 |
| backup | 否 | 是否在修改文件之前对文件进行备份,最好设置为yes |
案例
  在节点 创建文件
[root@node1 ~]# vim aaa.txt
ccc aaa bbb
abc abc abc
aaa ccc bbb
123456789abc

保存
在node 主机中 /root/aaa.txt 文件中的 abc 全部替换成 ABC
[root@Ansible ~]# ansible node -m replace -a 'path=/root/aaa.txt regexp="abc" replace="ABC"'
192.168.2.11 | SUCCESS => {
    "changed": true,
    "msg": "4 replacements made"
}
192.168.2.12 | SUCCESS => {
    "changed": true,
    "msg": "4 replacements made"
}
————————————————————————————————————————————
[root@node1 ~]# cat aaa.txt
ccc aaa bbb
ABC ABC ABC
aaa ccc bbb
123456789ABC
在node 主机中 /root/aaa.txt 文件中的 ABC 全部替换成 abc ,在操作前进行备份
[root@Ansible ~]# ansible node -m replace -a 'path=/root/aaa.txt regexp="ABC" replace="abc" backup=yes'
192.168.2.12 | SUCCESS => {
    "backup_file": "/root/aaa.txt.34904.2022-01-16@17:21:42~",
    "changed": true,
    "msg": "4 replacements made"
}
192.168.2.11 | SUCCESS => {
    "backup_file": "/root/aaa.txt.40720.2022-01-16@17:21:42~",
    "changed": true,
    "msg": "4 replacements made"
}
————————————————————————————————————————————————————————
[root@node1 ~]# ls aaa*
aaa.txt  aaa.txt.40720.2022-01-16@17:21:42~
[root@node1 ~]# cat aaa*
ccc aaa bbb
abc abc abc
aaa ccc bbb
123456789abc
ccc aaa bbb
ABC ABC ABC
aaa ccc bbb
123456789ABC
11、script模块
script 模块可以帮助我们在远程主机上执行 ansible 管理主机上的脚本,也就是说,脚本一直存在于 ansible 管理主机本地,不需要手动拷贝到远程主机后再执行
| 参数 | 必选 | 说明 |
|---|---|---|
| free_form | 是 | 指定需要执行的脚本,脚本位于 ansible 管理主机本地,并没有具体的一个参数名叫 free_form,具体解释请参考 command 模块 |
| chdir | 否 | 此参数的作用就是指定一个远程主机中的目录,在执行对应的脚本之前,会先进入到 chdir 参数指定的目录中 |
| creates | 否 | 使用此参数指定一个远程主机中的文件,当指定的文件存在时,就不执行对应脚本,可参考 command 模块中的解释 |
| removes | 否 | 用此参数指定一个远程主机中的文件,当指定的文件不存在时,就不执行对应脚本,可参考 command 模块中的解释 |
ansible 的脚本在 node 主机上进行执行,在执行前先进入 /opt 目录中
[root@Ansible ~]# ansible node -m script -a 'chdir=/opt /root/a.sh'
192.168.2.11 | SUCCESS => {
    "changed": true,
    "rc": 0,
    "stderr": "Shared connection to 192.168.2.11 closed.\r\n",
    "stderr_lines": [
        "Shared connection to 192.168.2.11 closed."
    ],
    "stdout": "hello\r\n0\r\n",
    "stdout_lines": [
        "hello",
        "0"
    ]
}
192.168.2.12 | SUCCESS => {
    "changed": true,
    "rc": 0,
    "stderr": "Shared connection to 192.168.2.12 closed.\r\n",
    "stderr_lines": [
        "Shared connection to 192.168.2.12 closed."
    ],
    "stdout": "hello\r\n0\r\n",
    "stdout_lines": [
        "hello",
        "0"
    ]
}
在node主机中 /root/aaa.txt 文件如果已经存在,ansible主机的 /root/a.sh 脚本就不会执行,不存在就执行
[root@Ansible ~]# ansible node -m script -a 'creates=/root/aaa.txt /root/a.sh'
192.168.2.11 | SKIPPED
192.168.2.12 | SUCCESS => {
    "changed": true,
    "rc": 0,
    "stderr": "Shared connection to 192.168.2.12 closed.\r\n",
    "stderr_lines": [
        "Shared connection to 192.168.2.12 closed."
    ],
    "stdout": "hello\r\n0\r\n",
    "stdout_lines": [
        "hello",
        "0"
    ]
}
在node主机中 /root/aaa.txt 文件如果存在,ansible主机的 /root/a.sh 脚本就会执行,不存在就不执行
[root@Ansible ~]# ansible node -m script -a 'removes=/root/aaa.txt /root/a.sh'
192.168.2.12 | SKIPPED
192.168.2.11 | SUCCESS => {
    "changed": true,
    "rc": 0,
    "stderr": "Shared connection to 192.168.2.11 closed.\r\n",
    "stderr_lines": [
        "Shared connection to 192.168.2.11 closed."
    ],
    "stdout": "hello\r\n0\r\n",
    "stdout_lines": [
        "hello",
        "0"
    ]
}