vue2迁移vue3之setup选项:快速入门
单文件组件*.vue中,script标签的内容
<script>
import childrenCom from './childrenCom.vue'
export default {
  name: "componentName",
  components: {
    childrenCom,
  },
  props: {
    titleProps: {
      type: String,
      default: "",
    },
    valuesProps: {
      type: Object,
      default: () => ({}),
    },
  },
  computed: {
    computedValue() {
      let res = this.titleProps + "xxx";
      return res;
    },
  },
  data() {
    // tableHeadLabel是非响应数据
    this.tableHeadLabel = [
      {
        title: "姓名",
        key: "name",
      },
      {
        title: "年龄",
        key: "age",
      },
    ];
    return {
      dataStr: "",
      dataNum: "",
      dataArr: [],
      dataObj: {
        searchWord: undefined,
        state: undefined,
        pageSize: 10,
        pageNo: 1,
      },
      dataTotal: 0,
      listData: [],
    };
  },
  created() {
    this.functionInCreate();
  },
  mounted() {
    this.functionInMounted();
  },
  methods: {
    // html模板中用到的函数
    functionInTemplate() {},

    // html模板中不用到的函数
    functionNotInTemplate() {
      console.log(this.dataStr);
    },

    // created生命周期调用的函数
    functionInCreate() {
      this.functionNotInTemplate();
    },

    // mounted生命周期调用的函数
    functionInMounted() {},
  },
};
</script>
改为:setup选项
<script>
import { reactive, computed, toRefs, onMounted } from "vue";
import childrenCom from './childrenCom.vue'
export default {
  name: "componentName",
  components: {
    childrenCom,
  },
  props: {
    titleProps: {
      type: String,
      default: "",
    },
    valuesProps: {
      type: Object,
      default: () => ({}),
    },
  },
  setup(props,ctx) {
  //功能1 :把一个功能模块写在一个函数里,这样,可以抽到独立的文件里,符合 Compsition API理念
   const part1=function(props,ctx){
    //  props数据,直接用参数props直接代替this,即可
    let computedValue = computed(() => {
      let res = props.titleProps + "xxx";
      return res;
    });

    // tableHeadLabel是非响应数据
    const tableHeadLabel = [
      {
        title: "姓名",
        key: "name",
      },
      {
        title: "年龄",
        key: "age",
      },
    ];
    // 用reactive函数包裹原vue2的data选项return的对象
    // 然后在各个方法中,用data代替this,来应用对应的响应数据,即可
    //所有变量用一个reactive定义,减少定义变量的次数,同时,避免某些响应式数据被赋值后导致响应式丢失的问题
    //对于非响应式数据,直接定义变量即可
    //对特殊的数据(只读/浅相应)
    const dataOpt = reactive({
      dataStr: "",
      dataNum: "",
      dataArr: [],
      dataObj: {
        searchWord: undefined,
        state: undefined,
        pageSize: 10,
        pageNo: 1,
      },
      dataTotal: 0,
      listData: [],
    });

    // html模板中用到的函数 不用表达式,这样,避免在调用函数时要时刻关注函数定义的顺序
    function functionInTemplate() {};

    // html模板中不用到的函数
    function  functionNotInTemplate() {
      // 在各个方法中,用data代替this,来应用对应的响应数据,即可
      console.log(data.dataStr);
    };

    // created生命周期调用的函数
    // 直接调用即可
    function  functionInCreate () {
      // html模板中不用到的函数
      // 在引用的地方,把this引用前缀去掉,即可
      functionNotInTemplate();
    };
    functionInCreate();

    // mounted生命周期调用的函数
    // 直接使用onMounted钩子函数,放入回调函数即可
   function  functionInMounted(params){};
    onMounted(() => {
      functionInMounted("xxx");
    });
     // setup函数return的对象,
    // 只包含在html模板中使用到的变量和方法,即可
      return  {
           computedValue,
           // toRefs函数可以把响应式数据最外层结构去掉,
           // 同时保持各个子属性仍是响应式的,
           // 即达到vue2中data选项的响应效果
           ...toRefs(dataOpt),
           functionInTemplate,
           tableHeadLabel,
        };
    }

    const part2=function(props,ctx){
      return {}
    }

    return {
       ...part1((props,ctx)),
       ...part2((props,ctx)),
       }
  },
};
</script>
组合Api–setup
由于setup函数会把顶层的绑定会被暴露给html模板,即在html模块版中,都是直接可以使用的,不再需要显式导出到html模板中
<script>
export default {
  name: "componentName",
};
</script>

<script setup>
import { reactive, computed, toRefs, onMounted } from "vue";
import childrenCom from "./childrenCom.vue";
// 在 <script setup> 中必须使用 defineProps 和 defineEmits API 来声明 props 和 emits ,
// 它们具备完整的类型推断并且在 <script setup> 中是直接可用的:
const props = defineProps({
  titleProps: {
    type: String,
    default: "",
  },
  valuesProps: {
    type: Object,
    default: () => ({}),
  },
});
// 显式声明需要触发的自定义事件名
const emit = defineEmits(["changeName", "deleteName"]);

//  props数据,直接用参数props直接代替this,即可
let computedValue = computed(() => {
  let res = props.titleProps + "xxx";
  return res;
});

// tableHeadLabel是非响应数据
const tableHeadLabel = [
  {
    title: "姓名",
    key: "name",
  },
  {
    title: "年龄",
    key: "age",
  },
];
// 用reactive函数包裹原vue2的data选项return的对象
// 然后在各个方法中,用data代替this,来应用对应的响应数据,即可
const data = reactive({
  dataStr: "",
  dataNum: "",
  dataArr: [],
  dataObj: {
    searchWord: undefined,
    state: undefined,
    pageSize: 10,
    pageNo: 1,
  },
  dataTotal: 0,
  listData: [],
});

// html模板中用到的函数
function functionInTemplate(){};

// html模板中不用到的函数
function functionNotInTemplate() {
  // 在各个方法中,用data代替this,来应用对应的响应数据,即可
  console.log(data.dataStr);
};

// created生命周期调用的函数
// 直接调用即可
function functionInCreate()  {
  // html模板中不用到的函数
  // 在引用的地方,把this引用前缀去掉,即可
  functionNotInTemplate();
};
functionInCreate();

// mounted生命周期调用的函数
// 直接使用onMounted钩子函数,放入回调函数即可
function functionInMounted(params) {};
onMounted(() => {
  functionInMounted("xxx");
});

// setup函数return的对象,
// 只包含在html模板中使用到的变量和方法,即可
let { dataStr, dataNum, dataArr, dataObj, dataTotal, listData } = toRefs(data);

</script>
此外,日志打印技巧
vue3使用代理后,打印数据后,查看时,特别不方便,此时可以这样做:F2
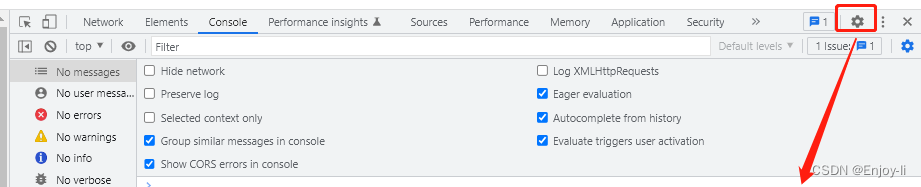
然后找到:
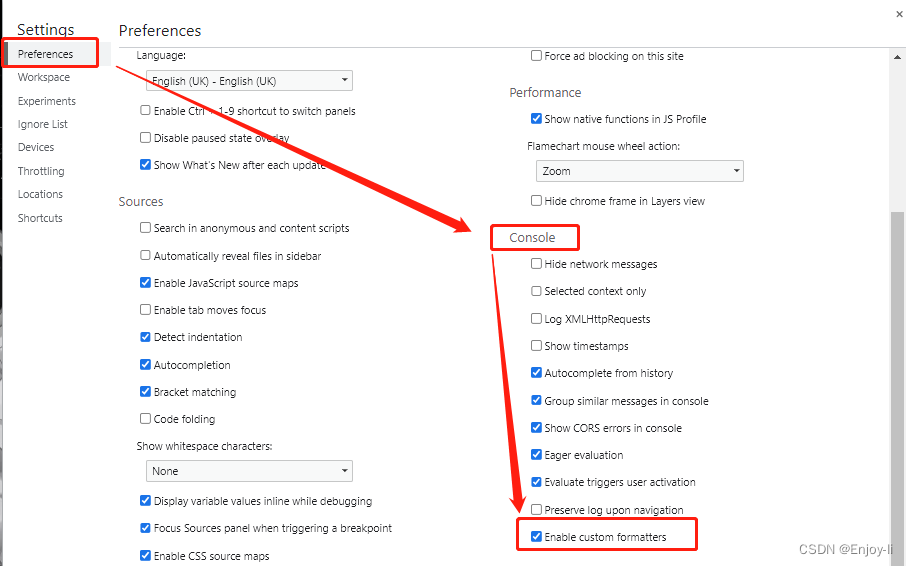
此时,查看打印的数据,就很清爽了
版权声明:本文为weixin_45062275原创文章,遵循 CC 4.0 BY-SA 版权协议,转载请附上原文出处链接和本声明。