首先四层的负载均衡我们用LVS,三层的我们通过ECMP(OSPF)来实现。支持ECMP特性的路由器将IP报文转发到不同的负载均衡服务器上,LVS通过NAT的方式进行负载均衡。首先看看这个实现的网络拓扑结构。
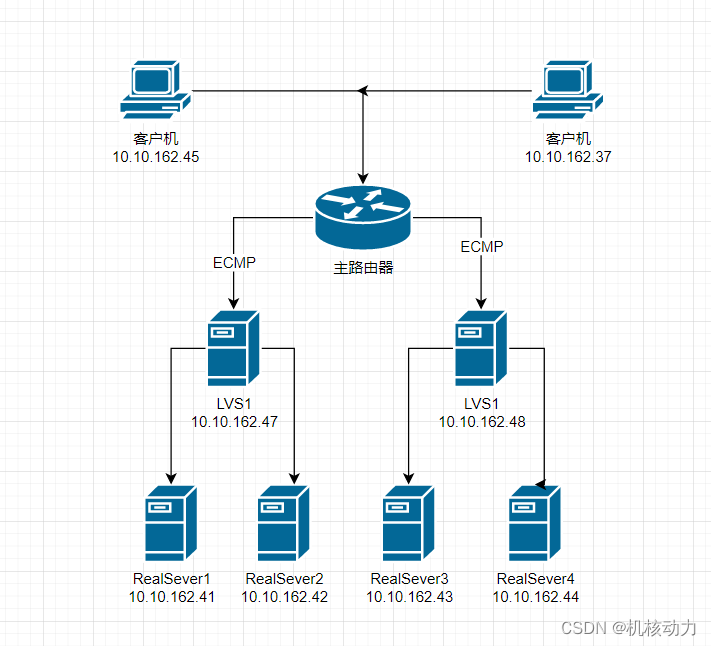
总共有9台机器,LVS负载均衡服务器2台,RealServer真实服务器4台,2台客户端访问机器,1台Quagga主路由器.
1.安装LVS
先做第一组LVS,一台LVS服务器有两个ip,分别是:10.10.162.49,10.10.162.47. 位数49这个ip作为RealServer的网关ip,47这个ip作为路由器的通信IP。
先在LVS服务器上安装
#停止防火墙
systemctl stop firewalld.service ; systemctl disable firewalld.service

#停止selinux
setenforce 0

#安装lvs
yum install ipvsadm -y
接下来需要把两台提供真实服务的RealServer的网关设置成LVS服务器的ip(10.10.162.49),因为大家都在同一个网段内,所以RealSever的子网掩码设置成32位的,也就是(255.255.255.255)。这样只要不是这个RealServer自己ip的包都丢给网关去处理。两个RealServer的IP分别是10.10.162.41,10.10.162.42,并且都装了nginx,访问端口是80,我用的是Centos,他们的网络配置是这样。
#RealSever1
TYPE=Ethernet
PROXY_METHOD=none
BROWSER_ONLY=no
BOOTPROTO=static
DEFROUTE=yes
IPV4_FAILURE_FATAL=no
IPV6INIT=yes
IPV6_AUTOCONF=yes
IPV6_DEFROUTE=yes
IPV6_FAILURE_FATAL=no
IPV6_ADDR_GEN_MODE=stable-privacy
NAME=ens3
DEVICE=ens3
IPADDR=10.10.162.41
PREFIX=32
GATEWAY=10.10.162.49
DNS1=114.114.114.114
ONBOOT=yes


#RealServer2
TYPE=Ethernet
PROXY_METHOD=none
BROWSER_ONLY=no
BOOTPROTO=static
DEFROUTE=yes
IPV4_FAILURE_FATAL=no
IPV6INIT=yes
IPV6_AUTOCONF=yes
IPV6_DEFROUTE=yes
IPV6_FAILURE_FATAL=no
IPV6_ADDR_GEN_MODE=stable-privacy
NAME=ens3
DEVICE=ens3
IPADDR=10.10.162.42
PREFIX=32
GATEWAY=10.10.162.49
DNS1=114.114.114.114
ONBOOT=yes
开始配置LVS服务器,10.10.162.47,10.10.162.48
#创建虚拟ip
ip addr add 192.168.1.3/32 dev lo:1

#配置LVS服务器,10.10.162.47是访问ip,41,42是Realserver服务器ip
ipvsadm -A -t 192.168.1.3:80 -s wrr
ipvsadm -a -t 192.168.1.3:80 -r 10.10.162.41:80 -m
ipvsadm -a -t 192.168.1.3:80 -r 10.10.162.42:80 -m

#打开包转发
echo 1 > /proc/sys/net/ipv4/ip_forward

#关闭 icmp 的重定向
echo 0 > /proc/sys/net/ipv4/conf/all/send_redirects
echo 0 > /proc/sys/net/ipv4/conf/default/send_redirects
echo 0 > /proc/sys/net/ipv4/conf/ens3/send_redirects
echo 0 > /proc/sys/net/ipv4/conf/ens4/send_redirects
接下来测试一下效果。直接Curl命令访问192.168.1.3
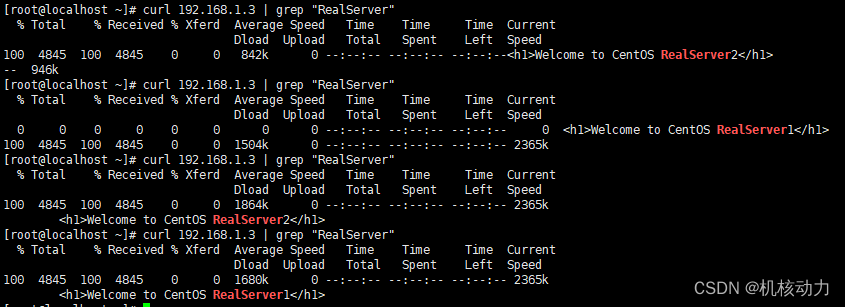
看到服务已经ok,而且两个RealSever服务器有轮询开始切换。
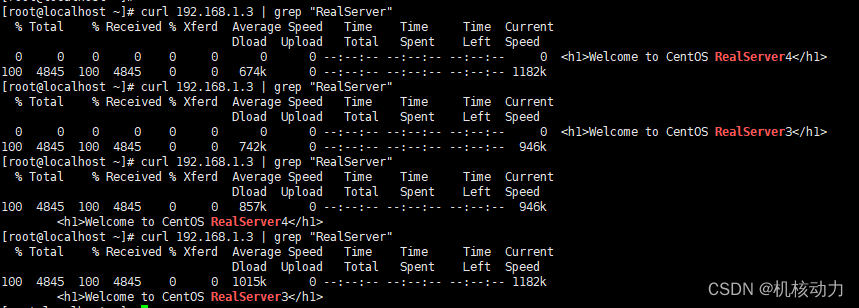
按照上面的方法开始装第二组LVS服务。LVS服务器有两个IP,10.10.162.50,10.10.162.48. 位数50这个ip作为RealServer的网关ip,48这个ip作为路由器的通信IP。RealSever的ip分别是10.10.162.43,10.10.162.44。成功后测试。
2.安装配置ECMP路由器
先在两台LVS服务器上,安装Quagga路由器软件。
yum -y install epel-release
yum -y install quagga
安装好后,开始配置zebra
vi /etc/quagga/zebra.conf
配置如下:
hostname LVS1
password test
enable password test
log file /var/log/quagga/zebra.log
log syslog
service password-encryption
interface ens3
#access-list 1 permit 127.0.0.1
ip prefix-list ANY seq 5 permit 0.0.0.0/0 le 32
ip protocol ospf route-map ANY
line vty
  access-class 1
配置ospf路由信息
vi /etc/quagga/ospfd.conf
hostname LVS1
password test
log file /var/log/quagga/ospfd.log
log stdout
log syslog
service password-encryption
interface ens3
  ip ospf hello-interval 1
  ip ospf dead-interval 4
  ip ospf priority 0
  ip ospf cost 1
router ospf
  ospf router-id 10.10.162.47
  log-adjacency-changes
  network 10.10.162.0/24 area 0.0.0.0
  network 192.168.1.0/24 area 0.0.0.0
line vty
 access-class 1
配置quagga的网络绑定配置
vi /etc/sysconfig/quagga
#
# Default: Bind all daemon vtys to the loopback(s) only
#
BABELD_OPTS="-A 0.0.0.0"
BGPD_OPTS="-A 0.0.0.0"
ISISD_OPTS="-A ::1"
OSPF6D_OPTS="-A ::1"
OSPFD_OPTS="-A 0.0.0.0"
RIPD_OPTS="-A 0.0.0.0"
RIPNGD_OPTS="-A ::1"
ZEBRA_OPTS="-A 0.0.0.0"

# Watchquagga configuration for LSB initscripts
#
# (Not needed with systemd: the service files are configured to automatically
# restart any daemon on failure. If zebra fails, all running daemons will be
# stopped; zebra will be started again; and then the previously running daemons
# will be started again.)
#
# Uncomment and edit this line to reflect the daemons you are actually using:
#WATCH_DAEMONS="zebra bgpd ospfd ospf6d ripd ripngd"
#
# Timer values can be adjusting by editing this line:
WATCH_OPTS="-Az -b_ -r/sbin/service_%s_restart -s/sbin/service_%s_start -k/sbin/service_%s_stop"
第二台LVS服务器的配置如下 :
hostname LVS2
password test
enable password test
log file /var/log/quagga/zebra.log
log syslog
service password-encryption
interface ens3
#access-list 1 permit 0.0.0.0
ip prefix-list ANY seq 5 permit 0.0.0.0/0 le 32
#route-map ANY deny 10
#  match ip address prefix-list ANY
ip protocol ospf route-map ANY
line vty
  access-class 1
hostname LVS2
password test
log file /var/log/quagga/ospfd.log
log stdout
log syslog
service password-encryption
interface ens3
  ip ospf hello-interval 1
  ip ospf dead-interval 4
  ip ospf priority 0
  ip ospf cost 1
router ospf
  ospf router-id 10.10.162.48
  log-adjacency-changes
  network 10.10.162.0/24 area 0.0.0.0
  network 192.168.1.0/24 area 0.0.0.0
line vty
 access-class 1
#
# Default: Bind all daemon vtys to the loopback(s) only
#
BABELD_OPTS="-A 0.0.0.0"
BGPD_OPTS="-A 0.0.0.0"
ISISD_OPTS="-A ::1"
OSPF6D_OPTS="-A ::1"
OSPFD_OPTS="-A 0.0.0.0"
RIPD_OPTS="-A 0.0.0.0"
RIPNGD_OPTS="-A ::1"
ZEBRA_OPTS="-A 0.0.0.0"

# Watchquagga configuration for LSB initscripts
#
# (Not needed with systemd: the service files are configured to automatically
# restart any daemon on failure. If zebra fails, all running daemons will be
# stopped; zebra will be started again; and then the previously running daemons
# will be started again.)
#
# Uncomment and edit this line to reflect the daemons you are actually using:
#WATCH_DAEMONS="zebra bgpd ospfd ospf6d ripd ripngd"
#
# Timer values can be adjusting by editing this line:
WATCH_OPTS="-Az -b_ -r/sbin/service_%s_restart -s/sbin/service_%s_start -k/sbin/service_%s_stop"
安装主路由器,ip是10.10.162.46
yum -y install epel-release
yum -y install quagga
配置zebra
vi /etc/quagga/zebra.conf
配置如下:
hostname RouterECMP
password test
enable password test
log file /var/log/quagga/zebra.log
service password-encryption
interface ens3
ip prefix-list ANY seq 5 permit 0.0.0.0/0 le 32
ip protocol ospf route-map ANY
line vty
  access-class 1
配置ospf路由信息
vi /etc/quagga/ospfd.conf
hostname RouterECMP
password test
log file /var/log/quagga/ospfd.log
log stdout
log syslog
service password-encryption
interface ens3
  ip ospf hello-interval 1
  ip ospf dead-interval 4
  ip ospf priority 1
  ip ospf cost 1
router ospf
  ospf router-id 10.10.162.46
  log-adjacency-changes
  network 10.10.162.0/24 area 0
line vty
 access-class 1
配置quagga的网络绑定配置
vi /etc/sysconfig/quagga
#
# Default: Bind all daemon vtys to the loopback(s) only
#
BABELD_OPTS="-A 0.0.0.0"
BGPD_OPTS="-A 0.0.0.0"
ISISD_OPTS="-A ::1"
OSPF6D_OPTS="-A ::1"
OSPFD_OPTS="-A 0.0.0.0"
RIPD_OPTS="-A 0.0.0.0"
RIPNGD_OPTS="-A ::1"
ZEBRA_OPTS="-A 0.0.0.0"

# Watchquagga configuration for LSB initscripts
#
# (Not needed with systemd: the service files are configured to automatically
# restart any daemon on failure. If zebra fails, all running daemons will be
# stopped; zebra will be started again; and then the previously running daemons
# will be started again.)
#
# Uncomment and edit this line to reflect the daemons you are actually using:
#WATCH_DAEMONS="zebra bgpd ospfd ospf6d ripd ripngd"
#
# Timer values can be adjusting by editing this line:
WATCH_OPTS="-Az -b_ -r/sbin/service_%s_restart -s/sbin/service_%s_start -k/sbin/service_%s_stop"
启动,LVS1,LVS2,主路由器的Quagga软件
systemctl restart zebra ; systemctl restart ospfd
大概过10秒后,在主路由器的服务器上,登录路由器
#密码是test
telnet localhost 2601
登录成功后,运行show ip route会得到如下选项
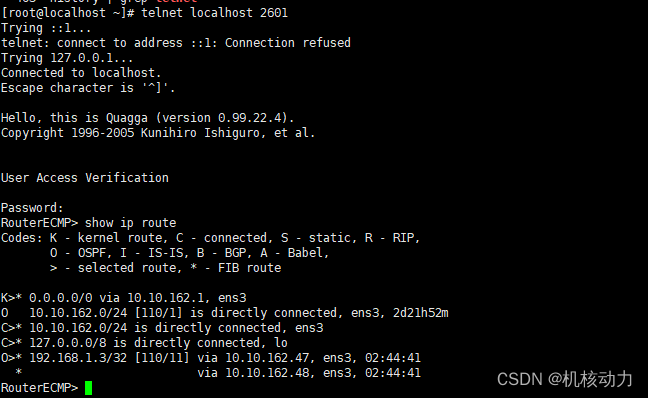
可以看到在去往192.168.1.3这个虚ip的路由,有两条路径,一条是10.10.162.47,一条是10.10.162.48,同时在主路由服务器上运行ip route list也可以看到这些选项

3.登录客户机测试效果
登录两台客户机,ip分别是10.10.162.45,10.10.162.37
分别在两台机器上,加上如下路由,把192.168.1.0网段的路由,指向主路由器10.10.162.46
ip route add 192.168.1.0/24 via 10.10.162.46
然后分别ping一下 192.168.1.3这个虚地址,应该会是通的

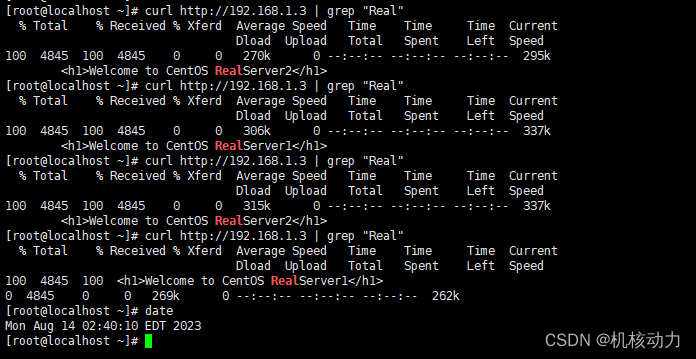
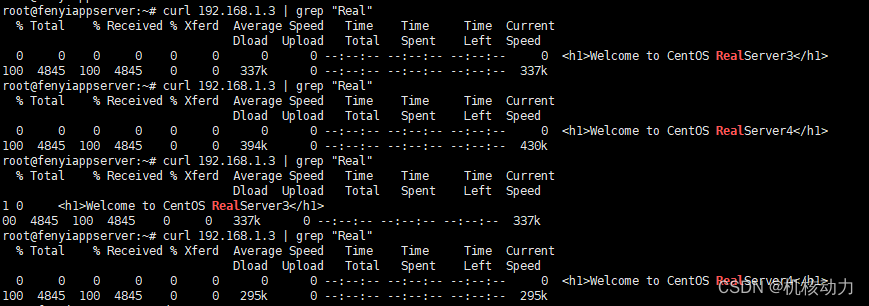
然后,分别在客户机上分别请求 http://192.168.1.3这个地址,两台服务器得到结果,一个是指向LVS1,一个是指向LVS2
至此成功配置完毕。