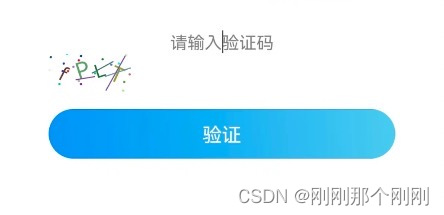
背景需求:uniapp登录界面除了账户名和密码之外,想要新增加一个图形验证码的验证机制
开始:
一、先准备工具类文件
1、首先在公用类目录,创建工具类文件,我的命名是fcaptcha.js(字意是Function-captcha),路径是放在了主目录下的common下面。
// fcaptcha.js

export class Fcaptcha {
  constructor(options) {
    this.options = options;
    this.fontSize = options.height * 3 / 6;
    this.init();
    this.refresh();
  }
  init() {
    this.ctx = wx.createCanvasContext(this.options.el);
    this.ctx.setTextBaseline("middle");
    this.ctx.setFillStyle(this.randomColor(180, 240));
  }
  refresh() {
    var code = '';
    var txtArr = ['a', 'b', 'c', 'd', 'e', 'f', 'g', 'h', 'i', 'j', 'k', 'l', 'm', 'n', 'o', 'p', 'q','r', 's', 't', 'u', 'v', 'w', 'x', 'y', 'z', 'A', 'B', 'C', 'D', 'E', 'F', 'G', 'H', 'I', 'J', 'K', 'L', 'M', 'N', 'O','P', 'Q', 'R', 'S', 'T', 'U', 'V', 'W', 'X', 'Y', 'Z',0,1,2,3,4,5,6,7,8,9]
    for(var i=0;i<4;i++){
      code += txtArr[this.randomNum(0, txtArr.length)];
    }
    this.options.createCodeImg = code;
    let arr = (code + '').split('');
    if (arr.length === 0) {
      arr = ['e', 'r', 'r','o','r'];
    };
    let offsetLeft = this.options.width * 0.6 / (arr.length - 1);
    let marginLeft = this.options.width * 0.2;
    arr.forEach((item, index) => {
      this.ctx.setFillStyle(this.randomColor(0, 180));
      let size = this.randomNum(24, this.fontSize);
      this.ctx.setFontSize(size);
      let dis = offsetLeft * index + marginLeft - size * 0.3;
      let deg = this.randomNum(-30, 30);
      this.ctx.translate(dis, this.options.height*0.5);
      this.ctx.rotate(deg * Math.PI / 180);
      this.ctx.fillText(item, 0, 0);
      this.ctx.rotate(-deg * Math.PI / 180);
      this.ctx.translate(-dis, -this.options.height * 0.5);
    })
    for (var i = 0; i < 4; i++) {
      this.ctx.strokeStyle = this.randomColor(40, 180);
      this.ctx.beginPath();
      this.ctx.moveTo(this.randomNum(0, this.options.width), this.randomNum(0, this.options.height));
      this.ctx.lineTo(this.randomNum(0, this.options.width), this.randomNum(0, this.options.height));
      this.ctx.stroke();
    }
    for (var i = 0; i < this.options.width / 4; i++) {
      this.ctx.fillStyle = this.randomColor(0, 255);
      this.ctx.beginPath();
      this.ctx.arc(this.randomNum(0, this.options.width), this.randomNum(0, this.options.height), 1, 0, 2 * Math.PI);
      this.ctx.fill();
    }
    this.ctx.draw();
  }
  validate(code){
    var code = code.toLowerCase();
    var v_code = this.options.createCodeImg.toLowerCase();
    console.log(code)
    console.log(v_code.substring(v_code.length - 4))
    if (code == v_code.substring(v_code.length - 4)) {
      return true;
    } else {
      return false;
    }
  }
  randomNum(min, max) {
    return Math.floor(Math.random() * (max - min) + min);
  }
  randomColor(min, max) {
    let r = this.randomNum(min, max);
    let g = this.randomNum(min, max);
    let b = this.randomNum(min, max);
    return "rgb(" + r + "," + g + "," + b + ")";
  }
}
二、在需要使用的用户界面使用
1、引用工具类文件,我的是在对应的login.vue中设置的
<script>
import {Fcaptcha} from "@/common/Fcaptcha.js"
//vue中其他的代码
</script>
2、界面部分创建用户输入区域和图形码显示区域以及触发验证的按钮
<view style="padding: 30px 20px;text-align: center;">
	<input class="" v-model="graphicVerifyCode" placeholder="请输入验证码" />
	<canvas style="width:220rpx;height:86rpx;" canvas-id="canvas" @click="updateImageCode"></canvas>
	<button style="margin-top: 10px;" :loading="loading" @tap="submitFcha" class="btn-big">验证</button>
</view>
3、在代码部分设置对应数据变量以及相关方法
export default {
		data() {
			return {
				loading: false,
				graphicVerifyCode:"",
			};
		},


		mounted() {},

		onReady() {
			this.fcaptcha = new Fcaptcha({
				el: 'canvas',
				width: 80,
				height: 35,
				createCodeImg: ""
			});
		},

		methods: {
			// 刷新验证码
			updateImageCode() {
			  this.fcaptcha.refresh()
			},
			// 提交前校验图形验证码
			submitFcha() {
			  if(!this.graphicVerifyCode) {
			    return uni.showToast({ title: '请输入图形验证码' })
			  }
			  let validate = this.fcaptcha.validate(this.graphicVerifyCode)
			  if(!validate) {
				this.updateImageCode();
			    return uni.showToast({ title: '图形验证码错误' })
			  }
			  else{
				return uni.showToast({ title: '图形验证码通过' })
			  }
			}
		},
	};
三、成型效果图

四、此处记录仅作为后期回顾所用
版权声明:本文为SSGX1989原创文章,遵循 CC 4.0 BY-SA 版权协议,转载请附上原文出处链接和本声明。