点击上方“
小白学视觉
”,选择加”
星标
“或“
置顶
”
重磅干货,第一时间送达
一:AlexNet网络结构
在2012年ImageNet图像分类任务竞赛中AlexNet一鸣惊人,对128万张1000个分类的预测结果大大超过其他算法模型准确率,打败其它非DNN网络一鸣惊人。AlexNet包括5个卷积层与三个全连接层,与今天动则十几层、几十层甚至成百上千层相比,简直是太简单、太容易理解啦。AlexNet网络一共有八层。前面5层是卷积层,后面3层是全连接层,整个网络结构显示如下:

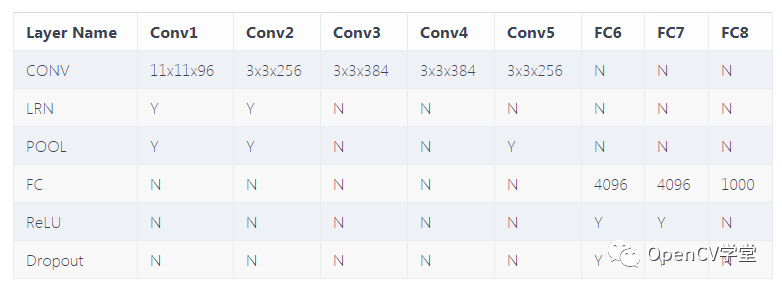
各个层结构如下:

输入图像大小为224x244x3 的彩色RGB图像
-
CONV表示卷积层
-
LRN 表示局部响应归一化
-
POOL表示池化层
-
FC表示全连接层
-
ReLU表示激活函数
-
Dropout表示参与训练神经元百分比,针对全连接层。
卷积层与池化层步长与填充方式:

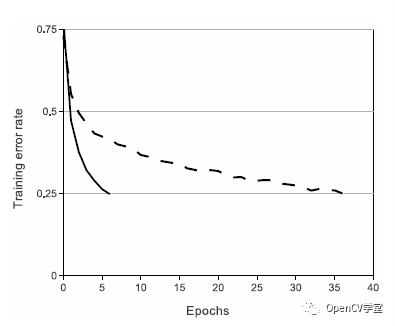
采用ReLU激活函数,基于CIFAR-10数据集,训练收敛速度相比tanh激活函数提升6倍。图示如下:

作者在2GPU上进行训练,所以paper中对上述完整的网络结构进行了差分,分别在2个GTX580 GPU上运行,基于ILSVRC-2000与ILSVRC-2012数据集进行了测试。很多文章中不加说明的将作者Paper中网络结构贴到文章中以后看文章了解AlexNet的读者都一头雾水,因为文章内容描述跟网络结构根本对不上,因此误导了不少人。
二:AlexNet网络实现
基于tensorflow,很容易实现一个AlexNet网络,本人把它定义成一个单独的Python类,方便大家创建使用它,完整的AlexNet网络代码实现如下
import tensorflow as tf
class AlexNet_CNN:
    def __init__(self, x, keep_prob, num_class, skip_layer):
        self.X = x
        self.KEEP_PROB = keep_prob
        self.NUM_CLASS = num_class
        self.SKIP_LAYER = skip_layer
        print("AlexNet Network...")
    def create(self):
        with tf.name_scope("conv1") as scope:
            kernel = tf.Variable(tf.truncated_normal([11, 11, 3, 96], dtype=tf.float32, stddev=1e-1), name='weights1')
            conv1 = tf.nn.conv2d(self.X, kernel, strides=[1, 4, 4, 1], padding='VALID')
            lrn1 = tf.nn.lrn(conv1,depth_radius=2,bias=1.0,alpha=1e-05,beta=0.75)
            pool1 = tf.nn.max_pool(lrn1, ksize=[1, 3, 3, 1],
                           strides=[1, 2, 2, 1],
                           padding='SAME', name='pool1')
            print("pool1", pool1.shape)
        with tf.name_scope("conv2") as scope:
            kernel = tf.Variable(tf.truncated_normal([5, 5, 96, 256], dtype=tf.float32, stddev=1e-1), name='weights2')
            conv2 = tf.nn.conv2d(pool1, kernel, strides=[1, 1, 1, 1], padding='SAME')
            lrn2 = tf.nn.lrn(conv2, depth_radius=2, bias=1.0, alpha=1e-05, beta=0.75)
            pool2 = tf.nn.max_pool(lrn2, ksize=[1, 3, 3, 1],
                                   strides=[1, 2, 2, 1],
                                   padding='VALID', name='pool2')
            print("pool2",pool2.shape)
        with tf.name_scope("conv3") as scope:
            kernel = tf.Variable(tf.truncated_normal([3, 3, 256, 384], dtype=tf.float32, stddev=1e-1), name='weights3')
            conv3 = tf.nn.conv2d(pool2, kernel, strides=[1, 1, 1, 1], padding='SAME')
            print("conv3",conv3.shape)
        with tf.name_scope("conv4") as scope:
            kernel = tf.Variable(tf.truncated_normal([3, 3, 384, 384], dtype=tf.float32, stddev=1e-1), name='weights4')
            conv4 = tf.nn.conv2d(conv3, kernel, strides=[1, 1, 1, 1], padding='SAME')
            print("conv4",conv4.shape)
        with tf.name_scope("conv5") as scope:
            kernel = tf.Variable(tf.truncated_normal([3, 3, 384, 256], dtype=tf.float32, stddev=1e-1), name='weights5')
            conv5 = tf.nn.conv2d(conv4, kernel, strides=[1, 1, 1, 1], padding='SAME')
            pool5 = tf.nn.max_pool(conv5, ksize=[1, 3, 3, 1],
                                   strides=[1, 2, 2, 1],
                                   padding='VALID', name='pool5')
        with tf.name_scope("fc6") as scope:
            print("pool5", pool5.shape)
            flattened = tf.reshape(pool5, [-1, 6 * 6 * 256])
            weights = tf.Variable(tf.random_normal([6*6*256, 4096]))
            biases = tf.Variable(tf.random_normal([4096]))
            # Matrix multiply weights and inputs and add bias
            act = tf.nn.xw_plus_b(flattened, weights, biases, name="fc6")
            fc6 = tf.nn.relu(act)
            dp6 = tf.nn.dropout(fc6,keep_prob=self.KEEP_PROB)
        with tf.name_scope("fc7") as scope:
            weights = tf.Variable(tf.random_normal([4096, 4096]))
            biases = tf.Variable(tf.random_normal([4096]))
            # Matrix multiply weights and inputs and add bias
            act = tf.nn.xw_plus_b(dp6, weights, biases, name="fc7")
            fc7 = tf.nn.relu(act)
            dp7 = tf.nn.dropout(fc7, keep_prob=self.KEEP_PROB)
        with tf.name_scope("fc8") as scope:
            weights = tf.Variable(tf.random_normal([4096, self.NUM_CLASS]))
            biases = tf.Variable(tf.random_normal([self.NUM_CLASS]))
            # Matrix multiply weights and inputs and add bias
            act = tf.nn.xw_plus_b(dp7, weights, biases, name="fc8")
        return act
运行之后结构显示:

卷积层输出与论文上完全一致。
下载1:OpenCV-Contrib扩展模块中文版教程

在「小白学视觉」公众号后台回复:扩展模块中文教程,即可下载全网第一份OpenCV扩展模块教程中文版,涵盖扩展模块安装、SFM算法、立体视觉、目标跟踪、生物视觉、超分辨率处理等二十多章内容。


下载2:Python视觉实战项目52讲
在「小白学视觉」公众号后台回复:Python视觉实战项目,即可下载包括图像分割、口罩检测、车道线检测、车辆计数、添加眼线、车牌识别、字符识别、情绪检测、文本内容提取、面部识别等31个视觉实战项目,助力快速学校计算机视觉。


下载3:OpenCV实战项目20讲
在「小白学视觉」公众号后台回复:OpenCV实战项目20讲,即可下载含有20个基于OpenCV实现20个实战项目,实现OpenCV学习进阶。


交流群

欢迎加入公众号读者群一起和同行交流,目前有SLAM、三维视觉、传感器、自动驾驶、计算摄影、检测、分割、识别、医学影像、GAN、算法竞赛等微信群(以后会逐渐细分),请扫描下面微信号加群,备注:”昵称+学校/公司+研究方向“,例如:”张三 + 上海交大 + 视觉SLAM“。请按照格式备注,否则不予通过。添加成功后会根据研究方向邀请进入相关微信群。请勿在群内发送广告,否则会请出群,谢谢理解~