cityscapesScripts是cityscapes数据集的官方公开工具集,第一次用的时候有点迷茫,记录下使用笔记,前边是readme里的讲解,以下是精细标注的部分
官方github:
https://github.com/mcordts/cityscapesScripts/tree/master/cityscapesscripts
Readme.md 翻译:
https://blog.csdn.net/Cxiazaiyu/article/details/81866173
数据集链接:
www.cityscapes-dataset.net
百度云下载:https://pan.baidu.com/s/16jj6FLG_cp3paJVjCWAJ_A 提取码:4je2 里面不包含19998 images的
Coarse
粗略注释 # 百度网盘已更新 @20201015
参考:
https://blog.csdn.net/zz2230633069/article/details/84591532
https://blog.csdn.net/Cxiazaiyu/article/details/81866173
1 cityscapes数据集结构Dataset Structure

文件夹结构如下:
{root}/{type}{video}/{split}/{city}/{city}_{seq:0>6}_{frame:0>6}_{type}{ext}各个元素的意义:
-
root
Cityscapes数据集的根文件夹。 我们的许多脚本检查指向该文件夹的环境变量“CITYSCAPES_DATASET”是否存在,并将其作为默认目录。 -
type
数据类型或形态,比如
gtFine
代表精细的GroundTruth,
leftImg8bit
代表左侧相机的八位图像。 -
split
分割,即train, val, test, train_extra或demoVideo。 请注意,并非所有分组都存在所有类型的数据。 因此,偶尔找到空文件夹不要感到惊讶。 -
city
所属城市 -
seq
序列号,使用6位数字。 -
frame
帧号,使用6位数字。 请注意,在一些城市中,虽然记录了非常长的序列,但在一些城市记录了许多短序列,其中仅记录了第19帧 -
ext
该文件的扩展名和可选的后缀,例如,
_polygons.json
为GroundTruth文件
      type的类型


     :
-
gtFine
精细注释,2975张训练图,500张验证图和1525张测试图。 这种类型的注释用于验证,测试和可选的训练。 注解使用包含单个多边形的“json”文件进行编码。 另外,我们提供
png
图像,其中像素值对标签进行编码。 有关详细信息,请参阅
helpers / labels.py
和
prepare
中的脚本 -
gtCoarse
粗略注释,可用于所有训练和验证图像以及另一组19998张训练图像(
train_extra
)。 这些注释可以用于训练,也可以与
gtFine
一起使用,也可以在弱监督的环境中单独使用。 -
gtBboxCityPersons
行人边界框注释,可用于所有训练和验证图像。 有关更多详细信息,请参阅helpers / labels_cityPersons.py以及
CityPersons
出版物(Zhang等,CVPR’17)
-
leftImg8bit
左侧图像,采用8位LDR格式。这些图像都有标准的注释. -
leftImg8bit_blurred
the left images in 8-bit LDR format with faces and license plates blurred. Please compute results on the original images but use the blurred ones for visualization. We thank
Mapillary
for blurring the images. -
leftImg16bit
左侧图像,采用16位HDR格式。这些图像提供每像素16位色彩深度并包含更多信息,特别是在场景的非常黑暗或明亮的部分。 警告:图像存储为16位PNG,这是非标准的,并且不是所有库都支持。 -
rightImg8bit
右侧图像,采用8位LDR格式。 -
rightImg16bit
右侧图像,采用16位HDR格式。 -
timestamp
记录时间,单位是ns。 每个序列的第一帧总是有一个0的时间戳。 -
disparity
预先计算的视差深度图。 为了获得视差值,对于p> 0的每个像素p计算:d =(float(p)-1)/ 256,而值p = 0是无效测量。 警告:图像存储为16位PNG,这是非标准的,并且不是所有库都支持。 -
camera
内部和外部相机校准。 有关详情,请参阅
csCalibration.pdf
-
vehicle
车辆测距,GPS坐标和室外温度。 详情请参阅
csCalibration.pdf
      split的类型


     :
-
train
通常用于训练, 包含 2975 张带有粗糙或精细标注的图像 -
val
应该用于验证hyper-parameters,包含500个具有精细和粗糙注释的图像。 也可以用于训练. -
test
用于在我们的评估服务器上测试。 注释不公开,但为方便起见,我们包含自我车辆和整改边界的注释。 -
train_extra
可以选择性地用于训练,包含带有粗略注释的19998张图像 -
demoVideo
可用于定性评估的视频序列,这些视频不提供注释
2 Scripts
cityscapes scripts公开以下工具:
-
csDownload
: 命令行下载cityscapes包 -
csViewer
: 查看图像并覆盖批注(overlay the annotations)。 -
csLabelTool
: 标注工具. -
csEvalPixelLevelSemanticLabeling
: Evaluate pixel-level semantic labeling results on the validation set. This tool is also used to evaluate the results on the test set.像素级评估 -
csEvalInstanceLevelSemanticLabeling
: Evaluate instance-level semantic labeling results on the validation set. This tool is also used to evaluate the results on the test set.实例级评估 -
csEvalPanopticSemanticLabeling
: Evaluate panoptic segmentation results on the validation set. This tool is also used to evaluate the results on the test set.全景分割评估 -
csCreateTrainIdLabelImgs
: Convert annotations in polygonal format to png images with label IDs, where pixels encode “train IDs” that you can define in
labels.py
.将多边形格式的注释转换为带标签ID的png图像,其中像素编码“序列ID”,可以在labels.py中定义。 -
csCreateTrainIdInstanceImgs
: Convert annotations in polygonal format to png images with instance IDs, where pixels encode instance IDs composed of “train IDs”.将多边形格式的注释转换为具有实例ID的png图像,其中像素对由“序列ID”组成的实例ID进行编码。 -
csCreatePanopticImgs
: Convert annotations in standard png format to
COCO panoptic segmentation format
.将标准png格式的注释转换为COCO全景分割格式。
cityscapes scripts文件夹
文件夹内容如下:
-
helpers
: 被其他脚本文件调用的帮助文件 -
viewer
: 用于查看图像和标注的脚本 -
preparation
: 用于将GroundTruth注释转换为适合您的方法的格式的脚本 -
evaluation
: 评价你的方法的脚本 -
annotation
: 被用来标注数据集的标注工具 -
download
: 下载Cityscapes packages
请注意,所有文件顶部都有一个小型documentation。 非常重要
-
helpers/labels.py
: 定义所有语义类ID的中心文件,并提供各种类属性之间的映射。 -
helpers/labels_cityPersons.py
: 文件定义所有CityPersons行人类的ID并提供各种类属性之间的映射。 -
viewer/cityscapesViewer.py
查看图像并覆盖注释。 -
preparation/createTrainIdLabelImgs.py
将多边形格式的注释转换为带有标签ID的png图像,其中像素编码可以在“labels.py”中定义的“训练ID”。 -
preparation/createTrainIdInstanceImgs.py
将多边形格式的注释转换为带有实例ID的png图像,其中像素编码由“train ID”组成的实例ID。 -
evaluation/evalPixelLevelSemanticLabeling.py
该脚本来评估验证集上的像素级语义标签结果。该脚本还用于评估测试集的结果。 -
evaluation/evalInstanceLevelSemanticLabeling.py
该脚本来评估验证集上的实例级语义标签结果。该脚本还用于评估测试集的结果。 -
setup.py
运行
setup.py build_ext --inplace
启用cython插件以进行更快速的评估。仅针对Ubuntu进行了测试。
3 安装
脚本可以通过 pip安装,如下:
sudo pip install如果需要安装的图形工具:
sudo apt install python-tk python-qt4
4 Evaluation
一旦您想在测试集上测试您的方法,请在提供的测试图像上运行您的方法并提交您的结果:www.cityscapes-dataset.net/submit/对于语义标记,我们要求结果格式与我们名为labelIDs的标签图像的格式匹配。因此,代码应该生成图像,其中每个像素的值对应于labels.py中定义的类ID。请注意,我们的评估脚本包含在scripts文件夹中,可用于在验证集上测试您的方法。有关提交过程的详细信息,请访问我们的网站。
参考:
https://blog.csdn.net/Cxiazaiyu/article/details/81866173
通过cityscapesscritps/evaluation/evalPixelLevelSemanticLabeling.py可以比较groudtruth和神经网络预测的结果图像,计算出classes IoU和Categories IoU.
但是这个代码要求输入的是labelIds,所以要求把根据TrainIds预测的图像转化为34类的Id,不方便。我修改的代码可以直接输入_gtFine_labelTrainIds.png和按照trainIds生成的图片;另外由于输入图像的分辨率高2048*1024,实际神经网络输出的分辨率可能不同,代码中修改resize的参数,可以评估修改了分辨率的预测图像。程序下载链接:
https://download.csdn.net/download/cxiazaiyu/10637603
。
5 精细标注训练集
训练使用的label的图片应该是值为0~n的单通道的灰度图,其中n表示类别。cityscapesScripts/helpers/labels.py文件中定义了不同类别和Id值的对应方式、class和category的对应关系等。训练时可以选择自己感兴趣的类别进行训练,如labels.py中给的trainId的19类的例子,不感兴趣的类别trainId设为255,ignoreInEval改为True。
使用训练数据的两种方法: 运行cityscapesscripts/preparation/createTrainIdLabelImgs.py代码,会调用labels.py中的类别定义,从json文件中生成19类的用于训练的_gtFine_labelTrainIds.png,进而进行训练。使用_gtFine_labelIds.png的数据,在load时通过代码将不需要的类对应的值设为255(ignore),并建立class_map将训练使用的类依次映射到0~18的连续值。
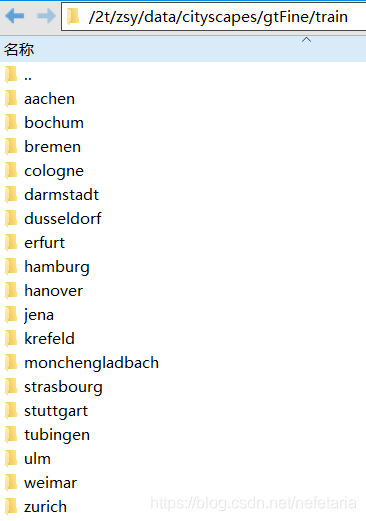
train集总共有2975张png格式的大小为2048 x 1024的0-255的RGB图片,按照城市名称,有18个文件夹对应德国的16个城市,法国一个城市和瑞士一个城市:


图片命名规则
城市名称_6位数字_6位数字_leftImg8bit.png
例:
aachen:aachen_000000_000019_
leftImg8bit.png,第二部分从000000到000173对应174张图片,第三部分固定是000019
文件夹内容:每张图片对应6个文件,分别存放不同的内容


6 验证集
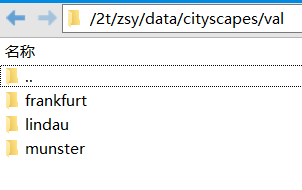
val集总共有500张png格式的大小为2048 x 1024的0-255的RGB图片,按照城市名称,有3个文件夹对应德国的3个城市


7 测试集
test集总共有1525张png格式的大小为2048 x 1024的0-255的RGB图片,按照城市名称,有6个文件夹对应德国的6个城市


8 测试结果提交
前提:
有注册的账号

其中最后一项要求,上传的结果为labelID,而非trainID,在官方的脚本工程里有对二者的解释:
https://github.com/mcordts/cityscapesScripts/blob/master/cityscapesscripts/helpers/labels.py
#--------------------------------------------------------------------------------
# Definitions
#--------------------------------------------------------------------------------

# a label and all meta information
Label = namedtuple( 'Label' , [

    'name'        , # The identifier of this label, e.g. 'car', 'person', ... .
                    # We use them to uniquely name a class

    'id'          , # An integer ID that is associated with this label.
                    # The IDs are used to represent the label in ground truth images
                    # An ID of -1 means that this label does not have an ID and thus
                    # is ignored when creating ground truth images (e.g. license plate).
                    # Do not modify these IDs, since exactly these IDs are expected by the
                    # evaluation server.

    'trainId'     , # Feel free to modify these IDs as suitable for your method. Then create
                    # ground truth images with train IDs, using the tools provided in the
                    # 'preparation' folder. However, make sure to validate or submit results
                    # to our evaluation server using the regular IDs above!
                    # For trainIds, multiple labels might have the same ID. Then, these labels
                    # are mapped to the same class in the ground truth images. For the inverse
                    # mapping, we use the label that is defined first in the list below.
                    # For example, mapping all void-type classes to the same ID in training,
                    # might make sense for some approaches.
                    # Max value is 255!

    'category'    , # The name of the category that this label belongs to

    'categoryId'  , # The ID of this category. Used to create ground truth images
                    # on category level.

    'hasInstances', # Whether this label distinguishes between single instances or not

    'ignoreInEval', # Whether pixels having this class as ground truth label are ignored
                    # during evaluations or not

    'color'       , # The color of this label
    ] )


#--------------------------------------------------------------------------------
# A list of all labels
#--------------------------------------------------------------------------------

# Please adapt the train IDs as appropriate for your approach.
# Note that you might want to ignore labels with ID 255 during training.
# Further note that the current train IDs are only a suggestion. You can use whatever you like.
# Make sure to provide your results using the original IDs and not the training IDs.
# Note that many IDs are ignored in evaluation and thus you never need to predict these!

labels = [
    #       name                     id    trainId   category            catId     hasInstances   ignoreInEval   color
    Label(  'unlabeled'            ,  0 ,      255 , 'void'            , 0       , False        , True         , (  0,  0,  0) ),
    Label(  'ego vehicle'          ,  1 ,      255 , 'void'            , 0       , False        , True         , (  0,  0,  0) ),
    Label(  'rectification border' ,  2 ,      255 , 'void'            , 0       , False        , True         , (  0,  0,  0) ),
    Label(  'out of roi'           ,  3 ,      255 , 'void'            , 0       , False        , True         , (  0,  0,  0) ),
    Label(  'static'               ,  4 ,      255 , 'void'            , 0       , False        , True         , (  0,  0,  0) ),
    Label(  'dynamic'              ,  5 ,      255 , 'void'            , 0       , False        , True         , (111, 74,  0) ),
    Label(  'ground'               ,  6 ,      255 , 'void'            , 0       , False        , True         , ( 81,  0, 81) ),
    Label(  'road'                 ,  7 ,        0 , 'flat'            , 1       , False        , False        , (128, 64,128) ),
    Label(  'sidewalk'             ,  8 ,        1 , 'flat'            , 1       , False        , False        , (244, 35,232) ),
    Label(  'parking'              ,  9 ,      255 , 'flat'            , 1       , False        , True         , (250,170,160) ),
    Label(  'rail track'           , 10 ,      255 , 'flat'            , 1       , False        , True         , (230,150,140) ),
    Label(  'building'             , 11 ,        2 , 'construction'    , 2       , False        , False        , ( 70, 70, 70) ),
    Label(  'wall'                 , 12 ,        3 , 'construction'    , 2       , False        , False        , (102,102,156) ),
    Label(  'fence'                , 13 ,        4 , 'construction'    , 2       , False        , False        , (190,153,153) ),
    Label(  'guard rail'           , 14 ,      255 , 'construction'    , 2       , False        , True         , (180,165,180) ),
    Label(  'bridge'               , 15 ,      255 , 'construction'    , 2       , False        , True         , (150,100,100) ),
    Label(  'tunnel'               , 16 ,      255 , 'construction'    , 2       , False        , True         , (150,120, 90) ),
    Label(  'pole'                 , 17 ,        5 , 'object'          , 3       , False        , False        , (153,153,153) ),
    Label(  'polegroup'            , 18 ,      255 , 'object'          , 3       , False        , True         , (153,153,153) ),
    Label(  'traffic light'        , 19 ,        6 , 'object'          , 3       , False        , False        , (250,170, 30) ),
    Label(  'traffic sign'         , 20 ,        7 , 'object'          , 3       , False        , False        , (220,220,  0) ),
    Label(  'vegetation'           , 21 ,        8 , 'nature'          , 4       , False        , False        , (107,142, 35) ),
    Label(  'terrain'              , 22 ,        9 , 'nature'          , 4       , False        , False        , (152,251,152) ),
    Label(  'sky'                  , 23 ,       10 , 'sky'             , 5       , False        , False        , ( 70,130,180) ),
    Label(  'person'               , 24 ,       11 , 'human'           , 6       , True         , False        , (220, 20, 60) ),
    Label(  'rider'                , 25 ,       12 , 'human'           , 6       , True         , False        , (255,  0,  0) ),
    Label(  'car'                  , 26 ,       13 , 'vehicle'         , 7       , True         , False        , (  0,  0,142) ),
    Label(  'truck'                , 27 ,       14 , 'vehicle'         , 7       , True         , False        , (  0,  0, 70) ),
    Label(  'bus'                  , 28 ,       15 , 'vehicle'         , 7       , True         , False        , (  0, 60,100) ),
    Label(  'caravan'              , 29 ,      255 , 'vehicle'         , 7       , True         , True         , (  0,  0, 90) ),
    Label(  'trailer'              , 30 ,      255 , 'vehicle'         , 7       , True         , True         , (  0,  0,110) ),
    Label(  'train'                , 31 ,       16 , 'vehicle'         , 7       , True         , False        , (  0, 80,100) ),
    Label(  'motorcycle'           , 32 ,       17 , 'vehicle'         , 7       , True         , False        , (  0,  0,230) ),
    Label(  'bicycle'              , 33 ,       18 , 'vehicle'         , 7       , True         , False        , (119, 11, 32) ),
    Label(  'license plate'        , -1 ,       -1 , 'vehicle'         , 7       , False        , True         , (  0,  0,142) ),
]
其中的id就是labelID,是按照cityscapes支持的所有类别顺序进行标注的。trainID是需要目标任务(比如语义分割)需要的类别,不需要的类别设为255。最终结果需要用labelID标注。
Make sure to provide your results using the original IDs and not the training IDs
. 比如car的labelID是26,trainID是13。
如果train阶段使用trainID进行训练,test结果转换成labelID即可:
From:
https://github.com/mcordts/cityscapesScripts/blob/master/cityscapesscripts/helpers/labels.py
# Map from trainID to label
    trainId = 0
    name = trainId2label[trainId].name
    print("Name of label with trainID '{id}': {name}".format( id=trainId, name=name ))
也可以train阶段就转换成labelID进行训练,test结果不需要进行转换。