DeepSnake
源代码阅读笔记
-
本篇主要分析
Deep Snake for Real-Time Instance Segmentation
文献中代码的实现,其开源代码地址为:https://github.com/zju3dv/snake。 -
[good18Levin](
(6条消息) 论文阅读_fighterflyfly的博客-CSDN博客
) 的deepsnake代码阅读记录对我启发很大,该博客主要分析了模型测试过程中的代码。 -
本篇笔记主要用于记录本人分析
deepsnake在sbd数据集上训练
的过程,本人水平有限,难免有理解不到位的地方,如有疑问欢迎交流。dongximing@webmail.hzau.edu.cn
〇、 环境配置
源码要求环境为pytorch1.1+cuda9.0,由于我显卡是RTX3090,并不支持老版本的cuda9.0,因此我采用了pytorch1.8.1+cuda11.1的环境,python版本为3.7。
-
pytorch及cuda的安装
pip install torch==1.8.1+cu111 torchvision==0.9.1+cu111 torchaudio==0.8.1 -f https://download.pytorch.org/whl/torch_stable.html也可以使用conda安装,但是使用conda安装会在后续编译cuda拓展的时候报错。
-
安装apex及编译
git clone https://github.com/NVIDIA/apex.git
cd apex
python setup.py install --cuda_ext --cpp_ext
这里要注意nvidia cuda 版本要和pytorch cuda版本一致,否则可能会报错。
-
dcn_v2的安装
源码中的dcn_v2版本不支持高版本的pytorch及cuda,可以下载安装新版本的dcn_v2
cd lib/csrc
rm -rf dcn_v2
git clone https://github.com/jinfagang/DCNv2_latest.git
mv DCNv2_latest dcn_v2
cd dcn_v2
git checkout fa9b2fd740ced2a22e0e7e913c3bf3934fd08098
python setup.py build develop
因为最新版本支持pytorch1.11可能不会向下兼容,所以使用git checkout 回退之前支持pytorch1.8的版本。
-
extreme_utils和roi_align_layer的安装按照源码进行安装即可
cd lib/csrc/extreme_utils
python setup.py build_ext --inplace
cd ../roi_align_layer
python setup.py build_ext --inplace
一、代码结构
-
整体项目使用了许多种数据集并且包含了许多种网络,需要配置的参数量较多,因此项目使用了cfg读取yaml并结合parser来进行全局参数的储存。根据
README.md
针对sbd训练传入的参数以及
configs/sbd_snake.yaml
文件,可以得到cfg的参数:ct_score: 0.05
demo_path:
det_dir: data/model/snake/
eval_ep: 5
gpus: [0, 1, 2, 3]
head_conv: 256
heads:
ct_hm: 20
wh: 2
model: sbd_snake
model_dir: data/model/snake/sbd
network: ro_34
record_dir: data/record/snake/sbd
result_dir: data/result/snake/sbd
resume: True
save_ep: 5
segm_or_bbox: segm
skip_eval: False
task: snake
test:
batch_size: 1
dataset: SbdMini
epoch: -1
train:
batch_size: 80
dataset: SbdTrain
epoch: 150
gamma: 0.5
lr: 0.0001
milestones: [80, 120, 150, 170]
num_workers: 32
optim: adam
scheduler:
warmup: False
weight_decay: 0.0005
use_gt_det: False -
项目训练采用了许多的封装,使得代码调用十分方便,但是对于代码阅读性也增添了些许难度,在接下来的代码阅读中我会利用cfg参数等对底层构建代码进行分析。
#train_net.py
from lib.config import cfg, args
from lib.networks import make_network
from lib.train import make_trainer, make_optimizer, make_lr_scheduler, make_recorder, set_lr_scheduler
from lib.datasets import make_data_loader
from lib.utils.net_utils import load_model, save_model, load_network
from lib.evaluators import make_evaluator
import torch.multiprocessing

def train(cfg, network):
    trainer = make_trainer(cfg, network) #将损失函数与网络模型封装
    optimizer = make_optimizer(cfg, network) #封装优化器
    scheduler = make_lr_scheduler(cfg, optimizer) #封装学习率
    recorder = make_recorder(cfg) #记录
    evaluator = make_evaluator(cfg) #评估

    begin_epoch = load_model(network, optimizer, scheduler, recorder, cfg.model_dir, resume=cfg.resume)
    # set_lr_scheduler(cfg, scheduler)

    train_loader = make_data_loader(cfg, is_train=True) #封装数据集构建函数
    val_loader = make_data_loader(cfg, is_train=False)

    for epoch in range(begin_epoch, cfg.train.epoch):
        recorder.epoch = epoch
        trainer.train(epoch, train_loader, optimizer, recorder) #训练过程
        scheduler.step()
		#保存数据
        if (epoch + 1) % cfg.save_ep == 0:
            save_model(network, optimizer, scheduler, recorder, epoch, cfg.model_dir)

        if (epoch + 1) % cfg.eval_ep == 0:
            trainer.val(epoch, val_loader, evaluator, recorder)

    return network

def main():
    network = make_network(cfg) #利用cfg参数构建网络
    if args.test:
        test(cfg, network)
    else:
        train(cfg, network)

if __name__ == "__main__":
    main()
二、数据集处理
首先找到构建数据集的封装函数
lib.datasets.make_data_loader
#lib/datasets/make_data_loader.py
from .transforms import make_transforms
from . import samplers
from .dataset_catalog import DatasetCatalog
import torch
import torch.utils.data
import imp
import os
from .collate_batch import make_collator

torch.multiprocessing.set_sharing_strategy('file_system')


def _dataset_factory(data_source, task):
    module = '.'.join(['lib.datasets', data_source, task])
    path = os.path.join('lib/datasets', data_source, task+'.py')
    dataset = imp.load_source(module, path).Dataset #加载lib.datasets.sbd.snake.Dataset函数
    return dataset


def make_dataset(cfg, dataset_name, transforms, is_train=True):
    args = DatasetCatalog.get(dataset_name)#SbdTrain
    data_source = args['id']
    dataset = _dataset_factory(data_source, cfg.task) #('sbd','snake')
    del args['id']
    # args['cfg'] = cfg
    # args['transforms'] = transforms
    # args['is_train'] = is_train
    dataset = dataset(**args)
    return dataset


def make_data_sampler(dataset, shuffle):
    if shuffle:
        sampler = torch.utils.data.sampler.RandomSampler(dataset)
    else:
        sampler = torch.utils.data.sampler.SequentialSampler(dataset)
    return sampler


def make_batch_data_sampler(cfg, sampler, batch_size, drop_last, max_iter):
    batch_sampler = torch.utils.data.sampler.BatchSampler(sampler, batch_size, drop_last)
    if max_iter != -1:
        batch_sampler = samplers.IterationBasedBatchSampler(batch_sampler, max_iter)
    return batch_sampler


def make_data_loader(cfg, is_train=True, is_distributed=False, max_iter=-1):
    if is_train:
        batch_size = cfg.train.batch_size #80
        shuffle = True
        drop_last = False
    else:
        batch_size = cfg.test.batch_size
        shuffle = True if is_distributed else False
        drop_last = False

    dataset_name = cfg.train.dataset if is_train else cfg.test.dataset #True

    transforms = make_transforms(cfg, is_train) #转变为Tensor并归一化,但是后续并没有用到
    dataset = make_dataset(cfg, dataset_name, transforms, is_train)
    sampler = make_data_sampler(dataset, shuffle)
    batch_sampler = make_batch_data_sampler(cfg, sampler, batch_size, drop_last, max_iter)
    num_workers = cfg.train.num_workers #32
    collator = make_collator(cfg)
    data_loader = torch.utils.data.DataLoader(
        dataset,
        batch_sampler=batch_sampler,
        num_workers=num_workers,
        collate_fn=collator
    )

    return data_loader
使用了
DatasetCatalog
中封装的数据集的信息,以及调用了
lib.datasets.sbd.snake.Dataset
函数构建数据集。
##lib/dataset/dataset_catalog.py
from lib.config import cfg
class DatasetCatalog(object):
    dataset_attrs = {  'SbdTrain': {
            'id': 'sbd',
            'data_root': 'data/sbd/img',
            'ann_file': 'data/sbd/annotations/sbd_train_instance.json',
            'split': 'train'
        }
    }
    @staticmethod
    def get(name):
        attrs = DatasetCatalog.dataset_attrs[name]
        return attrs.copy()
而
lib.datasets.sbd.snake.Dataset
又调用了
lib.datasets.voc.snake.Dataset
函数。
#lib/datasets/voc/snake.py
import os
from lib.utils.snake import snake_voc_utils, snake_config, visualize_utils
import cv2
import numpy as np
import math
from lib.utils import data_utils
import torch.utils.data as data
from pycocotools.coco import COCO
from lib.config import cfg

class Dataset(data.Dataset):
    def __init__(self, ann_file, data_root, split):
        super(Dataset, self).__init__()

        """
        data_root='data/sbd/img'
        ann_file='data/sbd/annotations/sbd_train_instance.json'
        split='train'
        """

        self.data_root = data_root
        self.split = split
        """
        构建COCO对象
        """
        self.coco = COCO(ann_file)
        self.anns = np.array(sorted(self.coco.getImgIds()))  # shape(5623,)
        self.anns = self.anns[:500] if split == 'mini' else self.anns
        self.json_category_id_to_contiguous_id = {v: i for i, v in enumerate(self.coco.getCatIds())}

    def process_info(self, img_id):
        """
        根据给定的imgid获得anno标注对象以及图片路径
        """
        ann_ids = self.coco.getAnnIds(imgIds=img_id)  # 获取标注id
        anno = self.coco.loadAnns(ann_ids)  # 读取标注信息
        path = os.path.join(self.data_root, self.coco.loadImgs(int(img_id))[0]['file_name'])
        return anno, path, img_id

    def read_original_data(self, anno, path):
        """
        读取图片
        将标注的segmentation由xyxyxyxyxy一维转为二维[[x,y],[x,y]] -> instance_polys
        读取标注对应的classid -> cls_ids
        """
        img = cv2.imread(path)
        instance_polys = [[np.array(poly).reshape(-1, 2) for poly in obj['segmentation']] for obj in anno]
        cls_ids = [self.json_category_id_to_contiguous_id[obj['category_id']] for obj in anno]
        return img, instance_polys, cls_ids

    def transform_original_data(self, instance_polys, flipped, width, trans_output, inp_out_hw):
        """
        因为数据增强的缘故,也需要对原始的标注进行相应的变换
        使用了trans_output进行仿射变换,使标注与图像的仿射变换保持一致
        """
        output_h, output_w = inp_out_hw[2:]
        instance_polys_ = []
        for instance in instance_polys:
            polys = [poly.reshape(-1, 2) for poly in instance]

            if flipped:
                polys_ = []
                for poly in polys:
                    poly[:, 0] = width - np.array(poly[:, 0]) - 1
                    polys_.append(poly.copy())
                polys = polys_

            polys = snake_voc_utils.transform_polys(polys, trans_output, output_h, output_w)
            instance_polys_.append(polys)
        return instance_polys_

    def get_valid_polys(self, instance_polys, inp_out_hw):
        """
        对变换后的多边形标注进行过滤:
        1.过滤掉点数小于等于四的多边形
        2.对多边形坐标进行clip,防止多边形超出output size
        3.filter删除面积小于5的多边形
        4.cw获取顺时针的poly
        5.对坐标重复的顶点进行去重,保持顶点的顺序不变
        """
        output_h, output_w = inp_out_hw[2:]
        instance_polys_ = []
        for instance in instance_polys:
            instance = [poly for poly in instance if len(poly) >= 4]
            for poly in instance:
                poly[:, 0] = np.clip(poly[:, 0], 0, output_w - 1)
                poly[:, 1] = np.clip(poly[:, 1], 0, output_h - 1)
            polys = snake_voc_utils.filter_tiny_polys(instance)
            polys = snake_voc_utils.get_cw_polys(polys)
            polys = [poly[np.sort(np.unique(poly, axis=0, return_index=True)[1])] for poly in polys]
            instance_polys_.append(polys)
        return instance_polys_

    def get_extreme_points(self, instance_polys):
        """
        获取多边形的极值点坐标(上左下右)(逆时针)
        """
        extreme_points = []
        for instance in instance_polys:
            points = [snake_voc_utils.get_extreme_points(poly) for poly in instance]
            extreme_points.append(points)
        return extreme_points

    def prepare_detection(self, box, poly, ct_hm, cls_id, wh, ct_cls, ct_ind):
        """
        计算center
        将已计算的class的id保存clsid,将center编码保存在ctind
        计算高斯模糊半径,并更新cthm
        """
        ct_hm = ct_hm[cls_id]#ct_hm.shape:(class,128,128) ->(128,128)
        ct_cls.append(cls_id)#将已经prepare的class保存

        x_min, y_min, x_max, y_max = box
        ct = np.array([(x_min + x_max) / 2, (y_min + y_max) / 2], dtype=np.float32)
        ct = np.round(ct).astype(np.int32)

        h, w = y_max - y_min, x_max - x_min
        radius = data_utils.gaussian_radius((math.ceil(h), math.ceil(w)))
        radius = max(0, int(radius))
        data_utils.draw_umich_gaussian(ct_hm, ct, radius)

        wh.append([w, h])
        ct_ind.append(ct[1] * ct_hm.shape[1] + ct[0])

        x_min, y_min = ct[0] - w / 2, ct[1] - h / 2
        x_max, y_max = ct[0] + w / 2, ct[1] + h / 2
        decode_box = [x_min, y_min, x_max, y_max]

        return decode_box

    def prepare_init(self, box, extreme_point, i_it_4pys, c_it_4pys, i_gt_4pys, c_gt_4pys, h, w):
        x_min, y_min = np.min(extreme_point[:, 0]), np.min(extreme_point[:, 1])
        x_max, y_max = np.max(extreme_point[:, 0]), np.max(extreme_point[:, 1])

        img_init_poly = snake_voc_utils.get_init(box)  # 中点连接的四边形
        """
        uniformsaple 对中点连接的四边形进行均匀采样,获得40个点;如果原始点大于40,则减去最短的路径。
        """
        img_init_poly = snake_voc_utils.uniformsample(img_init_poly, snake_config.init_poly_num)#在图片中的poly坐标
        can_init_poly = snake_voc_utils.img_poly_to_can_poly(img_init_poly, x_min, y_min, x_max, y_max)#归一化的poly坐标
        img_gt_poly = extreme_point
        can_gt_poly = snake_voc_utils.img_poly_to_can_poly(img_gt_poly, x_min, y_min, x_max, y_max)

        i_it_4pys.append(img_init_poly)
        c_it_4pys.append(can_init_poly)
        i_gt_4pys.append(img_gt_poly)
        c_gt_4pys.append(can_gt_poly)

    def prepare_evolution(self, poly, extreme_point, img_init_polys, can_init_polys, img_gt_polys, can_gt_polys):
        x_min, y_min = np.min(extreme_point[:, 0]), np.min(extreme_point[:, 1])
        x_max, y_max = np.max(extreme_point[:, 0]), np.max(extreme_point[:, 1])

        octagon = snake_voc_utils.get_octagon(extreme_point) #根据极值点建立八边形

        img_init_poly = snake_voc_utils.uniformsample(octagon, snake_config.poly_num)
        can_init_poly = snake_voc_utils.img_poly_to_can_poly(img_init_poly, x_min, y_min, x_max, y_max)

        img_gt_poly = snake_voc_utils.uniformsample(poly, len(poly) * snake_config.gt_poly_num)
        tt_idx = np.argmin(np.power(img_gt_poly - img_init_poly[0], 2).sum(axis=1))
        img_gt_poly = np.roll(img_gt_poly, -tt_idx, axis=0)[::len(poly)] #将最大值顶点移动到首位元素
        can_gt_poly = snake_voc_utils.img_poly_to_can_poly(img_gt_poly, x_min, y_min, x_max, y_max)

        img_init_polys.append(img_init_poly)
        can_init_polys.append(can_init_poly)
        img_gt_polys.append(img_gt_poly)
        can_gt_polys.append(can_gt_poly)

    def prepare_merge(self, is_id, cls_id, cp_id, cp_cls):
        cp_id.append(is_id)
        cp_cls.append(cls_id)

    def __getitem__(self, index):
        ann = self.anns[index]

        anno, path, img_id = self.process_info(ann)
        img, instance_polys, cls_ids = self.read_original_data(anno, path)

        height, width = img.shape[0], img.shape[1]
        """
        imgsize:442*500 -> inp size:512*512
        进行图片增强:随机裁剪翻转缩放,颜色增强,图片归一化,仿射变换
        trans为仿射变换矩阵
        fipped记录是否翻转
        inp_out_hw 记录输入输出宽高 (512,512,128,128),因为降采样倍数为4
        scale 随机裁剪后,仿射变换前的图片尺寸(缩放尺度)
        图片缩小了四倍。
        """
        orig_img, inp, trans_input, trans_output, flipped, center, scale, inp_out_hw = \
            snake_voc_utils.augment(
                img, self.split,
                snake_config.data_rng, snake_config.eig_val, snake_config.eig_vec,
                snake_config.mean, snake_config.std, instance_polys
            )
        instance_polys = self.transform_original_data(instance_polys, flipped, width, trans_output, inp_out_hw)
        instance_polys = self.get_valid_polys(instance_polys, inp_out_hw)
        extreme_points = self.get_extreme_points(instance_polys)

        # detection
        output_h, output_w = inp_out_hw[2:]
        ct_hm = np.zeros([cfg.heads.ct_hm, output_h, output_w], dtype=np.float32)
        wh = []
        ct_cls = []
        ct_ind = []

        # init
        i_it_4pys = []
        c_it_4pys = []
        i_gt_4pys = []
        c_gt_4pys = []

        # evolution
        i_it_pys = []
        c_it_pys = []
        i_gt_pys = []
        c_gt_pys = []

        for i in range(len(anno)):
            cls_id = cls_ids[i]
            instance_poly = instance_polys[i]
            instance_points = extreme_points[i]

            for j in range(len(instance_poly)):
                poly = instance_poly[j]
                extreme_point = instance_points[j]

                x_min, y_min = np.min(poly[:, 0]), np.min(poly[:, 1])
                x_max, y_max = np.max(poly[:, 0]), np.max(poly[:, 1])
                bbox = [x_min, y_min, x_max, y_max]
                h, w = y_max - y_min + 1, x_max - x_min + 1
                if h <= 1 or w <= 1:
                    continue

                """
                计算center
                将已计算的class的id保存clsid,将center编码保存在ctind
                计算高斯模糊半径,并更新cthm
                """
                self.prepare_detection(bbox, poly, ct_hm, cls_id, wh, ct_cls, ct_ind)
                """
                根据bbox中点连接的四边形,均匀采样四十个点生成i_it_4pys,c_it_4pys为其归一化的点坐标
                i_gt_4pys为极值点,c_gt_4pys为其归一化的点坐标
                """
                self.prepare_init(bbox, extreme_point, i_it_4pys, c_it_4pys, i_gt_4pys, c_gt_4pys, output_h, output_w)
                """
                根据极值点建立八边形,并采样128个点,生成i_it_pys
                i_gt_pys为根据标注采样的128个点
                """
                self.prepare_evolution(poly, extreme_point, i_it_pys, c_it_pys, i_gt_pys, c_gt_pys)

        ret = {'inp': inp}
        detection = {'ct_hm': ct_hm, 'wh': wh, 'ct_cls': ct_cls, 'ct_ind': ct_ind}
        init = {'i_it_4py': i_it_4pys, 'c_it_4py': c_it_4pys, 'i_gt_4py': i_gt_4pys, 'c_gt_4py': c_gt_4pys}
        evolution = {'i_it_py': i_it_pys, 'c_it_py': c_it_pys, 'i_gt_py': i_gt_pys, 'c_gt_py': c_gt_pys}
        ret.update(detection)
        ret.update(init)
        ret.update(evolution)
        # visualize_utils.visualize_snake_detection(orig_img, ret)
        # visualize_utils.visualize_snake_evolution(orig_img, ret)

        ct_num = len(ct_ind)
        meta = {'center': center, 'scale': scale, 'img_id': img_id, 'ann': ann, 'ct_num': ct_num}
        ret.update({'meta': meta})

        return ret

    def __len__(self):
        return len(self.anns)
最后制作的dataloader保存数据通过
for x,y in enumerate(train_loader): break
可以查看:

三、网络结构
#train_net.py
from lib.networks import make_network
def main():
    network = make_network(cfg)
    if args.test:
        test(cfg, network)
    else:
        train(cfg, network)
根据train_net.py找到调用函数
lib.networks.make_network
#lib/networks/make_network.py
def make_network(cfg):
    module = '.'.join(['lib.networks', cfg.task])
    path = os.path.join('lib/networks', cfg.task, '__init__.py')
    return imp.load_source(module, path).get_network(cfg)
cfg.task为snake,找到
lib.networks.snake.\__init__.get\_network
函数
#lib/networks/snkae/__init__.py
from lib.utils.snake import snake_config
from .ct_snake import get_network as get_ro

_network_factory = {
    'ro': get_ro
}
def get_network(cfg):
    arch = cfg.network
    heads = cfg.heads
    head_conv = cfg.head_conv
    num_layers = int(arch[arch.find('_') + 1:]) if '_' in arch else 0
    arch = arch[:arch.find('_')] if '_' in arch else arch
    get_model = _network_factory[arch]
    network = get_model(num_layers, heads, head_conv, snake_config.down_ratio, cfg.det_dir)
    return network
看来最后的网络构建函数来自于
lib.networks.snake.ct_snake.get_network
#lib/networks/snake/ct_snake.py
import torch.nn as nn
from .dla import DLASeg
from .evolve import Evolution
from lib.utils import net_utils, data_utils
from lib.utils.snake import snake_decode
import torch
from lib.config import cfg


class Network(nn.Module):
    def __init__(self, num_layers, heads, head_conv=256, down_ratio=4, det_dir=''):
        super(Network, self).__init__()
		"""
		DLASeg('dla34',heads={'ct_hm':20,'wh':2},
				pretrained=True,down_ratio=4,
				final_kernel=1,last_level=5,
				head_conv=256)
		"""
        self.dla = DLASeg('dla{}'.format(num_layers), heads,
                          pretrained=True,
                          down_ratio=down_ratio,
                          final_kernel=1,
                          last_level=5,
                          head_conv=head_conv)
        self.gcn = Evolution()

    def decode_detection(self, output, h, w):
        ct_hm = output['ct_hm']
        wh = output['wh']
        ct, detection = snake_decode.decode_ct_hm(torch.sigmoid(ct_hm), wh)
        detection[..., :4] = data_utils.clip_to_image(detection[..., :4], h, w)
        output.update({'ct': ct, 'detection': detection})
        return ct, detection

    def forward(self, x, batch=None):
        output, cnn_feature = self.dla(x)
        with torch.no_grad():
            ct, detection = self.decode_detection(output, cnn_feature.size(2), cnn_feature.size(3))
        if cfg.use_gt_det:
            self.use_gt_detection(output, batch)
        output = self.gcn(output, cnn_feature, batch)
        return output


def get_network(num_layers, heads, head_conv=256, down_ratio=4, det_dir=''):
    network = Network(num_layers, heads, head_conv, down_ratio, det_dir)
    return network
由上述代码可以看到,网络结构主要分为三个部分:
- DLAseg,使用了dla34的特征提取网络;
- decode_detection,解码特征图;
- Evolution,主要涉及轮廓演变。
1. DLASeg
该DLAseg主要分为:
- base层(dla34)
- DLAUP和IDAUP
- 检测头
最后输出:包含两个检测头输出的字典,CNNfeature。
class DLASeg(nn.Module):
    def __init__(self, base_name, heads, pretrained, down_ratio, final_kernel,
                 last_level, head_conv, out_channel=0):
        super(DLASeg, self).__init__()
        """
        base_name=dla34
        heads={'ct_hm':20,'wh':2}
        pretrained=True
        dwon_ratio=4
        final_kernel=1
        last_level=5
        head_conv=256
        """
        assert down_ratio in [2, 4, 8, 16]
        self.first_level = int(np.log2(down_ratio)) # 2
        self.last_level = last_level
        self.base = globals()[base_name](pretrained=pretrained) #dla34(pretrained=True)
        channels = self.base.channels
        scales = [2 ** i for i in range(len(channels[self.first_level:]))]
        self.dla_up = DLAUp(self.first_level, channels[self.first_level:], scales)

        if out_channel == 0:
            out_channel = channels[self.first_level]

        self.ida_up = IDAUp(out_channel, channels[self.first_level:self.last_level],
                            [2 ** i for i in range(self.last_level - self.first_level)])

        self.heads = heads

        """
        根据heads建立检测头,本任务有两个检测头:ct_hm:heatmap检测;wh:bbox的宽高。
        """
        for head in self.heads:
            classes = self.heads[head]
            if head_conv > 0:
                fc = nn.Sequential(
                    nn.Conv2d(channels[self.first_level], head_conv,
                              kernel_size=3, padding=1, bias=True),
                    nn.ReLU(inplace=True),
                    nn.Conv2d(head_conv, classes,
                              kernel_size=final_kernel, stride=1,
                              padding=final_kernel // 2, bias=True))
                if 'hm' in head:
                    fc[-1].bias.data.fill_(-2.19)
                else:
                    fill_fc_weights(fc)
            else:
                fc = nn.Conv2d(channels[self.first_level], classes,
                               kernel_size=final_kernel, stride=1,
                               padding=final_kernel // 2, bias=True)
                if 'hm' in head:
                    fc.bias.data.fill_(-2.19)
                else:
                    fill_fc_weights(fc)
            self.__setattr__(head, fc)

    def forward(self, x):
        x = self.base(x)
        x = self.dla_up(x)

        y = []
        for i in range(self.last_level - self.first_level):
            y.append(x[i].clone())
        self.ida_up(y, 0, len(y))

        z = {}
        for head in self.heads:
            z[head] = self.__getattr__(head)(y[-1])
        return z, y[-1]
1.1 dla34
def dla34(pretrained=True, **kwargs):  # DLA-34
    model = DLA([1, 1, 1, 2, 2, 1],
                [16, 32, 64, 128, 256, 512],
                block=BasicBlock, **kwargs)
    if pretrained:
        model.load_pretrained_model(data='imagenet', name='dla34', hash='ba72cf86')
    return model

class DLA(nn.Module):
    def __init__(self, levels, channels, num_classes=1000,
                 block=BasicBlock, residual_root=False, linear_root=False):
        super(DLA, self).__init__()
        self.channels = channels
        self.num_classes = num_classes
        self.base_layer = nn.Sequential(
            nn.Conv2d(3, channels[0], kernel_size=7, stride=1,
                      padding=3, bias=False),
            nn.BatchNorm2d(channels[0], momentum=BN_MOMENTUM),
            nn.ReLU(inplace=True))
        self.level0 = self._make_conv_level(
            channels[0], channels[0], levels[0])
        self.level1 = self._make_conv_level(
            channels[0], channels[1], levels[1], stride=2)
        """
        levelroot可以看作一个标记,看以看做是否接受上一个level输出的downsample传入(下图红色方块之间的蓝色箭头);
        默认的level_root为False,通过递归创建的Tree并未特定level_root,表示与前一个Tree为同一个level。
        """
        self.level2 = Tree(levels[2], block, channels[1], channels[2], 2,
                           level_root=False,
                           root_residual=residual_root)
        self.level3 = Tree(levels[3], block, channels[2], channels[3], 2,
                           level_root=True, root_residual=residual_root)
        self.level4 = Tree(levels[4], block, channels[3], channels[4], 2,
                           level_root=True, root_residual=residual_root)
        self.level5 = Tree(levels[5], block, channels[4], channels[5], 2,
                           level_root=True, root_residual=residual_root)


    def _make_conv_level(self, inplanes, planes, convs, stride=1, dilation=1):
        modules = []
        for i in range(convs):
            modules.extend([
                nn.Conv2d(inplanes, planes, kernel_size=3,
                          stride=stride if i == 0 else 1,
                          padding=dilation, bias=False, dilation=dilation),
                nn.BatchNorm2d(planes, momentum=BN_MOMENTUM),
                nn.ReLU(inplace=True)])
            inplanes = planes
        return nn.Sequential(*modules)

    def forward(self, x):
        y = []
        x = self.base_layer(x)
        for i in range(6):
            x = getattr(self, 'level{}'.format(i))(x)
            y.append(x)
        return y
dla34是首先通过Conv-BN-RL基础层然后再通过五个level进行特征提取的,level0和level1都是Conv-BN-RL层,level2、3、4、5则是调用Tree对象进行构建。DLA的输入参数levels,则表示了level0-5的循环调用与否。
levels:[1, 1, 1, 2, 2, 1]
表示level3,4会循环调用Tree。
class Tree(nn.Module):
    def __init__(self, levels, block, in_channels, out_channels, stride=1,
                 level_root=False, root_dim=0, root_kernel_size=1,
                 dilation=1, root_residual=False):
        super(Tree, self).__init__()
        if root_dim == 0:
            root_dim = 2 * out_channels
        if level_root:
            root_dim += in_channels
		"""
		当输入level等于1时直接用BasicBlock进行构建,当level大于1时进行Tree循环构建。
		"""
        if levels == 1:
            self.tree1 = block(in_channels, out_channels, stride,
                               dilation=dilation)
            self.tree2 = block(out_channels, out_channels, 1,
                               dilation=dilation)
        else:
            self.tree1 = Tree(levels - 1, block, in_channels, out_channels,
                              stride, root_dim=0,
                              root_kernel_size=root_kernel_size,
                              dilation=dilation, root_residual=root_residual)
            self.tree2 = Tree(levels - 1, block, out_channels, out_channels,
                              root_dim=root_dim + out_channels,
                              root_kernel_size=root_kernel_size,
                              dilation=dilation, root_residual=root_residual)
        if levels == 1:
            self.root = Root(root_dim, out_channels, root_kernel_size,
                             root_residual)
        self.level_root = level_root
        self.root_dim = root_dim
        self.downsample = None
        self.project = None
        self.levels = levels
        if stride > 1:
            self.downsample = nn.MaxPool2d(stride, stride=stride)
        if in_channels != out_channels:
            self.project = nn.Sequential(
                nn.Conv2d(in_channels, out_channels,
                          kernel_size=1, stride=1, bias=False),
                nn.BatchNorm2d(out_channels, momentum=BN_MOMENTUM)
            )

    def forward(self, x, residual=None, children=None):
        children = [] if children is None else children
        bottom = self.downsample(x) if self.downsample else x
        residual = self.project(bottom) if self.project else bottom
        if self.level_root:
            children.append(bottom)
        x1 = self.tree1(x, residual)
        if self.levels == 1:
            x2 = self.tree2(x1)
            x = self.root(x2, x1, *children)
        else:
            children.append(x1)
            x = self.tree2(x1, children=children)
        return x

class Root(nn.Module):
    def __init__(self, in_channels, out_channels, kernel_size, residual):
        super(Root, self).__init__()
        self.conv = nn.Conv2d(
            in_channels, out_channels, 1,
            stride=1, bias=False, padding=(kernel_size - 1) // 2)
        self.bn = nn.BatchNorm2d(out_channels, momentum=BN_MOMENTUM)
        self.relu = nn.ReLU(inplace=True)
        self.residual = residual

    def forward(self, *x):
        children = x
        x = self.conv(torch.cat(x, 1))
        x = self.bn(x)
        if self.residual:
            x += children[0]
        x = self.relu(x)

        return x

class BasicBlock(nn.Module):
    def __init__(self, inplanes, planes, stride=1, dilation=1):
        super(BasicBlock, self).__init__()
        self.conv1 = nn.Conv2d(inplanes, planes, kernel_size=3,
                               stride=stride, padding=dilation,
                               bias=False, dilation=dilation)
        self.bn1 = nn.BatchNorm2d(planes, momentum=BN_MOMENTUM)
        self.relu = nn.ReLU(inplace=True)
        self.conv2 = nn.Conv2d(planes, planes, kernel_size=3,
                               stride=1, padding=dilation,
                               bias=False, dilation=dilation)
        self.bn2 = nn.BatchNorm2d(planes, momentum=BN_MOMENTUM)
        self.stride = stride

    def forward(self, x, residual=None):
        if residual is None:
            residual = x

        out = self.conv1(x)
        out = self.bn1(out)
        out = self.relu(out)

        out = self.conv2(out)
        out = self.bn2(out)

        out += residual
        out = self.relu(out)

        return out
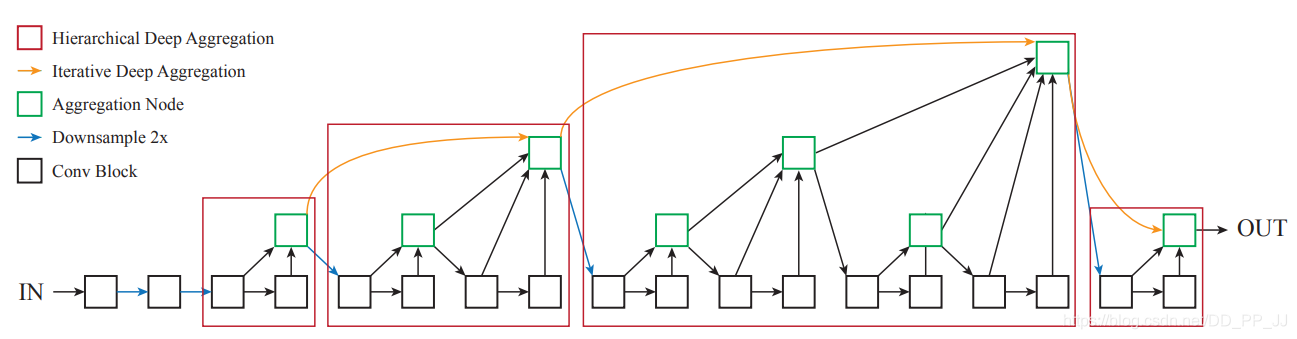
- 如上图DLA结构示意图,黑色方块就表示Basicblock,绿色方框就代表root,红色方框则是代表了一个Treelevel,实际上dla34只使用了第一个、第二个和第四个红色方块,第一个红色方块表示了level2,第二个红色方块表示了level3、level4,第四个红色方块则表示了level5。
-
dla34代码比较复杂,需要自己推理加深理解,[*pprp*博客](
(9条消息) DLA模型(分类模型+改进版分割模型) + 可变形卷积_BIT_Legend的博客-CSDN博客
)以及[算法小乔知乎](
DLA34主干网络介绍 – 知乎 (zhihu.com)
)对此有更深入的解释。
1.2 DLAUP与IDAUP
class DLAUp(nn.Module):
    def __init__(self, startp, channels, scales, in_channels=None):
        super(DLAUp, self).__init__()
        """
        startp=2
        channels=[64,128,256,512]
        sclaes[1,2,4,8]
        """
        self.startp = startp
        if in_channels is None:
            in_channels = channels
        self.channels = channels
        channels = list(channels)
        scales = np.array(scales, dtype=int)

        for i in range(len(channels) - 1): #range(3)
            j = -i - 2
            setattr(self, 'ida_{}'.format(i),
                    IDAUp(channels[j], in_channels[j:],
                          scales[j:] // scales[j]))
            scales[j + 1:] = scales[j]
            in_channels[j + 1:] = [channels[j] for _ in channels[j + 1:]]

    def forward(self, layers):
        out = [layers[-1]]  # start with 32
        for i in range(len(layers) - self.startp - 1):
            ida = getattr(self, 'ida_{}'.format(i))
            ida(layers, len(layers) - i - 2, len(layers))
            out.insert(0, layers[-1])
        return out

class IDAUp(nn.Module):
    def __init__(self, o, channels, up_f):
        super(IDAUp, self).__init__()
        for i in range(1, len(channels)):
            c = channels[i]
            f = int(up_f[i])
            """
            使用可形变卷积
            """
            proj = DeformConv(c, o)
            node = DeformConv(o, o)
			"""
			转置卷积,上采样
			"""
            up = nn.ConvTranspose2d(o, o, f * 2, stride=f,
                                    padding=f // 2, output_padding=0,
                                    groups=o, bias=False)
            fill_up_weights(up)

            setattr(self, 'proj_' + str(i), proj)
            setattr(self, 'up_' + str(i), up)
            setattr(self, 'node_' + str(i), node)

    def forward(self, layers, startp, endp):
        for i in range(startp + 1, endp):
            upsample = getattr(self, 'up_' + str(i - startp))
            project = getattr(self, 'proj_' + str(i - startp))
            layers[i] = upsample(project(layers[i]))
            node = getattr(self, 'node_' + str(i - startp))
            layers[i] = node(layers[i] + layers[i - 1])

DLAUP与IDAUP结构图,图中红框表示了本项目中使用的部分,4s,8s,16s,32s分别表示了leve2、3、4、5的输出,将特征融合最终输出4s特征图。
1.3 检测头
       """
       DLASeg中检测头的构造
       """
    	for head in self.heads:
            classes = self.heads[head]
            if head_conv > 0:
                fc = nn.Sequential(
                    nn.Conv2d(channels[self.first_level], head_conv,
                              kernel_size=3, padding=1, bias=True),
                    nn.ReLU(inplace=True),
                    nn.Conv2d(head_conv, classes,
                              kernel_size=final_kernel, stride=1,
                              padding=final_kernel // 2, bias=True))
                if 'hm' in head:
                    fc[-1].bias.data.fill_(-2.19)
                else:
                    fill_fc_weights(fc)
            else:
                fc = nn.Conv2d(channels[self.first_level], classes,
                               kernel_size=final_kernel, stride=1,
                               padding=final_kernel // 2, bias=True)
                if 'hm' in head:
                    fc.bias.data.fill_(-2.19)
                else:
                    fill_fc_weights(fc)
            self.__setattr__(head, fc)

"""
forward中的传递,y[-1]为IDAUP输出的4s特征图
"""
	z = {}
    for head in self.heads:
        z[head] = self.__getattr__(head)(y[-1])
2.decode_detection
还是先来看一下在ct_snake中decode_detection的使用:
    def forward(self, x, batch=None):
        output, cnn_feature = self.dla(x)
        """
        output为检测头的输出、cnn_feature为检测头之前的骨干网络提取的特征
        """
        with torch.no_grad():
            ct, detection = self.decode_detection(output, cnn_feature.size(2), cnn_feature.size(3))
        if cfg.use_gt_det: #False
            self.use_gt_detection(output, batch)
        output = self.gcn(output, cnn_feature, batch)
        return output

    def decode_detection(self, output, h, w):
        ct_hm = output['ct_hm']
        wh = output['wh']
        ct, detection = snake_decode.decode_ct_hm(torch.sigmoid(ct_hm), wh)
        detection[..., :4] = data_utils.clip_to_image(detection[..., :4], h, w) #防止越界
        output.update({'ct': ct, 'detection': detection})
        return ct, detection
主要使用了
snake_decode.decode_ct_hm
函数
def decode_ct_hm(ct_hm, wh, reg=None, K=100):
    """
    假设传入:ct_hm [80,20,128,128],wh [80,2,128,128]
    """
    batch, cat, height, width = ct_hm.size()
    ct_hm = nms(ct_hm) #非极大值抑制
	"""
	输出topk的得分值,索引,类别,xy值 [80,100]
	"""
    scores, inds, clses, ys, xs = topk(ct_hm, K=K)
    wh = transpose_and_gather_feat(wh, inds) #获取topk对应的宽高 [80,100,2]
    wh = wh.view(batch, K, 2)

    if reg is not None:
        reg = transpose_and_gather_feat(reg, inds)
        reg = reg.view(batch, K, 2)
        xs = xs.view(batch, K, 1) + reg[:, :, 0:1]
        ys = ys.view(batch, K, 1) + reg[:, :, 1:2]
    else:
        xs = xs.view(batch, K, 1)
        ys = ys.view(batch, K, 1)

    clses = clses.view(batch, K, 1).float() #[80,100,1]
    scores = scores.view(batch, K, 1) #[80,100,1]
    ct = torch.cat([xs, ys], dim=2) #构建center [80,100,2]
    bboxes = torch.cat([xs - wh[..., 0:1] / 2,
                        ys - wh[..., 1:2] / 2,
                        xs + wh[..., 0:1] / 2,
                        ys + wh[..., 1:2] / 2], dim=2) #构建bounding box [80,100,4]
    detection = torch.cat([bboxes, scores, clses], dim=2) #[80,100,4(bbox)+1(scores)+1(clses)]

    return ct, detection

def nms(heat, kernel=3):
    """
    使用3*3最大值池化进行非极大值抑制
    """
    pad = (kernel - 1) // 2
    hmax = nn.functional.max_pool2d(
        heat, (kernel, kernel), stride=1, padding=pad)
    keep = (hmax == heat).float()
    return heat * keep

def topk(scores, K=40):
    #假设现在scores维度为[80,10,128,128]
    batch, cat, height, width = scores.size()
	"""
	选择每类中最大的K个值 ->topk_scores [80,10,100]
	对应的索引 -> topk_inds [80,10,100]
	注意上述是在scores.view(batch,cat,-1):[80,10,128*128]中的索引。
	"""
    topk_scores, topk_inds = torch.topk(scores.view(batch, cat, -1), K)

    topk_inds = topk_inds % (height * width)    #这一行貌似没有作用?
    topk_ys = (topk_inds / width).int().float() #获取对应的图片的第几行
    topk_xs = (topk_inds % width).int().float()	#第几列
	"""
	选择topk_scores所有类中最大的k个值 ->topk_score [80,100]
	对应的索引-> topk_ind [80,100]
	注意上述是在topk_scores.view(batch,-1):[80,10*100]中的索引。
	"""
    topk_score, topk_ind = torch.topk(topk_scores.view(batch, -1), K)
    topk_clses = (topk_ind / K).int() #最大值对应的类别 [80,100]
    """
    获取在原始输入中最大K值对应的索引以及xy值
    """
    topk_inds = gather_feat(
        topk_inds.view(batch, -1, 1), topk_ind).view(batch, K) #[80,100]
    topk_ys = gather_feat(topk_ys.view(batch, -1, 1), topk_ind).view(batch, K)#[80,100]
    topk_xs = gather_feat(topk_xs.view(batch, -1, 1), topk_ind).view(batch, K)#[80,100]

    return topk_score, topk_inds, topk_clses, topk_ys, topk_xs

def gather_feat(feat, ind, mask=None):
    """
    以上述gather_feat(topk_inds.view(batch,-1,1),topk_ind)为例
    传入feat : topk_inds.view(batch,-1,1) : topk_inds[80,10,100]-> [80,10*100,1]
    传入ind:   topk_ind [80,100]
    """
    dim = feat.size(2) #1
    ind = ind.unsqueeze(2).expand(ind.size(0), ind.size(1), dim) #[80,100]->[80,100,1]
    """
    topk_inds 对应的是topk_scores的索引,也即在图片中位置的索引;
    而topk_ind对应的是topk_score的索引,是在topk_scores中最大的K个值的索引;
    因此使用topk_inds.gather(1,topk_ind)即可实现将topk_ind映射回在图片中对应位置的索引。
    """
    feat = feat.gather(1, ind)
    if mask is not None:
        mask = mask.unsqueeze(2).expand_as(feat)
        feat = feat[mask]
        feat = feat.view(-1, dim)
    return feat #[80,100]

def transpose_and_gather_feat(feat, ind):
    """
    传入wh:[80,2,128,128] ->feat
    topk的索引[80,100] -> ind
    """
    feat = feat.permute(0, 2, 3, 1).contiguous() #[80,128,128,2]
    feat = feat.view(feat.size(0), -1, feat.size(3))#[80,128*128,2]
    feat = gather_feat(feat, ind) #返回topk对应的宽高 [80,100,2]
    return feat
- 最后的结果是在output内更新了两个键值’ct’: [batch,topk,2] 和’detection’: [batch,topk,6],其中detection[…,:4]为bounding box,[…,4]为topk得分,[…,5]为class。
- ct和detection貌似没有在训练过程中使用,而是在测试过程中使用。
3. Evolution
Evolution模块主要可以分为:
- snake层
-
轮廓演化:
- 训练
- 测试
3.1 snake
Snake层主要是对应于论文中的循环卷积。
-
input[batch,66,顶点数]
-
首先构造head,将输入卷积(feature_dim66)至state_dim128;
-
然后使用空洞圆卷积构建七层残差层,这里空洞圆卷积是通过将input后方的特征拼接到input前,再将input前方的特征拼接到input后通过fc实现循环卷积;
-
接着将head和残差层按通道进行拼接后输入fuse层,输出通道256;
-
取fuse层输出每个特征通道的最大值(shape=[batch,256,1]),并拓展至[batch,256,顶点数];
-
将head+七层残差层+上一步的输出按照通道进行融合,传入prediction层,最后输出[batch,2,顶点数]。
"""
空洞圆卷积
可以看到在构造过程中与普通fc层无异,卷积核为9,dialtion根据Snake构造函数定义
重点是在forward函数中,先将input特征进行拼接:
	input后面的-n_adj*dialtion + input + input前面的n_adj*dialtion
形成环形,再进行fc卷积。
"""
class DilatedCircConv(nn.Module):
    def __init__(self, state_dim, out_state_dim=None, n_adj=4, dilation=1):
        super(DilatedCircConv, self).__init__()

        self.n_adj = n_adj
        self.dilation = dilation
        out_state_dim = state_dim if out_state_dim is None else out_state_dim
        self.fc = nn.Conv1d(state_dim, out_state_dim, kernel_size=self.n_adj*2+1, dilation=self.dilation)

    def forward(self, input, adj):
        """
		此处传入adj邻接矩阵,但是好像并没有用到,推测可能是原来想用于GCN的
		"""
        if self.n_adj != 0:
            input = torch.cat([input[..., -self.n_adj*self.dilation:], input, input[..., :self.n_adj*self.dilation]], dim=2)
        return self.fc(input)

"""
Conv-relu-bn,Conv为空洞圆卷积
"""
class BasicBlock(nn.Module):
    def __init__(self, state_dim, out_state_dim, conv_type, n_adj=4, dilation=1):
        super(BasicBlock, self).__init__()

        self.conv = _conv_factory[conv_type](state_dim, out_state_dim, n_adj, dilation) # DilatedCircConv
        self.relu = nn.ReLU(inplace=True)
        self.norm = nn.BatchNorm1d(out_state_dim)

    def forward(self, x, adj=None):
        x = self.conv(x, adj)
        x = self.relu(x)
        x = self.norm(x)
        return x


class Snake(nn.Module):
    def __init__(self, state_dim, feature_dim, conv_type='dgrid'):
        super(Snake, self).__init__()
		"""
		主要构造
		1.head为普通basicBlock
		2.七个残差层
		3.融合层
		4.预测层
		"""
        self.head = BasicBlock(feature_dim, state_dim, conv_type)

        self.res_layer_num = 7
        dilation = [1, 1, 1, 2, 2, 4, 4] # 每个残差层的dilation参数
        #循环构建七个残差层
        for i in range(self.res_layer_num):
            conv = BasicBlock(state_dim, state_dim, conv_type, n_adj=4, dilation=dilation[i])
            self.__setattr__('res'+str(i), conv)

        fusion_state_dim = 256
        #将head及残差层所有的特征进行融合
        self.fusion = nn.Conv1d(state_dim * (self.res_layer_num + 1), fusion_state_dim, 1)
        #输出偏移量
        self.prediction = nn.Sequential(
            nn.Conv1d(state_dim * (self.res_layer_num + 1) + fusion_state_dim, 256, 1),
            nn.ReLU(inplace=True),
            nn.Conv1d(256, 64, 1),
            nn.ReLU(inplace=True),
            nn.Conv1d(64, 2, 1)
        )

    def forward(self, x, adj):
        """
        假设传入x[80,66,40],state_dim=128,feature_dim=66
        """
        states = []

        x = self.head(x, adj) #[80,128,40]
        states.append(x)
        for i in range(self.res_layer_num):
            x = self.__getattr__('res'+str(i))(x, adj) + x
            states.append(x) #[80,128,40]
		#将head和res进行拼接
        state = torch.cat(states, dim=1)  #[80,128*8,40]
        """
         torch.max([80,256,40],dim=2,keepdim=True)[0] ->[80,256,1]
         相当于取每个通道的最大值
        """
        global_state = torch.max(self.fusion(state), dim=2, keepdim=True)[0]
        global_state = global_state.expand(global_state.size(0), global_state.size(1), state.size(2)) #[80,256,40]
        state = torch.cat([global_state, state], dim=1) #[80,256+128*8,40]
        x = self.prediction(state)

        return x
3.2 Evolution
class Evolution(nn.Module):
    def __init__(self):
        super(Evolution, self).__init__()

        self.fuse = nn.Conv1d(128, 64, 1)
        self.init_gcn = Snake(state_dim=128, feature_dim=64 + 2, conv_type='dgrid')
        self.evolve_gcn = Snake(state_dim=128, feature_dim=64 + 2, conv_type='dgrid')
        self.iter = 2
        for i in range(self.iter):
            evolve_gcn = Snake(state_dim=128, feature_dim=64 + 2, conv_type='dgrid')
            self.__setattr__('evolve_gcn' + str(i), evolve_gcn)

        for m in self.modules():
            if isinstance(m, nn.Conv1d) or isinstance(m, nn.Conv2d):
                m.weight.data.normal_(0.0, 0.01)
                if m.bias is not None:
                    nn.init.constant_(m.bias, 0)
3.2.1训练过程
- 训练过程中是先收集了标注的信息进行初始化,获得四十个点的初始坐标;
- 将初始坐标(利用bbox中点构建的四边形)传入snake,然后返回了极值点的预测(因为gt为极值点),更新进ret中;
- 根据标注的轮廓(利用极值点+bbox中点构建的八边形)进行初始轮廓演化,得到128个点的轮廓
- 将得到的轮廓传入下一次演化,迭代两次
- 将演化的轮廓更新进ret键值
def forward(self, output, cnn_feature, batch=None):
    ret = output

    if batch is not None and 'test' not in batch['meta']:
        with torch.no_grad():
            """
            init:
            ct_01记录了batch中每张图片里有几个poly,以及对应的poly位置
            collect_training将batch中所有的poly拼接在一起 size:(polynum,40,2)
            ct_num记录每张图片内有几个ct
            4py_ind记录了拼接后的poly对应的图片 size:(polynum,) 如:【0,1,2,2,3,4,4,4】
            output:
            更新了i_init_py..等四个py
            """
            init = self.prepare_training(output, batch)
        # 返回了预测的四个bbox中点坐标(极值点)
        ex_pred = self.init_poly(self.init_gcn, cnn_feature, init['i_it_4py'], init['c_it_4py'], init['4py_ind'])
        ret.update({'ex_pred': ex_pred, 'i_gt_4py': output['i_gt_4py']}) # ret 和output是一起改变的 为什么还要更新gt呢?

        # with torch.no_grad():
        #     init = self.prepare_training_evolve(output, batch, init)

        py_pred = self.evolve_poly(self.evolve_gcn, cnn_feature, init['i_it_py'], init['c_it_py'], init['py_ind'])
        py_preds = [py_pred]
        for i in range(self.iter): #range(2)
            py_pred = py_pred / snake_config.ro
            c_py_pred = snake_gcn_utils.img_poly_to_can_poly(py_pred)
            evolve_gcn = self.__getattr__('evolve_gcn' + str(i))
            py_pred = self.evolve_poly(evolve_gcn, cnn_feature, py_pred, c_py_pred, init['py_ind'])
            py_preds.append(py_pred)
        ret.update({'py_pred': py_preds, 'i_gt_py': output['i_gt_py'] * snake_config.ro})
这里训练过程其实是用到了标注的信息,收集标注中信息。
def prepare_training(self, output, batch):
    """
    ct_01记录了batch中每张图片里有几个poly,以及对应的poly位置
    collect_training将batch中所有的poly拼接在一起 size:(polynum,40,2)
    ct_num记录每张图片内有几个ct
    4py_ind记录了拼接后的poly对应的图片 size:(polynum,) 如:【0,1,2,2,3,4,4,4】
    """
    init = snake_gcn_utils.prepare_training(output, batch)
    output.update({'i_it_4py': init['i_it_4py'], 'i_it_py': init['i_it_py']})
    output.update({'i_gt_4py': init['i_gt_4py'], 'i_gt_py': init['i_gt_py']})
    return init

#snake_gcn_utils.prepare_training
def prepare_training(ret, batch):
    """
    ct_01记录了batch中每张图片里有几个poly,以及对应的poly位置 size(80,一张图片内最多的数量) 比如80张图片内最多有13个poly: (80,13)
    polynum=ct_01.sum
    collect_training将batch中所有的poly拼接在一起 size:(polynum,40,2)
    ct_num记录每张图片内有几个ct
    4py_ind记录了拼接后的poly对应的图片 shape:(polynum,) 如:【0,1,2,2,3,4,4,4】表示第一张图片有一个poly,位置为0;第二张图片有一个poly,位置1;第三张图片有两个poly,位置2,3;第四张图片有一个poly,位置4;第五张图片有三个poly,位置为5,6,7。
    """
    ct_01 = batch['ct_01'].byte()
    init = {}
    init.update({'i_it_4py': collect_training(batch['i_it_4py'], ct_01)})
    init.update({'c_it_4py': collect_training(batch['c_it_4py'], ct_01)})
    init.update({'i_gt_4py': collect_training(batch['i_gt_4py'], ct_01)})
    init.update({'c_gt_4py': collect_training(batch['c_gt_4py'], ct_01)})

    init.update({'i_it_py': collect_training(batch['i_it_py'], ct_01)})
    init.update({'c_it_py': collect_training(batch['c_it_py'], ct_01)})
    init.update({'i_gt_py': collect_training(batch['i_gt_py'], ct_01)})
    init.update({'c_gt_py': collect_training(batch['c_gt_py'], ct_01)})

    ct_num = batch['meta']['ct_num']
    init.update({'4py_ind': torch.cat([torch.full([ct_num[i]], i) for i in range(ct_01.size(0))], dim=0)})
    init.update({'py_ind': init['4py_ind']})

    if snake_config.train_pred_box:#Flase
        prepare_training_box(ret, batch, init)

    init['4py_ind'] = init['4py_ind'].to(ct_01.device)
    init['py_ind'] = init['py_ind'].to(ct_01.device)

    return init

def collect_training(poly, ct_01):
    """
    将batch中所有的poly拼接在一起 size:(polynum,40,2)
    """
    batch_size = ct_01.size(0)
    poly = torch.cat([poly[i][ct_01[i]] for i in range(batch_size)], dim=0)
    return poly
初始化轮廓
- 获取i_it_4py(四十个中点连接采样多边形的坐标)的特征,[polynum,64,40]
- 获取中心坐标特征[polynum,64,1],将中心点坐标特征与i_it_4py特征进行拼接,[polynum,128,40]
- 传入fuse,获得i_init_feature: [polynum,64,40]
- 将归一化的坐标合并 [polynum,66,40],传入snake,获得坐标偏移量[polynum,40,2]
- 将坐标偏移量加上原始i_it_4py,并采样,获得预测的极值点坐标( 因为标注是将极值点作为gt):[polynum,4,2].
def init_poly(self, snake, cnn_feature, i_it_poly, c_it_poly, ind):
    """
    Snake:Snake(state_dim=128,feature_dim=64+2,conv_type='dgrid'
    cnn_feature: size (80,64,128,128)
    i_it_poly: init['i_it_4py'] (199,40,2) 中点连接采样的多边形
    ind:       init['py_ind'] (199,)
    """
    if len(i_it_poly) == 0:
        return torch.zeros([0, 4, 2]).to(i_it_poly)

    h, w = cnn_feature.size(2), cnn_feature.size(3)
    init_feature = snake_gcn_utils.get_gcn_feature(cnn_feature, i_it_poly, ind, h, w)  # size (199,64,40)
    center = (torch.min(i_it_poly, dim=1)[0] + torch.max(i_it_poly, dim=1)[0]) * 0.5  # 每列中最小的行和最大的行 size (199,2)
    ct_feature = snake_gcn_utils.get_gcn_feature(cnn_feature, center[:, None], ind, h,w)  # poly中心的feature size(199,64,1)
    init_feature = torch.cat([init_feature, ct_feature.expand_as(init_feature)], dim=1) # size(199,128,40)
    init_feature = self.fuse(init_feature) #size(199,64,40)

    init_input = torch.cat([init_feature, c_it_poly.permute(0, 2, 1)], dim=1) #将归一化的坐标合并到特征 (199,64,40)+(199,2,40)-》(199,64,40)
    adj = snake_gcn_utils.get_adj_ind(snake_config.adj_num, init_input.size(2), init_input.device)
    i_poly = i_it_poly + snake(init_input, adj).permute(0, 2, 1) #这里adj实际上并没有用到 snake.permute -> (199,40,2)可以看作是偏移量
    i_poly = i_poly[:, ::snake_config.init_poly_num // 4] #size(199,4,2)

    return i_poly


def get_gcn_feature(cnn_feature, img_poly, ind, h, w):
    img_poly = img_poly.clone()
    """
    对poly进行归一化
    直接除以w,h不就行了吗?为什么还要乘2-1?
    img_poly[...,0]/w 取值范围为【0,1],此时*2-1 取值范围就变为了【-1,1】,可以应用到grid_sample中。
    """
    img_poly[..., 0] = img_poly[..., 0] / (w / 2.) - 1
    img_poly[..., 1] = img_poly[..., 1] / (h / 2.) - 1

    batch_size = cnn_feature.size(0)
    """
    gcn_feature size : (多边形数量,特征维度,多边形顶点数)
    """
    gcn_feature = torch.zeros([img_poly.size(0), cnn_feature.size(1), img_poly.size(1)]).to(img_poly.device)
    for i in range(batch_size):
        poly = img_poly[ind == i].unsqueeze(0)
        feature = torch.nn.functional.grid_sample(cnn_feature[i:i + 1], poly)[0].permute(1, 0, 2)
        gcn_feature[ind == i] = feature

    return gcn_feature
这里跟init_poly很相似,不过没有将中心点特征进行融合;乘四倍是因为此时进行了4s下采样,后面gt也乘了四倍。
def evolve_poly(self, snake, cnn_feature, i_it_poly, c_it_poly, ind):
    if len(i_it_poly) == 0:
        return torch.zeros_like(i_it_poly)
    h, w = cnn_feature.size(2), cnn_feature.size(3)
    init_feature = snake_gcn_utils.get_gcn_feature(cnn_feature, i_it_poly, ind, h, w) #199,64,128
    c_it_poly = c_it_poly * snake_config.ro #将归一化的坐标乘以4倍
    init_input = torch.cat([init_feature, c_it_poly.permute(0, 2, 1)], dim=1) #将乘以四倍的归一化的坐标合并到特征
    adj = snake_gcn_utils.get_adj_ind(snake_config.adj_num, init_input.size(2), init_input.device)
    i_poly = i_it_poly * snake_config.ro + snake(init_input, adj).permute(0, 2, 1) #(199,128,2)
    return i_poly
3.2.2 损失函数
这里损失函数比较简单易懂:loss=ct_loss+0.1wh_loss+ex_loss+py_loss
class NetworkWrapper(nn.Module):
    def __init__(self, net):
        super(NetworkWrapper, self).__init__()

        self.net = net

        self.ct_crit = net_utils.FocalLoss()
        self.wh_crit = net_utils.IndL1Loss1d('smooth_l1')
        self.reg_crit = net_utils.IndL1Loss1d('smooth_l1')
        self.ex_crit = torch.nn.functional.smooth_l1_loss
        self.py_crit = torch.nn.functional.smooth_l1_loss

    def forward(self, batch):
        output = self.net(batch['inp'], batch)

        scalar_stats = {}
        loss = 0

        ct_loss = self.ct_crit(net_utils.sigmoid(output['ct_hm']), batch['ct_hm'])
        scalar_stats.update({'ct_loss': ct_loss})
        loss += ct_loss

        wh_loss = self.wh_crit(output['wh'], batch['wh'], batch['ct_ind'], batch['ct_01'])
        scalar_stats.update({'wh_loss': wh_loss})
        loss += 0.1 * wh_loss

        # reg_loss = self.reg_crit(output['reg'], batch['reg'], batch['ct_ind'], batch['ct_01'])
        # scalar_stats.update({'reg_loss': reg_loss})
        # loss += reg_loss

        ex_loss = self.ex_crit(output['ex_pred'], output['i_gt_4py'])
        scalar_stats.update({'ex_loss': ex_loss})
        loss += ex_loss

        py_loss = 0
        output['py_pred'] = [output['py_pred'][-1]]
        for i in range(len(output['py_pred'])):
            py_loss += self.py_crit(output['py_pred'][i], output['i_gt_py']) / len(output['py_pred'])
        scalar_stats.update({'py_loss': py_loss})
        loss += py_loss

        scalar_stats.update({'loss': loss})
        image_stats = {}

        return output, loss, scalar_stats, image_stats
3.2.3 训练过程
与训练过程中不同的地方主要在于:
- 利用ouput[‘detection’]进行了bbox中点连接四边形的初始化,在训练中是直接用了标注信息;
- 利用预测的ex建立八边形并采样,作为轮廓演化的初值,在训练中也是直接用了标注信息。
- 最后输出的是ct值超过ct_score的多边形poly。
def forward(self, output, cnn_feature, batch=None):
    ret = output

    if not self.training:
        with torch.no_grad():
            """
            初始化,通过ct_score更新output['detection'] shape(>ct_score,6)
            将预测i_it_4py更新到it_ex:shape[>ct_score,40,2]
            """
            init = self.prepare_testing_init(output)
            ex = self.init_poly(self.init_gcn, cnn_feature, init['i_it_4py'], init['c_it_4py'], init['ind']) #[>ct_score,4,2]
            ret.update({'ex': ex})
			"""
			根据ex建立八边形并采样,获取轮廓it_py([>ct_score,128,2])更新进入output['it_py']
			evole则包含两个键:'i_it_py','c_it_py'shape与it_py相同
			"""
            evolve = self.prepare_testing_evolve(output, cnn_feature.size(2), cnn_feature.size(3))
            py = self.evolve_poly(self.evolve_gcn, cnn_feature, evolve['i_it_py'], evolve['c_it_py'], init['ind'])
            pys = [py / snake_config.ro]
            for i in range(self.iter):
                py = py / snake_config.ro
                c_py = snake_gcn_utils.img_poly_to_can_poly(py)
                evolve_gcn = self.__getattr__('evolve_gcn' + str(i))
                py = self.evolve_poly(evolve_gcn, cnn_feature, py, c_py, init['ind'])
                pys.append(py / snake_config.ro)
            ret.update({'py': pys})

    return output
test初始化,利用detection获取i_it_4py(ex)
def prepare_testing_init(self, output):
    """
    output['detection'] shape(batch,100,6)
    init通过detection获得超过ct_score的i_it_4py,c_it_4py,以及对应的索引ind
    output也通过ct_score筛选,并将i_it_4py更新入键值it_ex
    """
    init = snake_gcn_utils.prepare_testing_init(output['detection'][..., :4], output['detection'][..., 4])
    output['detection'] = output['detection'][output['detection'][..., 4] > snake_config.ct_score]
    output.update({'it_ex': init['i_it_4py']})
    return init

#snake_gcn_utils.repare_testing_init
def prepare_testing_init(box, score):
    """
    box=output['detection'][..., :4] shape(batch,100,4)
    score=output['detection'][..., 4] shape(batch,100)
    """
    i_it_4pys = snake_decode.get_init(box) #根据中点建立四边形 [batch,100,4,2]
    i_it_4pys = uniform_upsample(i_it_4pys, snake_config.init_poly_num) #采样40个点 [batch,100,40,2]
    c_it_4pys = img_poly_to_can_poly(i_it_4pys) #归一化

    ind = score > snake_config.ct_score #根据阈值筛选
    i_it_4pys = i_it_4pys[ind] #[过阈值数量,40,2]
    c_it_4pys = c_it_4pys[ind] #[过阈值数量,40,2]
    """
    ind shape[超过阈值数量,]
    for example:[0,0,0,1,2,2]表示第一个batch有3个超过阈值的,第二个batch有1个,第三个batch有2个。
    """
    ind = torch.cat([torch.full([ind[i].sum()], i) for i in range(ind.size(0))], dim=0)
    init = {'i_it_4py': i_it_4pys, 'c_it_4py': c_it_4pys, 'ind': ind}

    return init
test轮廓演化初始化,利用ex建立八边形轮廓
def prepare_testing_evolve(self, output, h, w):
    """
    根据极值点建立八边形,并进行采样,获得轮廓i_py ([ct_score,128,2])更新进output['it_py']
    """
    ex = output['ex'] #[>ct_score,4,2]
    ex[..., 0] = torch.clamp(ex[..., 0], min=0, max=w - 1)#越界修正
    ex[..., 1] = torch.clamp(ex[..., 1], min=0, max=h - 1)
    evolve = snake_gcn_utils.prepare_testing_evolve(ex)
    output.update({'it_py': evolve['i_it_py']})
    return evolve
#snake_gcn_utils.prepare_testing_evolve
def prepare_testing_evolve(ex):
    if len(ex) == 0:
        i_it_pys = torch.zeros([0, snake_config.poly_num, 2]).to(ex)
        c_it_pys = torch.zeros_like(i_it_pys)
    else:
        i_it_pys = snake_decode.get_octagon(ex[None]) #根据极值点建立八边形 #[1,>ct_score,12,2]
        i_it_pys = uniform_upsample(i_it_pys, snake_config.poly_num)[0] #[>ct_score,128,2]
        c_it_pys = img_poly_to_can_poly(i_it_pys)
    evolve = {'i_it_py': i_it_pys, 'c_it_py': c_it_pys}
    return evolve
四、总结
- 项目用了大量的高级封装调用起来很简单,阅读起来就比较麻烦,但也是让我学到了很多封装的技巧。
- 由于项目的环境都比较老,迁移到本地的时候环境配置也需要调整,我也是花了不少时间搜索了不少资料才完成了cuda拓展的编译。
- 该项目采用了DLA34作为特征提取网络,而没有接触过DLA的我第一次看DLA网络很头大,因为代码写的比较抽象吧,看懂backbone大概花了我一个星期吧,DLA系列看起来还挺有趣的,感兴趣的可以深入学习一下。
- 项目数据集的处理和轮廓演化是相互配合的,需要结合一起学习。