android studio实现按钮控制指示灯点亮熄灭
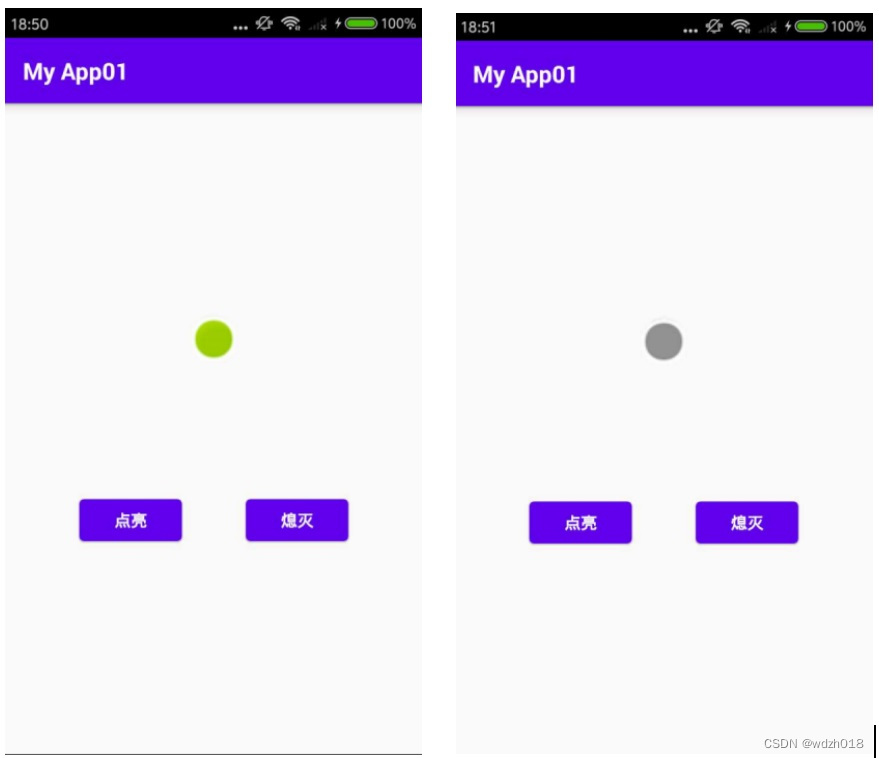
采用两个普通按键Button,控制一个由ImageView虚拟的指示灯,按第一个按键灯点亮变成绿色,按第二个按键灯变成灰色。非常简单,直接分享一下。
1、AndroidManifest.xml代码
<?xml version="1.0" encoding="utf-8"?>
<manifest xmlns:android="http://schemas.android.com/apk/res/android"
    package="com.example.myapp01">

    <application
        android:allowBackup="true"
        android:icon="@mipmap/ic_launcher"
        android:label="@string/app_name"
        android:roundIcon="@mipmap/ic_launcher_round"
        android:supportsRtl="true"
        android:theme="@style/Theme.MyApp01">
        <activity
            android:name=".MainActivity"
            android:exported="true"
            android:label="@string/app_name">
            <intent-filter>
                <action android:name="android.intent.action.MAIN" />
                <category android:name="android.intent.category.LAUNCHER" />
            </intent-filter>
        </activity>
    </application>
</manifest>
2、MainActivity.java代码
import android.os.Bundle;
import android.view.View;
import android.widget.Button;
import android.widget.ImageView;


import androidx.appcompat.app.AppCompatActivity;

public class MainActivity extends AppCompatActivity implements View.OnClickListener {
    ImageView L1;
    Button bnt1;
    Button bnt2;

    @Override
    protected void onCreate(Bundle savedInstanceState) {
        super.onCreate(savedInstanceState);
        setContentView(R.layout.activity_main);
        bnt1 = findViewById(R.id.button1);//  按钮灯开
        bnt2 = findViewById(R.id.button2);//  按钮灯关
        bnt1.setOnClickListener(this);
        bnt2.setOnClickListener(this);
        L1 = (ImageView)this.findViewById(R.id.Lamp);
    }

    @Override
    public void onClick(View view) {
        int i=view.getId();
        if (i==bnt1.getId())
            L1.setVisibility(View.VISIBLE);

        if (i==bnt2.getId())
            L1.setVisibility(View.INVISIBLE) ;

    }
}
通过检测两个按钮bnt1及bnt2状态,使指示灯L1在可见与不可见之间切换完成灯的亮灭指示,bnt1点击时L1切换为可见,显示是绿色,bnt2点击时L1切换为不可见,显示灰色,为实现显示灰色,这里是在L1对应的ImageView(Lamp)下放置了一个同样大小灰色的ImageView(ImageView2)。
3、activity_main.xml代码
<?xml version="1.0" encoding="utf-8"?>
<androidx.constraintlayout.widget.ConstraintLayout xmlns:android="http://schemas.android.com/apk/res/android"
    xmlns:app="http://schemas.android.com/apk/res-auto"
    xmlns:tools="http://schemas.android.com/tools"
    android:layout_width="match_parent"
    android:layout_height="match_parent">

    <androidx.constraintlayout.widget.ConstraintLayout
        android:layout_width="match_parent"
        android:layout_height="match_parent"
        tools:layout_editor_absoluteX="34dp"
        tools:layout_editor_absoluteY="0dp">

        <Button
            android:id="@+id/button1"
            android:layout_width="wrap_content"
            android:layout_height="wrap_content"
            android:layout_marginTop="109dp"
            android:layout_marginEnd="50dp"
            android:text="点亮"
            app:layout_constraintEnd_toEndOf="@+id/imageView2"
            app:layout_constraintTop_toBottomOf="@+id/Lamp" />

        <Button
            android:id="@+id/button2"
            android:layout_width="wrap_content"
            android:layout_height="wrap_content"
            android:layout_marginStart="50dp"
            android:layout_marginTop="109dp"
            android:text="熄灭"
            app:layout_constraintStart_toStartOf="@+id/imageView2"
            app:layout_constraintTop_toBottomOf="@+id/imageView2" />

        <ImageView
            android:id="@+id/imageView2"
            android:layout_width="45dp"
            android:layout_height="45dp"
            android:layout_marginTop="180dp"
            android:visibility="visible"
            app:layout_constraintEnd_toEndOf="parent"
            app:layout_constraintHorizontal_bias="0.5"
            app:layout_constraintStart_toStartOf="parent"
            app:layout_constraintTop_toTopOf="parent"
            app:srcCompat="@android:drawable/presence_invisible" />

        <ImageView
            android:id="@+id/Lamp"
            android:layout_width="45dp"
            android:layout_height="45dp"
            android:layout_marginTop="180dp"
            android:visibility="invisible"
            app:layout_constraintEnd_toEndOf="parent"
            app:layout_constraintHorizontal_bias="0.5"
            app:layout_constraintStart_toStartOf="parent"
            app:layout_constraintTop_toTopOf="parent"
            app:srcCompat="@android:drawable/presence_online" />

    </androidx.constraintlayout.widget.ConstraintLayout>
</androidx.constraintlayout.widget.ConstraintLayout>
4、最后效果如下

版权声明:本文为wdzh018原创文章,遵循 CC 4.0 BY-SA 版权协议,转载请附上原文出处链接和本声明。