系列文章目录
Webrtc从理论到实践一:初识
Webrtc从理论到实践二: 架构
Webrtc从理论到实践三: 角色
Webrtc从理论到实践四: 通信
Webrtc从理论到实践五: 编译webrtc源码
Webrtc从理论到实践六: Webrtc官方demo运行
Webrtc从理论到实践七: 官方demo源码走读(peerconnection_server)
Webrtc从理论到实践八: 官方demo源码走读(peerconnection_client)(上)
时序图
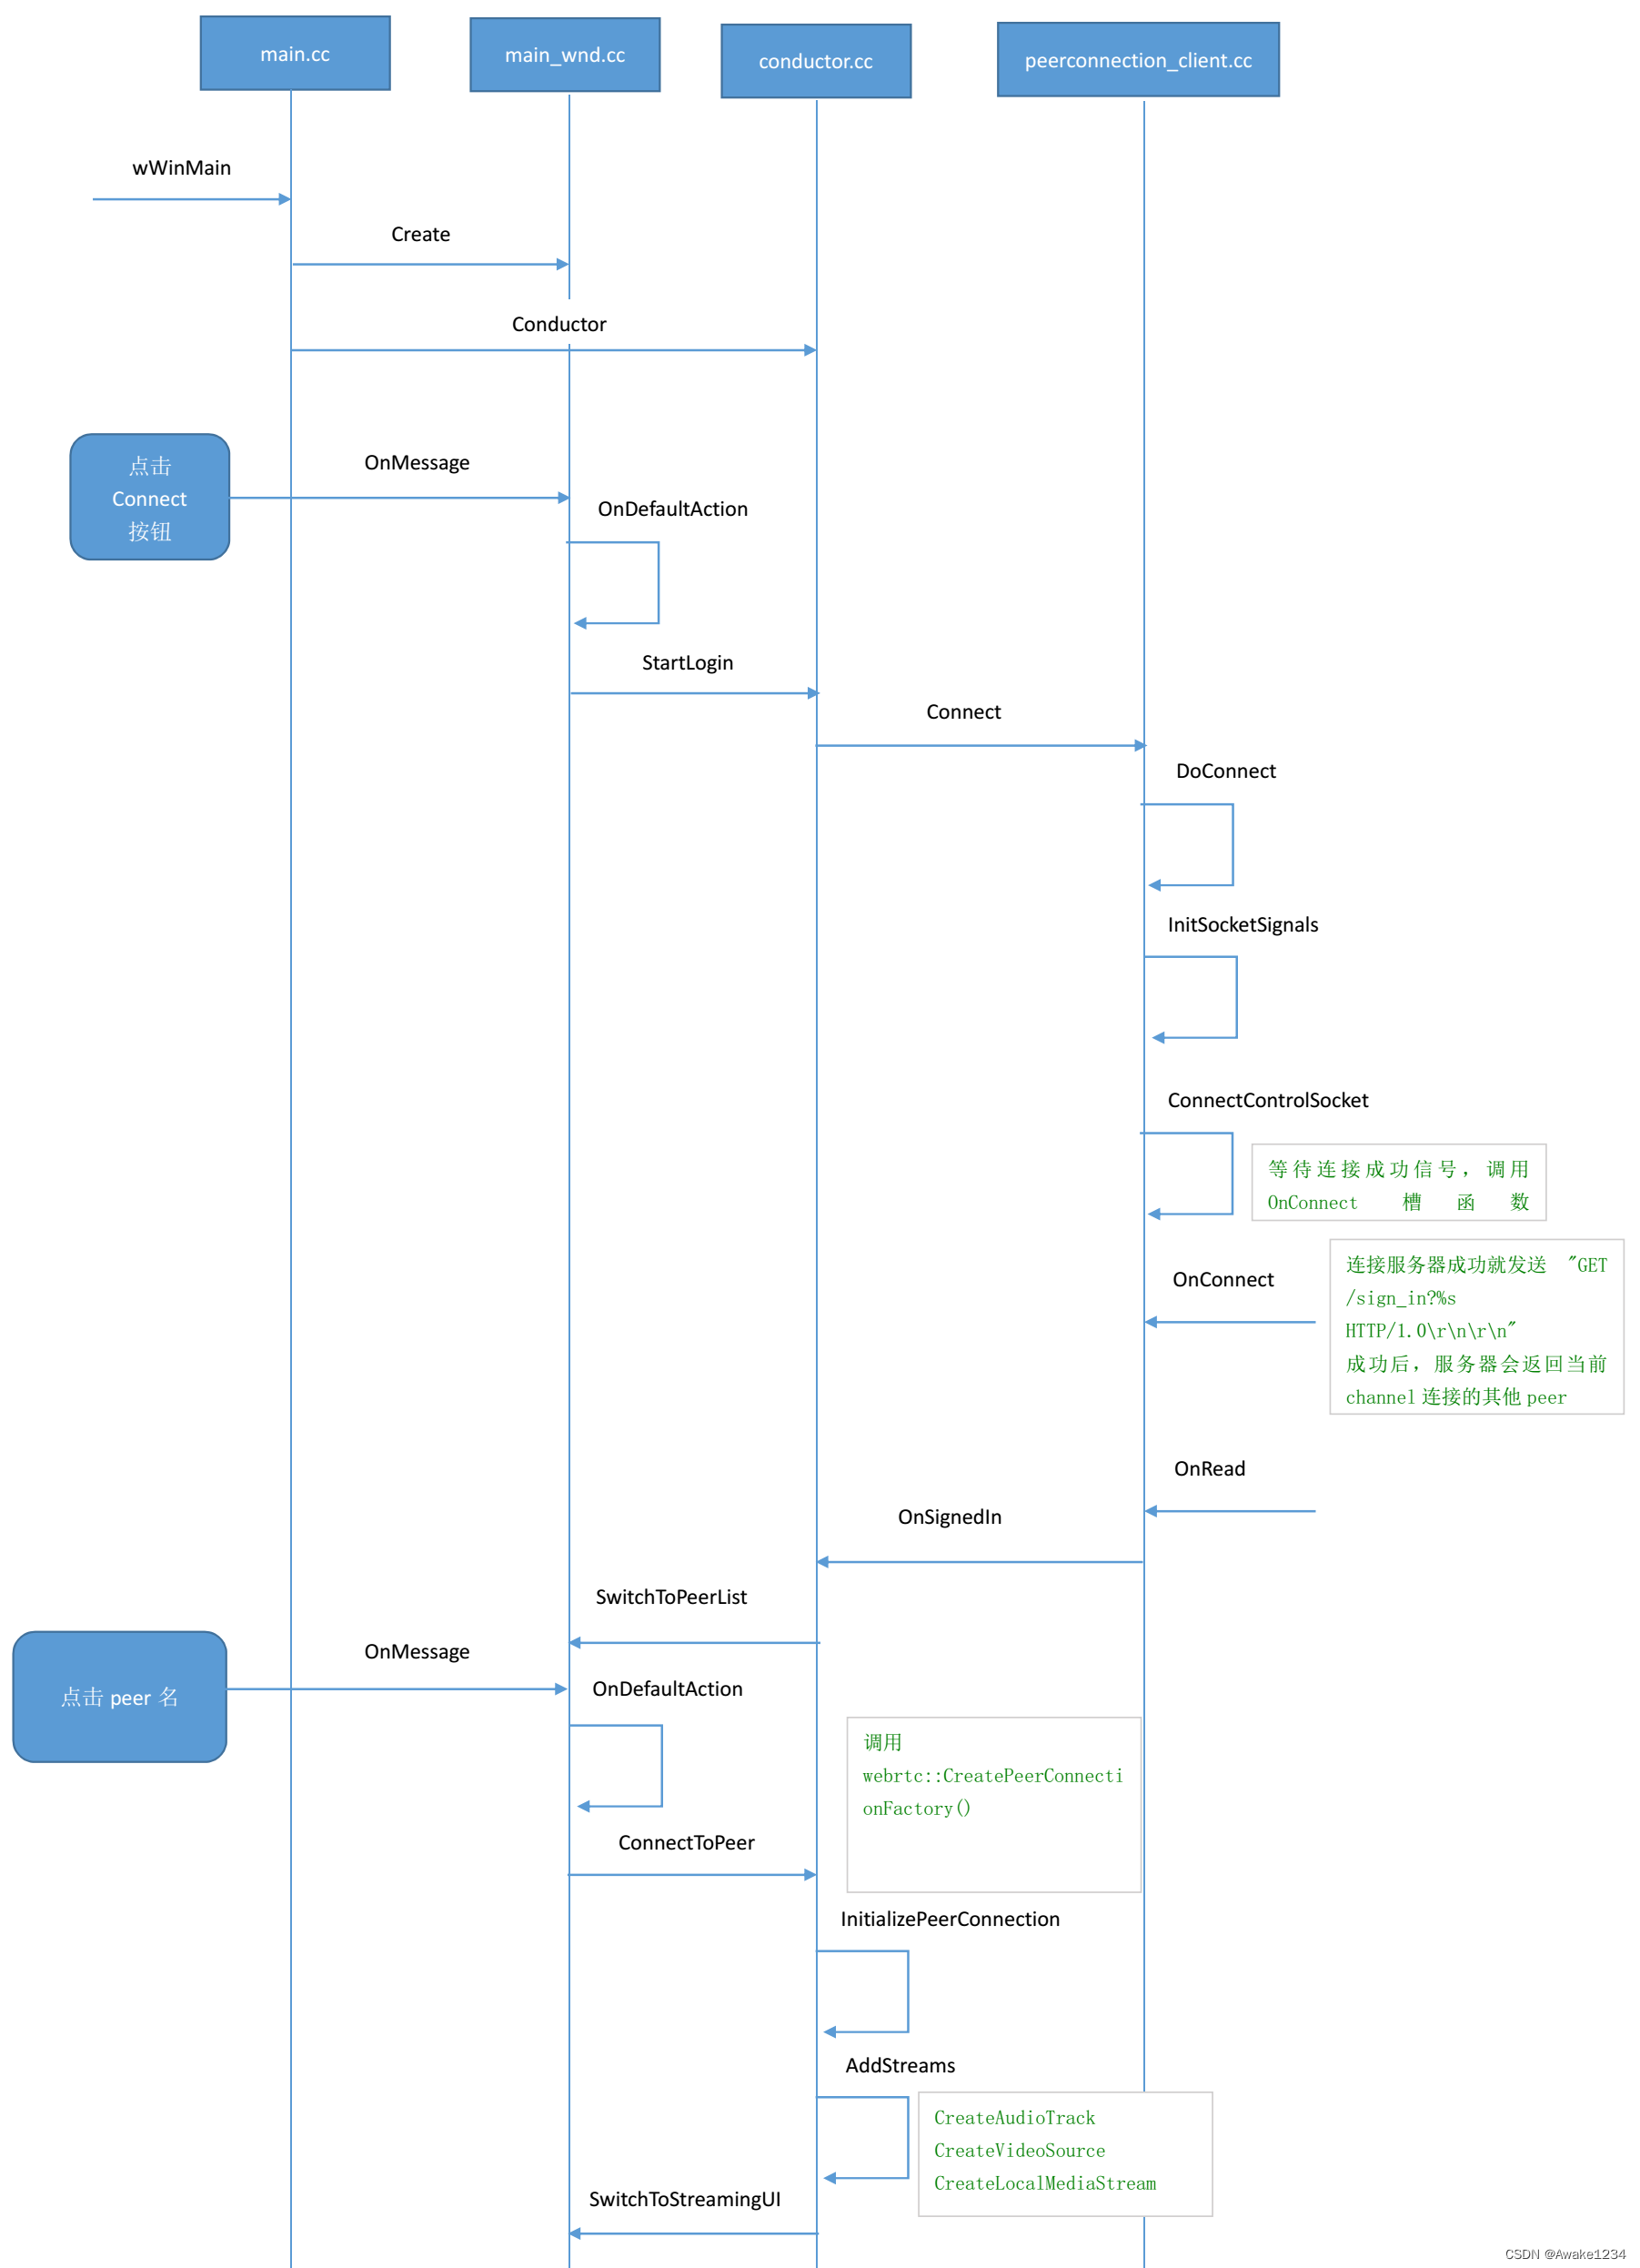
在上篇,我们已经介绍到双方的peerList中都已经出现了对端的item,下篇,我们将结合流程图来继续介绍双击item后触发的事件。
一、双击peer名
双击item后同样会在onMessage中处理,会判断发送消息的句柄是不是listbox_,然后会在OnDefaultAction()中处理。
bool MainWnd::OnMessage(UINT msg, WPARAM wp, LPARAM lp, LRESULT* result) {
  switch (msg) {
    //do something
    ...
    case WM_COMMAND:
      if (button_ == reinterpret_cast<HWND>(lp)) {
        if (BN_CLICKED == HIWORD(wp))
          OnDefaultAction();
      } else if (listbox_ == reinterpret_cast<HWND>(lp)) {
        if (LBN_DBLCLK == HIWORD(wp)) {
          OnDefaultAction();
        }
      }
      return true;
      ...
  return false;
}
在OnDefaultAction()中先获取当前被选中的item的index,然后从item之前设置的Data中获取对方的peer_id,再调用ConnectToPeer()函数去连接对端
void MainWnd::OnDefaultAction() {
  if (ui_ == CONNECT_TO_SERVER) {
     //do something
  } else if (ui_ == LIST_PEERS) {
    LRESULT sel = ::SendMessage(listbox_, LB_GETCURSEL, 0, 0);
    if (sel != LB_ERR) {
      LRESULT peer_id = ::SendMessage(listbox_, LB_GETITEMDATA, sel, 0);
      if (peer_id != -1 && callback_) {
        callback_->ConnectToPeer(peer_id);
      }
    }
  }
}
在ConnectToPeer()中我们需要重点关注
InitializePeerConnection()这个函数,前面我们讲了PeerConnection对象是webrtc的核心,这个函数内部就是去创建PeerConnection对象。
void Conductor::ConnectToPeer(int peer_id) {
  //do some check
  ...
  ...
  if (InitializePeerConnection()) {
    peer_id_ = peer_id;
    peer_connection_->CreateOffer(
        this, webrtc::PeerConnectionInterface::RTCOfferAnswerOptions());
  }
}
在创建PeerConnection之前需要先调用CreatePeerConnectionFactory()创建一个PeerConnectionFactory对象,前三个参数,如果没有特殊需求,则传入nullptr,Webrtc内部会创建默认线程。
- 网络线程工作在网络传输层,是专门用于处理网络收发包的线程,从网络接收的包会发给工作线程,工作线程要发送数据包也会交给网络线程.
- 工作线程工作在媒体引擎层,包含视频采集线程,视频渲染线程,视频编码线程,视频解码线程等。
- 信令线程工作在PeerConnection层,负责与应用层交互,例如createOffer,createAnswer等操作,并通知工作线程和网络线程相应的信号。
- 第四个参数default_adm用于音频设备的管理。
- 第五和六个参数用于设置音频的编解码器
- 第七和第八个参数用于设置视频的编解码器
- 第九个参数用于处理混音,不设置则使用默认音频混音器
- 第十个参数用于3A处理(回音消除,降噪,自动增益),不设置则使用默认值
bool Conductor::InitializePeerConnection() {
  peer_connection_factory_ = webrtc::CreatePeerConnectionFactory(
      nullptr /* network_thread */, nullptr /* worker_thread */,
      nullptr /* signaling_thread */, nullptr /* default_adm */,
      webrtc::CreateBuiltinAudioEncoderFactory(),
      webrtc::CreateBuiltinAudioDecoderFactory(),
      webrtc::CreateBuiltinVideoEncoderFactory(),
      webrtc::CreateBuiltinVideoDecoderFactory(), nullptr /* audio_mixer */,
      nullptr /* audio_processing */);
      ...
      ...
  if (!CreatePeerConnection(/*dtls=*/true)) {
    main_wnd_->MessageBox("Error", "CreatePeerConnection failed", true);
    DeletePeerConnection();
  }

  AddTracks();

  return peer_connection_ != nullptr;
}
当PeerConnectionFactory创建完成后,首先需要设置config的各项参数,然后peer_connection_factory_调用CreatePeerConnection() 创建PeerConnection对象。各参数含义可以见以下注释:
bool Conductor::CreatePeerConnection(bool dtls) {

  webrtc::PeerConnectionInterface::RTCConfiguration config;
  //设置SDP的格式为PlanB或者UnifiedPlan
  config.sdp_semantics = webrtc::SdpSemantics::kUnifiedPlan;
  //设置底层数据加密传输方式,webrtc底层有dtls_srtp和SDES,推荐使用dtls_srtp
  config.enable_dtls_srtp = dtls;
  webrtc::PeerConnectionInterface::IceServer server;
  //指定Stun服务器的地址
  server.uri = GetPeerConnectionString();
  config.servers.push_back(server);
  //参数1:config,上面设置一些配置信息
  //参数2:allocator,网络端口分配器,用于给每个Candidate分配端口用的,nullptr使用默认分配器,建议使用默认值
  //参数3:cert_generator,证书生成器,只有需要生成特定证书的时候才使用该参数,所以也建议使用默认值,传nullptr
  //参数4:observer,PeerConnection的观察者,这里设置Conductor对象,可以对PeerConnection各种事件做出响应。
  peer_connection_ = peer_connection_factory_->CreatePeerConnection(
      config, nullptr, nullptr, this);
  return peer_connection_ != nullptr;
}
在PeerConnection创建好之后,还有一个关键的步骤就是添加本地音视频轨,如果没有添加本地音视频轨,WebRTC内部就无法为其产生带有媒体信息的SDP,媒体协商就会失败,其操作是在Conductor的AddTrack()中执行的:
-
创建音频轨,调用PeerConnectionFactory对象的
CreateAudioTrack()方法,参数1是音频标识字符,参数2是AudioSource指针,AudioSource是指可以提供音频数据来源的对象,通过CreateAudioSource()生成,这样就可以完成audiotrack和audiosource的绑定。生成audio_track之后就可以调用AddTrack(),参数2是streamId是用来标识一个audiostream,可以将track添加到stream中,最后切换界面到聊天界面。
void Conductor::AddTracks() {

if (!peer_connection_->GetSenders().empty()) {
    return;  // Already added tracks.
  }

  rtc::scoped_refptr<webrtc::AudioTrackInterface> audio_track(
      peer_connection_factory_->CreateAudioTrack(
          kAudioLabel, peer_connection_factory_->CreateAudioSource(
                           cricket::AudioOptions())));
  auto result_or_error = peer_connection_->AddTrack(audio_track, {kStreamId});
  if (!result_or_error.ok()) {
    RTC_LOG(LS_ERROR) << "Failed to add audio track to PeerConnection: "
                      << result_or_error.error().message();
  }

  rtc::scoped_refptr<CapturerTrackSource> video_device =
      CapturerTrackSource::Create();
  if (video_device) {
    rtc::scoped_refptr<webrtc::VideoTrackInterface> video_track_(
        peer_connection_factory_->CreateVideoTrack(kVideoLabel, video_device));
    main_wnd_->StartLocalRenderer(video_track_);

    result_or_error = peer_connection_->AddTrack(video_track_, {kStreamId});
    if (!result_or_error.ok()) {
      RTC_LOG(LS_ERROR) << "Failed to add video track to PeerConnection: "
                        << result_or_error.error().message();
    }
  } else {
    RTC_LOG(LS_ERROR) << "OpenVideoCaptureDevice failed";
  }

  main_wnd_->SwitchToStreamingUI();
}
在音视频轨道添加到PeerConnection对象之后,就可以调用CreateOffer()生成SDP信息。参数1是SDP生成事件的观察者,传入的是Conductor对象。参数2是媒体协商选项,比如是否开启静音检测,RTCP和RTP端口是否复用等。
void PeerConnection::CreateOffer(CreateSessionDescriptionObserver* observer,
                                 const RTCOfferAnswerOptions& options) {
  RTC_DCHECK_RUN_ON(signaling_thread());
  sdp_handler_->CreateOffer(observer, options);
}
当成功创建SDP后,Webrtc就会回调Conductor对象的OnSuccess()方法,首先调用SetLocalDescription() 设置本地会话描述,然后将SDP通过信令发送给对端。如果SDP创建失败,则回调Conductor的OnFailure()方法。
void Conductor::OnSuccess(webrtc::SessionDescriptionInterface* desc) {
  peer_connection_->SetLocalDescription(
      DummySetSessionDescriptionObserver::Create(), desc);

  std::string sdp;
  desc->ToString(&sdp);

  //loopback test
  ...
  ...

  Json::StyledWriter writer;
  Json::Value jmessage;
  jmessage[kSessionDescriptionTypeName] =
      webrtc::SdpTypeToString(desc->GetType());
  jmessage[kSessionDescriptionSdpName] = sdp;
  SendMessage(writer.write(jmessage));
}
我们可以通过设置断点的方式,来查看获取到的sdp究竟是什么,想要知道具体含义的可以自己去断点操作,并对照SDP字段含义去解读。
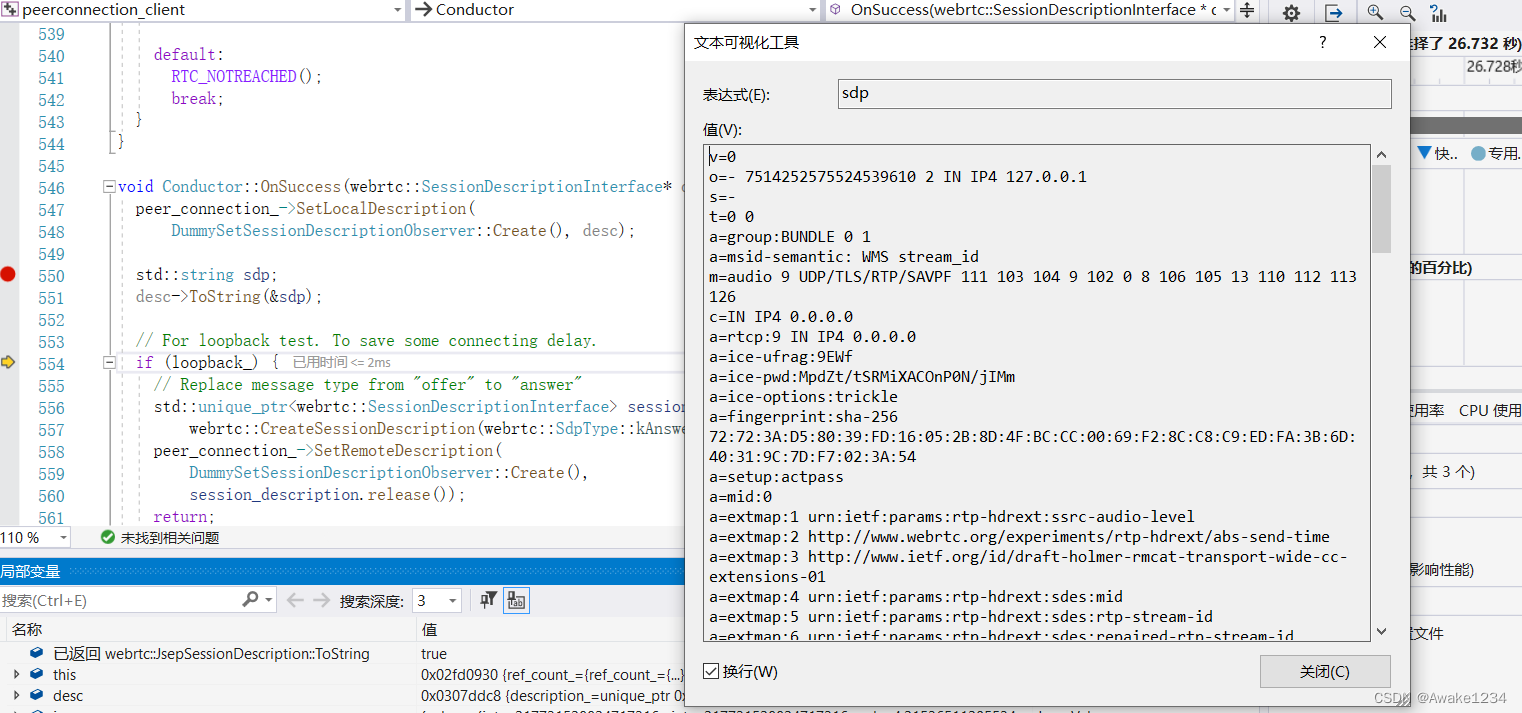
当对端收到会话描述之后,主要进行两步操作:1.SetRemoteDescription()设置远端会话描述 2.CreateAnswer()创建自己的sdp,并且发送给对端。
void Conductor::OnMessageFromPeer(int peer_id, const std::string& message) {
  //do some check
  std::string type_str;
  std::string json_object;
  rtc::GetStringFromJsonObject(jmessage, kSessionDescriptionTypeName,
                               &type_str);
  if (!type_str.empty()) {

    webrtc::SdpType type = *type_maybe;
    std::string sdp;
    if (!rtc::GetStringFromJsonObject(jmessage, kSessionDescriptionSdpName,
                                      &sdp)) {
      return;
    }
    webrtc::SdpParseError error;

    std::unique_ptr<webrtc::SessionDescriptionInterface> session_description =
        webrtc::CreateSessionDescription(type, sdp, &error);
    if (!session_description) {
      return;
    }
    //设置远端会话描述
    peer_connection_->SetRemoteDescription(
        DummySetSessionDescriptionObserver::Create(),
        session_description.release());
    if (type == webrtc::SdpType::kOffer) {
      //创建answer sdp
      peer_connection_->CreateAnswer(
          this, webrtc::PeerConnectionInterface::RTCOfferAnswerOptions());
    }
  }
}
二、ICE建立过程
整个ICE的建立过程主要是在Transport层,而且类与类之间的关系比较复杂,首先我们先要来看一下几个关键类的作用,然后再从代码的层面来观察调用堆栈。
核心类
-
先介绍一个最重要的类
P2PTransportChannel
,它主要负责P2P local candidate,reflex candidate的收集,Connection连接建立等,
这个是必须要创建的
-
JsepTransportController
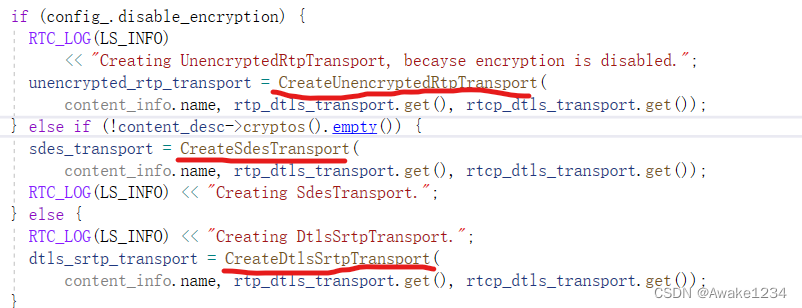
,遵循JSEP规范(JavaScript Session Establishment Protocol,JavaScript会话建立协议),负责管理各种类型的Transport对象的创建,获取和销毁,是PeerConnection到Transport层的入口. - 根据SDP中指定的协议类型创建Transport对象,举个例子,假设sdp中m属性如下m=audio 9 UDP/TLS/RTP/SAVPF 111 103 104 9 102 0 8 106 105 13 110 112 113 126, 有UDP/DTLS标记,会创建一个DtlsSrtpTransport对象,当连接建立以后,需要进行DTLS会话协商,协商成功后,才会转到SrtpTransport,对RTP数据包进行加密传输,如果没有UDP/DTLS标记,如果config_,disable_encryption为false,则会创建一个SrtpTransport对象,只是对RTP数据包进行加密。如果config_disable_encrtyption为true时则创建一个RtpTransport对象,不加密RTP数据.
-
创建transport流程
这里首先放一张各类型transport创建的流程图,可以方便我们更好的理解:
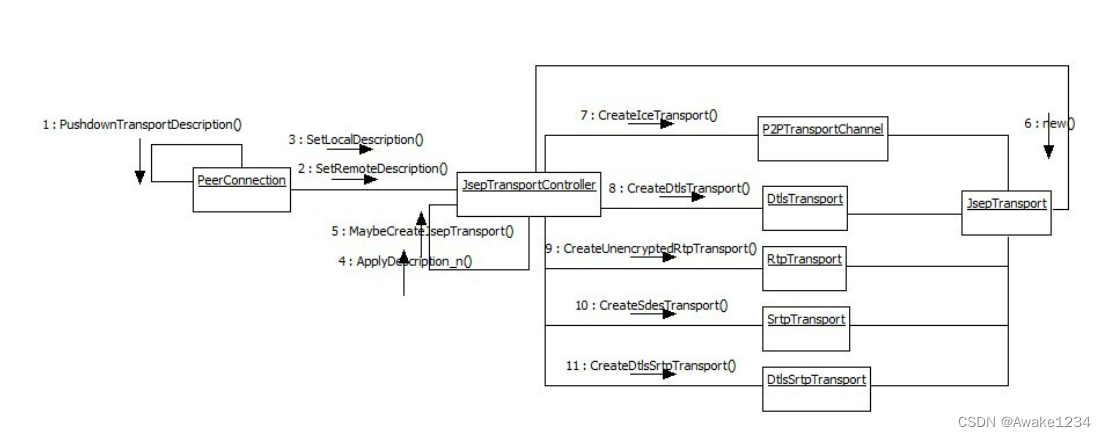
然后我们来看一下创建各种Transport的函数调用堆栈,下面是以localdescription生成成功后为例,一步一步追踪JsepTransportController::MaybeCreateJsepTransport()函数中,在此函数中就包含了根据sdp创建各种transport对象的逻辑,可以仔细去看看.然后也是在这里创建了接下来收集candidate需要使用的对象
P2PTransportChannel.
conductor::OnSuccess()
PeerConnection::SetLocalDescription()
SdpOfferAnswerHandler::SetLocalDescription()
SdpOfferAnswerHandler::DoSetLocalDescription()
SdpOfferAnswerHandler::ApplyLocalDescription()
SdpOfferAnswerHandler::PushdownTransportDescription()
JsepTransportController::SetLocalDescription()
JsepTransportController::ApplyDescription_n()
JsepTransportController::MaybeCreateJsepTransport()
收集candidate
conductor::OnSuccess()
PeerConnection::SetLocalDescription()
SdpOfferAnswerHandler::SetLocalDescription()
SdpOfferAnswerHandler::DoSetLocalDescription()
JsepTransportController::MaybeStartGathering()
P2PTransportChannel::MaybeStartGathering()
BasicPortAllocatorSession::StartGettingPorts()
BasicPortAllocatorSession::DoAllocate()
建立连接
整个建立连接的过程比较复杂,详细可以参考这篇文章
webrtc源码分析-ICE交互连接
视频数据采集
当网络连接建立成功之后,就会开始不断地将音视频数据发送给对端,我们来看一下视频采集和渲染的流程
视频的采集与渲染
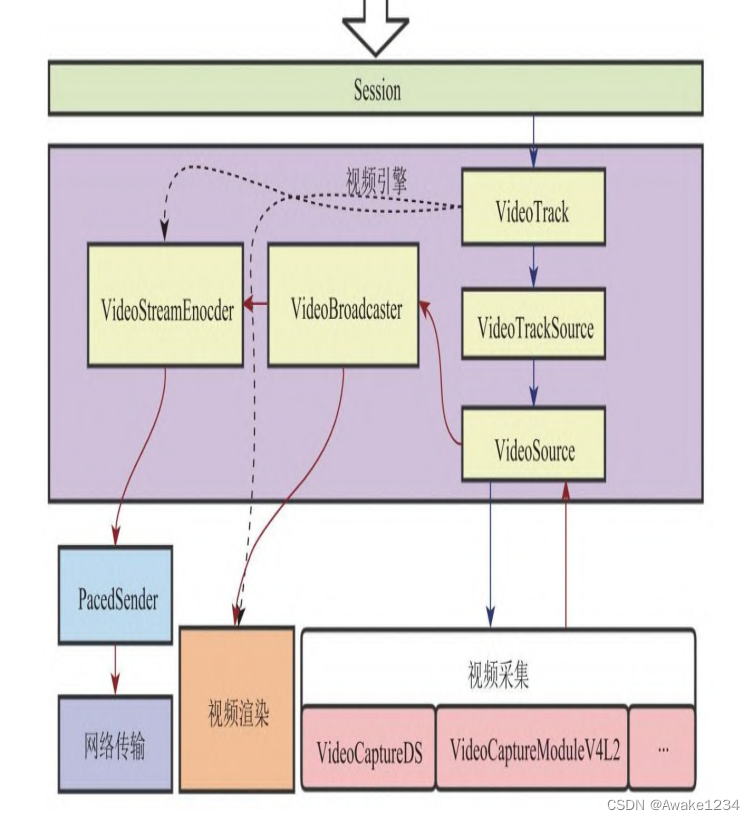
从上图可以看到,整个流程包括
视频采集,视频引擎,网络传输和视频渲染
等模块组成。
视频采集模块根据不同的操作系统使用不同的模块,比如Windows系统使用DirectShow,Linux系统使用V4L2,Android系统使用Camera1和Camera2。
视频引擎层是值得我们重点关注的,他串联了整个视频采集发送和渲染的流程。VideoTrack可以抽象成一个管道,管道的一头连接的是视频源(VideoTrackSource),另一头连接的是编码器(VideoStreamEncoder)发送给对端,或者是本地预览窗口进行渲染。本地渲染的绑定流程的代码实现如下:
Conductor::AddTracks(){
...
rtc::scoped_refptr<CapturerTrackSource> video_device =
      CapturerTrackSource::Create();
  if (video_device) {
    rtc::scoped_refptr<webrtc::VideoTrackInterface> video_track_(
        peer_connection_factory_->CreateVideoTrack(kVideoLabel, video_device));
    main_wnd_->StartLocalRenderer(video_track_);

    result_or_error = peer_connection_->AddTrack(video_track_, {kStreamId});
  }
}
...
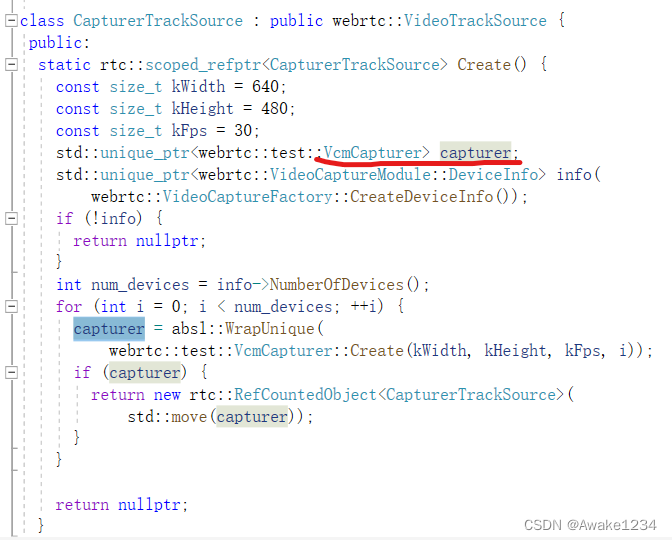
接下来要讲的是VideoTrackSource,但是它只是一个抽象对象,真正实现功能的是VideoSource,它会调用VideoCapture驱动设备,最终从摄像头采集数据。在CaptureTrackSource::Create()函数中的实现如下,我们可以看到最终返回的对象是这个VcmCapturer对象,这个对象的祖父类就是VideoSourceInterface.
下图介绍了VcmCapturer是如何将其他类都串联起来的,当用户创建VideoTrack并为其设置视频源的时候,就创建了一个VcmCapturer对象,该对象中包含了用于数据分发的VideoBroadcaster对象,视频数据则是由VideoCaptureModule对象驱动摄像头获取的。当应用层为VideoTrack设置本地预览窗口时,会通过AddOrUpdateSink()将窗口传递到VideoBroadcaster中,传递路径如下图虚线所示。当VideoCaptureModule采集到视频数据之后,会通过回调的方式将数据传递给VcmCapturer,而VcmCapturer则将数据转交给VideoBroadcaster进行分发,最终将数据发给本地预览。当与远端视频通话时,VideoBroadcaster则会在数据分发时复制一份给VideoStreamEncoder.

以下是VideoBroadcaster的视频数据回调函数
void VideoBroadcaster::OnFrame(const webrtc::VideoFrame& frame) {
  webrtc::MutexLock lock(&sinks_and_wants_lock_);
  bool current_frame_was_discarded = false;
  for (auto& sink_pair : sink_pairs()) {
    if (sink_pair.wants.rotation_applied &&
        frame.rotation() != webrtc::kVideoRotation_0) {
      // Calls to OnFrame are not synchronized with changes to the sink wants.
      // When rotation_applied is set to true, one or a few frames may get here
      // with rotation still pending. Protect sinks that don't expect any
      // pending rotation.
      RTC_LOG(LS_VERBOSE) << "Discarding frame with unexpected rotation.";
      sink_pair.sink->OnDiscardedFrame();
      current_frame_was_discarded = true;
      continue;
    }
    if (sink_pair.wants.black_frames) {
      webrtc::VideoFrame black_frame =
          webrtc::VideoFrame::Builder()
              .set_video_frame_buffer(
                  GetBlackFrameBuffer(frame.width(), frame.height()))
              .set_rotation(frame.rotation())
              .set_timestamp_us(frame.timestamp_us())
              .set_id(frame.id())
              .build();
      sink_pair.sink->OnFrame(black_frame);
    } else if (!previous_frame_sent_to_all_sinks_ && frame.has_update_rect()) {
      // Since last frame was not sent to some sinks, no reliable update
      // information is available, so we need to clear the update rect.
      webrtc::VideoFrame copy = frame;
      copy.clear_update_rect();
      sink_pair.sink->OnFrame(copy);
    } else {
      sink_pair.sink->OnFrame(frame);
    }
  }
  previous_frame_sent_to_all_sinks_ = !current_frame_was_discarded;
}
总结
以上就是关于ICE建立和视频数据采集的源码分析,由于篇幅原因不能将webrtc的源码分析讲的特别细致,深入分析还得靠读者自己去看。