集合:对象的容器,定义了对多个对象进项操作的的常用方法。可实现数组的功能。
和数组的区别:
- 数组长度固定,集合长度不固定。
- 数组可以存储基本类型和引用类型,集合只能存储引用类型。
位置: java.util.*;
Collection体系集合
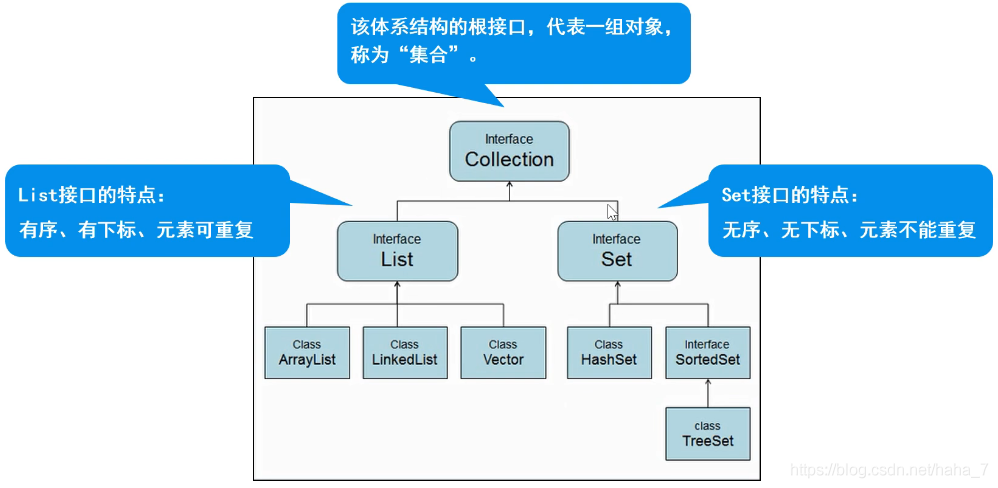
Collection父接口
**特点:**代表一组任意类型的对象,无序、无下标、不能重复。
方法:
boolean add(Object obj) //添加一个对象。
boolean addAll(Collection c) //讲一个集合中的所有对象添加到此集合中。
void clear() //清空此集合中的所有对象。
boolean contains(Object o) //检查此集合中是否包含o对象。
boolean equals(Object o) //比较此集合是否与指定对象相等。
boolean isEmpty() //判断此集合是否为空。
boolean remove(Object o) //在此集合中移除o对象。
int size() //返回此集合中的元素个数。
Object[] toArray() //姜此集合转换成数组。
实现:
/**
 * Collection接口的使用(一)
 * 1.添加元素
 * 2.删除元素
 * 3.遍历元素
 * 4.判断
 */
public class Demo1{
    pubic static void main(String[] args){
        //创建集合
        Collection collection=new ArrayList();
//      * 1.添加元素
        Collection.add("苹果");
        Collection.add("西瓜");
        Collection.add("榴莲");
        System.out.println("元素个数:"+collection.size());
        System.out.println(collection);
//      * 2.删除元素
        collection.remove("榴莲");
        System.out.println("删除之后:"+collection.size());
//      * 3.遍历元素
        //3.1 使用增强for
        for(Object object : collection){
            System.out.println(object);
        }
        //3.2 使用迭代器(迭代器专门用来遍历集合的一种方式)
        //hasnext();判断是否有下一个元素
        //next();获取下一个元素
        //remove();删除当前元素
        Iterator iterator=collection.Itertor();
        while(iterator.hasnext()){
            String object=(String)iterator.next();
            System.out.println(s);
            //删除操作
            //collection.remove(s);引发错误:并发修改异常
            //iterator.remove();应使用迭代器的方法
//      * 4.判断
        System.out.println(collection.contains("西瓜"));//true
        System.out.println(collection.isEmpty());//false
        }
    }
}
/**
 * Collection接口的使用(二)
 * 1.添加元素
 * 2.删除元素
 * 3.遍历元素
 * 4.判断
 */
public class Demo2 {
	public static void main(String[] args) {
		Collection collection=new ArrayList();
		Student s1=new Student("张三",18);
		Student s2=new Student("李四", 20);
		Student s3=new Student("王五", 19);
		//1.添加数据
		collection.add(s1);
		collection.add(s2);
		collection.add(s3);
		//collection.add(s3);可重复添加相同对象
		System.out.println("元素个数:"+collection.size());
		System.out.println(collection.toString());
		//2.删除数据
		collection.remove(s1);
		System.out.println("删除之后:"+collection.size());
		//3.遍历数据
		//3.1 增强for
		for(Object object:collection) {
			Student student=(Student) object;
			System.out.println(student.toString());
		}
		//3.2迭代器
		//迭代过程中不能使用collection的删除方法
		Iterator iterator=collection.iterator();
		while (iterator.hasNext()) {
			Student student=(Student) iterator.next();
			System.out.println(student.toString());
		}
		//4.判断和上一块代码类似。
	}
}
/**
 * 学生类
 */
public class Student {
	private String name;
	private int age;
	public Student(String name, int age) {
		super();
		this.name = name;
		this.age = age;
	}
	public String getName() {
		return name;
	}
	public void setName(String name) {
		this.name = name;
	}
	public int getAge() {
		return age;
	}
	public void setAge(int age) {
		this.age = age;
	}
	@Override
	public String toString() {
		return "Student [name=" + name + ", age=" + age +"]";
	}
}
Collection子接口
List集合
特点:有序、有下标、元素可以重复。
方法:
void add(int index,Object o) //在index位置插入对象o。
boolean addAll(index,Collection c) //将一个集合中的元素添加到此集合中的index位置。
Object get(int index) //返回集合中指定位置的元素。
List subList(int fromIndex,int toIndex) //返回fromIndex和toIndex之间的集合元素。
实现:
/**
 * List子接口的使用(一)
 * 特点:1.有序有下标 2.可以重复
 *
 * 1.添加元素
 * 2.删除元素
 * 3.遍历元素
 * 4.判断
 * 5.获取位置
 */
public class Demo3 {
	public static void main(String[] args) {
		List list=new ArrayList<>();
		//1.添加元素
		list.add("tang");
		list.add("he");
		list.add(0,"yu");//插入操作
		System.out.println("元素个数:"+list.size());
		System.out.println(list.toString());
		//2.删除元素
		list.remove(0);
		//list.remove("yu");结果同上
		System.out.println("删除之后:"+list.size());
		System.out.println(list.toString());
		//3.遍历元素
		//3.1 使用for遍历
		for(int i=0;i<list.size();++i) {
			System.out.println(list.get(i));
		}
		//3.2 使用增强for
		for(Object object:list) {
			System.out.println(object);
		}
		//3.3 使用迭代器
		Iterator iterator=list.iterator();
		while (iterator.hasNext()) {
			System.out.println(iterator.next());
		}
		//3.4使用列表迭代器,listIterator可以双向遍历,添加、删除及修改元素。
		ListIterator listIterator=list.listIterator();
		//从前往后
		while (listIterator.hasNext()) {
			System.out.println(listIterator.next());
		}
		//从后往前(此时“遍历指针”已经指向末尾)
		while(listIterator.hasPrevious()) {
			System.out.println(listIterator.previous());
		}
		//4.判断
		System.out.println(list.isEmpty());
		System.out.println(list.contains("tang"));
		//5.获取位置
		System.out.println(list.indexOf("tang"));
	}
}
/**
 * List子接口的使用(二)
 * 1.添加元素
 * 2.删除元素
 * 3.遍历元素
 * 4.判断
 * 5.获取位置
 */
public class Demo4 {
	public static void main(String[] args) {
		List list=new ArrayList();
		//1.添加数字数据(自动装箱)
		list.add(20);
		list.add(30);
		list.add(40);
		list.add(50);
		System.out.println("元素个数:"+list.size());
		System.out.println(list.toString());
		//2.删除元素
		list.remove(0);
		//list.remove(20);很明显数组越界错误,改成如下
		//list.remove(Object(20));
		//list.remove(new Integer(20));
		System.out.println("元素个数:"+list.size());
		System.out.println(list.toString());
		//3-5不再演示,与之前类似
		//6.补充方法subList,返回子集合,含头不含尾
		List list2=list.subList(1, 3);
		System.out.println(list2.toString());
	}
}
List实现类
ArrayList【重点】
数组结构实现,查询块、增删慢;
JDK1.2版本,运行效率快、线程不安全。
/**
 * ArrayList的使用
 * 存储结构:数组;
 * 特点:查找遍历速度快,增删慢。
 * 1.添加元素
 * 2.删除元素
 * 3.遍历元素
 * 4.判断
 * 5.查找
 */
public class Demo5 {
	public static void main(String[] args) {
		ArrayList arrayList=new ArrayList<>();
		//1.添加元素
		Student s1=new Student("唐", 21);
		Student s2=new Student("何", 22);
		Student s3=new Student("余", 21);
		arrayList.add(s1);
		arrayList.add(s2);
		arrayList.add(s3);
		System.out.println("元素个数:"+arrayList.size());
		System.out.println(arrayList.toString());
		//2.删除元素
		arrayList.remove(s1);
		//arrayList.remove(new Student("唐", 21));
		//注:这样可以删除吗(不可以)?显然这是两个不同的对象。
		//假如两个对象属性相同便认为其是同一对象,那么如何修改代码?
		//3.遍历元素
		//3.1使用迭代器
		Iterator iterator=arrayList.iterator();
		while(iterator.hasNext()) {
			System.out.println(iterator.next());
		}
		//3.2使用列表迭代器
		ListIterator listIterator=arrayList.listIterator();
		//从前往后遍历
		while(listIterator.hasNext()) {
			System.out.println(listIterator.next());
		}
		//从后往前遍历
		while(listIterator.hasPrevious()) {
			System.out.println(listIterator.previous());
		}
		//4.判断
		System.out.println(arrayList.isEmpty());
		//System.out.println(arrayList.contains(new Student("何", 22)));
		//注:与上文相同的问题。
		//5.查找
		System.out.println(arrayList.indexOf(s1));
	}
}
注:Object里的equals(this==obj)用地址和当前对象比较,如果想实现代码中的问题,可以在学生类中重写equals方法:
@Override
public boolean equals(Object obj) {
	//1.是否为同一对象
	if (this==obj) {
		return true;
	}
	//2.判断是否为空
	if (obj==null) {
		return false;
	}
	//3.判断是否是Student类型
	if (obj instanceof Student) {
		Student student=(Student) obj;
		//4.比较属性
		if(this.name.equals(student.getName())&&this.age==student.age) {
			return true;
		}
	}
	//不满足,返回false
	return false;
}
ArrayList源码分析
- 默认容量大小:private static final int DEFAULT_CAPACITY = 10;
- 存放元素的数组:transient Object[] elementData;
- 实际元素个数:private int size;
- 创建对象时调用的无参构造函数:
//这是一个空的数组
private static final Object[] DEFAULTCAPACITY_EMPTY_ELEMENTDATA = {};
public ArrayList() {
    this.elementData = DEFAULTCAPACITY_EMPTY_ELEMENTDATA;
}
这段源码说明当你没有向集合中添加任何元素时,集合容量为0。那么默认的10个容量怎么来的呢?
这就得看看add方法的源码了:
public boolean add(E e) {
    ensureCapacityInternal(size + 1);  // Increments modCount!!
    elementData[size++] = e;
    return true;
}
假设你new了一个数组,当前容量为0,size当然也为0。这时调用add方法进入到ensureCapacityInternal(size + 1);该方法源码如下:
private void ensureCapacityInternal(int minCapacity) {
    ensureExplicitCapacity(calculateCapacity(elementData, minCapacity));
}
该方法中的参数minCapacity传入的值为size+1也就是 1,接着我们再进入到calculateCapacity(elementData, minCapacity)里面:
private static int calculateCapacity(Object[] elementData, int minCapacity) {
    if (elementData == DEFAULTCAPACITY_EMPTY_ELEMENTDATA) {
        return Math.max(DEFAULT_CAPACITY, minCapacity);
    }
    return minCapacity;
}
上文说过,elementData就是存放元素的数组,当前容量为0,if条件成立,返回默认容量DEFAULT_CAPACITY也就是10。这个值作为参数又传入ensureExplicitCapacity()方法中,进入该方法查看源码:
private void ensureExplicitCapacity(int minCapacity) {
    modCount++;
    // overflow-conscious code
    if (minCapacity - elementData.length > 0)
        grow(minCapacity);
}
因为elementData数组长度为0,所以if条件成立,调用grow方法,重要的部分来了,我们再次进入到grow方法的源码中:
private void grow(int minCapacity) {
    // overflow-conscious code
    int oldCapacity = elementData.length;
    int newCapacity = oldCapacity + (oldCapacity >> 1);
    if (newCapacity - minCapacity < 0)
        newCapacity = minCapacity;
    if (newCapacity - MAX_ARRAY_SIZE > 0)
        newCapacity = hugeCapacity(minCapacity);
    // minCapacity is usually close to size, so this is a win:
    elementData = Arrays.copyOf(elementData, newCapacity);
}
这个方法先声明了一个oldCapacity变量将数组长度赋给它,其值为0;又声明了一个newCapacity变量其值为oldCapacity+一个增量,可以发现这个增量是和原数组长度有关的量,当然在这里也为0。第一个if条件满足,newCapacity的值为10(这就是默认的容量,不理解的话再看看前面)。第二个if条件不成立,也可以不用注意,因为MAX_ARRAY_SIZE的定义如下:
private static final int MAX_ARRAY_SIZE = Integer.MAX_VALUE - 8;
这个值太大了以至于第二个if条件没有了解的必要。
最后一句话就是为elementData数组赋予了新的长度,Arrays.copyOf()方法返回的数组是新的数组对象,原数组对象不会改变,该拷贝不会影响原来的数组。copyOf()的第二个自变量指定要建立的新数组长度,如果新数组的长度超过原数组的长度,则保留数组默认值。
这时候再回到add的方法中,接着就向下执行elementData[size++] = e;到这里为止关于ArrayList就讲解得差不多了,当数组长度为10的时候你们可以试着过一下源码,查一下每次的增量是多少(答案是每次扩容为原来的1.5倍)。
Vector
- 数组结构实现,查询快、增删慢;
- JDK1.0版本,运行效率慢、线程安全。
/**
 * Vector的演示使用
 *
 *1.添加数据
 *2.删除数据
 *3.遍历
 *4.判断
 */
public class Demo1 {
	public static void main(String[] args) {
		Vector vector=new Vector<>();
		//1.添加数据
		vector.add("tang");
		vector.add("he");
		vector.add("yu");
		System.out.println("元素个数:"+vector.size());
		//2.删除数据
		/*
		 * vector.remove(0); vector.remove("tang");
		 */
		//3.遍历
		//使用枚举器
		Enumeration enumeration=vector.elements();
		while (enumeration.hasMoreElements()) {
			String s = (String) enumeration.nextElement();
			System.out.println(s);
		}
		//4.判断
		System.out.println(vector.isEmpty());
		System.out.println(vector.contains("he"));
		//5. Vector其他方法
		//firstElement()  lastElement()  ElementAt();
	}
}
LinkedList
- 链表结构实现,增删快,查询慢。
/**
 * LinkedList的用法
 * 存储结构:双向链表
 * 1.添加元素
 * 2.删除元素
 * 3.遍历
 * 4.判断
 */
public class Demo2 {
	public static void main(String[] args) {
		LinkedList linkedList=new LinkedList<>();
		Student s1=new Student("唐", 21);
		Student s2=new Student("何", 22);
		Student s3=new Student("余", 21);
		//1.添加元素
		linkedList.add(s1);
		linkedList.add(s2);
		linkedList.add(s3);
		linkedList.add(s3);
		System.out.println("元素个数:"+linkedList.size());
		System.out.println(linkedList.toString());
		//2.删除元素
		/*
		 * linkedList.remove(new Student("唐", 21));
		 * System.out.println(linkedList.toString());
		 */
		//3.遍历
		//3.1 使用for
		for(int i=0;i<linkedList.size();++i) {
			System.out.println(linkedList.get(i));
		}
		//3.2 使用增强for
		for(Object object:linkedList) {
			Student student=(Student) object;
			System.out.println(student.toString());
		}
		//3.3 使用迭代器
		Iterator iterator =linkedList.iterator();
		while (iterator.hasNext()) {
			Student student = (Student) iterator.next();
			System.out.println(student.toString());
		}
		//3.4 使用列表迭代器(略)
		//4. 判断
		System.out.println(linkedList.contains(s1));
		System.out.println(linkedList.isEmpty());
		System.out.println(linkedList.indexOf(s3));
	}
}
LinkedList源码分析
LinkedList首先有三个属性:
- 链表大小:transient int size = 0;
- (指向)第一个结点/头结点:transient Node first;
- (指向)最后一个结点/尾结点:transient Node last;
关于Node类型我们再进入到类里看看:
private static class Node<E> {
    E item;
    Node<E> next;
    Node<E> prev;

    Node(Node<E> prev, E element, Node<E> next) {
        this.item = element;
        this.next = next;
        this.prev = prev;
    }
}
首先item存放的是实际数据;next指向下一个结点而prev指向上一个结点。
Node带参构造方法的三个参数分别是前一个结点、存储的数据、后一个结点,调用这个构造方法时将它们赋值给当前对象。
LinkedList是如何添加元素的呢?先看看add方法:
public boolean add(E e) {
    linkLast(e);
    return true;
}
进入到linkLast方法:
void linkLast(E e) {
    final Node<E> l = last;
    final Node<E> newNode = new Node<>(l, e, null);
    last = newNode;
    if (l == null)
        first = newNode;
    else
        l.next = newNode;
    size++;
    modCount++;
}
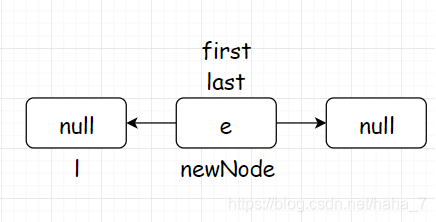
假设刚开始new了一个LinkedList对象,first和last属性都为空,调用add进入到linkLast方法。
首先创建一个Node变量 l 将last(此时为空)赋给它,然后new一个newNode变量存储数据,并且它的前驱指向l,后继指向null;再把last指向newNode。如下图所示:

如果满足if条件,说明这是添加的第一个结点,将first指向newNode:
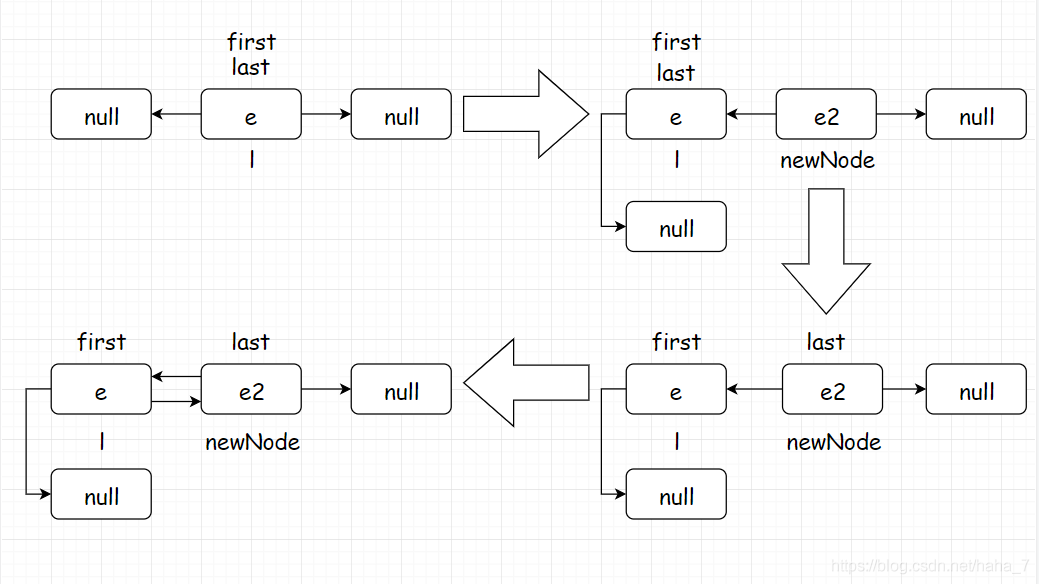
至此,LinkedList对象的第一个数据添加完毕。假设需要再添加一个数据,我们可以再来走一遍,过程同上不再赘述,图示如下:
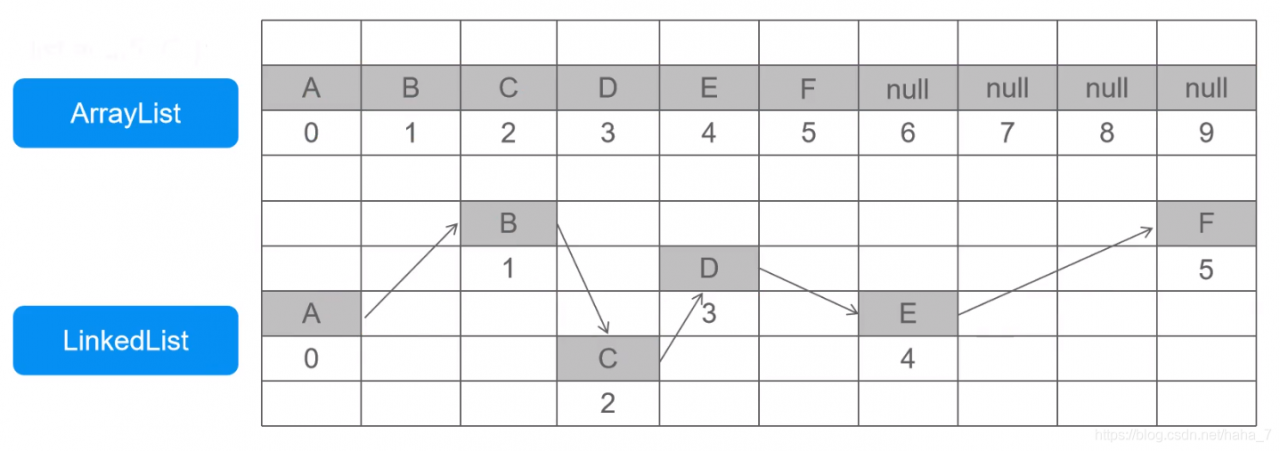
ArrayList和LinkedList区别
- ArrayList:必须开辟连续空间,查询快,增删慢。
- LinkedList:无需开辟连续空间,查询慢,增删快。
泛型概述
- java泛型是JDK1.5中引入的一个新特性,其本质是参数化类型,把类型作为参数传递。
- 常见形式有泛型类、泛型接口、泛型方法。
- 语法:
<T,…> T称为类型占位符,表示一种引用类型。 - 好处:
提高代码的重用性。
防止类型转换异常,提高代码的安全性。
泛型类
/**
 * 泛型类
 * 语法:类名<T>
 * T是类型占位符,表示一种引用类型,编写多个使用逗号隔开
 *
 */
public class myGeneric<T>{
	//1.创建泛型变量
	//不能使用new来创建,因为泛型是不确定的类型,也可能拥有私密的构造方法。
	T t;
	//2.泛型作为方法的参数
	public void show(T t) {
		System.out.println(t);
	}
	//泛型作为方法的返回值
	public T getT() {
		return t;
	}
}
/**
 * 注意:
 * 1.泛型只能使用引用类型
 * 2.不同泛型类型的对象不能相互赋值
 */
public class testGeneric {
	public static void main(String[] args) {
		//使用泛型类创建对象
		myGeneric<String> myGeneric1=new myGeneric<String>();
		myGeneric1.t="tang";
		myGeneric1.show("he");

		myGeneric<Integer> myGeneric2=new myGeneric<Integer>();
		myGeneric2.t=10;
		myGeneric2.show(20);
		Integer integer=myGeneric2.getT();
	}
}
泛型接口
/**
 * 泛型接口
 * 语法:接口名<T>
 * 注意:不能创建泛型静态常量
 */
public interface MyInterface<T> {
    //创建常量
	String nameString="tang";

	T server(T t);
}
/**
 * 实现接口时确定泛型类
 */
public class MyInterfaceImpl implements MyInterface<String>{
	@Override
	public String server(String t) {
		System.out.println(t);
		return t;
	}
}
//测试
MyInterfaceImpl myInterfaceImpl=new MyInterfaceImpl();
myInterfaceImpl.server("xxx");
//xxx
/**
 * 实现接口时不确定泛型类
 */
public class MyInterfaceImpl2<T> implements MyInterface<T>{
	@Override
	public T server(T t) {
		System.out.println(t);
		return t;
	}
}
//测试
MyInterfaceImpl2<Integer> myInterfaceImpl2=new MyInterfaceImpl2<Integer>();
myInterfaceImpl2.server(2000);
//2000
泛型方法
/**
 * 泛型方法
 * 语法:<T> 返回类型
 */
public class MyGenericMethod {
	public <T> void show(T t) {
		System.out.println("泛型方法"+t);
	}
}
//测试
MyGenericMethod myGenericMethod=new MyGenericMethod();
myGenericMethod.show("tang");
myGenericMethod.show(200);
myGenericMethod.show(3.14);
泛型集合
- 概念:参数化类型、类型安全的集合,强制集合元素的类型必须一致。
- 特点:
编译时即可检查,而非运行时抛出异常。
访问时,不必类型转换(拆箱)。
不同泛型指尖引用不能相互赋值,泛型不存在多态。
之前我们在创建LinkedList类型对象的时候并没有使用泛型,但是进到它的源码中会发现:
public class LinkedList<E>
    extends AbstractSequentialList<E>
    implements List<E>, Deque<E>, Cloneable, java.io.Serializable{//略}
它是一个泛型类,而我之前使用的时候并没有传递,说明java语法是允许的,这个时候传递的类型是Object类,虽然它是所有类的父类,可以存储任意的类型,但是在遍历、获取元素时需要原来的类型就要进行强制转换。这个时候就会出现一些问题,假如往链表里存储了许多不同类型的数据,在强转的时候就要判断每一个原来的类型,这样就很容易出现错误。
Set集合概述
Set子接口
- 特点:无序、无下标、元素不可重复。
- 方法:全部继承自Collection中的方法。
/**
 * 测试Set接口的使用
 * 特点:1.无序,没有下标;2.重复
 * 1.添加数据
 * 2.删除数据
 * 3.遍历【重点】
 * 4.判断
 */
public class Demo1 {
	public static void main(String[] args) {
		Set<String> set=new HashSet<String>();
		//1.添加数据
		set.add("tang");
		set.add("he");
		set.add("yu");
		System.out.println("数据个数:"+set.size());
		System.out.println(set.toString());//无序输出
		//2.删除数据
		/*
		 * set.remove("tang"); System.out.println(set.toString());
		 */
		//3.遍历【重点】
		//3.1 使用增强for
		for (String string : set) {
			System.out.println(string);
		}
		//3.2 使用迭代器
		Iterator<String> iterator=set.iterator();
		while (iterator.hasNext()) {
			System.out.println(iterator.next());
		}
		//4.判断
		System.out.println(set.contains("tang"));
		System.out.println(set.isEmpty());
	}
}
Set实现类
HashSet【重点】
基于HashCode计算元素存放位置。
当存入元素的哈希码相同时,会调用equals进行确认,如结果为true,则拒绝后者存入。
/**
 * 人类
 */
public class Person {
	private String name;
	private int age;
	public Person(String name,int age) {
		this.name = name;
		this.age = age;
	}
	public String getName() {
		return name;
	}
	public void setName(String name) {
		this.name = name;
	}
	public int getAge() {
		return age;
	}
	public void setAge(int age) {
		this.age = age;
	}
	@Override
	public String toString() {
		return "Peerson [name=" + name + ", age=" + age + "]";
	}
}
/**
 * HashSet集合的使用
 * 存储结构:哈希表(数组+链表+红黑树)
 * 1.添加元素
 * 2.删除元素
 * 3.遍历
 * 4.判断
*/
public class Demo3 {
	public static void main(String[] args) {
		HashSet<Person> hashSet=new HashSet<>();
		Person p1=new Person("tang",21);
		Person p2=new Person("he", 22);
		Person p3=new Person("yu", 21);
		//1.添加元素
		hashSet.add(p1);
		hashSet.add(p2);
		hashSet.add(p3);
        //重复,添加失败
        hashSet.add(p3);
        //直接new一个相同属性的对象,依然会被添加,不难理解。
        //假如相同属性便认为是同一个对象,怎么修改?
        hashSet.add(new Person("yu", 21));
		System.out.println(hashSet.toString());
		//2.删除元素
		hashSet.remove(p2);
		//3.遍历
		//3.1 增强for
		for (Person person : hashSet) {
			System.out.println(person);
		}
		//3.2 迭代器
		Iterator<Person> iterator=hashSet.iterator();
		while (iterator.hasNext()) {
			System.out.println(iterator.next());
		}
		//4.判断
		System.out.println(hashSet.isEmpty());
        //直接new一个相同属性的对象结果输出是false,不难理解。
        //注:假如相同属性便认为是同一个对象,该怎么做?
		System.out.println(hashSet.contains(new Person("tang", 21)));
	}
}
注:hashSet存储过程:
- 根据hashCode计算保存的位置,如果位置为空,则直接保存,否则执行第二步。
- 执行equals方法,如果方法返回true,则认为是重复,拒绝存储,否则形成链表。
存储过程实际上就是重复依据,要实现“注”里的问题,可以重写hashCode和equals代码:
@Override
public int hashCode() {
    final int prime = 31;
    int result = 1;
    result = prime * result + age;
    result = prime * result + ((name == null) ? 0 : name.hashCode());
    return result;
}
@Override
public boolean equals(Object obj) {
    if (this == obj)
        return true;
    if (obj == null)
        return false;
    if (getClass() != obj.getClass())
        return false;
    Person other = (Person) obj;
    if (age != other.age)
        return false;
    if (name == null) {
        if (other.name != null)
            return false;
    } else if (!name.equals(other.name))
        return false;
    return true;
}
hashCode方法里为什么要使用31这个数字大概有两个原因:
- 31是一个质数,这样的数字在计算时可以尽量减少散列冲突。
- 可以提高执行效率,因为31*i=(i<<5)-i,31乘以一个数可以转换成移位操作,这样能快一点;但是也有网上一些人对这两点提出质疑。
TreeSet
- 基于排序顺序实现不重复。
- 实现了SortedSet接口,对集合元素自动排序。
- 元素对象的类型必须实现Comparable接口,指定排序规则。
- 通过CompareTo方法确定是否为重复元素。
/**
 * 使用TreeSet保存数据
 * 存储结构:红黑树
 * 要求:元素类必须实现Comparable接口,compareTo方法返回0,认为是重复元素
 */
public class Demo4 {
	public static void main(String[] args) {
		TreeSet<Person> persons=new TreeSet<Person>();
		Person p1=new Person("tang",21);
		Person p2=new Person("he", 22);
		Person p3=new Person("yu", 21);
		//1.添加元素
		persons.add(p1);
		persons.add(p2);
		persons.add(p3);
		//注:直接添加会报类型转换错误,需要实现Comparable接口
		System.out.println(persons.toString());
		//2.删除元素
		persons.remove(p1);
		persons.remove(new Person("he", 22));
		System.out.println(persons.toString());
		//3.遍历(略)
		//4.判断
		System.out.println(persons.contains(new Person("yu", 21)));
	}
}
查看Comparable接口的源码,发现只有一个compareTo抽象方法,在人类中实现它:
public class Person implements Comparable<Person>{
    @Override
	//1.先按姓名比
	//2.再按年龄比
	public int compareTo(Person o) {
		int n1=this.getName().compareTo(o.getName());
		int n2=this.age-o.getAge();
		return n1==0?n2:n1;
	}
}
除了实现Comparable接口里的比较方法,TreeSet也提供了一个带比较器Comparator的构造方法,使用匿名内部类来实现它:
/**
 * TreeSet的使用
 * Comparator:实现定制比较(比较器)
 */
public class Demo5 {
	public static void main(String[] args) {
		TreeSet<Person> persons=new TreeSet<Person>(new Comparator<Person>() {
			@Override
			public int compare(Person o1, Person o2) {
				// 先按年龄比较
				// 再按姓名比较
				int n1=o1.getAge()-o2.getAge();
				int n2=o1.getName().compareTo(o2.getName());
				return n1==0?n2:n1;
			}
		});
		Person p1=new Person("tang",21);
		Person p2=new Person("he", 22);
		Person p3=new Person("yu", 21);
		persons.add(p1);
		persons.add(p2);
		persons.add(p3);
		System.out.println(persons.toString());
	}
}
接下来我们来做一个小案例:
/**
 * 要求:使用TreeSet集合实现字符串按照长度进行排序
 * helloworld tangrui hechengyang wangzixu yuguoming
 * Comparator接口实现定制比较
 */
public class Demo6 {
	public static void main(String[] args) {
		TreeSet<String> treeSet=new TreeSet<String>(new Comparator<String>() {
			@Override
			//先比较字符串长度
			//再比较字符串
			public int compare(String o1, String o2) {
				int n1=o1.length()-o2.length();
				int n2=o1.compareTo(o2);
				return n1==0?n2:n1;
			}
		});
		treeSet.add("helloworld");
		treeSet.add("tangrui");
		treeSet.add("hechenyang");
		treeSet.add("yuguoming");
		treeSet.add("wangzixu");
		System.out.println(treeSet.toString());
        //输出[tangrui, wangzixu, yuguoming, hechenyang, helloworld]
	}
}
Map集合概述
Map接口的特点:
- 用于存储任意键值对(Key-Value)。
- 键:无序、无下标、不允许重复(唯一)。
- 值:无序、无下标、允许重复。
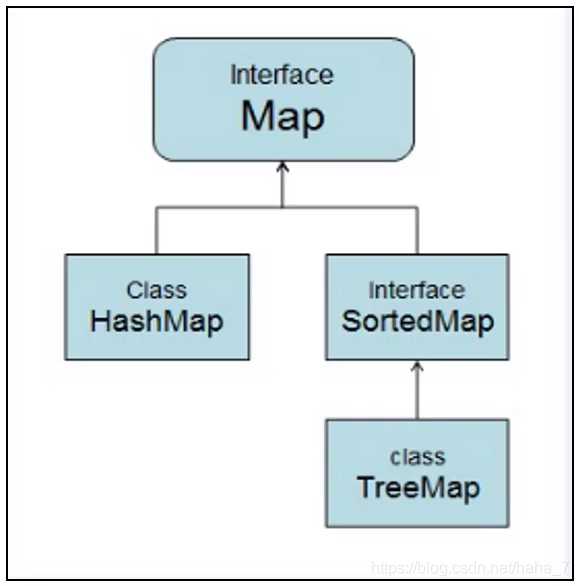
**特点:**存储一对数据(Key-Value),无序、无下标,键不可重复。
方法:
- V put(K key,V value)//将对象存入到集合中,关联键值。key重复则覆盖原值。
- Object get(Object key)//根据键获取相应的值。
- Set//返回所有的key
- Collection values()//返回包含所有值的Collection集合。
- Set<Map.Entry<K,V>>//键值匹配的set集合
/**
 * Map接口的使用
 * 特点:1.存储键值对 2.键不能重复,值可以重复 3.无序
 */
public class Demo1 {
	public static void main(String[] args) {
		Map<String,Integer> map=new HashMap<String, Integer>();
		//1.添加元素
		map.put("tang", 21);
		map.put("he", 22);
		map.put("fan", 23);
		System.out.println(map.toString());
		//2.删除元素
		map.remove("he");
		System.out.println(map.toString());
		//3.遍历
		//3.1 使用keySet();
		for (String key : map.keySet()) {
			System.out.println(key+" "+map.get(key));
		}
		//3.2 使用entrySet();效率较高
		for (Map.Entry<String, Integer> entry : map.entrySet()) {
			System.out.println(entry.getKey()+" "+entry.getValue());
		}
	}
}
Map集合的实现类
HashMap【重点】
DK1.2版本,线程不安全,运行效率快;允许用null作为key或是value。
/**
 * 学生类
 */
public class Student {
	private String name;
	private int id;
	public Student(String name, int id) {
		super();
		this.name = name;
		this.id = id;
	}
	public String getName() {
		return name;
	}
	public void setName(String name) {
		this.name = name;
	}
	public int getId() {
		return id;
	}
	public void setId(int id) {
		this.id = id;
	}
	@Override
	public String toString() {
		return "Student [name=" + name + ", age=" + id + "]";
	}
}
/**
 * HashMap的使用
 * 存储结构:哈希表(数组+链表+红黑树)
 */
public class Demo2 {
	public static void main(String[] args) {
		HashMap<Student, String> hashMap=new HashMap<Student, String>();
		Student s1=new Student("tang", 36);
		Student s2=new Student("yu", 101);
		Student s3=new Student("he", 10);
		//1.添加元素
		hashMap.put(s1, "成都");
		hashMap.put(s2, "杭州");
		hashMap.put(s3, "郑州");
		//添加失败,但会更新值
		hashMap.put(s3,"上海");
		//添加成功,不过两个属性一模一样;
		//注:假如相同属性便认为是同一个对象,怎么修改?
		hashMap.put(new Student("he", 10),"上海");
		System.out.println(hashMap.toString());
		//2.删除元素
		hashMap.remove(s3);
		System.out.println(hashMap.toString());
		//3.遍历
		//3.1 使用keySet()遍历
		for (Student key : hashMap.keySet()) {
			System.out.println(key+" "+hashMap.get(key));
		}
		//3.2 使用entrySet()遍历
		for (Entry<Student, String> entry : hashMap.entrySet()) {
			System.out.println(entry.getKey()+" "+entry.getValue());
		}
		//4.判断
		//注:同上
		System.out.println(hashMap.containsKey(new Student("he", 10)));
		System.out.println(hashMap.containsValue("成都"));
	}
}
注:和之前说过的HashSet类似,重复依据是hashCode和equals方法,重写即可:
@Override
public int hashCode() {
    final int prime = 31;
    int result = 1;
    result = prime * result + id;
    result = prime * result + ((name == null) ? 0 : name.hashCode());
    return result;
}
@Override
public boolean equals(Object obj) {
    if (this == obj)
        return true;
    if (obj == null)
        return false;
    if (getClass() != obj.getClass())
        return false;
    Student other = (Student) obj;
    if (id != other.id)
        return false;
    if (name == null) {
        if (other.name != null)
            return false;
    } else if (!name.equals(other.name))
        return false;
    return true;
}
HashMap源码分析
-
默认初始化容量:
static final int DEFAULT_INITIAL_CAPACITY = 1 << 4; // aka 16 -
数组最大容量:
static final int MAXIMUM_CAPACITY = 1 << 30; -
默认加载因子:
static final float DEFAULT_LOAD_FACTOR = 0.75f; -
链表调整为红黑树的链表长度阈值(JDK1.8):
static final int TREEIFY_THRESHOLD = 8; -
红黑树调整为链表的链表长度阈值(JDK1.8):
static final int UNTREEIFY_THRESHOLD = 6; -
链表调整为红黑树的数组最小阈值(JDK1.8):
static final int MIN_TREEIFY_CAPACITY = 64; -
HashMap存储的数组:
transient Node<K,V>[] table; -
HashMap存储的元素个数:
transient int size; -
默认加载因子是什么?
就是判断数组是否扩容的一个因子。假如数组容量为100,如果HashMap的存储元素个数超过了100*0.75=75,那么就会进行扩容。
- 链表调整为红黑树的链表长度阈值是什么?
假设在数组中下标为3的位置已经存储了数据,当新增数据时通过哈希码得到的存储位置又是3,那么就会在该位置形成一个链表,当链表过长时就会转换成红黑树以提高执行效率,这个阈值就是链表转换成红黑树的最短链表长度;
- 红黑树调整为链表的链表长度阈值是什么?
当红黑树的元素个数小于该阈值时就会转换成链表。
- 链表调整为红黑树的数组最小阈值是什么?
并不是只要链表长度大于8就可以转换成红黑树,在前者条件成立的情况下,数组的容量必须大于等于64才会进行转换。
HashMap的数组table存储的就是一个个的Node<K,V>类型,很清晰地看到有一对键值,还有一个指向next的指针(以下只截取了部分源码):
static class Node<K,V> implements Map.Entry<K,V> {
    final K key;
    V value;
    Node<K,V> next;
}
之前的代码中在new对象时调用的是HashMap的无参构造方法,进入到该构造方法的源码查看一下:
public HashMap() {
    this.loadFactor = DEFAULT_LOAD_FACTOR; // all other fields defaulted
}
发现没什么内容,只是赋值了一个默认加载因子;而在上文我们观察到源码中table和size都没有赋予初始值,说明刚创建的HashMap对象没有分配容量,并不拥有默认的16个空间大小,这样做的目的是为了节约空间,此时table为null,size为0。
当我们往对象里添加元素时调用put方法:
public V put(K key, V value) {
    return putVal(hash(key), key, value, false, true);
}
put方法把key和value传给了putVal,同时还传入了一个hash(Key)所返回的值,这是一个产生哈希值的方法,再进入到putVal方法(部分源码):
final V putVal(int hash, K key, V value, boolean onlyIfAbsent,
                   boolean evict) {
     Node<K,V>[] tab; Node<K,V> p; int n, i;
     if ((tab = table) == null || (n = tab.length) == 0)
         n = (tab = resize()).length;
     if ((p = tab[i = (n - 1) & hash]) == null)
         tab[i] = newNode(hash, key, value, null);
     else{
         //略
     }
 }
这里面创建了一个tab数组和一个Node变量p,第一个if实际是判断table是否为空,而我们现在只关注刚创建HashMap对象时的状态,此时tab和table都为空,满足条件,执行内部代码,这条代码其实就是把resize()所返回的结果赋给tab,n就是tab的长度,resize顾名思义就是重新调整大小。查看resize()源码(部分):
final Node<K,V>[] resize() {
    Node<K,V>[] oldTab = table;
    int oldCap = (oldTab == null) ? 0 : oldTab.length;
    int oldThr = threshold;
    if (oldCap > 0);
    else if (oldThr > 0);
    else {               // zero initial threshold signifies using defaults
        newCap = DEFAULT_INITIAL_CAPACITY;
        newThr = (int)(DEFAULT_LOAD_FACTOR * DEFAULT_INITIAL_CAPACITY);
    }
    @SuppressWarnings({"rawtypes","unchecked"})
    Node<K,V>[] newTab = (Node<K,V>[])new Node[newCap];
    table = newTab;
    return newTab;
}
该方法首先把table及其长度赋值给oldTab和oldCap;threshold是阈值的意思,此时为0,所以前两个if先不管,最后else里newCap的值为默认初始化容量16;往下创建了一个newCap大小的数组并将其赋给了table,刚创建的HashMap对象就在这里获得了初始容量。然后我们再回到putVal方法,第二个if就是根据哈希码得到的tab中的一个位置是否为空,为空便直接添加元素,此时数组中无元素所以直接添加。至此HashMap对象就完成了第一个元素的添加。当添加的元素超过16*0.75=12时,就会进行扩容:
final V putVal(int hash, K key, V value, boolean onlyIfAbsent,boolean evict){
    if (++size > threshold)
        resize();
}
扩容的代码如下(部分):
final Node<K,V>[] resize() {
    int oldCap = (oldTab == null) ? 0 : oldTab.length;
    int newCap;
    if (oldCap > 0) {
        if (oldCap >= MAXIMUM_CAPACITY) {//略}
        else if ((newCap = oldCap << 1) < MAXIMUM_CAPACITY &&
                 oldCap >= DEFAULT_INITIAL_CAPACITY)
    }
}
核心部分是else if里的移位操作,也就是说每次扩容都是原来大小的两倍。
注:额外说明的一点是在JDK1.8以前链表是头插入,JDK1.8以后链表是尾插入。
HashSet源码分析
了解完HashMap之后,再回过头来看之前的HashSet源码,为什么放在后面写你们看一下源码就知道了(部分):
public class HashSet<E>
    extends AbstractSet<E>
    implements Set<E>, Cloneable, java.io.Serializable
{
    private transient HashMap<E,Object> map;
    private static final Object PRESENT = new Object();
    public HashSet() {
        map = new HashMap<>();
    }
}
可以看见HashSet的存储结构就是HashMap,那它的存储方式是怎样的呢?可以看一下add方法:
public boolean add(E e) {
    return map.put(e, PRESENT)==null;
}
Hashtable
- JDK1.0版本,线程安全,运行效率慢;不允许null作为key或是value。
- 初始容量11,加载因子0.75。
这个集合在开发过程中已经不用了,稍微了解即可。
Properties
- Hashtable的子类,要求key和value都是String。通常用于配置文件的读取。
它继承了Hashtable的方法,与流关系密切,此处不详解。
TreeMap
- 实现了SortedMap接口(是Map的子接口),可以对key自动排序。
/**
 * TreeMap的使用
 * 存储结构:红黑树
 */
public class Demo3 {
	public static void main(String[] args) {
		TreeMap<Student, Integer> treeMap=new TreeMap<Student, Integer>();
		Student s1=new Student("tang", 36);
		Student s2=new Student("yu", 101);
		Student s3=new Student("he", 10);
		//1.添加元素
		treeMap.put(s1, 21);
		treeMap.put(s2, 22);
		treeMap.put(s3, 21);
		//不能直接打印,需要实现Comparable接口,因为红黑树需要比较大小
		System.out.println(treeMap.toString());
		//2.删除元素
		treeMap.remove(new Student("he", 10));
		System.out.println(treeMap.toString());
		//3.遍历
		//3.1 使用keySet()
		for (Student key : treeMap.keySet()) {
			System.out.println(key+" "+treeMap.get(key));
		}
		//3.2 使用entrySet()
		for (Entry<Student, Integer> entry : treeMap.entrySet()) {
			System.out.println(entry.getKey()+" "+entry.getValue());
		}
		//4.判断
		System.out.println(treeMap.containsKey(s1));
		System.out.println(treeMap.isEmpty());
	}
}
在学生类中实现Comparable接口:
public class Student implements Comparable<Student>{
    @Override
    public int compareTo(Student o) {
        int n1=this.id-o.id;
        return n1;
}
除此之外还可以使用比较器来定制比较:
TreeMap<Student, Integer> treeMap2=new TreeMap<Student, Integer>(new Comparator<Student>() {
    @Override
    public int compare(Student o1, Student o2) {
        // 略
        return 0;
    }
});
TreeSet源码
和HashSet类似,放在TreeMap之后讲便一目了然(部分):
public class TreeSet<E> extends AbstractSet<E>
    implements NavigableSet<E>, Cloneable, java.io.Serializable
{
    private transient NavigableMap<E,Object> m;
    private static final Object PRESENT = new Object();
    TreeSet(NavigableMap<E,Object> m) {
        this.m = m;
    }
    public TreeSet() {
        this(new TreeMap<E,Object>());
    }
}
TreeSet的存储结构实际上就是TreeMap,再来看其存储方式:
public boolean add(E e) {
    return m.put(e, PRESENT)==null;
}
它的add方法调用的就是TreeMap的put方法,将元素作为key传入到存储结构中。
Collections工具类
**概念:**集合工具类,定义了除了存取以外的集合常用方法。
方法:
public static void reverse(List<?> list)//反转集合中元素的顺序
public static void shuffle(List<?> list)//随机重置集合元素的顺序
public static void sort(List list)//升序排序(元素类型必须实现Comparable接口)
/**
 * 演示Collections工具类的使用
 *
 */
public class Demo4 {
	public static void main(String[] args) {
		List<Integer> list=new ArrayList<Integer>();
		list.add(20);
		list.add(10);
		list.add(30);
		list.add(90);
		list.add(70);

		//sort排序
		System.out.println(list.toString());
		Collections.sort(list);
		System.out.println(list.toString());
		System.out.println("---------");

		//binarySearch二分查找
		int i=Collections.binarySearch(list, 10);
		System.out.println(i);

		//copy复制
		List<Integer> list2=new ArrayList<Integer>();
		for(int i1=0;i1<5;++i1) {
			list2.add(0);
		}
		//该方法要求目标元素容量大于等于源目标
		Collections.copy(list2, list);
		System.out.println(list2.toString());

		//reserve反转
		Collections.reverse(list2);
		System.out.println(list2.toString());

		//shuffle 打乱
		Collections.shuffle(list2);
		System.out.println(list2.toString());

		//补充:list转成数组
		Integer[] arr=list.toArray(new Integer[0]);
		System.out.println(arr.length);
		//补充:数组转成集合
		String[] nameStrings= {"tang","he","yu"};
		//受限集合,不能添加和删除
		List<String> list3=Arrays.asList(nameStrings);
		System.out.println(list3);

		//注:基本类型转成集合时需要修改为包装类
	}
}
**:集合工具类,定义了除了存取以外的集合常用方法。
方法:
public static void reverse(List<?> list)//反转集合中元素的顺序
public static void shuffle(List<?> list)//随机重置集合元素的顺序
public static void sort(List list)//升序排序(元素类型必须实现Comparable接口)
/**
 * 演示Collections工具类的使用
 *
 */
public class Demo4 {
	public static void main(String[] args) {
		List<Integer> list=new ArrayList<Integer>();
		list.add(20);
		list.add(10);
		list.add(30);
		list.add(90);
		list.add(70);

		//sort排序
		System.out.println(list.toString());
		Collections.sort(list);
		System.out.println(list.toString());
		System.out.println("---------");

		//binarySearch二分查找
		int i=Collections.binarySearch(list, 10);
		System.out.println(i);

		//copy复制
		List<Integer> list2=new ArrayList<Integer>();
		for(int i1=0;i1<5;++i1) {
			list2.add(0);
		}
		//该方法要求目标元素容量大于等于源目标
		Collections.copy(list2, list);
		System.out.println(list2.toString());

		//reserve反转
		Collections.reverse(list2);
		System.out.println(list2.toString());

		//shuffle 打乱
		Collections.shuffle(list2);
		System.out.println(list2.toString());

		//补充:list转成数组
		Integer[] arr=list.toArray(new Integer[0]);
		System.out.println(arr.length);
		//补充:数组转成集合
		String[] nameStrings= {"tang","he","yu"};
		//受限集合,不能添加和删除
		List<String> list3=Arrays.asList(nameStrings);
		System.out.println(list3);

		//注:基本类型转成集合时需要修改为包装类
	}
}