什么是MVC?
MVC最早存在于桌面程序中的, M(model)是指
业务数据
, V(view)是指
用户界面
, C(controller)则是
控制器
. 在具体的业务场景中, C作为M和V之间的连接.
负责获取输入的业务数据, 然后将处理后的数据输出到界面上做相应展示, 另外, 在数据有所更新时, C还需要及时提交相应更新到界面展示.
在上述过程中, 因为M和V之间是完全隔离的, 所以在业务场景切换时, 通常只需要替换相应的C, 复用已有的M和V便可快速搭建新的业务场景.
MVC因其复用性, 大大提高了开发效率, 现已被广泛应用在各端开发中。
MVC模式
MVC模式虽然是iOS编程中使用最广泛的模式,但论起复杂程度,MVC模式可以算是众多设计模式之首。通常情况下,MVC模式需要综合使用
target-action模式
、
delegate模式
、
Notification
或
KVO模式
等。
-
Model
(模型)表示应用程序核心(比如数据库记录列表),通常模型对象负责在数据库中存取数据。模型独立于视图和控制器。 -
View
(视图)显示数据(数据库记录),通常视图是依据模型数据创建的。 -
Controller
(控制器)处理输入(写入数据库记录),通常控制器负责从视图读取数据,控制用户输入,并向模型发送数据。
MVC模式能够完成各司其职的任务模式,由于降低了各个环节的耦合性,大大优化
Controller
的代码量,当程序调试时,如果某一个功能没有按照既定的模式工作,可以很方便的定位到到底是
Controller
还是
View
还是
Model
出了问题,而且还利于程序的可复用性,建议在程序中能多多使用这个模式。
原理图解

-
Controller和View之间可以通信,Controllor通过outlet(输出口)控制View,View可以通过
target-action
、
delegate
或者
dataSource
(想想
UITableVeiwDatasource
)来和Controller通信; - Controller在接收到View传过来的交互事件(View就是完成让人和程序的交互的呀,比如按B1按钮)之后,经过一些判断和处理,把需要Model处理的事件递交给Model处理(比如刚才的例子中的保存到数据库),Controller对Model使用的是API;
-
Model在处理完数据之后,如果有需要,会通过
Notification
或者
KVO
的方式告知Controller,事件已经处理完,Controller再经过判断和处理之后,考虑下一步要怎么办(是默默无闻的在后台操作,还是需要更新View,这得看Controller的“脸色”行事)。这里的无线天线很有意思,Model只负责发送通知,具体谁接收这个通知并处理它,Model并不关心,这一点非常重要,是理解Notification模式的关键。 - Model和View之间不直接通信!
关于outlet
由于视图(
view
)和控制器(
controller
)的分离,为了解决视图和控制器交互的问题,iOS就引入了输出口(
outlet
)和操作(
action
)的概念。
outlet(输出口)
:控制器类可以通过一种特殊的属性来引用nib文件中的对象,这种属性称为输出口,可以把输出口看成是指向nib文件的对象的指针。假设你在界面上创建了一个文本标签,想要通过代码修改文本的内容。通过声明一个输出口,并将其指向此标签对象。你就可以在代码里通过输出口来修改标签。
MVC样例(登陆/注册)
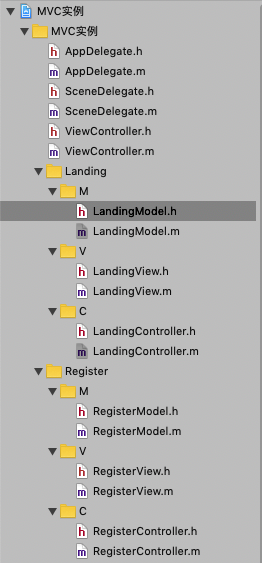
- 新建M、V、 C三个文件夹(需要几个View建几套文件夹)
-
M中新建一个名为LandingModel的类,继承自
NSObject
(以登陆界面为例) -
V中新建一个名为LandingView的类,继承自
UIView
-
C中新建一个名为LandingController的类,继承自
UIViewController

先将登陆的V(view)的代码放出,登陆页面需要两个
textfield
文本输入框,和两个
button
(登陆/注册)按钮,
具体的点击事件不需要在view文件夹写,这是controller中该做的事
@interface LandingView : UIView

@property (nonatomic,strong) UITextField* userTextField;
@property (nonatomic,strong) UITextField* passwordTextField;
@property (nonatomic,strong) UIButton* landingButton;
@property (nonatomic,strong) UIButton* registerButton;

@end
#import "LandingView.h"

@implementation LandingView

- (instancetype)initWithFrame:(CGRect)frame {

    self = [super initWithFrame:frame];
    self.backgroundColor = [UIColor whiteColor];
    _userTextField = [[UITextField alloc] initWithFrame:CGRectMake(100, 200, 175, 40)];
    _userTextField.backgroundColor = [UIColor yellowColor];
    _userTextField.placeholder = @"输入用户名";
    [self addSubview:_userTextField];

    _passwordTextField = [[UITextField alloc] initWithFrame:CGRectMake(100, 300, 175, 40)];
    _passwordTextField.placeholder = @"输入密码";
    _passwordTextField.backgroundColor = [UIColor yellowColor];
    [self addSubview:_passwordTextField];

    _landingButton= [UIButton buttonWithType:UIButtonTypeRoundedRect];
    [_landingButton setTitle:@"登陆" forState:UIControlStateNormal];
    [_landingButton setFrame:CGRectMake(120, 500, 75, 30)];
    [self addSubview:_landingButton];

    _registerButton = [UIButton buttonWithType:UIButtonTypeRoundedRect];
    [_registerButton setTitle:@"注册" forState:UIControlStateNormal];
    [_registerButton setFrame:CGRectMake(225, 500, 75, 30)];
    [self addSubview:_registerButton];

    return self;
}
@end
关于 initWithFrame 方法
在上述代码初始化View中使用了
initWithFrame
方法。
initWithFrame
方法用来初始化并返回一个新的视图对象,根据指定的CGRect(尺寸)。
当然,其他UI对象,也有
initWithFrame
方法,但是,我们以
UIView
为例,来搞清楚
initWithFrame
方法。
我们用编程方式申明,创建
UIView
对象时,使用
initWithFrame
方法。
在此,我们必须搞清楚,两种方式来进行初始化
UIView
。
1. 使用 Interface Builder 方式。
这种方式,就是使用nib文件。通常我们说的“拖控件” 的方式。
实际编程中,我们如果用Interface Builder 方式创建了
UIView
对象。(也就是,用拖控件的方式)
那么,
initWithFrame
方法方法是不会被调用的。因为nib文件已经知道如何初始化该View。(因为,我们在拖该view的时候,就定义好了长、宽、背景等属性)。
这时候,会调用
initWithCoder
方法,我们可以用
initWithCoder
方法来重新定义我们在nib中已经设置的各项属性。
2. 使用编程方式。
就是我们声明一个
UIView
的子类,进行“手工”编写代码的方式。
实际编程中,我们使用编程方式下,来创建一个
UIView
或者创建
UIView
的子类。这时候,将调用
initWithFrame
方法,来实例化
UIView
。
特别注意,如果在子类中重载
initWithFrame
方法,必须先调用父类的
initWithFrame
方法。在对自定义的
UIView
子类进行初始化操作。
关于M(model)模型文件中,完成对用户名、密码array数组的初始化方法函数。我在这个方法函数中增加了使用通知传值:每当初始化完毕后,此处新建的通知中心向controller控制器的接受函数中发送消息表示初始化已完成
#import <Foundation/Foundation.h>

NS_ASSUME_NONNULL_BEGIN

@interface LandingModel : NSObject
@property (nonatomic, strong) NSMutableArray* userArray;
@property (nonatomic, strong) NSMutableArray* passwordArray;

- (void)landingMassageInit;
@end
#import "LandingModel.h"

@implementation LandingModel

- (void)landingMassageInit {
    _userArray = [[NSMutableArray alloc] init];
    _passwordArray = [[NSMutableArray alloc] init];
    [_userArray addObject:@"11"];
    [_passwordArray addObject:@"11"];
    //添加 字典,将label的值通过key值设置传递
    NSDictionary *dict =[[NSDictionary alloc]initWithObjectsAndKeys:@"初始化完毕!",@"textOne", nil];
    //创建通知
    NSNotification *notification =[NSNotification notificationWithName:@"tongzhi" object:nil userInfo:dict];
    //通过通知中心发送通知
    [[NSNotificationCenter defaultCenter] postNotification:notification];
}
关于C(controller)控制器文件中,使用自定义的model、view类创建对应的对象——
landingModel
、
landingView
,此时
landingModel
、
landingView
成为输出口(
outlet
)并反馈在控制器中进行操作。还需要将view中的button控件的点击事件(
target-action
)在控制器文件中完成,将model中创建的用户名、密码array数组在控制器文件中访问并进行检验判断。
#import "ViewController.h"
#import "LandingView.h"
#import "LandingModel.h"
#import "RegisterController.h"

NS_ASSUME_NONNULL_BEGIN

@interface LandingController : ViewController <RegisterDelegate>
@property(nonatomic,strong) LandingView* landingView;
@property(nonatomic,strong) LandingModel* landingModel;

- (void)passName:(NSString *)name passPassword:(NSString *)password;

@end
#import "LandingController.h"

@interface LandingController ()

@end

@implementation LandingController


- (void)viewDidLoad {
    [super viewDidLoad];

    [[NSNotificationCenter defaultCenter] addObserver:self selector:@selector(tongzhi:)name:@"tongzhi" object:nil];

    _landingView = [[LandingView alloc] init];
    _landingView.frame = CGRectMake(0, 0, self.view.frame.size.width, self.view.frame.size.height);

    [_landingView.registerButton addTarget:self action:@selector(pressRegister) forControlEvents:UIControlEventTouchUpInside];
    [_landingView.landingButton addTarget:self action:@selector(pressLanding) forControlEvents:UIControlEventTouchUpInside];

    [self.view addSubview:_landingView];

    _landingModel = [[LandingModel alloc] init];
    [_landingModel landingMassageInit];
}

- (void)pressRegister {
    RegisterController* registerViewController = [[RegisterController alloc]init];
    registerViewController.modalPresentationStyle = UIModalPresentationFullScreen;
    registerViewController.existUserArray = _landingModel.userArray;
    registerViewController.registerDelegate = self;
    [self presentViewController:registerViewController animated:YES completion:nil];
}


- (void)pressLanding {
    BOOL flag = NO;
    for (int i = 0; i < _landingModel.passwordArray.count; i++) {
        if ([_landingView.userTextField.text isEqualToString:_landingModel.userArray[i]] && [_landingView.passwordTextField.text isEqualToString:_landingModel.passwordArray[i]]) {
            flag = YES;
            break;
        }
    }
    if (flag == YES) {
        UIAlertController *alert = [UIAlertController alertControllerWithTitle:@"提示" message:@"登陆成功!" preferredStyle:UIAlertControllerStyleAlert];
        UIAlertAction *sure = [UIAlertAction actionWithTitle:@"确定" style:UIAlertActionStyleCancel handler:nil];
        [alert addAction:sure];
        [self presentViewController:alert animated:YES completion:nil];
    } else {
        UIAlertController *alert = [UIAlertController alertControllerWithTitle:@"提示" message:@"帐号或密码错误!" preferredStyle:UIAlertControllerStyleAlert];
        UIAlertAction *sure = [UIAlertAction actionWithTitle:@"确定" style:UIAlertActionStyleDestructive handler:nil];
        [alert addAction:sure];
        [self presentViewController:alert animated:YES completion:nil];
    }
}

- (void)passName:(NSString *)name passPassword:(NSString *)password {
    [_landingModel.userArray addObject:name];
    [_landingModel.passwordArray addObject:password];
}

- (void)tongzhi:(NSNotification *)text {

    NSLog(@"%@",text.userInfo[@"textOne"]);
    NSLog(@"-----接收到通知------");
}

- (void)dealloc {
    [[NSNotificationCenter defaultCenter] removeObserver:self name:@"tongzhi" object:self];
}
注册中的M、V、C三个文件夹同理,只是在注册的控制器中增加了协议传值将新注册的账号密码传入到登陆存储的数组中去,还有进行对登陆中用户名array数组的查重
效果如图:


git
附上git:
点击此处