zabbix监控mongodb
mongostat命令
mongostat是mongodb自带的状态检测工具,可以使用这个命令获取mongodb的当前运行状态,并输出。我们使用这个命令获取mongodb的状态。
本示例中是一个3节点的复制集群(一主一从一仲裁),mongodb版本为4.4。
常用参数:
MONGO_HOST=127.0.0.1
MONGO_PORT=27017

# 输出json格式数据
mongostat -h $MONGO_HOST:$MONGO_PORT -p'1111111' --authenticationDatabase admin --json

输出数据样式如下:
{
  "127.0.0.1:27017": {
    "arw": "1|0",
    "command": "2|0",
    "conn": "14",
    "delete": "*0",
    "dirty": "0.1%",
    "flushes": "0",
    "getmore": "0",
    "insert": "*0",
    "net_in": "747b",
    "net_out": "51.4k",
    "qrw": "0|0",
    "query": "*0",
    "repl": "PRI",
    "res": "3.03G",
    "set": "mongo",
    "time": "10:01:01",
    "update": "*0",
    "used": "79.8%",
    "vsize": "4.92G"
  }
}

# --noheaders,不带标题头部;-n 1,只输出1行,默认情况下会持续输出数据
mongostat -h $MONGO_HOST:$MONGO_PORT -umongo_monitor -p'1111111' --authenticationDatabase admin -n 1 -o=net_in --noheaders

# 直接输出数据,不经过转换
mongostat -h $MONGO_HOST:$MONGO_PORT -umongo_monitor -p'1111111' --authenticationDatabase admin -n 1 -o=res --noheaders --humanReadable=false
# 输出数据,经过单位转换,例如GB、MB
mongostat -h $MONGO_HOST:$MONGO_PORT -umongo_monitor -p'1111111' --authenticationDatabase admin -n 1 -o=res --noheaders --humanReadable=false
上面的命令是在加了用户验证之后的,需要先配置相应的用户,添加admin.clusterMonitor权限。
详细命令参数参考:
mongostat详解 mongodb性能监控工具
监控脚本参考
#!/bin/sh
# -------------------------------------------------------------------------------
# FileName:    check_mongodb_27017.sh
# Date:        2023/01/16

MONGO_HOST='127.0.0.1'
MONGO_PORT=27017
USER=monitor
PASS=123456
DB=admin

#if [ $# -ne "$ARGS" ];then
#    echo "Please input the port and one arguement:"
#fi


case $1 in
    # 每秒插入次数
    insert)
        result=$(mongostat -h $MONGO_HOST:$MONGO_PORT -u$USER -p$PASS --authenticationDatabase $DB -n 1 --noheaders -o=insert)
        echo $result | sed  "s/*//g"
        ;;
    # 每秒更新次数
    delete)
        result=$(mongostat -h $MONGO_HOST:$MONGO_PORT -u$USER -p$PASS --authenticationDatabase $DB -n 1 --noheaders -o=delete)
        echo $result | sed  "s/*//g"
        ;;
    # 每秒查询次数
    query)
        result=$(mongostat -h $MONGO_HOST:$MONGO_PORT -u$USER -p$PASS --authenticationDatabase $DB -n 1 --noheaders -o=query)
        echo $result | sed  "s/*//g"
        ;;
    # 每秒更新次数
    update)
        result=$(mongostat -h $MONGO_HOST:$MONGO_PORT -u$USER -p$PASS --authenticationDatabase $DB -n 1 --noheaders -o=update)
        echo $result | sed  "s/*//g"
        ;;
    # 每秒执行getmore次数,查看更多的意思,我们每次查询数据时,如果一次数据量比较大,超过了mongodb一次能查询的最大数据量,那么mongodb就回把这次要查询的数据分成几次查询,分别返回
    getmore)
        result=$(mongostat -h $MONGO_HOST:$MONGO_PORT -u$USER -p$PASS --authenticationDatabase $DB -n 1 --noheaders -o=getmore)
        echo $result
        ;;
    # 当前连接数
    conn)
        result=$(mongostat -h $MONGO_HOST:$MONGO_PORT -u$USER -p$PASS --authenticationDatabase $DB -n 1 --noheaders -o=conn)
        echo $result
        ;;
    # 每秒执行fsync将数据写入硬盘的次数, WiredTiger存储引擎中,flushes是指WiredTiger循环创建检查点的时间间隔。每隔一段时间,mongodb就将内存上的数据写入硬盘,如果这个数值比较大的话,会影响性能
    flushes)
        result=$(mongostat -h $MONGO_HOST:$MONGO_PORT -u$USER -p$PASS --authenticationDatabase $DB -n 1 --noheaders -o=flushes)
        echo $result
        ;;

    # 每秒的命令数,比以上插入、查找、更新、删除的综合还多,还统计了别的命令
    command)
        result=$(mongostat -h $MONGO_HOST:$MONGO_PORT -u$USER -p$PASS --authenticationDatabase $DB -n 1 --noheaders -o=command)
        echo $result
        ;;
    #####################################################################################################################################

    # 活跃客户执行写操作的数量
    ar)
        result=$(mongostat -h $MONGO_HOST:$MONGO_PORT -u$USER -p$PASS --authenticationDatabase $DB -n 1 --noheaders -o=arw)
        echo $result | cut -d "|" -f 1
        ;;
    # 活跃客户等待写的数量
    aw)
        result=$(mongostat -h $MONGO_HOST:$MONGO_PORT -u$USER -p$PASS --authenticationDatabase $DB -n 1 --noheaders -o=arw)
        echo $result | cut -d "|" -f 2
        ;;
    # 客户端等待读的长度,队列中的长度
    qr)
        result=$(mongostat -h $MONGO_HOST:$MONGO_PORT -u$USER -p$PASS --authenticationDatabase $DB -n 1 --noheaders -o=qrw)
        echo $result | cut -d "|" -f 1
        ;;
    # 客户端等待写的队列长度
    qw)
        result=$(mongostat -h $MONGO_HOST:$MONGO_PORT -u$USER -p$PASS --authenticationDatabase $DB -n 1 --noheaders -o=qrw)
        echo $result | cut -d "|" -f 2
        ;;
    #####################################################################################################################################

    # WiredTiger存储引擎中dirty 数据占缓存百分比
    dirty)
        result=$(mongostat -h $MONGO_HOST:$MONGO_PORT -u$USER -p$PASS --authenticationDatabase $DB -n 1 --noheaders -o=dirty --humanReadable=false)
        echo $result
        ;;
    # WiredTiger存储引擎中引擎使用缓存占百分比
    used)
        result=$(mongostat -h $MONGO_HOST:$MONGO_PORT -u$USER -p$PASS --authenticationDatabase $DB -n 1 --noheaders -o=used --humanReadable=false)
        echo $result
        ;;
    #####################################################################################################################################

    # 物理内存使用量,单位MB
    res)
        result=$(mongostat -h $MONGO_HOST:$MONGO_PORT -u$USER -p$PASS --authenticationDatabase $DB -n 1 --noheaders -o=res --humanReadable=false)
        echo $result
        ;;
    # 虚拟内存使用量,单位MB
    vsize)
        result=$(mongostat -h $MONGO_HOST:$MONGO_PORT -u$USER -p$PASS --authenticationDatabase $DB -n 1 --noheaders -o=vsize --humanReadable=false)
        echo $result
        ;;
    # mongodb进入的流量包含mongostat本身(单位:bytes)
    netin)
        result=$(mongostat -h $MONGO_HOST:$MONGO_PORT -u$USER -p$PASS --authenticationDatabase $DB -n 1 --noheaders -o=net_in --humanReadable=false)
        echo $result
        ;;
    # mongodb出去的流量包含mongostat本身
    netout)
        result=$(mongostat -h $MONGO_HOST:$MONGO_PORT -u$USER -p$PASS --authenticationDatabase $DB -n 1 --noheaders -o=net_out --humanReadable=false)
        echo $result
        ;;
    #####################################################################################################################################

    # 当前实例的角色
    repl)
        result=$(mongostat -h $MONGO_HOST:$MONGO_PORT -u$USER -p$PASS --authenticationDatabase $DB -n 1 --noheaders -o=repl)
        echo $result
        ;;
    *)
        echo "Usage:$0(insert|query|delete|update|command)"
        ;;
esac
zabbix配置
添加配置文件:/etc/zabbix/zabbix_agentd.d/userparameter_mongodb.conf
UserParameter=mongodb.status[*],/etc/zabbix/zabbix_agentd.d/mongodb_stat.sh $1
zabbix获取测试
# zabbix_get -s 192.168.3.11 -p 10050 -k 'mongodb.status[netout]'
101284
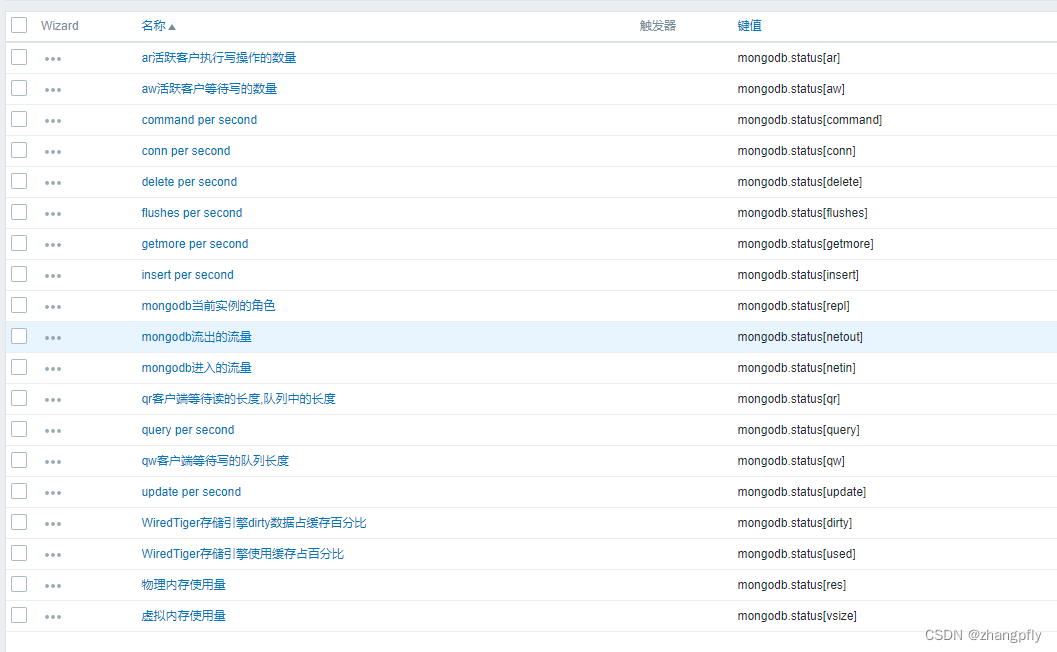
如果能够正常获取到数据,就可以在zabbix控制台配置mongodb监控项了。
我配置了一个mongodb的监控模板。

后面还可以根据实际使用情况,添加监控图表、告警触发器等。
参考链接:
https://www.jianshu.com/p/073bd0fab907
http://t.zoukankan.com/bien94-p-13047292.html
https://m.xp.cn/b.php/83962.html
版权声明:本文为zhangpfly原创文章,遵循 CC 4.0 BY-SA 版权协议,转载请附上原文出处链接和本声明。