用Qt和QtWebApp能够实现在C++中开发HTTP Web服务器应用程序。
首先,需要先安装Qt的软件开发工具包。
点此下载
其次,下载最新的QtWebApp库。
点此下载
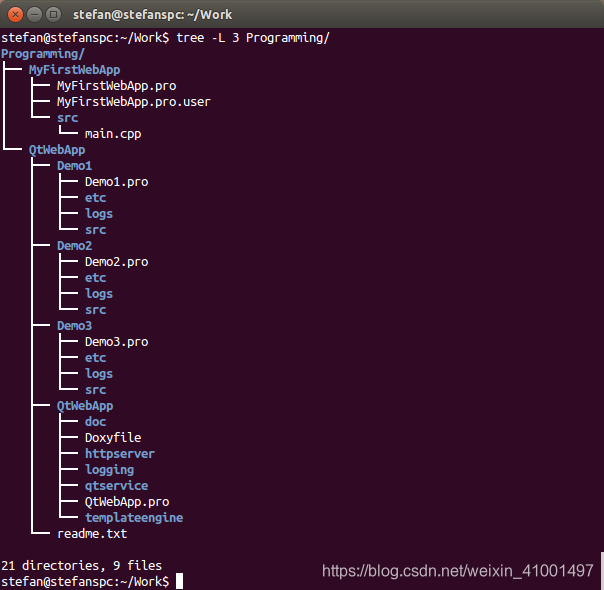
下载并解压缩QtWebApp ZIP文件。你将会看到:

如何使用QtWebApp
1)将QtWebApp.zip文件解压到文件夹中,并创建一个名为“ MyFirstWebApp”的新Qt控制台项目。然后,建立如下文件结构:

2)将以下行添加到MyFirstWebApp项目的项目文件中:
QT += network
include(…/QtWebApp/QtWebApp/httpserver/httpserver.pri)

3)启动QT Creator IDE,然后打开项目文件Demo1 / Demo1.pro。
4)下一步是创建配置文件MyFirstWebApp / etc / webapp1.ini。这步需要使用操作系统的文件管理器来执行此操作,因为Qt Creator无法创建新文件夹。文件内容为:
[listener]
;host=192.168.0.100
port=8080
minThreads=4
maxThreads=100
cleanupInterval=60000
readTimeout=60000
maxRequestSize=16000
maxMultiPartSize=10000000
-
host 和 port 参数指定Web服务器在哪个IP地址和端口上侦听。如果注释掉主机(如上所述),则服务器将侦听所有网络接口。公用Web服务器使用端口80,而内部Web服务器通常在端口8080上侦听。你可以使用任何喜欢的空闲端口。
-
QtWebApp可以同时处理多个HTTP请求,因此它是多线程的。由于启动新线程需要花费大量时间,因此QtWebApp会将线程重新用于后续的HTTP请求。
-
maxThreads值指定并发工作线程的最大数量。在进入生产环境之前,应该使用负载生成器工具来查找服务器可以处理多少负载,而不会耗尽内存或变慢。
-
Web服务器始终以空线程池开头。当HTTP请求进入时,将根据需要创建线程。空闲线程由计时器缓慢关闭。每隔一个cleanupInterval时间间隔(以毫秒为单位),服务器都将关闭一个空闲线程。但是minThreads 个线程始终保持运行状态。
-
使用给定的值,服务器最多可以处理100个并发HTTP连接。它使4个空闲的工作线程保持运行状态,以确保一段时间不活动后的良好响应时间。
-
readTimeout设置通过打开大量连接而不使用它们,来保护服务器免受简单的拒绝服务攻击。静默连接将在设定的毫秒数后被关闭。通常情况下,是由Web浏览器来关闭连接。
-
maxRequestSize保护服务器免受非常多的HTTP请求而导致内存过载的影响。此值适用于常规请求。另一个maxMultiPartSize值适用于网络浏览器将文件上传到服务器时发生的大部分请求。如果要接受10 MB的文件,由于HTTP协议开销,必须将此值设置得更大一些。
-
文件上传存储在临时文件中。临时文件的位置由操作系统定义。
5)让我们继续创建我们的第一个Web应用程序。要使此配置文件在Qt Creator中可见,请在项目文件中添加一行:
OTHER_FILES + = etc / webapp1.ini
6)现在,我们添加一些代码来加载该文件:
#include <QCoreApplication>
#include <QSettings>

int main(int argc, char *argv[])
{
    QCoreApplication app(argc, argv);
    QSettings* listenerSettings=
         new QSettings("../MyFirstWebApp/etc/webapp1.ini",QSettings::IniFormat,&app);
    qDebug("config file loaded");
    return app.exec();
}
运行该程序来检查是否可以加载配置文件。你可能需要修改上面的路径,使其与你的个人计算机设置相匹配。
如果在目标计算机上运行程序,则配置文件可能位于其他位置。因此,最好在几个文件夹中自动搜索它:
#include <QCoreApplication>
#include <QSettings>
#include <QFile>
#include <QDir>
#include <QString>

/**
 * Search the configuration file.
 * Aborts the application if not found.
 * @return The valid filename
 */
//该方法用来搜索配置文件
QString searchConfigFile() {
    QString binDir=QCoreApplication::applicationDirPath();
    QString appName=QCoreApplication::applicationName();
    QFile file;
    file.setFileName(binDir+"/webapp1.ini");
    if (!file.exists()) {
        file.setFileName(binDir+"/etc/webapp1.ini");
        if (!file.exists()) {
            file.setFileName(binDir+"/../etc/webapp1.ini");
            if (!file.exists()) {
                file.setFileName(binDir+"/../"+appName+"/etc/webapp1.ini");
                if (!file.exists()) {
                    file.setFileName(binDir+"/../../"+appName+"/etc/webapp1.ini");
                    if (!file.exists()) {
                        file.setFileName(binDir+"/../../../../../"+appName+"/etc/webapp1.ini");
                        if (!file.exists()) {
                            file.setFileName(QDir::rootPath()+"etc/webapp1.ini");
                        }
                    }
                }
            }
        }
    }
    if (file.exists()) {
        QString configFileName=QDir(file.fileName()).canonicalPath();	//将相对路径换成绝对路径
        qDebug("using config file %s", qPrintable(configFileName));
        return configFileName;
    }
    else {
        qFatal("config file not found");	//找不到该文件,则应用程序将输出一条错误消息,并中止程序
    }
}


int main(int argc, char *argv[])
{
    QCoreApplication app(argc, argv);

    // Load the configuration file
    QString configFileName=searchConfigFile();
    QSettings* listenerSettings=new QSettings(configFileName, QSettings::IniFormat, &app);
    qDebug("config file loaded");

    return app.exec();
}
7)加载配置文件后,接着创建HTTP侦听器对象,这是Web服务器的核心:
#include <QCoreApplication>
#include <QSettings>
#include <QFile>
#include <QDir>
#include <QString>
#include "httplistener.h"	//新增代码
#include "httprequesthandler.h"	//新增代码

using namespace stefanfrings;

int main(int argc, char *argv[])
{
    QCoreApplication app(argc, argv);

    // Load the configuration file
    QString configFileName=searchConfigFile();
    QSettings* listenerSettings=new QSettings(configFileName, QSettings::IniFormat, &app);
    listenerSettings->beginGroup("listener");	//新增代码

    // Start the HTTP server
    new HttpListener(listenerSettings, new HttpRequestHandler(&app), &app);	//新增代码

    return app.exec();
}
-
QSettings::beginGroup() 从配置文件中选择组 “[listener]”。
-
HttpRequestHandler接收所有传入的HTTP请求,并生成响应。默认情况下,请求处理程序仅返回错误页面。
注意:要在堆上创建 HttpListener(new),否则它将在程序启动后立即终止。
输出Hello World
下面,编写我们自己的请求处理程序,来输出一个 “Hello World”消息。用鼠标右键单击src文件夹,选择”Add New…”,根据实际情况选择创建的文件类型。
//helloworldcontroller.h
#ifndef HELLOWORLDCONTROLLER_H
#define HELLOWORLDCONTROLLER_H

#include "httprequesthandler.h"

using namespace stefanfrings;

class HelloWorldController : public HttpRequestHandler {
    Q_OBJECT
public:
    HelloWorldController(QObject* parent=0);
    void service(HttpRequest& request, HttpResponse& response);
};

#endif // HELLOWORLDCONTROLLER_H
//helloworldcontroller.cpp:
#include "helloworldcontroller.h"

HelloWorldController::HelloWorldController(QObject* parent)
    : HttpRequestHandler(parent) {
    // empty
}

void HelloWorldController::service(HttpRequest &request, HttpResponse &response) {
    response.write("Hello World",true);
}
可选参数 “true” 表示当前的HTTP请求是最后一次调用 write() 。
//main.cpp中的两个更改:

#include "helloworldcontroller.h"

    new HttpListener(listenerSettings,new HelloWorldController(&app),&app);
运行程序,并在浏览器中打开URL:http://localhost:8080

至此,我们的Web服务器就问世了。
动态HTML
上面的应用程序确实输出了简单的纯文本,但是网络语言是HTML,因此,让我们看看如何生成HTML。我们将输出当前时间并显示列表对象中的一些数据。
//listdatacontroller.h:

#ifndef LISTDATACONTROLLER_H
#define LISTDATACONTROLLER_H

#include <QList>
#include <QString>
#include "httprequesthandler.h"

using namespace stefanfrings;

class ListDataController: public HttpRequestHandler {
    Q_OBJECT
public:
    ListDataController(QObject* parent=0);
    void service(HttpRequest& request, HttpResponse& response);
private:
    QList<QString> list;
};

#endif // LISTDATACONTROLLER_H
//listdatacontroller.cpp:
#include <QTime>
#include "listdatacontroller.h"

ListDataController::ListDataController(QObject* parent)
    : HttpRequestHandler(parent) {
    list.append("Robert");
    list.append("Lisa");
    list.append("Hannah");
    list.append("Ludwig");
    list.append("Miranda");
    list.append("Francesco");
    list.append("Kim");
    list.append("Jacko");
}

void ListDataController::service(HttpRequest &request, HttpResponse &response) {
    response.setHeader("Content-Type", "text/html; charset=ISO-8859-1");
    response.write("<html><body>");

    response.write("The time is ");
    QString now=QTime::currentTime().toString("HH:mm:ss");
    response.write(now.toLatin1());

    response.write("<p>List of names:");
    response.write("<table border='1' cellspacing='0'>");
    for(int i=0; i<list.size(); i++) {
        QString number=QString::number(i);
        QString name=list.at(i);
        response.write("<tr><td>");
        response.write(number.toLatin1());
        response.write("</td><td>");
        response.write(name.toLatin1());
        response.write("</td></tr>");
    }
    response.write("</table>");

    response.write("</body></header>",true);
}
构造函数用一些名称填充列表。service()方法输出带有当前时间的HTML文档和一个显示列表对象内容的表。
注意:我们在编写文档之前设置了HTTP响应标头,该标头告诉浏览器我们正在使用什么文件格式和字符编码。ISO-8859-1与Latin 1相同,后者是欧洲默认的8位编码。
用新的控制器替换main.cpp中的控制器:
#include "listdatacontroller.h"

    new HttpListener(listenerSettings,new ListDataController(&app),&app);
运行并测试该应用程序。输出应如下所示:

请求映射器(Request Mapper)
现在,我们的应用程序中有两个不同的控制器类,但一次只能使用一个。所以我们创建一个”RequestMapper”类,它将在两个控制器之间切换。和以前一样,新类再次继承自HttpRequestHandler。
//requestmapper.h:

#ifndef REQUESTMAPPER_H
#define REQUESTMAPPER_H

#include "httprequesthandler.h"

using namespace stefanfrings;

class RequestMapper : public HttpRequestHandler {
    Q_OBJECT
public:
    RequestMapper(QObject* parent=0);
    void service(HttpRequest& request, HttpResponse& response);
};

#endif // REQUESTMAPPER_H
//requestmapper.cpp:
#include "requestmapper.h"
#include "helloworldcontroller.h"
#include "listdatacontroller.h"

RequestMapper::RequestMapper(QObject* parent)
    : HttpRequestHandler(parent) {
    // empty
}

void RequestMapper::service(HttpRequest& request, HttpResponse& response) {
    QByteArray path=request.getPath();		//获取请求路径
    qDebug("RequestMapper: path=%s",path.data());

	//请求映射器的作用:根据不同的url调用不同的控制器
    if (path=="/" || path=="/hello") {
        HelloWorldController().service(request, response);
    }
    else if (path=="/list") {
        ListDataController().service(request, response);
    }
    else {
        response.setStatus(404,"Not found");
        response.write("The URL is wrong, no such document.",true);
    }

    qDebug("RequestMapper: finished request");
}
用新的请求映射器替换main.cpp中的旧控制器:
#include "requestmapper.h"

    new HttpListener(listenerSettings,new RequestMapper(&app),&app);
请求映射器根据请求的路径调用我们两个控制器之一。
所以当你现在打开
http://localhost:8080/
或
http://localhost:8080/hello
,你得到 “Hello World”页。当你打开
http://localhost:8080/list
,将获得名称列表。
而如果你尝试打开任何错误的URL,如
http://localhost:8080/lalala
,将会收到错误消息 “The URL is wrong…”加上状态代码404,它是“未找到”的意思。一些程序使用它来处理错误。如果未设置状态码,则使用默认值200,表示“成功”。
注意:如果同时出现多个并发HTTP请求,则 service() 方法并行执行多次。因此,此方法是多线程的。当访问在 service() 方法外部声明的变量时,必须考虑这一点。
请求映射器是一个 “singleton” (单例),或者说它在”application scope”,因为它只有一个实例。
两种控制器类 (HelloWorldController 和 ListDataController) 在 “request scope”,这意味着每个请求都由其所属类的新实例处理。这会损失一些性能,但会稍微简化编程。
稍作修改即可将两个控制器类的范围更改为 “application scope”:
//新的requestmapper.h:
#ifndef REQUESTMAPPER_H
#define REQUESTMAPPER_H

#include "httprequesthandler.h"
#include "helloworldcontroller.h"
#include "listdatacontroller.h"

using namespace stefanfrings;

class RequestMapper : public HttpRequestHandler {
    Q_OBJECT
public:
    RequestMapper(QObject* parent=0);
    void service(HttpRequest& request, HttpResponse& response);
private:
    HelloWorldController helloWorldController;
    ListDataController listDataController;
};

#endif // REQUESTMAPPER_H
//新的requestmapper.cpp:
#include "requestmapper.h"

RequestMapper::RequestMapper(QObject* parent)
    : HttpRequestHandler(parent) {
    // empty
}

void RequestMapper::service(HttpRequest& request, HttpResponse& response) {
    QByteArray path=request.getPath();
    qDebug("RequestMapper: path=%s",path.data());

    if (path=="/" || path=="/hello") {
        helloWorldController.service(request, response);
    }
    else if (path=="/list") {
        listDataController.service(request, response);
    }
    else {
        response.setStatus(404,"Not found");
        response.write("The URL is wrong, no such document.");
    }

    qDebug("RequestMapper: finished request");
}
现在,每个请求仅重用一个实例 HelloWorldController 或 ListDataController。它们在启动期间仅创建一次,因为HttpRequestMapper 确实也只存在一次。
说明:上一个例子中,两个控制器类对象不是请求映射器类中的成员变量,所以它只能在 RequestMapper::service() 这个范围内生效。另外,每次调用 RequestMapper::service() 都会创建一个新实例,而在这个例子中,两个控制器类对象是成员变量,因此只在 RequestMapper 对象初始化时创建一次。
学习了如何使用会话后,还可以为每个会话创建控制器实例,并将其存储在会话存储中。然后你将会有一个”session scope”。会话将在后面进行解释。