配置
默认情况下,在 spring boot 嵌入的 tomcat 限制了上传文件的大小,在 spring boot 的我官方文档中说明,每个文件的最大配置为
1Mb
,单次请求的总文件数不能大于
10Mb
。
这意味着如果你上传的图片大于
1Mb
,会被拦截下来,无法正常保存到后台,并抛出一个错误,返回状态码:
500
。
The field file exceeds its maximum permitted size of 1048576 bytes.
需要根据实际情况更改这两个数值。(application.yml 配置文件)
spring:
  servlet:
    multipart:
      enabled: true
      max-file-size: 10MB
      max-request-size: 100MB
配置虚拟路径映射
后端程序接收到图片资源后,会将图片保存到硬盘中的一个路径下,如果我们想通过URL直接访问到图片资源,就需要配置一个 Mapping 路径去映射这个真实存在的物理路径。
同样是在 application.yml 文件中,添加物理存储路径以及映射到项目中的 Mapping 路径。
image:
  save-path: D:/image # 图片存储路径
  mapping-path: /img # 图片的 RequestMapping 的路径
添加一个spring boot配置程序,这样就形成了一对映射关系。
import org.springframework.beans.factory.annotation.Value;
import org.springframework.context.annotation.Configuration;
import org.springframework.web.servlet.config.annotation.ResourceHandlerRegistry;
import org.springframework.web.servlet.config.annotation.WebMvcConfigurer;

@Configuration
public class SpringbootConfigure implements WebMvcConfigurer {
    //@Value可以将配置文件的内容自动注入到属性内
    /***图标物理存储路径*/
    @Value("${image.save-path}")
    private String imageSavePath;
    /***图标映射路径*/
    @Value("${image.mapping-path}")
    private String imageMappingPath;

    @Override
    public void addResourceHandlers(ResourceHandlerRegistry registry) {
        registry.addResourceHandler(imageMappingPath + "**").addResourceLocations("file:" + imageSavePath);
    }
}
ImageController
用于接收图片的
Controller
import org.springframework.beans.factory.annotation.Value;
import org.springframework.core.io.FileSystemResource;
import org.springframework.core.io.Resource;
import org.springframework.http.MediaType;
import org.springframework.http.ResponseEntity;
import org.springframework.stereotype.Controller;
import org.springframework.web.bind.annotation.*;
import org.springframework.web.multipart.MultipartFile;

import java.io.File;
import java.io.IOException;
import java.nio.file.Files;
import java.nio.file.Path;
import java.util.UUID;


@Controller
@RequestMapping("/img")
public class ImageController {

    /*** 图片存储路径 */
    @Value("${image.save-path}")
    private String imageSavePath;
    /*** 图片映射路径 */
    @Value("${image.mapping-path}")
    private String imageMappingPath;


    /**
     * 获取图片
     *
     * @param imagePath 图片在服务器中的路径
     * @return 返回响应资源
     */
    @GetMapping("/{path}")
    public ResponseEntity<Resource> getImage(@PathVariable("path") String imagePath) throws IOException {
        final Path path = new File(imagePath).toPath();
        FileSystemResource resource = new FileSystemResource(path);
        return ResponseEntity.ok()
                .contentType(MediaType.parseMediaType(Files.probeContentType(path)))
                .body(resource);
    }

    /**
     * 上传
     *
     * @param fileUpload 图片资源
     * @return 图映射的虚拟访问路径
     */
    @PostMapping("/upload")
    public String upload(@RequestParam("file") MultipartFile fileUpload) {
        //获取文件名
        String fileName = fileUpload.getOriginalFilename();
        //获取文件后缀名。也可以在这里添加判断语句,规定特定格式的图片才能上传,否则拒绝保存。
        String suffixName = fileName.substring(fileName.lastIndexOf("."));
        //为了避免发生图片替换,这里使用了文件名重新生成
        fileName = UUID.randomUUID() + suffixName;
        try {
            // 将图片保存到文件夹里
            fileUpload.transferTo(new File(imageSavePath + fileName));
            // 返回文件 Mapping 路径,使用 http://IP:端口/下面返回的路径 ,即可在网页中查看图片
            return imageMappingPath + fileName;
        } catch (Exception e) {
            e.printStackTrace();
            return null;
        }
    }

}
数据发送到后端需要注意的问题
要注意前端 post 提交
content-type
的格式以及后端
@RequestBody
注解的问题
@RequestBody注解
@RequestBody
注解常用来处理
POST
请求,并且
content-type
不是默认的
application/x-www-form-urlcoded
编码的内容,比如说:
application/json
或者是
application/xml
等。一般情况下来说常用其来处理
application/json
类型。
@RequestMapping
注解的方法的参数中包含了
@RequestBody
注解,那么 Spring 会首先查看请求中的
Content-Type
头部,然后根据
Content-Type
头部去查找合适的
HttpMessageConverter
@RequestBody
用于需要触发
HttpMessageConverter
的场景:
-
当HTTP请求的
Content-Type
头部为
application/json
时,需要加上
@RequestBody
注解,并使用默认的
HttpMessageConverter
或者自定义的
HttpMessageConverter
对请求的body中的json字符串转换为java对象。 -
当
Content-Type
头部的值为
application/x-www-form-urlencoded
或者
multipart/form-data
时,表名此请求是一个常规的表单请求,不能使用
@RequestBody
注解。
在《Spring 实战》中,表明了
@RequestBody
注解的含义和使用方式:用来解析请求体(可能是
POST
,
PUT
,
DELETE
,
GET
请求)中
Content-Type
为
application/json
类型的请求,利用消息转换器将其转换为对应的java对象(必须使用 VO 对象(VO:存储表单数据的实体类对象,详见类命名:
Java 中 PO、VO、POJO、DTO、DAO、Service 包等常见包名的理解
)去接收)
那么什么类型的消息能够加上
@RequestBody
,什么类型的消息不能加呢?当请求中的
ContentType
分别为一下三种类型时的结果:
| 是否加上注解 | x-www-form-urlencoded | form-data | application/json |
|---|---|---|---|
不加注解 |
能接收 | 能接收 | 不能接收 |
加上注解 |
不能接收 | 不能接收 | 能接收 |
延伸学习:
常见的表单数据格式
图片转为 Base64 编码格式保存
一般建议很小的图片保存为 Base64 格式,或者页面中图片特别少且大小不是很大的情况下使用,因为转为 Base64 编码格式后将会明显占用更多空间。因为 Base64 的使用缺点,所以一般图片小于
10kb
的时候,我们才会选择使用 Base64 图片,比如一些表情图片,太大的图片转换成 Base64 得不偿失。当然,极端情况极端考虑。
Base64 编码的思想是是采用
64
个基本的 ASCII 码字符对数据进行重新编码。
Base64 编码要求把
3
个
8
位字节(
3×8=24
)转化为
4
个
6
位的字节(
4×6=24
),之后在
6
位的前面补两个
0
,形成
8
位一个字节的形式。
如果剩下的字符不足
3
个字节,则用
0
填充,输出字符使用’
=
‘,因此编码后输出的文本末尾可能会出现
1
或
2
个’
=
‘。
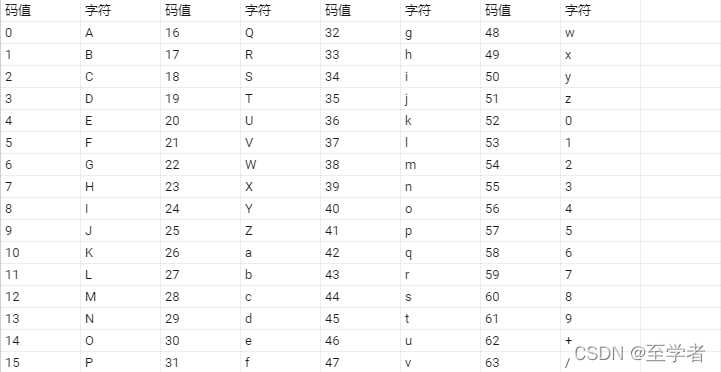
为了保证所输出的编码位可读字符,Base64 制定了一个编码表,以便进行统一转换。编码表的大小为
2^6=64
,这也是 Base64 名称的由来。
注BASE64字符表:
ABCDEFGHIJKLMNOPQRSTUVWXYZabcdefghijklmnopqrstuvwxyz0123456789+/
从以上编码规则可以得知,通过 Base64 编码,原来的
3
个字节编码后将成为
4
个字节,即字节增加了 33.3%,数据量相应变大。所以
10M
的数据通过 Base64 编码后大小大概为
10M*133.3%=13.33M
。
图片转换成base64格式的优缺点
- 优点
(1)Base64 格式的图片是文本格式,占用
内存
小,转换后的大小比例大概为
1/3
,降低了资源服务器的消耗;
(2)网页中使用 Base64 格式的图片时,不用再请求服务器调用图片资源,减少了服务器访问次数。
- 缺点
(1)base64格式的文本内容较多,存储在数据库中增大了数据库服务器的压力;(磁盘空间占用大)
(2)网页加载图片虽然不用访问服务器了,但因为base64格式的内容太多,所以加载网页的速度会降低,可能会影响用户的体验。
(3)Base64 无法缓存,要缓存只能缓存包含 Base64 的文件,比如 js 或者 css,这比直接缓存图片要差很多,而且一般 HTML 改动比较频繁,所以等同于得不到缓存效益。
Base64 转换图片工具类
其实也可以转换文件
import org.apache.tomcat.util.codec.binary.Base64;
import org.springframework.web.multipart.MultipartFile;

import java.io.*;
import java.util.Objects;


public class ImageToBase64Util {

    /***  本地文件(图片、excel等)转换成Base64字符串 */
    public static String convertFileToBase64(String imgPath) {
        //读取图片字节数组
        byte[] data = null;
        try {
            InputStream in = new FileInputStream(imgPath);
            System.out.println("文件大小(字节)=" + in.available());
            data = new byte[in.available()];
            in.read(data);
            in.close();
        } catch (IOException e) {
            e.printStackTrace();
        }
        //对字节数组进行Base64编码,得到Base64编码的字符串
        return new String(Objects.requireNonNull(Base64.encodeBase64(data)));
    }

    /*** 将base64字符串,生成文件 */
    public static File convertBase64ToFile(String fileBase64String, String filePath, String fileName) {
        BufferedOutputStream bos = null;
        FileOutputStream fos = null;
        File file = null;
        try {
            File dir = new File(filePath);
            //判断文件目录是否存在
            if (!dir.exists() && dir.isDirectory()) {
                dir.mkdirs();
            }
            byte[] bfile = Base64.decodeBase64(fileBase64String);
            file = new File(filePath + File.separator + fileName);
            fos = new FileOutputStream(file);
            bos = new BufferedOutputStream(fos);
            bos.write(bfile);
            return file;
        } catch (Exception e) {
            e.printStackTrace();
        } finally {
            if (bos != null) {
                try {
                    bos.close();
                } catch (IOException e1) {
                    e1.printStackTrace();
                }
            }
            if (fos != null) {
                try {
                    fos.close();
                } catch (IOException e1) {
                    e1.printStackTrace();
                }
            }
        }
        return null;
    }

    /*** MultipartFile转成InputStream 将图片转换成Base64编码 */
    public static String imgToBase64(MultipartFile uploadFiles) {
        InputStream in;
        byte[] data = null;
        //读取图片字节数组
        try {
            byte[] byteArr = uploadFiles.getBytes();
            in = new ByteArrayInputStream(byteArr);
            data = new byte[in.available()];
            in.read(data);
            in.close();
        } catch (IOException e) {
            e.printStackTrace();
        } catch (Exception e1) {
            e1.getMessage();
            e1.printStackTrace();
        }

        return new String(Objects.requireNonNull(Base64.encodeBase64(data)));
    }
参考