1服务器功能介绍简介
1.1 WEB 服务器
WEB 网站服务器可以对企业内部及外部网站提供网站信息、同时可以提供文档,放置网站文件。作为企业对外宣称及对内服务的核心业务。在 linux 系统中,通常使用 apache 及 nginx服务作为提供网站服务器的支撑。
1.2 NFS 服务器
NFS,是Network File System的简写,即网络文件系统。网络文件系统是FreeBSD支持的文件系统中的一种,也被称为NFS. NFS允许一个系统在网络上与他人共享目录和文件。通过使用NFS,用户和程序可以像访问本地文件一样访问远端系统上的文件。本次项目用来为web服务器提供存储。
1.3负载均衡调度器
负载均衡建立在现有网络结构之上,它提供了一种廉价有效透明的方法扩展网络设备和服务器的带宽、增加吞吐量、加强网络数据处理能力、提高网络的灵活性和可用性。负载均衡(Load Balance)其意思就是分摊到多个操作单元上进行执行,例如Web服务器、FTP服务器、企业关键应用服务器和其它关键任务服务器等,从而共同完成工作任务。本项目用来合理分配访问资源,减少带宽的浪费。
1.4双机热备服务器
双机热备特指基于MASTER/BACKUP方式的服务器热备。服务器数据包括数据库数据同时往两台或多台服务器执行写操作,或者使用一个共享的存储设备。在同一时间内只有一台服务器运行。当其中运行着的一台服务器出现故障无法启动时,另一台备份服务器会通过软件诊测(一般是通过心跳诊断)将standby机器激活,保证应用在短时间内完全恢复正常使用。本项目结合keepalive作为双调速器进行主备设计,防止单点故障的产生。
2工作原理介绍
2.1 Nginx的模块与工作原理
Nginx由内核和模块组成,其中,内核的设计非常微小和简洁,完成的工作也非常简单,仅仅通过查找配置文件将客户端请求映射到一个location block(location是Nginx配置中的一个指令,用于URL匹配),而在这个location中所配置的每个指令将会启动不同的模块去完成相应的工作。
Nginx的模块从结构上分为核心模块、基础模块和第三方模块:
核心模块:HTTP模块、EVENT模块和MAIL模块。
基础模块:HTTP Access模块、HTTP FastCGI模块、HTTP Proxy模块和HTTP Rewrite模块。
第三方模块:HTTP Upstream Request Hash模块、Notice模块和HTTP Access Key模块。
用户根据自己的需要开发的模块都属于第三方模块。正是有了这么多模块的支撑,Nginx的功能才会如此强大。
Nginx的模块从功能上分为如下三类。
Handlers(处理器模块)。此类模块直接处理请求,并进行输出内容和修改headers信息等操作。Handlers处理器模块一般只能有一个。
Filters (过滤器模块)。此类模块主要对其他处理器模块输出的内容进行修改操作,最后由Nginx输出。
Proxies (代理类模块)。此类模块是Nginx的HTTP Upstream之类的模块,这些模块主要与后端一些服务比如FastCGI等进行交互,实现服务代理和负载均衡等功能。
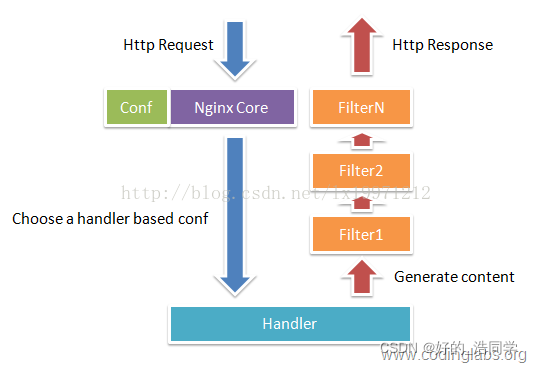
图1-1展示了Nginx模块常规的HTTP请求和响应的过程。

Nginx本身做的工作实际很少,当它接到一个HTTP请求时,它仅仅是通过查找配置文件将此次请求映射到一个location block,而此location中所配置的各个指令则会启动不同的模块去完成工作,因此模块可以看做Nginx真正的劳动工作者。通常一个location中的指令会涉及一个handler模块和多个filter模块(当然,多个location可以复用同一个模块)。handler模块负责处理请求,完成响应内容的生成,而filter模块对响应内容进行处理。
Nginx的模块直接被编译进Nginx,因此属于静态编译方式。启动Nginx后,Nginx的模块被自动加载,不像Apache,首先将模块编译为一个so文件,然后在配置文件中指定是否进行加载。在解析配置文件时,Nginx的每个模块都有可能去处理某个请求,但是同一个处理请求只能由一个模块来完成。
2.2keepalived热备方式
Keepalived 是专门针对 LVS 设计的一款强大的辅助工具,主要用来提供故障切
换(Failover)和健康检查(Health Checking)功能——判断 LVS 负载调度器,节点服
务器的 可用性,及时隔离并替换为新的服务器,当故障主机恢复后将其重新加入群集。
Keepalived 的官方网站: http://www.keepalived.org/
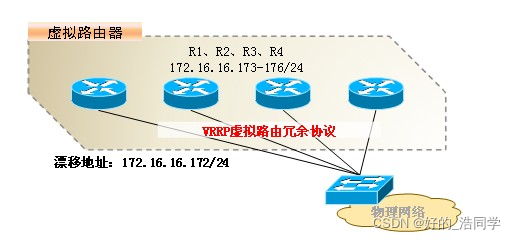
Keepalived 采用 VRRP(Virtual Router Redundancy Protocol, 虚拟路由冗余协议)
热备份,以软件的方式实现 Linux 服务器的多机热备功能。VRRP 是针对路由器的一种备份解决方案,由多台路由器组成一个热备组,通过共用的虚拟 IP 地址对外提供服务;每个热备组内同一时刻只有一台主路由器提供服务, 其他路由器处于冗余状态, 若当前在线的路由器失效,则其他路由器会自动接替(优先级决定接替顺序)虚拟 IP 地址,以继续提供服务

要点:
1、多台路由器产生-台虚拟路由器,虚拟路由器有虚拟 IP(VIP)和 MAC
2、多台路由通过选举机制决定谁是主(master,只有一个)
1)比较优先级、再比较 IP ,大优先
2)Priority: 默认 100,0-255 ,255-路由器接口 IP 配成 VIP,0–mater 辞职
3)Preempt: 抢占,默认配置,实际工作中,建议不抢占
3、Vip–漂移地址,vip 总是跟着 master
4、主备切换什么情况下发生:
1)master 辞职或关闭服务等已知原因,切换立即
2)master 联系不到了等未知原因 3 秒后发生切换(backup 和 master 相互发 hello,1 次/s,三次没收到对方 hello,认为对方故障,发生切换)
3.网络设计
3.1项目需求
构建基于云架构企业内部网络对比体系与数据服务体系,使企业网的资源具有标准化、规范化并享有平台的权威性。利用公司的信息基础设施,结合未来大数据时代体系,以及智慧城市、人工智能、机器学习等规划与建设内容,以应用需求为牵引,统一整合信息资源。为未来更多公司内部多元化应用业务数据提供廉优服务平台,具有纵深意义。企业及运营商的主机设备及其外围支持设备已逐步被高性能的服务器所替代,这些服务器的运行速率大多已达到 GB 等级。数据中心内部多种应用的共存、特定环境下必须考虑的建筑因素,再加上基于主机的服务将转变为基于云计算服务器,这些都为数据中心的设计与实施带来了新的挑战。网络系统和基于互联网的应用也需要更高带宽、更快速度和更安全机制来发挥所有系统设施的潜能。
交大之光公司,由于用户量的激增,公司原来的网络架构已经承载不了巨大的流量冲击,为了用户有更好的体验,决定升级本公司的网络集群架构,具体要求是可以承载十万以上的日活跃用户访问网站,并且合理分配资源,便于维护与管理,可以实现快速的扩容。
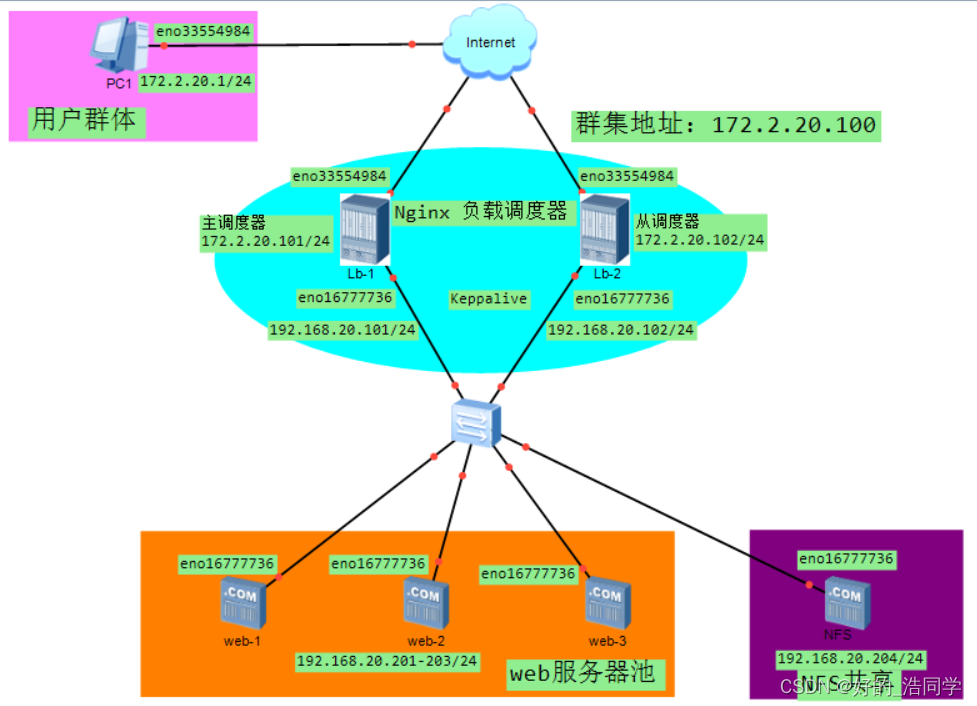
3.2项目拓扑

3.3设备管理规划
|
|
|||
|
|
|
|
|
|
|
|
|
|
|
|
|
|
|
|
|
|
|
|
|
|
|
|
|
|
|
|
|
|
|
|
|
|
|
|
|
|
|
|
3.4IP 规划
|
|
|||
|
|
|
|
|
|
|
|
|
|
|
|
|
|
|
|
|
|
|
|
|
|
|
|
|
|
|
|
|
|
|
|
|
|
|
|
|
|
|
|
|
|
|
|
|
|
|
|
|
|
4.项目实践过程。
4.1web-1 的配置
4.
1.1 安装yum本地源
[root@zgh2303-web-1 ~]# systemctl disable firewalld
[root@zgh2303-web-1 ~]# systemctl stop firewalld
[root@zgh2303-web-1 ~]# setenforce 0
[root@zgh2303-web-1 ~]# mount /dev/cdrom /mnt
[root@zgh2303-web-1 ~]# cd /etc/yum.repos.d/
[root@zgh2303-web-1 yum.repos.d]# rm -f *
[root@zgh2303-web-1 yum.repos.d]# vim base.repo
[base]
name=base
baseurl=file:///mnt
enabled=1
gpgcheck=0
4.1.2安装httpd 服务,并配置测试页面
[root@zgh2303-web-1 yum.repos.d]# yum clean all
[root@zgh2303-web-1 yum.repos.d]# yum -y install httpd
[root@zgh2303-web-1 ~]# yum -y install httpd
[root@zgh2303-web-1~]# echo “This is web-1 zgh2303” > /var/www/html/index.html
[root@zgh2303-web-1 ~]# systemctl start httpd
[root@zgh2303-web-1 ~]# systemctl enable httpd
[root@zgh2303-web-1 ~]# curl 192.168.20.201
This is web-1 zgh2303
4.
1.3安装NFS客户端,挂在NFS
[root@zgh2303-web-1 ~]# yum -y install nfs-utils
[root@zgh2303-web-1 ~]# showmount -e 192.168.20.204
Export list for 192.168.20.204:
/web *
[root@zgh2303-web-1 ~]# vim /etc/fstab
192.168.20.204:/web /var/www/html nfs defaults,rw,_netdev 0 0
[root@zgh2303-web-1 ~]# cat /var/www/html/index.html
This is web-1 zgh2303
[root@zgh2303-web-1 ~]# mount -a
[root@zgh2303-web-1 ~]# cat /var/www/html/index.html
This is NFS zgh2303
4.
1.4设置访问目录的权限
[root@zgh2303-web-1 ~]# yum -y install httpd php php-mysql
[root@zgh2303-web-1 ~]# systemctl restart httpd
[root@zgh2303-web-1 ~]# chmod -R 777 /var/www/html/
4.2web-2 的
配置
4.
2.1 安装yum本地源
[root@zgh2303-web-2 ~]#systemctl disable firewalld
[root@zgh2303-web-2 ~]#systemctl stop firewalld
[root@zgh2303-web-2 ~]#setenforce 0
[root@zgh2303-web-2 ~]# mount /dev/cdrom /mnt
[root@zgh2303-web-2 ~]# cd /etc/yum.repos.d/
[root@zgh2303-web-2 yum.repos.d]# rm -f *
[root@zgh2303-web-2 yum.repos.d]# vim base.repo
[base]
name=base
baseurl=file:///mnt
enabled=1
gpgcheck=0
4.
2.2安装httpd 服务,并配置测试页面
[root@zgh2303-web-2 yum.repos.d]# yum clean all
[root@zgh2303-web-2 yum.repos.d]# yum -y install httpd
[root@zgh2303-web-2 ~]# yum -y install httpd
[root@zgh2303-web-2~]# echo “This is web-2 zgh2303” > /var/www/html/index.html
[root@zgh2303-web-2 ~]# systemctl start httpd
[root@zgh2303-web-2 ~]# systemctl enable httpd
[root@zgh2303-web-2 ~]# curl 192.168.20.202
This is web-2 zgh2303
4.
2.3安装NFS客户端,挂在NFS
[root@ zgh2303-web-2 ~]# yum -y install nfs-utils
[root@ zgh2303-web-2 ~]# showmount -e 192.168.20.204
Export list for 192.168.20.204:
/web *
[root@ zgh2303-web-2 ~]# vim /etc/fstab
192.168.20.204:/web /var/www/html nfs defaults,rw,_netdev 0 0
[root@ zgh2303-web-2 ~]# cat /var/www/html/index.html
This is web-2 zgh2303
[root@ zgh2303-web-2 ~]# mount -a
[root@ zgh2303-web-2 ~]# cat /var/www/html/index.html
This is NFS zgh2303
4.
2.4设置访问目录的权限
[root@ zgh2303-web-2 ~]# yum -y install httpd php php-mysql
[root@ zgh2303-web-2 ~]# systemctl restart httpd
[root@ zgh2303-web-2 ~]# chmod -R 777 /var/www/html/
4.
3web-3 的配置
4.3.1 安装yum本地源
[root@ zgh2303-web-3 ~]#systemctl disable firewalld
[root@ zgh2303-web-3 ~]#systemctl stop firewalld
[root@ zgh2303-web-3 ~]#setenforce 0
[root@ zgh2303-web-3 ~]# mount /dev/cdrom /mnt
[root@ zgh2303-web-3 ~]# cd /etc/yum.repos.d/
[root@ zgh2303-web-3 yum.repos.d]# rm -f *
[root@ zgh2303-web-3 yum.repos.d]# vim base.repo
[base]
name=base
baseurl=file:///mnt
enabled=1
gpgcheck=0
4.3.2安装httpd 服务,并配置测试页面
[root@ zgh2303-web-3 yum.repos.d]# yum clean all
[root@ zgh2303-web-3 yum.repos.d]# yum -y install httpd
[root@ zgh2303-web-3 ~]# yum -y install httpd
[root@zgh2303-web-3~]# echo “This is web-3 zgh2303” > /var/www/html/index.html
[root@ zgh2303-web-3 ~]# systemctl start httpd
[root@ zgh2303-web-3 ~]# systemctl enable httpd
[root@ zgh2303-web-3 ~]# curl 192.168.20.203
This is web-3 zgh2303
4.3.3安装NFS客户端,挂在NFS
[root@ zgh2303-web-3 ~]# yum -y install nfs-utils
[root@ zgh2303-web-3 ~]# showmount -e 192.168.20.204
Export list for 192.168.20.204:
/web *
[root@ zgh2303-web-3 ~]# vim /etc/fstab
192.168.20.204:/web /var/www/html nfs defaults,rw,_netdev 0 0
[root@ zgh2303-web-3 ~]# cat /var/www/html/index.html
This is web-3 zgh2303
[root@ zgh2303-web-3 ~]# mount -a
[root@ zgh2303-web-3 ~]# cat /var/www/html/index.html
This is NFS zgh2303
4.3.4设置访问目录的权限
[root@ zgh2303-web-3 ~]# yum -y install httpd php php-mysql
[root@ zgh2303-web-3 ~]# systemctl restart httpd
[root@ zgh2303-web-3 ~]# chmod -R 777 /var/www/html/
4.4NFS 的配置
4.
4.1 安装yum本地源
[root@ zgh2303-nfs ~]#systemctl disable firewalld
[root@ zgh2303-nfs ~]#systemctl stop firewalld
[root@ zgh2303-nfs ~]#setenforce 0
[root@ zgh2303-nfs ~]# mount /dev/cdrom /mnt
[root@ zgh2303-nfs ~]# cd /etc/yum.repos.d/
[root@ zgh2303-nfs yum.repos.d]# rm -f *
[root@ zgh2303-nfs yum.repos.d]# vim base.repo
[base]
name=base
baseurl=file:///mnt
enabled=1
gpgcheck=0
4.
4.2配置NFS
[root@ zgh2303-nfs ~]# systemctl stop firewalld
[root@ zgh2303-nfs ~]# systemctl disable firewalld
[root@ zgh2303-nfs ~]# setenforce 0
[root@ zgh2303-nfs ~]# mkdir /web //建共享目录
[root@ zgh2303-nfs ~]# chmod 777 /web
[root@ zgh2303-nfs ~]# yum -y install nfs-utils
[root@ zgh2303-nfs ~]# systemctl start nfs-server
[root@ zgh2303-nfs ~]# systemctl enable nfs-server
[root@ zgh2303-nfs ~]# vim /etc/exports //配置共享
/web *(rw,no_root_squash)
[root@ zgh2303-nfs ~]# systemctl restart nfs-server
[root@ zgh2303-nfs ~]# echo “This is NFS zgh2303” > /web/index.html
4.5Lb-1 的配置
4.
5.1配置网卡ip地址
[root@ zgh2303-Lb-1 ~]#nmcli connection modify eno16777736 ipv4.addresses 192.168.20.101/24 ipv4.method manual
[root@ zgh2303-Lb-1 ~]#nmcli connection modify eno16777736 ipv4.addresses 172.2.20.101/24 ipv4.method manual
[root@ zgh2303-Lb-1 ~]#systemctl restart network
[root@ zgh2303-Lb-1 ~]# systemctl stop firewalld
[root@ zgh2303-Lb-1 ~]# setenforce 0
4.
5.2下载epel yum源配置
[root@zgh2303-Lb-1~]# wget -O /etc/yum.repos.d/epel.repo http://mirrors.aliyun.com/repo/epel-7.repo
4.
5.3安装Nginx,配置负载均衡调度器
[root@ zgh2303-Lb-1 ~]# yum -y install nginx
[root@ zgh2303-Lb-1 ~]# systemctl start nginx
[root@ zgh2303-Lb-1 ~]# systemctl enable nginx.service
[root@ zgh2303-Lb-1 ~]# vim /etc/nginx/conf.d/proxy.conf
# 负载均衡器收到请求后,会用轮询方式把请求转发到两台web服务器处理。
upstream jt {
server 192.168.20.201:80; #web-1第一台web服务器
server 192.168.20.202:80; #web-2 第二台web服务器
server 192.168.20.203:80; #web-3 第三台web服务器
}
# 本服务器配置
server {
server_name 172.2.20.100; #负载均衡的外网IP,集群IP,这个IP+域名
listen 80;
location / {
proxy_set_header Host $host;
proxy_set_header X-Real-IP $remote_addr;
proxy_set_header X-Forwarded-For $proxy_add_x_forwarded_for;
proxy_pass http://jt; }
}
[root@ zgh2303-Lb-1 ~]# nginx –t #检查语法
[root@ zgh2303-Lb-1 ~]# nginx -s reload #重启
4.
5.4 配置yum本地源
[root@ zgh2303-Lb-1 ~]# mount /dev/cdrom /mnt
[root@ zgh2303-Lb-1 ~]# cd /etc/yum.repos.d/
[root@ zgh2303-Lb-1 yum.repos.d]# rm -f *
[root@ zgh2303-Lb-1 yum.repos.d]# vim base.repo
[base]
name=base
baseurl=file:///mnt
enabled=1
gpgcheck=0
4.
5.5 安装keepalive,实现双机热备
[root@ zgh2303-Lb-1 ~]# yum clean all
[root@ zgh2303-Lb-1 ~]# yum -y install keepalived ipvsadm
[root@ zgh2303-Lb-1 ~]# systemctl enable keepalived
[root@ zgh2303-Lb-1 ~]# cd /etc/keepalived/
[root@ zgh2303-Lb-1 keepalived]# cp keepalived.conf keepalived.conf.bak
[root@ zgh2303-Lb-1 keepalived]# vim keepalived.conf
global_defs {
router_id HA_TEST_R1
}
vrrp_instance VI_1 {
state MASTER
interface eno33554984
virtual_router_id 1
priority 110
advert_int 1
authentication {
auth_type PASS
auth_pass 123456
}
virtual_ipaddress {
172.2.20.100
}
}
[root@ zgh2303-Lb-1 keepalived]# systemctl start keepalived
4.6 Lb-2 的配置
4.6.1配置网卡ip地址
[root@Lb-2~]#nmcli connection modify eno16777736 ipv4.addresses 192.168.20.102/24 ipv4.method manual
[root@Lb-2 ~]#nmcli connection modify eno33554984 ipv4.addresses 172.2.20.102/24 ipv4.method manual
[root@Lb-2 ~]#systemctl restart network
[root@Lb-2 ~]# systemctl stop firewalld
[root@Lb-2 ~]# setenforce 0
4.6.2下载epel yum源配置
[root@Lb-2 ~]# wget -O /etc/yum.repos.d/epel.repo http://mirrors.aliyun.com/repo/epel-7.repo
4.6.3安装Nginx,配置负载均衡调度器
[root@Lb-2 ~]# yum -y install nginx
[root@Lb-2 ~]# systemctl start nginx
[root@Lb-2 ~]# systemctl enable nginx.service
[root@Lb-2 ~]# vim /etc/nginx/conf.d/proxy.conf
# 负载均衡器收到请求后,会用轮询方式把请求转发到两台web服务器处理。
upstream jt {
server 192.168.20.201:80; #web-1,第一台web服务器
server 192.168.20.202:80; #web-2 第二台web服务器
server 192.168.20.203:80; #web-3 第三台web服务器
}
# 本服务器配置
server {
server_name 172.2.20.100; #负载均衡的外网IP,集群IP,这个IP+域名
listen 80;
location / {
proxy_set_header Host $host;
proxy_set_header X-Real-IP $remote_addr;
proxy_set_header X-Forwarded-For $proxy_add_x_forwarded_for;
proxy_pass http://jt; }
}
[root@Lb-1 ~]# nginx –t #检查语法
[root@Lb-1 ~]# nginx -s reload #重启
4.6.4 配置yum本地源
[root@Lb-2 ~]# mount /dev/cdrom /mnt
[root@Lb-2 ~]# cd /etc/yum.repos.d/
[root@Lb-2 yum.repos.d]# rm -f *
[root@Lb-2 yum.repos.d]# vim base.repo
[base]
name=xxxxxxxxxxxx
baseurl=file:///mnt
enabled=1
gpgcheck=0
4.6.5 安装keepalive,实现双机热备
[root@Lb-2 ~]# yum clean all
[root@Lb-2 ~]# yum -y install keepalived ipvsadm
[root@Lb-2 ~]# systemctl enable keepalived
[root@Lb-2 ~]# cd /etc/keepalived/
[root@Lb-2 keepalived]# cp keepalived.conf keepalived.conf.bak
[root@Lb-2 keepalived]# vim keepalived.conf
global_defs {
router_id HA_TEST_R2
}
vrrp_instance VI_1 {
state BACKUP
interface eno33554984
virtual_router_id 1
priority 99
advert_int 1
authentication {
auth_type PASS
auth_pass 123456
}
virtual_ipaddress {
172.2.20.100
}
}
[root@Lb-2 keepalived]# systemctl start keepalived
5
.项目验证与测试
5.1验证负载均衡
在web-1、web-2、web-3分别设置测试页面验证负载均衡。

5.
2验证web服务器的NFS挂载成功。
在挂载成功之后,修改测试页面,再次访问,出现修改以后的结果。

5.
3验证keepalive
一开始漂移地址在主调度器Lb-1。

从调度器Lb-2上没有漂移地址。

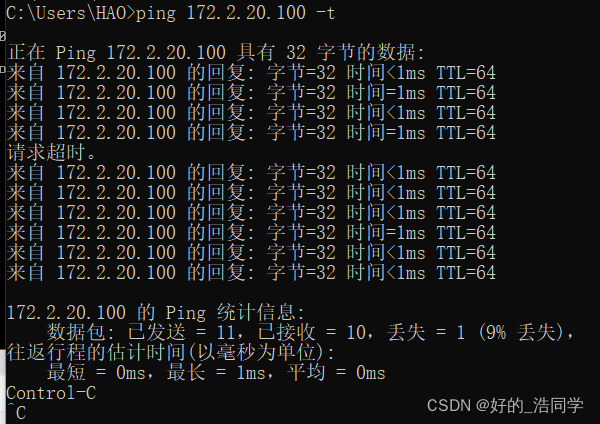
用客户机ping 172.2.20.100 一开始完全连接,中继部分丢包,是因为关闭了主调度器Lb-1服务很快有继续连接上,是因为从调度器的状态由BACKUP变成MASTER。

当客户机 ping 172.2.20.100 时 主调度器Lb-1停止了keepalive服务。

由于 主调度器Lb-1模拟故障,此时从调度器Lb-2变成MASTER,漂移地址出现在从调度器。

从调度器的日志文件,可以看出状态的切换。
