首先分享之前的所有文章 , 欢迎点赞收藏转发三连下次一定 >>>>
???
文章合集 :
?
https://juejin.cn/post/6941642435189538824
Github :
?
https://github.com/black-ant
CASE 备份 :
?
https://gitee.com/antblack/case
一 .前言
前面说了 Seata Client 的请求流程 , 这一篇来看一下 Client 端对 undo-log 的操作.
undo-log 是 AT 模式中的核心部分 ,
他是在 RM 部分完成的 , 在每一个数据库单元处理时均会生成一条 undoLog 数据.
二 . undo-log 表
先来看一下 undo-log 的表结构
CREATE TABLE `undo_log` (
  `id` bigint(20) NOT NULL AUTO_INCREMENT,
  `branch_id` bigint(20) NOT NULL,
  `xid` varchar(100) NOT NULL,
  `context` varchar(128) NOT NULL,
  `rollback_info` longblob NOT NULL,
  `log_status` int(11) NOT NULL,
  `log_created` datetime NOT NULL,
  `log_modified` datetime NOT NULL,
  `ext` varchar(100) DEFAULT NULL,
  PRIMARY KEY (`id`),
  UNIQUE KEY `ux_undo_log` (`xid`,`branch_id`)
) ENGINE=InnoDB AUTO_INCREMENT=17 DEFAULT CHARSET=utf8;

// 看一下其中可以了解的参数 :
- branch_id : 分支 ID
- context : 镜像数据
- rollback_info :
- log_status :
SQL 语句
INSERT INTO `seata`.`undo_log`(
    `id`, `branch_id`, `xid`,
    `context`, `rollback_info`,
    `log_status`, `log_created`, `log_modified`,
    `ext`
) VALUES (
    1, 5116237355214458898, '192.168.181.2:8091:5116237355214458897',
    'serializer=jackson', 0x7B7D,
    1, '2021-06-25 23:26:06', '2021-06-25 23:26:06',
    NULL
);
单纯的看 SQL 语句还不是很清楚 , 再详细的看看 ,
这里首先透露最终的处理逻辑 , debug 的时候可以通过 DEBUG 该方法进行回退
:
// 看一下当前插入的 undoLog 详情
private void insertUndoLog(String xid, long branchId, String rollbackCtx,
                               byte[] undoLogContent, State state, Connection conn) throws SQLException {
    try (PreparedStatement pst = conn.prepareStatement(INSERT_UNDO_LOG_SQL)) {
        pst.setLong(1, 4386660905323926071);
        pst.setString(2, "192.168.181.2:8091:4386660905323926065");
        pst.setString(3, "serializer=jackson");
        pst.setBlob(4, BlobUtils.bytes2Blob(undoLogContent));
        pst.setInt(5, State.Normal(0));
        pst.executeUpdate();
    } catch (Exception e) {
        if (!(e instanceof SQLException)) {
                e = new SQLException(e);
        }
        throw (SQLException) e;
    }
}

// undoLogContent 参数
{
    "@class": "io.seata.rm.datasource.undo.BranchUndoLog",
    "xid": "192.168.181.2:8091:4386660905323926065",
    "branchId": 4386660905323926071,
    "sqlUndoLogs": ["java.util.ArrayList", [{
        "@class": "io.seata.rm.datasource.undo.SQLUndoLog",
        "sqlType": "INSERT",
        "tableName": "t_order",
        "beforeImage": {
            "@class": "io.seata.rm.datasource.sql.struct.TableRecords$EmptyTableRecords",
            "tableName": "t_order",
            "rows": ["java.util.ArrayList", []]
        },
        "afterImage": {
            "@class": "io.seata.rm.datasource.sql.struct.TableRecords",
            "tableName": "t_order",
            "rows": ["java.util.ArrayList", [{
                "@class": "io.seata.rm.datasource.sql.struct.Row",
                "fields": ["java.util.ArrayList", [{
                    "@class": "io.seata.rm.datasource.sql.struct.Field",
                    "name": "id",
                    "keyType": "PRIMARY_KEY",
                    "type": 4,
                    "value": 31
                }, {
                    "@class": "io.seata.rm.datasource.sql.struct.Field",
                    "name": "order_no",
                    "keyType": "NULL",
                    "type": 12,
                    "value": "63098e74e93b49bba77f1957e8fdab39"
                }, {
                    "@class": "io.seata.rm.datasource.sql.struct.Field",
                    "name": "user_id",
                    "keyType": "NULL",
                    "type": 12,
                    "value": "1"
                }, {
                    "@class": "io.seata.rm.datasource.sql.struct.Field",
                    "name": "commodity_code",
                    "keyType": "NULL",
                    "type": 12,
                    "value": "C201901140001"
                }, {
                    "@class": "io.seata.rm.datasource.sql.struct.Field",
                    "name": "count",
                    "keyType": "NULL",
                    "type": 4,
                    "value": 50
                }, {
                    "@class": "io.seata.rm.datasource.sql.struct.Field",
                    "name": "amount",
                    "keyType": "NULL",
                    "type": 8,
                    "value": 100.0
                }]]
            }]]
        }
    }]]
}
undoLogContent 是一个BlobUtils.bytes2Blob 转换的 Byte 数组 , 其中通过 xid 和 BranchId 存储了
全局事务 ID (xid)
以及
分支事务 ID(BranchId)
,同时在 sqlUndoLogs 属性中记录了
表名 (tableName)
和
操作类型 (sqlType)
此处通过
beforeImage
和
afterImage
对前后的数据 (PS : 此处不是备份了整个记录 ,而是备份了部分参数)
三 . Client undo-log 的处理流程
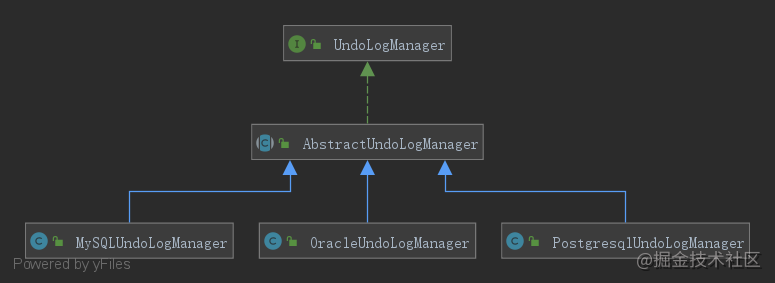
Client 提供了三种保存 undo-log 的实现 , 可以看到 , 都是持久化到库中的 , 只是区分了具体的库类型

3.1 AbstractUndoLogManager 解析
AbstractUndoLogManager 实现了 UndoLogManager , 它是一个主要的管理工具 , 实现了对 undo-log 的管理 , 该类主要实现了如下方法
public interface UndoLogManager {

    void flushUndoLogs(ConnectionProxy cp) throws SQLException;

    void undo(DataSourceProxy dataSourceProxy, String xid, long branchId) throws TransactionException;

    void deleteUndoLog(String xid, long branchId, Connection conn) throws SQLException;

    void batchDeleteUndoLog(Set<String> xids, Set<Long> branchIds, Connection conn) throws SQLException;

    int deleteUndoLogByLogCreated(Date logCreated, int limitRows, Connection conn) throws SQLException;

}
整个案例中有三个 RM ( Order , Account , Storage) , 下面来看一下三个 RM 是怎么处理的
3.2 undo-log 发起的流程 (Order)
-
ConnectionProxy # doCommit :
发起整体的 commit 流程
-
ConnectionProxy # processGlobalTransactionCommit :
全局事务提交操作
-
UndoLogManagerFactory # getUndoLogManager :
获取 undoLog 管理器
- AbstractUndoLogManager # flushUndoLogs
- MySQLUndoLogManager # insertUndoLogWithNormal
-
MySQLUndoLogManager # insertUndoLog :
插入 undoLog
3.2.1 undo-log 的主处理流程
flushUndoLogs是核心流程 , 在该环节中对 BranchUndoLog 进行了查询创建
public void flushUndoLogs(ConnectionProxy cp) throws SQLException {
    ConnectionContext connectionContext = cp.getContext();
    if (!connectionContext.hasUndoLog()) {
        return;
    }

    String xid = connectionContext.getXid();
    long branchId = connectionContext.getBranchId();

    // 构建undo-log 对象 -> 3.2.2 镜像的查询和获取
    BranchUndoLog branchUndoLog = new BranchUndoLog();
    branchUndoLog.setXid(xid);
    branchUndoLog.setBranchId(branchId);
    branchUndoLog.setSqlUndoLogs(connectionContext.getUndoItems());

    UndoLogParser parser = UndoLogParserFactory.getInstance();
    byte[] undoLogContent = parser.encode(branchUndoLog);

    // 插入数据 -> 3.2.3 最终数据的插入
    insertUndoLogWithNormal(xid, branchId, buildContext(parser.getName()), undoLogContent,
        cp.getTargetConnection());
}

// 这里 branchUndoLog 中存放了前后的数据 image , 可以来看一下

3.2.2 镜像的查询和获取
镜像是将变动前 (beforeImage) 和变动后(AfterImage)的数据进行了处理 , 来看一下镜像是在哪个环节查询出来的
// Image 的起点是 Context 中获取的
public class ConnectionProxy extends AbstractConnectionProxy {

    private static final Logger LOGGER = LoggerFactory.getLogger(ConnectionProxy.class);

    private ConnectionContext context = new ConnectionContext();

}

// 先来看一下 ConnectionContext 的结构 :
public class ConnectionContext {
    private String xid;
    private Long branchId;
    private boolean isGlobalLockRequire;

    /**
     * Table and primary key should not be duplicated.
     */
    private Set<String> lockKeysBuffer = new HashSet<>();
    private List<SQLUndoLog> sqlUndoItemsBuffer = new ArrayList<>();

}


// 查询的流程 :
C- ExecuteTemplate # execute
C- AbstractDMLBaseExecutor # executeAutoCommitFalse
C- BaseTransactionalExecutor # prepareUndoLog
C- ConnectionContext # appendUndoItem
Step Start : 主逻辑 , 其中查询了前后 Image
// 在这个流程中 ,完成了大部分的数据操作
protected T executeAutoCommitFalse(Object[] args) throws Exception {
    if (!JdbcConstants.MYSQL.equalsIgnoreCase(getDbType()) && isMultiPk()) {
        throw new NotSupportYetException("multi pk only support mysql!");
    }
    // 查询前置镜像
    TableRecords beforeImage = beforeImage();
    // 执行 SQL 方法
    T result = statementCallback.execute(statementProxy.getTargetStatement(), args);
    // 查询后置镜像
    TableRecords afterImage = afterImage(beforeImage);
    // 保存 Undo-log
    prepareUndoLog(beforeImage, afterImage);
    return result;
}

// 补充 : TableRecords 对象
public class TableRecords implements java.io.Serializable {
    // 支持序列化的能力
    private static final long serialVersionUID = 4441667803166771721L;

    private transient TableMeta tableMeta;
    private String tableName;
    private List<Row> rows = new ArrayList<Row>();
Step 1 : 获取 beforeImage
AbstractDMLBaseExecutor 会根据处理的不同有多个实现类

这里仅以Update为例 , insert 时不会查询 , 就不过多的深入了:
// C-BaseInsertExecutor : Insert 情况时的处理方式
protected TableRecords beforeImage() throws SQLException {
    return TableRecords.empty(getTableMeta());
}

// C-UpdateExecutor : Update 情况时 Image 的查询方式
protected TableRecords beforeImage() throws SQLException {
    ArrayList<List<Object>> paramAppenderList = new ArrayList<>();
    TableMeta tmeta = getTableMeta();
    String selectSQL = buildBeforeImageSQL(tmeta, paramAppenderList);
    return buildTableRecords(tmeta, selectSQL, paramAppenderList);
}

// Step 1-1 :
private String buildBeforeImageSQL(TableMeta tableMeta, ArrayList<List<Object>> paramAppenderList) {
    SQLUpdateRecognizer recognizer = (SQLUpdateRecognizer) sqlRecognizer;
    List<String> updateColumns = recognizer.getUpdateColumns();
    assertContainsPKColumnName(updateColumns);
    StringBuilder prefix = new StringBuilder("SELECT ");
    StringBuilder suffix = new StringBuilder(" FROM ").append(getFromTableInSQL());
    String whereCondition = buildWhereCondition(recognizer, paramAppenderList);
    if (StringUtils.isNotBlank(whereCondition)) {
        suffix.append(WHERE).append(whereCondition);
    }
    String orderBy = recognizer.getOrderBy();
    if (StringUtils.isNotBlank(orderBy)) {
        suffix.append(orderBy);
    }
    ParametersHolder parametersHolder = statementProxy instanceof ParametersHolder ? (ParametersHolder)statementProxy : null;
    String limit = recognizer.getLimit(parametersHolder, paramAppenderList);
    if (StringUtils.isNotBlank(limit)) {
        suffix.append(limit);
    }
    suffix.append(" FOR UPDATE");
    StringJoiner selectSQLJoin = new StringJoiner(", ", prefix.toString(), suffix.toString());
    // 是否只更新列
    if (ONLY_CARE_UPDATE_COLUMNS) {
        if (!containsPK(updateColumns)) {
            selectSQLJoin.add(getColumnNamesInSQL(tableMeta.getEscapePkNameList(getDbType())));
        }
        // 查询更新的列
        for (String columnName : updateColumns) {
            selectSQLJoin.add(columnName);
        }
    } else {
        for (String columnName : tableMeta.getAllColumns().keySet()) {
            selectSQLJoin.add(ColumnUtils.addEscape(columnName, getDbType()));
        }
    }
    // SELECT id, count FROM t_storage WHERE commodity_code = ? FOR UPDATE
    return selectSQLJoin.toString();
}
TableMeta 表元数据 :

Step 2 : 查询 afterImage
protected TableRecords afterImage(TableRecords beforeImage) throws SQLException {
        TableMeta tmeta = getTableMeta();
        if (beforeImage == null || beforeImage.size() == 0) {
            return TableRecords.empty(getTableMeta());
        }
        String selectSQL = buildAfterImageSQL(tmeta, beforeImage);
        ResultSet rs = null;
        try (PreparedStatement pst = statementProxy.getConnection().prepareStatement(selectSQL)) {
            SqlGenerateUtils.setParamForPk(beforeImage.pkRows(), getTableMeta().getPrimaryKeyOnlyName(), pst);
            rs = pst.executeQuery();
            return TableRecords.buildRecords(tmeta, rs);
        } finally {
            IOUtil.close(rs);
        }
}

// 这里就不深入了
Step 3 : 添加 undo-log , 构建 Context ()
C- BaseTransactionalExecutor
protected void prepareUndoLog(TableRecords beforeImage, TableRecords afterImage) throws SQLException {
    // image 改变时才会创建 undo-log
    if (beforeImage.getRows().isEmpty() && afterImage.getRows().isEmpty()) {
        return;
    }
    // 获取代理连接器
    ConnectionProxy connectionProxy = statementProxy.getConnectionProxy();
    // 插入实体 -> 详见下图
    TableRecords lockKeyRecords = sqlRecognizer.getSQLType() == SQLType.DELETE ? beforeImage : afterImage;
    String lockKeys = buildLockKey(lockKeyRecords);
    connectionProxy.appendLockKey(lockKeys);

    SQLUndoLog sqlUndoLog = buildUndoItem(beforeImage, afterImage);
    connectionProxy.appendUndoLog(sqlUndoLog);
}

这里查询到 Image 后 , 下面再来看一下 image 的插入流程
3.2.3 最终数据的插入
protected void insertUndoLogWithGlobalFinished(String xid, long branchId, UndoLogParser parser, Connection conn) throws SQLException {
	insertUndoLog(xid, branchId, buildContext(parser.getName()),
		parser.getDefaultContent(), State.GlobalFinished, conn);
}

// 数据的插入逻辑在章节2中
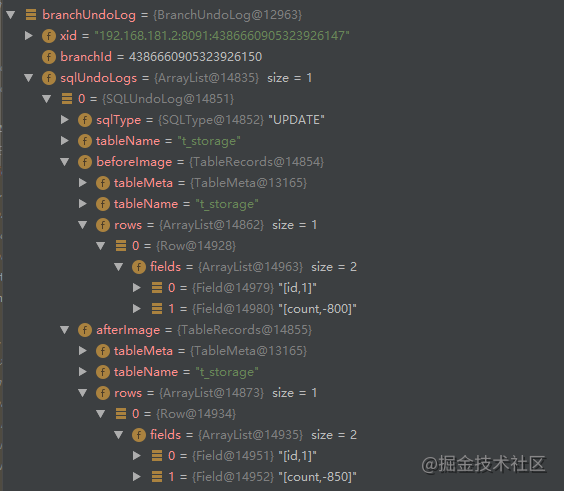
补充 :update 下的镜像 undo-log (Storage)
其主流程是和 Order 一致的 , 主要来看一下插入时的 undo-log 数据 , 可以看到 , 这里不是生成了一个 SQL , 而是对字段和数据进行了镜像处理
而且这里的镜像处理的是变动的节点
{
    "@class": "io.seata.rm.datasource.undo.BranchUndoLog",
	"xid": "192.168.181.2:8091:4386660905323926147",
	"branchId": 4386660905323926150,
	"sqlUndoLogs": ["java.util.ArrayList", [{
        "@class": "io.seata.rm.datasource.undo.SQLUndoLog",
        "sqlType": "UPDATE",
        "tableName": "t_storage",
        "beforeImage": {
        	"@class": "io.seata.rm.datasource.sql.struct.TableRecords",
        	"tableName": "t_storage",
        	"rows": ["java.util.ArrayList", [{
                "@class": "io.seata.rm.datasource.sql.struct.Row",
                "fields": ["java.util.ArrayList", [{
                	"@class": "io.seata.rm.datasource.sql.struct.Field",
                	"name": "id",
                	"keyType": "PRIMARY_KEY",
                	"type": 4,
                	"value": 1
                }, {
                	"@class": "io.seata.rm.datasource.sql.struct.Field",
                	"name": "count",
                	"keyType": "NULL",
                	"type": 4,
                	"value": -800
                }]]
            }]]
        },
        "afterImage": {
        	"@class": "io.seata.rm.datasource.sql.struct.TableRecords",
        	"tableName": "t_storage",
        	"rows": ["java.util.ArrayList", [{
                "@class": "io.seata.rm.datasource.sql.struct.Row",
                "fields": ["java.util.ArrayList", [{
                	"@class": "io.seata.rm.datasource.sql.struct.Field",
                	"name": "id",
                	"keyType": "PRIMARY_KEY",
                	"type": 4,
                	"value": 1
                }, {
                	"@class": "io.seata.rm.datasource.sql.struct.Field",
                	"name": "count",
                	"keyType": "NULL",
                	"type": 4,
                	"value": -850
                }]]
            }]]
        }
    }]]
}
Account
与此同理 , 这里暂时不说了
四 . Client undo-log 回退流程
上面看完了 undo-log 的创建流程 , 下面来看一下回退时对 undo-log 的处理
这里有个很重要的知识点 , undo-log 的创建是在每个 RM 中创建的 , 但是回滚在
4.1 undo-log 回退流程
Rollback 主流程 :
-
RmBranchRollbackProcessor # process :
接收到回退处理请求
- RmBranchRollbackProcessor # handleBranchRollback
- AbstractRMHandler # onRequest
- AbstractRMHandler # handle
- AbstractExceptionHandler # exceptionHandleTemplate
- AbstractRMHandler # handle
- AbstractRMHandler # doBranchRollback : 分支回退
- DataSourceManager # branchRollback
-
AbstractUndoLogManager # undo :
执行 undo 逻辑
-
AbstractUndoLogManager # deleteUndoLog :
删除分支
这里可以看到 , 最核心的逻辑就是 undo , 这个逻辑的代码比较长 , 我这里分为回调和删除 undo-log 2个逻辑来看 :
4.2 回调主逻辑
C- AbstractUndoLogManager
public void undo(DataSourceProxy dataSourceProxy, String xid, long branchId) throws TransactionException {
    Connection conn = null;
    ResultSet rs = null;
    PreparedStatement selectPST = null;
    boolean originalAutoCommit = true;

    for (; ; ) {
        conn = dataSourceProxy.getPlainConnection();

        // The entire undo process should run in a local transaction.
        if (originalAutoCommit = conn.getAutoCommit()) {
            conn.setAutoCommit(false);
        }

        // 通过 branchId 和 xid 查询 undo-log
        selectPST = conn.prepareStatement(SELECT_UNDO_LOG_SQL);
        selectPST.setLong(1, branchId);
        selectPST.setString(2, xid);
        rs = selectPST.executeQuery();

        boolean exists = false;
        // 对查询出的 undo-log 进行循环处理
        while (rs.next()) {
            exists = true;

            // 服务器可能会重复发送回滚请求,将同一个分支事务回滚到多个进程,从而确保只处理正常状态下的undo_log
            int state = rs.getInt(ClientTableColumnsName.UNDO_LOG_LOG_STATUS);
            if (!canUndo(state)) {
                return;
            }

            String contextString = rs.getString(ClientTableColumnsName.UNDO_LOG_CONTEXT);
            Map<String, String> context = parseContext(contextString);
            byte[] rollbackInfo = getRollbackInfo(rs);

            String serializer = context == null ? null : context.get(UndoLogConstants.SERIALIZER_KEY);
            UndoLogParser parser = serializer == null ? UndoLogParserFactory.getInstance()
                    : UndoLogParserFactory.getInstance(serializer);
            // 反序列化为 BranchUndoLog
            BranchUndoLog branchUndoLog = parser.decode(rollbackInfo);

            try {
                // put serializer name to local
                setCurrentSerializer(parser.getName());
                List<SQLUndoLog> sqlUndoLogs = branchUndoLog.getSqlUndoLogs();
                if (sqlUndoLogs.size() > 1) {
                    // 顺序反转
                    Collections.reverse(sqlUndoLogs);
                }

                // 执行 undo-log 进行回退处理
                for (SQLUndoLog sqlUndoLog : sqlUndoLogs) {
                    TableMeta tableMeta = TableMetaCacheFactory.getTableMetaCache(dataSourceProxy.getDbType()).getTableMeta(
                            conn, sqlUndoLog.getTableName(), dataSourceProxy.getResourceId());
                    sqlUndoLog.setTableMeta(tableMeta);
                    AbstractUndoExecutor undoExecutor = UndoExecutorFactory.getUndoExecutor(
                            dataSourceProxy.getDbType(), sqlUndoLog);
                    undoExecutor.executeOn(conn);
                }
            } finally {
                // remove serializer name
                removeCurrentSerializer();
            }
        }

        // ........ 省略回退逻辑

    }
}
AbstractUndoExecutor 对 executeOn 进行回退处理
public void executeOn(Connection conn) throws SQLException {
    if (IS_UNDO_DATA_VALIDATION_ENABLE && !dataValidationAndGoOn(conn)) {
        return;
    }
    try {
        // UPDATE t_storage SET count = ? WHERE id = ?
        String undoSQL = buildUndoSQL();
        PreparedStatement undoPST = conn.prepareStatement(undoSQL);
        TableRecords undoRows = getUndoRows();
        // 获取受影响的列
        for (Row undoRow : undoRows.getRows()) {
            ArrayList<Field> undoValues = new ArrayList<>();
            List<Field> pkValueList = getOrderedPkList(undoRows, undoRow, getDbType(conn));
            for (Field field : undoRow.getFields()) {
                if (field.getKeyType() != KeyType.PRIMARY_KEY) {
                    undoValues.add(field);
                }
            }
            // 解析需要回退的字段值 (即原有值)
            undoPrepare(undoPST, undoValues, pkValueList);
            // 执行 undo-log 处理 , 回退值
            undoPST.executeUpdate();
        }

    } catch (Exception ex) {

    }

}
五 . Client undo-log 删除流程
回退完成后 , 再来看一下 undo-log 的删除处理 , 删除逻辑是在 rollback 逻辑之后处理的
5.1 undo-log 主逻辑
public void undo(DataSourceProxy dataSourceProxy, String xid, long branchId) throws TransactionException {
    Connection conn = null;
    ResultSet rs = null;
    PreparedStatement selectPST = null;
    boolean originalAutoCommit = true;

    for (; ; ) {
        try {
            // .... 省略 rollback 逻辑

            // 如果undo_log存在,这意味着分支事务已经完成了第一阶段,我们可以直接回滚并清理undo_log
            // 否则,它表明分支事务中有一个异常,导致undo_log没有写入数据库。

            // 例如,业务处理超时时,全局事务被启动器回滚。
            // 为了确保数据的一致性,我们可以插入一个带有GlobalFinished状态的undo_log,以防止其他程序第一阶段的本地事务被正确提交。

            if (exists) {
                deleteUndoLog(xid, branchId, conn);
                conn.commit();
            } else {
                insertUndoLogWithGlobalFinished(xid, branchId, UndoLogParserFactory.getInstance(), conn);
                conn.commit();
            }

            return;
        } catch (SQLIntegrityConstraintViolationException e) {
            // Possible undo_log has been inserted into the database by other processes, retrying rollback undo_log
        } catch (Throwable e) {
            if (conn != null) {
                try {
                    conn.rollback();
                } catch (SQLException rollbackEx) {
                    LOGGER.warn("Failed to close JDBC resource while undo ... ", rollbackEx);
                }
            }
            throw new BranchTransactionException(BranchRollbackFailed_Retriable, String
                .format("Branch session rollback failed and try again later xid = %s branchId = %s %s", xid,
                    branchId, e.getMessage()), e);

        } finally {
            //...
        }
    }
}
5.2 删除 undo-log
    public void deleteUndoLog(String xid, long branchId, Connection conn) throws SQLException {
        try (PreparedStatement deletePST = conn.prepareStatement(DELETE_UNDO_LOG_SQL)) {
            deletePST.setLong(1, branchId);
            deletePST.setString(2, xid);
            deletePST.executeUpdate();
        } catch (Exception e) {
            if (!(e instanceof SQLException)) {
                e = new SQLException(e);
            }
            throw (SQLException) e;
        }
    }
总结
这一篇只是归纳了一下 undo-log 的逻辑 ,
主要通过 BeforeImage 和 AfterImage 保存前后逻辑
, 用于回退处理
但是这还远远没完 ,
后面还有 lock 机制和 远程调用 机制来完善整个流程 , 同时需要梳理出 TCC 的逻辑