1. 学习目标:
| 目标 | OpenCV函数 |
| 腐蚀 |
erode |
| 膨胀 | dilate |
2. OpenCV理论
简而言之:一组基于形状处理图像的操作。 形态学操作将结构元素应用于输入图像并生成输出图像。
最基本的形态学操作是:侵蚀和膨胀。 它们有广泛的用途,即:
1. 消除噪音
2. 隔离单个元素并连接图像中的不同元素。
3. 查找图像中的强度凸起或孔
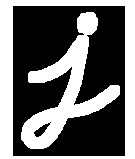
我们将使用以下图像作为示例,简要解释膨胀和侵蚀:

dilate(膨胀)
- 该操作包括将图像A与一些内核(B)卷积,该卷积可以具有任何形状或大小,通常是正方形或圆形。
- 内核B有一个定义的锚点,通常是内核的中心。
- 当在图像上扫描内核B时,我们计算由B重叠的最大像素值,并用该最大值替换锚点位置中的图像像素。 这种最大化操作会导致图像中的明亮区域“增长”(因此称为扩张)。
-
扩张操作是:dst(x,y)= max(x’,y’):element(x’,y’)≠0 src(x + x’,y + y’)
膨胀处理: -

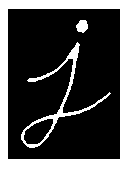
Erosion
同理,用邻域中的最小值代替

3
. Code
#include "opencv2/imgproc.hpp"
#include "opencv2/highgui.hpp"
#include <iostream>
using namespace cv;
using namespace std;
Mat src, erosion_dst, dilation_dst;
int erosion_elem = 0;
int erosion_size = 0;
int dilation_elem = 0;
int dilation_size = 0;
int const max_elem = 2;
int const max_kernel_size = 21;
void Erosion( int, void* );
void Dilation( int, void* );
int main( int argc, char** argv )
{
  CommandLineParser parser( argc, argv, "{@input | ../data/LinuxLogo.jpg | input image}" );
  src = imread( parser.get<String>( "@input" ), IMREAD_COLOR );
  if( src.empty() )
  {
    cout << "Could not open or find the image!\n" << endl;
    cout << "Usage: " << argv[0] << " <Input image>" << endl;
    return -1;
  }
  namedWindow( "Erosion Demo", WINDOW_AUTOSIZE );
  namedWindow( "Dilation Demo", WINDOW_AUTOSIZE );
  moveWindow( "Dilation Demo", src.cols, 0 );
  createTrackbar( "Element:\n 0: Rect \n 1: Cross \n 2: Ellipse", "Erosion Demo",
          &erosion_elem, max_elem,
          Erosion );
  createTrackbar( "Kernel size:\n 2n +1", "Erosion Demo",
          &erosion_size, max_kernel_size,
          Erosion );
  createTrackbar( "Element:\n 0: Rect \n 1: Cross \n 2: Ellipse", "Dilation Demo",
          &dilation_elem, max_elem,
          Dilation );
  createTrackbar( "Kernel size:\n 2n +1", "Dilation Demo",
          &dilation_size, max_kernel_size,
          Dilation );
  Erosion( 0, 0 );
  Dilation( 0, 0 );
  waitKey(0);
  return 0;
}
void Erosion( int, void* )
{
  int erosion_type = 0;
  if( erosion_elem == 0 ){ erosion_type = MORPH_RECT; }
  else if( erosion_elem == 1 ){ erosion_type = MORPH_CROSS; }
  else if( erosion_elem == 2) { erosion_type = MORPH_ELLIPSE; }
  Mat element = getStructuringElement( erosion_type,
                       Size( 2*erosion_size + 1, 2*erosion_size+1 ),
                       Point( erosion_size, erosion_size ) );
  erode( src, erosion_dst, element );
  imshow( "Erosion Demo", erosion_dst );
}
void Dilation( int, void* )
{
  int dilation_type = 0;
  if( dilation_elem == 0 ){ dilation_type = MORPH_RECT; }
  else if( dilation_elem == 1 ){ dilation_type = MORPH_CROSS; }
  else if( dilation_elem == 2) { dilation_type = MORPH_ELLIPSE; }
  Mat element = getStructuringElement( dilation_type,
                       Size( 2*dilation_size + 1, 2*dilation_size+1 ),
                       Point( dilation_size, dilation_size ) );
  dilate( src, dilation_dst, element );
  imshow( "Dilation Demo", dilation_dst );
}
4. 代码详解
erosion
void Erosion( int, void* )
{
  int erosion_type = 0;
  if( erosion_elem == 0 ){ erosion_type = MORPH_RECT; }
  else if( erosion_elem == 1 ){ erosion_type = MORPH_CROSS; }
  else if( erosion_elem == 2) { erosion_type = MORPH_ELLIPSE; }
  Mat element = getStructuringElement( erosion_type,
                       Size( 2*erosion_size + 1, 2*erosion_size+1 ),
                       Point( erosion_size, erosion_size ) );
  erode( src, erosion_dst, element );
  imshow( "Erosion Demo", erosion_dst );
}
执行侵蚀操作的函数是cv :: erode。 我们可以看到,它有三个参数:
- src:源图像
- erosion_dst:输出图像
- element:这是我们将用于执行操作的内核。 如果我们不指定,则默认为简单的3×3矩阵。 否则,我们可以指定其形状。 为此,我们需要使用函数cv :: getStructuringElement:
-

-
我们可以为内核选择三种形状中的任何一种:
矩形框:MORPH_RECT
十字: MORPH_CROSS
椭圆: MORPH_ELLIPSE
然后,我们只需要指定内核的大小和锚点。 如果未指定,则假定它位于中心。
Result

原图

版权声明:本文为red_ear原创文章,遵循 CC 4.0 BY-SA 版权协议,转载请附上原文出处链接和本声明。