python 使用api
How can we set up a way to communicate from one software instance to another? It sounds simple, and — to be completely honest — it is.
^ h我们流可以设置方式,从一个软件实例传达给别人呢? 听起来很简单,而且-坦白地说-确实如此。
All we need is an API.
我们需要的只是一个API。
An API (Application Programming Interface) is a simple interface that defines the types of requests (demands/questions, etc.) that can be made, how they are made, and how they are processed.
API(应用程序编程接口)是一个简单的接口,它定义了可以进行的请求类型(需求/问题等),如何进行以及如何处理。
In our case, we will be building an API that allows us to send a range of GET/POST/PUT/PATCH/DELETE requests (more on this later), to different endpoints, and return or modify data connected to our API.
在我们的案例中,我们将构建一个API,该API允许我们向不同的端点发送一系列GET / POST / PUT / PATCH / DELETE请求(稍后会详细介绍),并返回或修改连接到我们API的数据。
We will be using the Flask framework to create our API and Postman to test it. In short, we will cover:
我们将使用Flask框架创建我们的API,并使用Postman对其进行测试。 简而言之,我们将介绍:
> Setup
  - Our Toy Data
  - Initialize a Flask API
  - Endpoints
  - Running a Local Server> Writing Our API
  - GET
  - POST
  - 401 Unauthorized
  - PUT
  - DELETE
  - Users Class (summary)> That's It!
建立
(
Setup
)
Our API will contain two endpoints,
users
and
locations
. The former will allow access to our registered user’s details, whereas the latter will include a list of cafe locations.
我们的API将包含两个终结点,
users
和
locations
。 前者将允许访问我们注册用户的详细信息,而后者将包括咖啡馆位置列表。
The hypothetical use-case here is of a multi-million cafe bookmarking app, where users open the app and bookmark their favorite cafe’s — like Google Maps, but not useful.
此处假设的用例是数百万个咖啡馆的书签应用程序,用户可以在其中打开该应用程序并为自己喜欢的咖啡馆添加书签,例如Google Maps,但没有用。
我们的玩具数据
(
Our Toy Data
)
For the sake of simplicity, we are going to store this data in two local CSV files. In reality, you probably want to take a look at something like MongoDB or Google Firebase.
为了简单起见,我们将把这些数据存储在两个本地CSV文件中。 实际上,您可能想看看MongoDB或Google Firebase之类的东西。
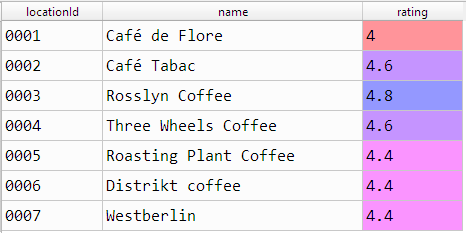
Our CSV files look like this:
我们的CSV文件如下所示:

users.csv
. Image by Author.
users.csv中的
用户数据。 图片由作者提供。

locations.csv
. Image by Author.
locations.csv
。 图片由作者提供。
You can download
users.csv here
, and
locations.csv here
.
您可以
在此处
下载
users.csv,在此处
下载
locations.csv
。
初始化Flask API
(
Initialize a Flask API
)
Now to our Python script, we need to import modules and initialize our API, like so:
现在到我们的Python脚本,我们需要导入模块并初始化我们的API,如下所示:
from flask import Flask
from flask_restful import Resource, Api, reqparse
import pandas as pd
import astapp = Flask(__name__)
api = Api(app)
终点
(
Endpoints
)
As we already touched on, our API will have two endpoints,
users
and
locations
.
正如我们已经谈到的那样,我们的API将具有两个端点,
users
和
locations
。
The result of this is — if our API was located at
www.api.com
, communication with the
Users
class would be provided at
          www.api.com


           /users
and
Locations
at
           www.api.com


            /locations
.
这样做的结果是-如果我们的API是位于
www.api.com
,与通信
Users
类将在提供
          www.api.com


           /users
和
Locations
在
           www.api.com


            /locations
。
To create an endpoint, we define a Python class (with any name you want) and connect it to our desired endpoint with
api.add_resource
, like this:
要创建端点,我们定义一个Python类(使用您想要的任何名称),然后使用
api.add_resource
将其连接到所需的端点,如下所示:
class Users(Resource):
    # methods go here
    pass


api.add_resource(Users, '/users') # '/users' is our entry point-
Flask needs to know that this class is an endpoint for our API, and so we pass
Resource
in with the class definition.Flask需要知道此类是我们API的终结点,因此我们将
Resource
与类定义一起传入。 -
Inside the class, we include our HTTP methods (GET, POST, DELETE, etc.).
在类内部,我们包含我们的HTTP方法(GET,POST,DELETE等)。
-
Finally, we link our
Users
class with the
/users
endpoint using
api.add_resource
.最后,我们使用
api.add_resource
将
Users
类与
/users
端点
api.add_resource
。
Because we want
two
endpoints, we replicate the logic:
因为我们需要
两个
端点,所以我们复制逻辑:
class Users(Resource):
    # methods go here
    pass

class Locations(Resource):
    # methods go here
    pass

api.add_resource(Users, '/users')  # '/users' is our entry point for Users
api.add_resource(Locations, '/locations')  # and '/locations' is our entry point for Locations
运行本地服务器
(
Running a Local Server
)
Finally, when we write out our API, we need to test it!
最后,当我们写出我们的API时,我们需要对其进行测试!
To do this, we need to host our API, which we can do locally by adding
app.run
to the end of our script like this:
为此,我们需要托管我们的API,我们可以在本地通过将
app.run
添加到脚本末尾来进行本地化,如下所示:
if __name__ == '__main__':
    app.run()  # run our Flask app
Now, when we run our script, we should see something like this:
现在,当我们运行脚本时,我们应该看到如下所示:

Once our server is setup, we can test our API as we build it using Postman, if you haven’t used it before it is the de-facto standard for API testing. And, don’t worry — it’s incredibly simple to use — download Postman from
here
.
设置好服务器后,如果您在使用Postman构建API的事实上的标准之前还没有使用过它,就可以对其进行测试。 而且,不用担心-使用起来非常简单-从
此处
下载Postman。
Before going ahead, you can find the full script that we will be building
here
. If you’re not sure where a code snippet should go, check there!
在继续之前,您可以找到我们将在
此处
构建的完整脚本。 如果不确定代码片段应该放在哪里,请检查那里!
编写API方法
(
Writing API Methods
)
Inside each of our classes, we keep our HTTP methods, GET, POST, and DELETE.
在每个类中,我们保留HTTP方法GET,POST和DELETE。
To create a GET method, we use
def get(self)
. POST and DELETE follow the same pattern.
要创建GET方法,我们使用
def get(self)
。 POST和DELETE遵循相同的模式。
得到
(
GET
)
The GET method is the simplest. We return all data stored in
users.csv
wrapped inside a dictionary, like so:
GET方法是最简单的。 我们返回存储在字典中的
users.csv
存储的所有数据,如下所示:
class Users(Resources):
    def get(self):
        data = pd.read_csv('users.csv')  # read CSV
        data = data.to_dict()  # convert dataframe to dictionary
        return {'data': data}, 200  # return data and 200 OK code
We can then run the script to initialize our API, open Postman and send a GET request to our localhost address (typically
http://127.0.0.1:5000
)— this is our API
entry point
.
然后,我们可以运行脚本来初始化我们的API,打开Postman并将GET请求发送到我们的本地主机地址(通常为
http://127.0.0.1:5000
),这是我们的API
入口点
。

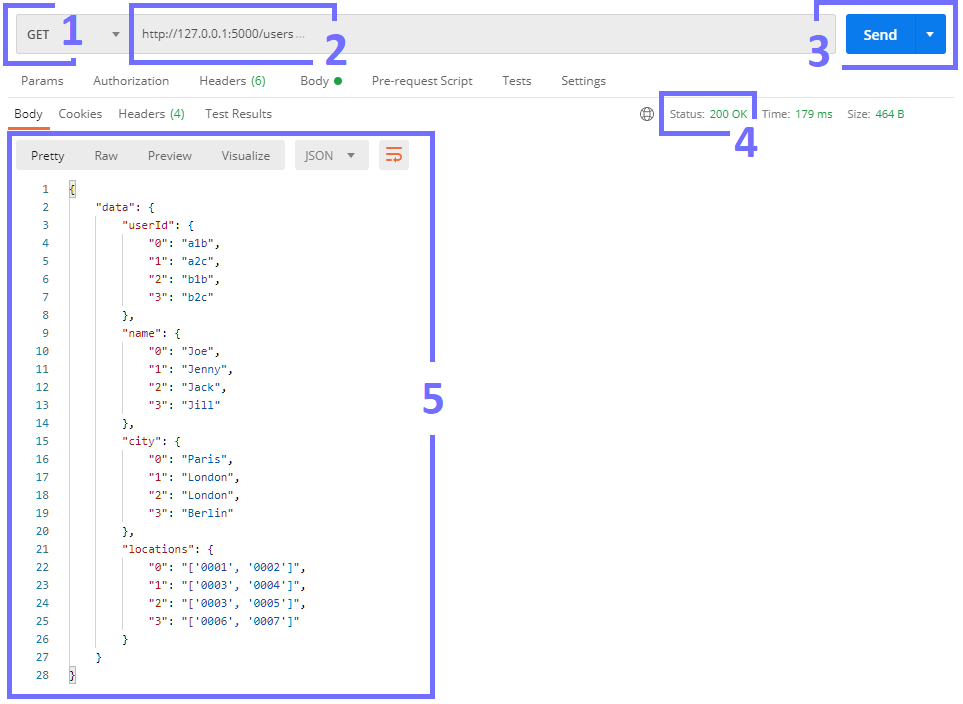
To send a GET request to our API in Postman we:
要将GET请求发送到Postman中的API,我们:
-
Select GET from the dropdown
从下拉列表中选择GET
-
Type the entry point of our API instance +
/users
(the
endpoint
)输入我们的API实例+
/users
的入口点(
端点
) -
Hit
Send
点击
发送
-
Check the status code returned by our API (we should see
200 OK
)检查我们的API返回的状态码(我们应该看到
200 OK
) -
View our API’s response, which is
users.csv
in JSON
(like a dictionary)
format查看我们的API响应,即JSON
(如字典)
格式的
users.csv
开机自检
(
POST
)
The POST method allows us to add records to our data. In this case, we will take arguments for
usedId
,
name
, and
city
.
POST方法允许我们将记录添加到数据中。 在这种情况下,我们将使用
usedId
,
name
和
city
。
These arguments are passed to our API endpoint as URL parameters, which look like this:
这些参数作为URL参数传递到我们的API端点,如下所示:
http://127.0.0.1:5000/users?userId=abc123&name=The Rock&city=Los Angeles
We can specify the required parameters, and then parse the values provided using
reqparse
— like this:
我们可以指定所需的参数,然后使用
reqparse
解析提供的值,如下所示:
parser = reqparse.RequestParser()  # initialize


parser.add_argument('userId', required=True)  # add arguments
parser.add_argument('name', required=True)
parser.add_argument('city', required=True)


args = parser.parse_args()  # parse arguments to dictionary
Let’s break our parser code down:
让我们分解一下解析器代码:
-
We initialize our parser with
.RequestParser()
.我们使用
.RequestParser()
初始化解析器。 -
Add our arguments with
.add_argument([arg_name], required)
— note that
required=True
means that the argument is required in the request. Alternatively, we can add optional arguments with
required=False
.使用
.add_argument([arg_name], required)
添加参数—请注意,
required=True
表示请求中的参数是必需的。 另外,我们可以添加带有
required=False
可选参数。 -
Parse our arguments and their values into a Python dictionary using
.parse_args()
.使用
.parse_args()
参数及其值解析为Python字典。
We can then access the values passed to each argument like we usually would with key-value pairs in a dictionary.
然后,我们可以像通常使用字典中的键值对那样访问传递给每个参数的值。
Let’s put those together to add values to our CSV:
让我们将它们放在一起为CSV添加值:
class Users(Resource):
    def post(self):
        parser = reqparse.RequestParser()  # initialize

        parser.add_argument('userId', required=True)  # add args
        parser.add_argument('name', required=True)
        parser.add_argument('city', required=True)

        args = parser.parse_args()  # parse arguments to dictionary

        # create new dataframe containing new values
        new_data = pd.DataFrame({
            'userId': args['userId'],
            'name': args['name'],
            'city': args['city'],
            'locations': [[]]
        })
        # read our CSV
        data = pd.read_csv('users.csv')
        # add the newly provided values
        data = data.append(new_data, ignore_index=True)
        # save back to CSV
        data.to_csv('users.csv', index=False)
        return {'data': data.to_dict()}, 200  # return data with 200 OK
If it’s starting to look a little more confusing — all we’re doing is:
如果开始看起来有些混乱,那么我们要做的就是:
-
Creating a row of new data
new_data
from the URL parameters
args
从URL参数
args
创建一行新数据
new_data
-
Appending it to the pre-existing
data
将其附加到预先存在的
data
-
Saving the newly merged data
保存新合并的数据
-
And, returning
data
alongside a
200 OK
status code.并且,返回
data
以及
200 OK
状态代码。

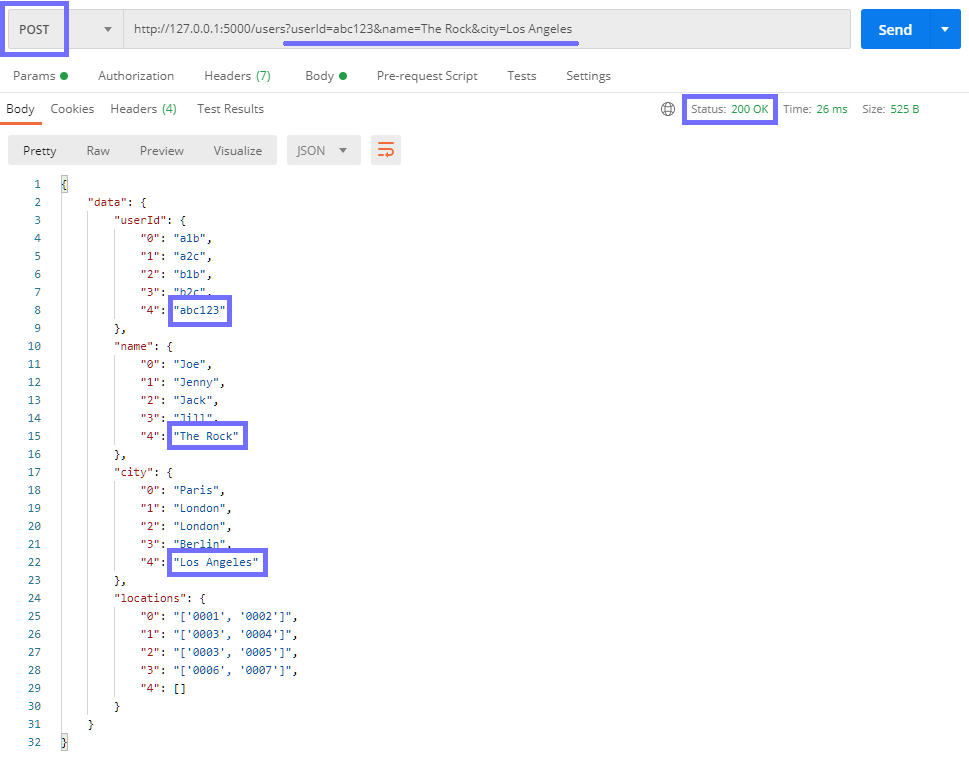
POST
request containing
userId
,
userId
,
name
和
name
, and
city
参数的
city
parameters to our /user endpoint. Image by Author.
POST
请求发送到/ user端点来创建新用户。 图片由作者提供。
We can now send a
POST
request to create a new user, easy!
现在,我们可以发送
POST
请求来创建新用户,简单!
401未经授权
(
401 Unauthorized
)
Our code handles
POST
requests, allowing us to write new data to
users.csv
— but what if that user already exists?
我们的代码处理
POST
请求,使我们可以将新数据写入
users.csv
,但是如果该用户已经存在怎么办?
For that, we need to add a check. If the
userId
already exists, we return a
401 Unauthorized
code to the user.
为此,我们需要添加一张支票。 如果
userId
已经存在,我们将向用户返回
401 Unauthorized
代码。
...


        # read our CSV
        data = pd.read_csv('users.csv')


        if args['userId'] in data['userId']:
            return {
                'message': f"'{args['userId']}' already exists."
            }, 401
        else:
            # create new dataframe containing new values
            new_data = pd.DataFrame({
                'userId': args['userId'],
                'name': args['name'],
                'city': args['city'],
                'locations': [[]]
            })
            # add the newly provided values
            data = data.append(new_data, ignore_index=True)
            data.to_csv('users.csv', index=False)  # save back to CSV
            return {'data': data.to_dict()}, 200  # return data with 200 OK
Going back to Postman, we can test if our API is functioning by trying to add the same user twice — this time, The Rock received a
401 Unauthorized
response.
回到Postman,我们可以通过尝试两次添加同一用户来测试我们的API是否正常运行-这次,The Rock收到
401 Unauthorized
响应。
放
(
PUT
)
What if we want to add a cafe to a user? We can’t use
POST
as this returns a
401 Unauthorized
code — instead, we use
PUT
.
如果我们想为用户添加咖啡馆怎么办? 我们不能使用
POST,
因为它会返回
401 Unauthorized
代码-而是使用
PUT
。
Similar to
POST
, we need to add if-else logic in the case of the provided
userId
not existing.
与
POST
类似,在提供的
userId
不存在的情况下,我们需要添加if-else逻辑。
class Users(Resource):
    def put(self):
        parser = reqparse.RequestParser()  # initialize
        parser.add_argument('userId', required=True)  # add args
        parser.add_argument('location', required=True)
        args = parser.parse_args()  # parse arguments to dictionary


        # read our CSV
        data = pd.read_csv('users.csv')

        if args['userId'] in list(data['userId']):
            # evaluate strings of lists to lists
            data['locations'] = data['locations'].apply(
                lambda x: ast.literal_eval(x)
            )
            # select our user
            user_data = data[data['userId'] == args['userId']]


            # update user's locations
            user_data['locations'] = user_data['locations'].values[0] \
                .append(args['location'])

            # save back to CSV
            data.to_csv('users.csv', index=False)
            # return data and 200 OK
            return {'data': data.to_dict()}, 200


        else:
            # otherwise the userId does not exist
            return {
                'message': f"'{args['userId']}' user not found."
            }, 404
Other than a couple of small tweaks to the code, our
PUT
method is almost identical to
POST
.
除了对代码进行一些小调整之外,我们的
PUT
方法几乎与
POST
相同。

PUT
method to add the cafe with ID 0007 to The Rock’s bookmarked locations. Image by Author.
PUT
方法将ID 0007的咖啡馆添加到The Rock的加标签位置。 图片由作者提供。
Back in Postman, our required input parameters have changed. Now, we only need
userId
and a
location
to add to the users bookmarked
locations
.
回到Postman,我们所需的输入参数已更改。 现在,我们只需要
userId
和一个
location
即可将添加了书签的
locations
添加到用户。
删除
(
DELETE
)
We can also delete records with the
DELETE
method.
我们还可以使用
DELETE
方法删除记录。
This method is pretty straightforward, we need to specify a
userId
to remove, and add some if-else logic in the case of a non-existent
userId
.
此方法非常简单,我们需要指定要删除的
userId
,并在不存在
userId
的情况下添加一些if-else逻辑。
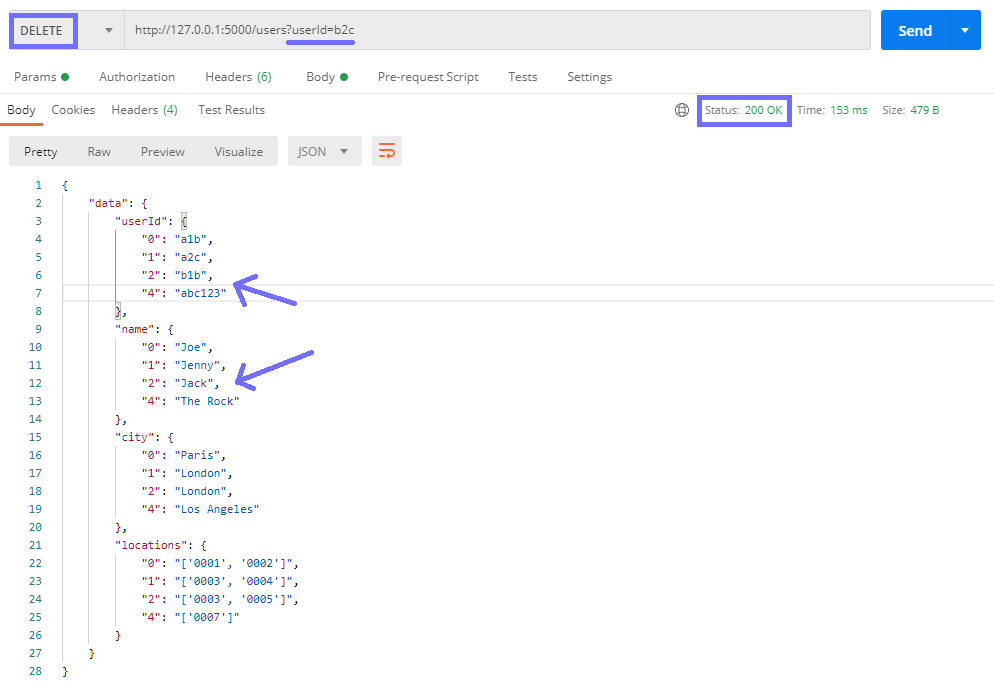
So if
Jill
decides our app is useless and wants to leave, we would send a
DELETE
request containing her
userId
.
因此,如果
Jill
我们的应用程序无用并想离开,我们将发送包含她的
userId
的
DELETE
请求。

DELETE
request for
userId’b2c’
的
userId ‘b2c’
deletes Jill’s record from our user data. Image by Author.
DELETE
请求将从我们的用户数据中删除Jill的记录。 图片由作者提供。
We can test this in Postman, and as expected, we return our data without Jill’s record. What if we try and delete a non-existent user?
我们可以在邮递员中对此进行测试,并且可以预期,我们返回的数据没有Jill的记录。 如果我们尝试删除不存在的用户怎么办?

DELETE
a
删除
不存在的
userId
that does not exist, we will receive a
userId
,我们将收到
404 Not Found
status code and a message explaining that the userId does not exist. Image by Author.
404 Not Found
状态代码和一条消息,说明该userId不存在。 图片由作者提供。
Again, we receive our
404 Not Found
and a brief message explaining that the
userId
was not found.
同样,我们收到
404 Not Found
和一条简短消息,说明
404 Not Found
userId
。
用户类别
(
Users Class
)
That’s all of the parts that make up the
Users
class, accessed via our
/users
endpoint. You can find the
full script for it here
.
这就是组成
Users
类的所有部分,可以通过我们的
/users
端点进行访问。 您可以在
此处
找到
完整的脚本
。
After that, we still need to put together the
Locations
class. This other class should allow us to GET, POST, PATCH (update), and DELETE locations.
之后,我们仍然需要将
Locations
类放在一起。 这个其他类应允许我们获取,发布,修补(更新)和删除位置。
Each location is given a unique ID — when a user bookmarks a location, that unique ID is added to their
locations
list with
PUT /users
.
每个位置都有一个唯一的ID-当用户为某个位置添加书签时,该唯一ID将通过
PUT /users
添加到其
locations
列表中。
The code for this is not that much different from what we wrote in the
Users
class so that we won’t repeat ourselves. However, you can find it alongside the
Users
class
here
.
此代码与我们在
Users
类中编写的代码没有太大不同,因此我们不会重复自己。 但是,您可以
在此处
的
Users
类旁边找到它。
而已!
(
That’s It!
)
It’s as simple as that. Setting up an API with Flask and Python is incredibly straightforward.
就这么简单。 使用Flask和Python设置API非常简单。
We now have an easy-to-use and standardized method for communicating between different interfaces.
现在,我们有了一种易于使用的标准化方法,可以在不同接口之间进行通信。
We’ve covered all of the most common request methods — GET, POST, PUT, and DELETE — and a few HTTP status codes too — 200, 401, and 404.
我们介绍了所有最常见的请求方法-GET,POST,PUT和DELETE-以及一些HTTP状态代码-200、401和404。
Finally, we’ve learned how to host our API locally and test it with Postman — allowing us to quickly diagnose issues and ensure our API is behaving as intended.
最后,我们学习了如何在本地托管我们的API并通过Postman对其进行测试-使我们能够快速诊断问题并确保我们的API能够按预期运行。
All-in-all, API development is a crucial skill for developers, data scientists, and almost any other tech-inclined role you can imagine.
总而言之,API开发对于开发人员,数据科学家以及您可以想象的几乎任何其他技术领域的角色都是至关重要的技能。
If you have any questions or ideas for improvement, let me know on
Twitter
or in the comments below.
如果您有任何疑问或需要改进的想法,请在
Twitter
或以下评论中告诉我。
I hope you enjoyed the article and thank-you for reading!
希望您喜欢这篇文章,并感谢您的阅读!
翻译自:
https://towardsdatascience.com/the-right-way-to-build-an-api-with-python-cd08ab285f8f
python 使用api