大数据平台Ambari2.7.4+HDP3.1.4安装(超详细教程)
Ambari2.7.4+HDP3.1.4是最后一个免费版本,新版本需要授权。
因工作需要,安装大数据集群,了解到Ambari属于Apache顶级开源项目,能够快速且便捷的安装。Apache Ambari是一种基于Web的工具,支持Apache Hadoop集群的供应、管理和监控。Ambari已支持大多数Hadoop组件,包括HDFS、MapReduce、Hive、Pig、 Hbase、Zookeeper、Sqoop和Hcatalog等。
文章目录
一、hortonworks简介
使用到的分别为Ambari、HDP和HDP-UTILS。
Ambari是一个基于web的工具,用于配置、管理和监视Hadoop集群,支持HDFS、MapReduce、Hive、HCatalog、HBase、ZooKeeper、Kafka、Oozie、Pig、Sqoop和Spark等服务。Ambari同样还提供了集群状况仪表盘,以友好的用户界面对它们的性能特性进行诊断。
HDP是hortonworks的软件栈,里面包含了hadoop生态系统的所有软件项目。
HDP-UTILS是工具类库。
提示:以下是本篇文章正文内容,下面案例可供参考
二、准备工作
1.机器节点
准备三台机器(可以是任意多台),均是centos7系统,分别修改主机名为hdp01、hdp02、hdp03。
修改/etc/hosts文件如下:(
本次安装因为资源有限,将硬盘最大的151节点作为安装主节点
)
[root@master ~]# vi /etc/hosts
127.0.0.1   localhost localhost.localdomain localhost4 localhost4.localdomain4
::1         localhost localhost.localdomain localhost6 localhost6.localdomain6
192.168.10.151 hdp01
192.168.10.150 hdp02
192.168.10.152 hdp03
修改本机名:
[root@localhost ~]# hostnamectl set-hostname hdp01
[root@localhost ~]# hostname
hdp01
接下来就可以通过测试一下是否可以通过ping主机名来找到对应的服务器:
[root@localhost ~]# ping hdp02
PING hdp02 (192.168.10.150) 56(84) bytes of data.
64 bytes from hdp02 (192.168.10.150): icmp_seq=1 ttl=64 time=0.490 ms
64 bytes from hdp02 (192.168.10.150): icmp_seq=2 ttl=64 time=0.518 ms
64 bytes from hdp02 (192.168.10.150): icmp_seq=3 ttl=64 time=0.471 ms
64 bytes from hdp02 (192.168.10.150): icmp_seq=4 ttl=64 time=1.12 ms
64 bytes from hdp02 (192.168.10.150): icmp_seq=5 ttl=64 time=0.770 ms
2.下载安装包
因为使用在线安装特别慢,所有的安装包加起来有9个G左右,所以本教程是通过迅雷下载包,然后上传到服务器,通过配置本地源的方式来实现的离线安装。通过ambari安装需要下载下面的三个主要包:
http://public-repo-1.hortonworks.com/ambari/centos7/2.x/updates/2.7.4.0/ambari-2.7.4.0-centos7.tar.gz
http://public-repo-1.hortonworks.com/HDP/centos7/3.x/updates/3.1.4.0/HDP-3.1.4.0-centos7-rpm.tar.gz
http://public-repo-1.hortonworks.com/HDP-UTILS-1.1.0.22/repos/centos7/HDP-UTILS-1.1.0.22-centos7.tar.gz
注意问题
:安装的centos系统需要选择英文版本,不然里面有些地方为莫名出错
3.系统环境配置
3.1安装jdk(所有机器)
一般linux自带的jdk或者是通过yum安装的jdk都是openjdk,但是最好是使用oracle/sun jdk,前者是开源的,缺失部分功能,后者是官方的。但是如果直接安装oracle的jdk,第三方的依赖包不会安装,所以最有效的额方式是通过yum安装openjdk,并同时安装了第三方依赖包,然后卸载openjdk,通过自己来安装oracle的jdk,就能解决依赖问题。
安装之前先检查一下系统有没有自带的open-jdk:
rpm -qa|grep gcj
查看系统的jdk安装情况:
rpm -qa |grep java

rpm -qa |grep jdk
如果没有输入信息表示没有安装,如果安装可以使用:
rpm -qa | grep java | xargs rpm -e --nodeps
批量卸载所有带有Java的文件 这句命令的关键字是java,运行此命令运行后没有任何反应。
首先从网络中检索包含java的列表:
[root@localhost ~]# yum list java-1.8*
Loaded plugins: fastestmirror, langpacks
Loading mirror speeds from cached hostfile
 * base: mirrors.cn99.com
 * extras: mirrors.cn99.com
 * updates: mirrors.cn99.com
Available Packages
java-1.8.0-openjdk.i686                      1:1.8.0.302.b08-0.el7_9          updates
java-1.8.0-openjdk.x86_64                    1:1.8.0.302.b08-0.el7_9          updates
java-1.8.0-openjdk-accessibility.i686        1:1.8.0.302.b08-0.el7_9          updates
java-1.8.0-openjdk-accessibility.x86_64      1:1.8.0.302.b08-0.el7_9          updates
java-1.8.0-openjdk-demo.i686                 1:1.8.0.302.b08-0.el7_9          updates
java-1.8.0-openjdk-demo.x86_64               1:1.8.0.302.b08-0.el7_9          updates
java-1.8.0-openjdk-devel.i686                1:1.8.0.302.b08-0.el7_9          updates
java-1.8.0-openjdk-devel.x86_64              1:1.8.0.302.b08-0.el7_9          updates
java-1.8.0-openjdk-headless.i686             1:1.8.0.302.b08-0.el7_9          updates
java-1.8.0-openjdk-headless.x86_64           1:1.8.0.302.b08-0.el7_9          updates
java-1.8.0-openjdk-javadoc.noarch            1:1.8.0.302.b08-0.el7_9          updates
java-1.8.0-openjdk-javadoc-zip.noarch        1:1.8.0.302.b08-0.el7_9          updates
java-1.8.0-openjdk-src.i686                  1:1.8.0.302.b08-0.el7_9          updates
java-1.8.0-openjdk-src.x86_64                1:1.8.0.302.b08-0.el7_9          updates
安装1.8.0的所有文件
yum install java-1.8.0-openjdk* -y
安装使用命令检查是否安装成功
[root@localhost ~]# java -version
openjdk version "1.8.0_302"
OpenJDK Runtime Environment (build 1.8.0_302-b08)
OpenJDK 64-Bit Server VM (build 25.302-b08, mixed mode)
到此jdk就安装好了,这样安装有一个好处就是不需要对path进行设置,自动就设置好了
3.2关闭防火墙(所有机器)
禁用防火墙
[root@localhost ~]# systemctl disable firewalld
Removed symlink /etc/systemd/system/multi-user.target.wants/firewalld.service.
Removed symlink /etc/systemd/system/dbus-org.fedoraproject.FirewallD1.service.
关闭防火墙
systemctl stop firewalld
查看防火墙是否关闭成功
[root@localhost ~]# systemctl status firewalld
● firewalld.service - firewalld - dynamic firewall daemon
   Loaded: loaded (/usr/lib/systemd/system/firewalld.service; disabled; vendor preset: enabled)
   Active: inactive (dead)
     Docs: man:firewalld(1)

Sep 23 01:11:27 localhost.localdomain systemd[1]: Starting firewalld - dynamic firewall daemon...
Sep 23 01:11:28 localhost.localdomain systemd[1]: Started firewalld - dynamic firewall daemon.
Sep 23 01:11:28 localhost.localdomain firewalld[700]: WARNING: ICMP type 'beyond-scope' is not supported by the kernel for ipv6.
Sep 23 01:11:28 localhost.localdomain firewalld[700]: WARNING: beyond-scope: INVALID_ICMPTYPE: No supported ICMP type., ignoring for run-time.
Sep 23 01:11:28 localhost.localdomain firewalld[700]: WARNING: ICMP type 'failed-policy' is not supported by the kernel for ipv6.
Sep 23 01:11:28 localhost.localdomain firewalld[700]: WARNING: failed-policy: INVALID_ICMPTYPE: No supported ICMP type., ignoring for run-time.
Sep 23 01:11:28 localhost.localdomain firewalld[700]: WARNING: ICMP type 'reject-route' is not supported by the kernel for ipv6.
Sep 23 01:11:28 localhost.localdomain firewalld[700]: WARNING: reject-route: INVALID_ICMPTYPE: No supported ICMP type., ignoring for run-time.
Sep 23 04:11:22 hdp01 systemd[1]: Stopping firewalld - dynamic firewall daemon...
Sep 23 04:11:23 hdp01 systemd[1]: Stopped firewalld - dynamic firewall daemon.
3.3同步时钟 安装ntp服务(所有机器)
yum -y install ntp
3.4 SSH无密码登陆(主节点)
1)输入ssh-keygen -t rsa,连续按三次回车即可生成RSA公司密钥。
[root@localhost ~]# ssh-keygen -t rsa
Generating public/private rsa key pair.
Enter file in which to save the key (/root/.ssh/id_rsa):
Enter passphrase (empty for no passphrase):
Enter same passphrase again:
Your identification has been saved in /root/.ssh/id_rsa.
Your public key has been saved in /root/.ssh/id_rsa.pub.
The key fingerprint is:
SHA256:pZeoRRtrpG+mpeTuHUekdbV1QZcYkRjW37p4I9YAQms root@hdp01
The key's randomart image is:
+---[RSA 2048]----+
|           o+oBo*|
|        . .. = +o|
|       .+.+ . o .|
|       +E@.o   ..|
|      ..S.+.   . |
|       = o  . .  |
|      o * .  + . |
|     o B o  + =  |
|     o* .  . o . |
+----[SHA256]-----+
2)分别发送主节点公钥至其他节点(包含它自己)
中途需要输入对应机器密码。
[root@localhost ~]# ssh-copy-id hdp03
/usr/bin/ssh-copy-id: INFO: Source of key(s) to be installed: "/root/.ssh/id_rsa.pub"
The authenticity of host 'hdp03 (192.168.10.152)' can't be established.
ECDSA key fingerprint is SHA256:x6ljE2ZIVSCwQ07P44FgjsTy35bFXFBRa9SWIEgnmBI.
ECDSA key fingerprint is MD5:a8:8f:75:dd:9d:11:7c:ca:0c:cb:e9:66:5a:c2:d8:34.
Are you sure you want to continue connecting (yes/no)? yes
/usr/bin/ssh-copy-id: INFO: attempting to log in with the new key(s), to filter out any that are already installed
/usr/bin/ssh-copy-id: INFO: 1 key(s) remain to be installed -- if you are prompted now it is to install the new keys
root@hdp03's password:

Number of key(s) added: 1

Now try logging into the machine, with:   "ssh 'hdp03'"
and check to make sure that only the key(s) you wanted were added.

[root@localhost ~]# ssh hdp03
Last login: Thu Sep 23 01:13:11 2021 from 10.1.44.124
[root@hdp03 ~]# exit
logout
Connection to hdp03 closed.
依次验证,查看主节点是否可以免密登录各个节点。
3.5修改创建文件夹权限(所有机器)
umask 0022 表示创建文件夹默认权限是755
sh -c "echo umask 0022 >> /etc/profile"
3.6关闭Selinux(所有机器)
# 临时关闭(机器重启后会再开)
setenforce 0
# 永久关闭(设置后需重启才能生效)
vi /etc/selinux/config # 然后将 SELINUX=enforcing 改为 SELINUX=disabled
3.7关闭THP(所有机器)
如果出现下述结果说明启动了THP
[root@nyfhdpnn2 ~]# cat /sys/kernel/mm/transparent_hugepage/defrag
[always] madvise never
[root@nyfhdpnn2 ~]# cat /sys/kernel/mm/transparent_hugepage/enabled
[always] madvise never
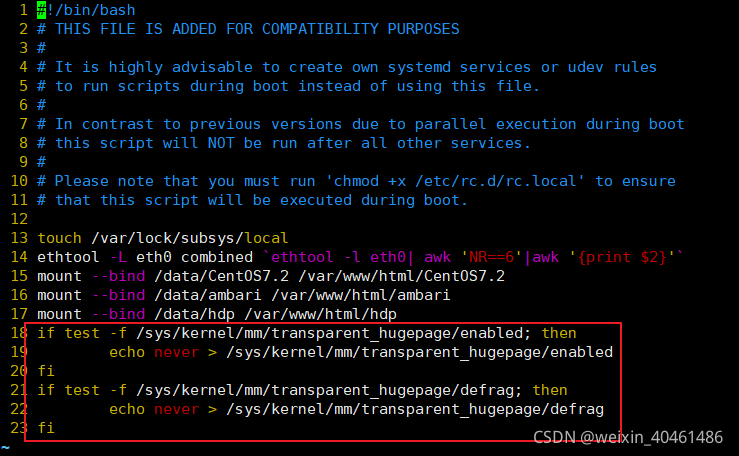
永久关闭:vim /etc/rc.d/rc.local

保存退出,然后赋予rc.local文件执行权限:chmod +x /etc/rc.d/rc.local
重启服务器:reboot
[root@nyfhdpnn1 ~]# cat /sys/kernel/mm/transparent_hugepage/defrag
always madvise [never]
[root@nyfhdpnn1 ~]# cat /sys/kernel/mm/transparent_hugepage/enabled
always madvise [never]
再次查看该文件,为这个结果说明关闭THP成功
三、修改yum源,实现离线安装
1.安装httpd服务(主服务器)
yum -y install httpd #安装

systemctl start httpd #启动

systemctl status httpd #查看启动状态

chkconfig httpd on #设置开机启动
2.将上面下载的三个包放到/var/www/html目录下(主服务器)
解压ambari
[root@localhost ambari]# tar -zxvf ambari-2.7.4.0-centos7.tar.gz -C /var/www/html/
ambari/centos7/2.7.4.0-118/
ambari/centos7/2.7.4.0-118/smartsense/
ambari/centos7/2.7.4.0-118/smartsense/smartsense-hst-1.5.1.2.7.4.0-118.x86_64.rpm
ambari/centos7/2.7.4.0-118/artifacts.txt
ambari/centos7/2.7.4.0-118/repodata/
ambari/centos7/2.7.4.0-118/repodata/93d3d0034a10948d2a8bab8fe169d22a0b484f2a96a013e1f1014e8af4e7b8a0-primary.xml.gz
ambari/centos7/2.7.4.0-118/repodata/e44b35d9b2a2df3c5262a0b2c646a311dc57d4092fb12950009395fa1e1c6c14-filelists.xml.gz
ambari/centos7/2.7.4.0-118/repodata/8e66e006ee0f5242f24b7188fa3f946e1b4f6611d92d99706cb42e48cfc5c305-other.xml.gz
ambari/centos7/2.7.4.0-118/repodata/e3bccd6657c0b0e1450c69d14310057ac783726091bbe59db801d1e75cdc2dfa-filelists.sqlite.bz2
ambari/centos7/2.7.4.0-118/repodata/a9bd00530ca0d875f5f837b8e40f7fa5db6ca155152d3e68d586f5dca1a0bef4-primary.sqlite.bz2
ambari/centos7/2.7.4.0-118/repodata/1ab58b50b4e1d83a1412f6fb635b664be89b15320eafe69c50544c7e17f1a2a3-other.sqlite.bz2
ambari/centos7/2.7.4.0-118/repodata/repomd.xml
ambari/centos7/2.7.4.0-118/hotfix_index.html
ambari/centos7/2.7.4.0-118/ambari.repo
ambari/centos7/2.7.4.0-118/build_metadata.txt
ambari/centos7/2.7.4.0-118/build.id
ambari/centos7/2.7.4.0-118/private_index.html
ambari/centos7/2.7.4.0-118/tars/
ambari/centos7/2.7.4.0-118/tars/smartsense/
ambari/centos7/2.7.4.0-118/tars/smartsense/smartsense_files.tar.gz
ambari/centos7/2.7.4.0-118/tars/hdp_ambari_definitions/
ambari/centos7/2.7.4.0-118/tars/hdp_ambari_definitions/hdp_ambari_definitions-3.0.0.0.2.7.4.0-118-source.tar.gz
ambari/centos7/2.7.4.0-118/tars/ambari/
ambari/centos7/2.7.4.0-118/tars/ambari/ambari-3.0.0.0.2.7.4.0-118-source.tar.gz
ambari/centos7/2.7.4.0-118/RPM-GPG-KEY/
ambari/centos7/2.7.4.0-118/RPM-GPG-KEY/RPM-GPG-KEY-Jenkins
ambari/centos7/2.7.4.0-118/ambari/
ambari/centos7/2.7.4.0-118/ambari/ambari-metrics-common-2.7.4.0-118.noarch.rpm
ambari/centos7/2.7.4.0-118/ambari/ambari-infra-manager-2.7.4.0-118.noarch.rpm
ambari/centos7/2.7.4.0-118/ambari/ambari-server-2.7.4.0-118.x86_64.rpm
ambari/centos7/2.7.4.0-118/ambari/ambari-metrics-monitor-2.7.4.0-118.x86_64.rpm
ambari/centos7/2.7.4.0-118/ambari/ambari-logsearch-logfeeder-2.7.4.0-118.noarch.rpm
ambari/centos7/2.7.4.0-118/ambari/ambari-logsearch-portal-2.7.4.0-118.noarch.rpm
ambari/centos7/2.7.4.0-118/ambari/ambari-infra-solr-2.7.4.0-118.noarch.rpm
ambari/centos7/2.7.4.0-118/ambari/ambari-infra-solr-client-2.7.4.0-118.noarch.rpm
ambari/centos7/2.7.4.0-118/ambari/ambari-metrics-grafana-2.7.4.0-118.x86_64.rpm
ambari/centos7/2.7.4.0-118/ambari/ambari-agent-2.7.4.0-118.x86_64.rpm
ambari/centos7/2.7.4.0-118/ambari/ambari-metrics-hadoop-sink-2.7.4.0-118.x86_64.rpm
ambari/centos7/2.7.4.0-118/ambari/ambari-metrics-collector-2.7.4.0-118.x86_64.rpm
ambari/centos7/2.7.4.0-118/index.html
ambari/centos7/2.7.4.0-118/public_index.html
在/var/www/html/目录下创建hdp文件夹用于存放HDP文件
mkdir hdp
此时文件结构是这样的:
[root@localhost html]# ll
total 0
drwxr-xr-x. 3 root root 21 Sep 23 04:52 ambari
drwxr-xr-x. 2 root root  6 Sep 23 04:54 hdp
按照同样的方式将其他两个压缩包解压至/var/www/html/hdp/目录下
tar -zxvf HDP-3.1.4.0-centos7-rpm.tar.gz -C /var/www/html/hdp/
tar -zxvf HDP-GPL-3.1.4.0-centos7-gpl.tar.gz -C /var/www/html/hdp/
tar -zxvf HDP-UTILS-1.1.0.22-centos7.tar.gz -C /var/www/html/hdp/
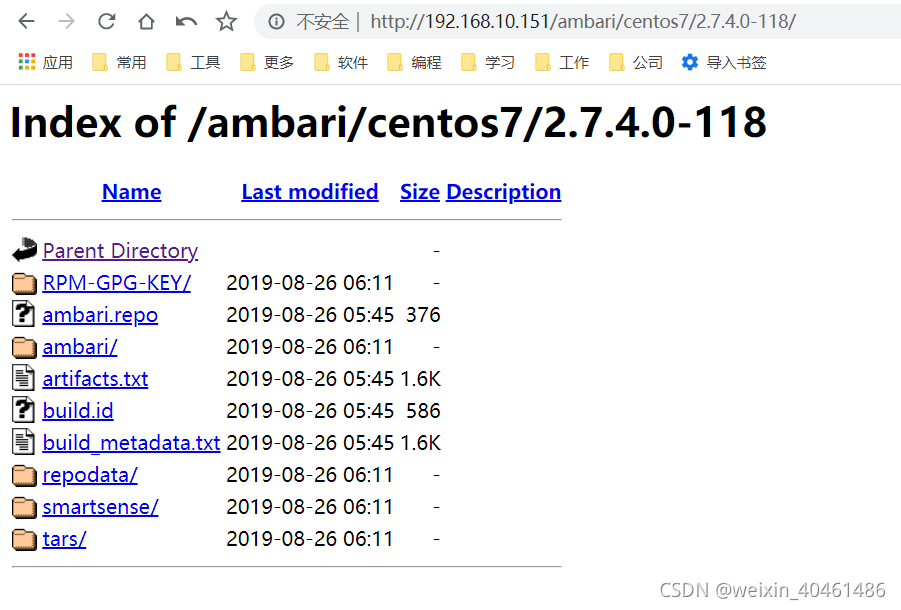
这里有个坑需要注意,需要把里面的html文件删除掉,不然页面访问不到资源。
现在可以通过访问http://192.168.10.151/ambari/查看是否能成功访问

3.配置基础源,创建本地源的repo文件,修改repo文件源路径:
在/etc/yum.repos.d/目录下:
创建ambari.repo
[ambari-2.7.4.0]
name=ambari
baseurl=http://192.168.10.151/ambari/centos7/2.7.4.0-118
gpgkey=http://192.168.10.151/ambari/centos7/2.7.4.0-118/RPM-GPG-KEY/RPM-GPG-KEY-Jenkins
gpgcheck=1
enabled=1
priority=1
创建hdp.repo
#VERSION_NUMBER=3.1.4.0-315
[HDP-3.1.4.0]
name=HDP Version - HDP-3.1.4.0
baseurl=http://192.168.10.151/hdp/HDP/centos7/3.1.4.0-315/
gpgcheck=1
gpgkey=http://192.168.10.151/hdp/HDP/centos7/3.1.4.0-315/RPM-GPG-KEY/RPM-GPG-KEY-Jenkins
enabled=1
priority=1


[HDP-UTILS-1.1.0.22]
name=HDP-UTILS Version - HDP-UTILS-1.1.0.22
baseurl=http://192.168.10.151/hdp/HDP-UTILS/centos7/1.1.0.22/
gpgcheck=1
gpgkey=http://192.168.10.151/hdp/HDP-UTILS/centos7/1.1.0.22/RPM-GPG-KEY/RPM-GPG-KEY-Jenkins
enabled=1
priority=1
查看目录:
[root@hdp01 ~]# cd /etc/yum.repos.d/
[root@hdp01 yum.repos.d]# ll
total 36
-rw-r--r--. 1 root root  206 Sep 23 18:13 ambari.repo
-rw-r--r--. 1 root root 1664 Aug 30  2017 CentOS-Base.repo
-rw-r--r--. 1 root root 1309 Aug 30  2017 CentOS-CR.repo
-rw-r--r--. 1 root root  649 Aug 30  2017 CentOS-Debuginfo.repo
-rw-r--r--. 1 root root  314 Aug 30  2017 CentOS-fasttrack.repo
-rw-r--r--. 1 root root  630 Aug 30  2017 CentOS-Media.repo
-rw-r--r--. 1 root root 1331 Aug 30  2017 CentOS-Sources.repo
-rw-r--r--. 1 root root 3830 Aug 30  2017 CentOS-Vault.repo
-rw-r--r--. 1 root root  506 Sep 23 18:17 hdp.repo
安装createrepo命令:
yum install yum-utils createrepo yum-plugin-priorities -y
生成本地源: 使用createrepo命令,创建yum本地源(软件仓库),即为存放本地特定位置的众多rpm包建立索引,描述各包所需依赖信息,并形成元数据。:
createrepo ./
上面就创建好了主机上的文件,然后可以通过下面命令清楚一下yum的缓存就可以了
[root@hdp01 ambari]# yum clean all
[root@hdp01 ambari]# yum makecache
[root@hdp01 ambari]# yum repolist
Loaded plugins: fastestmirror, langpacks
Loading mirror speeds from cached hostfile
 * base: mirrors.ustc.edu.cn
 * extras: mirrors.cn99.com
 * updates: mirrors.cn99.com
repo id                           repo name                                              status
HDP-3.1.4.0                       HDP Version - HDP-3.1.4.0                                 201
HDP-UTILS-1.1.0.22                HDP-UTILS Version - HDP-UTILS-1.1.0.22                     16
ambari-2.7.4.0                    ambari                                                     13
base/7/x86_64                     CentOS-7 - Base                                        10,072
extras/7/x86_64                   CentOS-7 - Extras                                         500
updates/7/x86_64                  CentOS-7 - Updates                                      2,751
repolist: 13,553
将创建好的文件拷贝到子节点:
[root@hdp01 ambari]# cd /etc/yum.repos.d/
[root@hdp01 yum.repos.d]# scp ambari.repo hdp.repo hdp02:$PWD
ambari.repo                                                  100%  206   166.6KB/s   00:00
hdp.repo                                                     100%  506   557.5KB/s   00:00
[root@hdp01 yum.repos.d]# scp ambari.repo hdp.repo hdp03:$PWD
ambari.repo                                                  100%  206   167.7KB/s   00:00
hdp.repo                                                     100%  506   562.9KB/s   00:00
四、安装ambari-server
yum -y install ambari-server
ambari-server默认使用postgresql数据库的安装方式,其他的数据库也支持,这里我用到的是mysql,大家根据自身选一种即可。
1.MySQL安装
1.1 下载wget命令
yum -y install wget
1.2 在线下载mysql安装包
wget https://dev.mysql.com/get/mysql57-community-release-el7-8.noarch.rpm
1.3 安装MySQL
rpm -ivh mysql57-community-release-el7-8.noarch.rpm
1.4 安装mysql服务
yum -y install mysql-server
1.5 启动MySQL
systemctl start mysqld
1.6 修改MySQL临时密码
MySQL安装成功后会有一个临时密码,我们可以使用grep命令查看临时密码先登录进去MySQL,然后修改MySQL密码。
1.7 获取MySQL临时密码
grep 'temporary password' /var/log/mysqld.log
1.8 使用临时密码先登录
[root@hdp01 yum.repos.d]# grep 'temporary password' /var/log/mysqld.log
2021-09-24T01:47:46.821154Z 1 [Note] A temporary password is generated for root@localhost: impl.kgME7>n
[root@hdp01 yum.repos.d]# mysql -uroot -p
Enter password:
Welcome to the MySQL monitor.  Commands end with ; or \g.
Your MySQL connection id is 2
Server version: 5.7.35

Copyright (c) 2000, 2021, Oracle and/or its affiliates.

Oracle is a registered trademark of Oracle Corporation and/or its
affiliates. Other names may be trademarks of their respective
owners.

Type 'help;' or '\h' for help. Type '\c' to clear the current input statement.

mysql>
1.9 把MySQL的密码校验强度改为低风险
mysql> set global validate_password_policy=LOW;
Query OK, 0 rows affected (0.00 sec)
1.10 修改MySQL的密码长度
set global validate_password_length=4;
1.11 修改MySQL密码
mysql> ALTER USER  'root'@'localhost'  IDENTIFIED BY 'root';
Query OK, 0 rows affected (0.00 sec)
1.12 允许远程访问
1.12.1 首先要关闭Cenots的防火墙
systemctl disable firewalld
1.3.2 修改MySQL允许任何人连接
1)首先登录MySQL
[root@hdp01 yum.repos.d]# mysql -uroot -proot
2)查看user表
mysql> use mysql;
Reading table information for completion of table and column names
You can turn off this feature to get a quicker startup with -A

Database changed
mysql> select Host,User from user;
+-----------+---------------+
| Host      | User          |
+-----------+---------------+
| localhost | mysql.session |
| localhost | mysql.sys     |
| localhost | root          |
+-----------+---------------+
3 rows in set (0.00 sec)

mysql> update user set Host='%' where User='root';
Query OK, 1 row affected (0.00 sec)
Rows matched: 1  Changed: 1  Warnings: 0

mysql> flush privileges;
Query OK, 0 rows affected (0.00 sec)
1.3.3 使用Navicat连接工具测试
五、安装Ambari
前面都是准备工作,我们的重点工作开始拉
首先看下我们之前安装的jdk的路径,在安装ambari的时候用到
使用echo $JAVA_HOME命令查看java的环境变量
[root@hdp01 bin]# echo $JAVA_HOME
像这种没有任何打印,说明环境变量没有配置,就不能用echo $JAVA_HOME来查看java路径
[root@hdp01 bin]# which java
/usr/bin/java
[root@hdp01 bin]# ls -lrt /usr/bin/java
lrwxrwxrwx. 1 root root 22 Sep 23 04:00 /usr/bin/java -> /etc/alternatives/java
[root@hdp01 bin]# ls -lrt /etc/alternatives/java
lrwxrwxrwx. 1 root root 73 Sep 23 04:00 /etc/alternatives/java -> /usr/lib/jvm/java-1.8.0-openjdk-1.8.0.302.b08-0.el7_9.x86_64/jre/bin/java
后面这个路径/usr/lib/jvm/java-1.8.0-openjdk-1.8.0.302.b08-0.el7_9.x86_64 就是完整的安装路径。
找到java安装路径,我们把它设置好,完了别忘记source一下/etc/profile,使其生效。
[root@hdp01 bin]# source /etc/profile
[root@hdp01 bin]# echo $JAVA_HOME
/usr/lib/jvm/java-1.8.0-openjdk-1.8.0.302.b08-0.el7_9.x86_64
[root@hdp01 jvm]# ambari-server setup
Using python  /usr/bin/python
Setup ambari-server
Checking SELinux...
SELinux status is 'enabled'
SELinux mode is 'permissive'
WARNING: SELinux is set to 'permissive' mode and temporarily disabled.
OK to continue [y/n] (y)? y  #这里之前在设置关闭SELinux 时没有重启机器报警了,不影响
Customize user account for ambari-server daemon [y/n] (n)? y
Enter user account for ambari-server daemon (root):root  #设置账号为root
Adjusting ambari-server permissions and ownership...
Checking firewall status...
Checking JDK...
[1] Oracle JDK 1.8 + Java Cryptography Extension (JCE) Policy Files 8
[2] Custom JDK
==============================================================================
Enter choice (1): 2  #选择2表示自定义安装的JDK
WARNING: JDK must be installed on all hosts and JAVA_HOME must be valid on all hosts.
WARNING: JCE Policy files are required for configuring Kerberos security. If you plan to use Kerberos,please make sure JCE Unlimited Strength Jurisdiction Policy Files are valid on all hosts.
Path to JAVA_HOME: /usr/lib/jvm/java-1.8.0-openjdk-1.8.0.302.b08-0.el7_9.x86_64
Validating JDK on Ambari Server...done.
Check JDK version for Ambari Server...
JDK version found: 8
Minimum JDK version is 8 for Ambari. Skipping to setup different JDK for Ambari Server.
Checking GPL software agreement...
GPL License for LZO: https://www.gnu.org/licenses/old-licenses/gpl-2.0.en.html
Enable Ambari Server to download and install GPL Licensed LZO packages [y/n] (n)? y
Completing setup...
Configuring database...
Enter advanced database configuration [y/n] (n)? y  #选择y,表示自定义数据库
Configuring database...
==============================================================================
Choose one of the following options:
[1] - PostgreSQL (Embedded)
[2] - Oracle
[3] - MySQL / MariaDB
[4] - PostgreSQL
[5] - Microsoft SQL Server (Tech Preview)
[6] - SQL Anywhere
[7] - BDB
==============================================================================
Enter choice (1): 3  #这里选择mysql
Hostname (localhost): #直接回车默认localhost
Port (3306): #直接回车默认3306
Database name (ambari): #直接回车默认ambari
Username (ambari): root #root用户
Enter Database Password (bigdata): #输入数据库密码root
Re-enter password: #再次输入数据库密码root
Configuring ambari database...
Enter full path to custom jdbc driver: /usr/share/java/mysql-connector-java.jar
Configuring remote database connection properties...
WARNING: Before starting Ambari Server, you must run the following DDL directly from the database shell to create the schema: /var/lib/ambari-server/resources/Ambari-DDL-MySQL-CREATE.sql
Proceed with configuring remote database connection properties [y/n] (y)?
Extracting system views...
ambari-admin-2.7.4.0.118.jar
....
Ambari repo file doesn't contain latest json url, skipping repoinfos modification
Adjusting ambari-server permissions and ownership...
Ambari Server 'setup' completed successfully. #到这里表示ambari-server已经安装成功
创建ambari数据库
[root@hdp01 jvm]# mysql -uroot -proot
mysql: [Warning] Using a password on the command line interface can be insecure.
Welcome to the MySQL monitor.  Commands end with ; or \g.
Your MySQL connection id is 7
Server version: 5.7.35 MySQL Community Server (GPL)

Copyright (c) 2000, 2021, Oracle and/or its affiliates.

Oracle is a registered trademark of Oracle Corporation and/or its
affiliates. Other names may be trademarks of their respective
owners.

Type 'help;' or '\h' for help. Type '\c' to clear the current input statement.

mysql> create database ambari;
Query OK, 1 row affected (0.00 sec)

mysql> show databases;
+--------------------+
| Database           |
+--------------------+
| information_schema |
| ambari             |
| mysql              |
| performance_schema |
| sys                |
+--------------------+
5 rows in set (0.00 sec)
初始化ambari数据库:
mysql> use ambari
Database changed
mysql> source /var/lib/ambari-server/resources/Ambari-DDL-MySQL-CREATE.sql
启动 Ambari-Server
[root@hdp01 ~]# ambari-server start
Using python  /usr/bin/python
Starting ambari-server
Ambari Server running with administrator privileges.
Organizing resource files at /var/lib/ambari-server/resources...
Ambari database consistency check started...
Server PID at: /var/run/ambari-server/ambari-server.pid
Server out at: /var/log/ambari-server/ambari-server.out
Server log at: /var/log/ambari-server/ambari-server.log
Waiting for server start........................
Server started listening on 8080

DB configs consistency check: no errors and warnings were found.
Ambari Server 'start' completed successfully.
服务启动成功后,会监听8080端口,如果启动失败先查看8080端口是否被占用。其他原因可以查看/var/log/ambari-server/ambari-server.log,具体原因具体分析。

使用浏览器登录,账号密码admin/admin正常登录,则安装完成。

到这里我想说的是,行百里者半九十。我们还差最后一步:使用ambari安装hadoop集群。
六、使用ambari部署Hadoop集群
第一步:点击LAUNCH INSTALL WIZARD
第二步:给集群起个名字

第三步:选择版本并修改为本地源地址
因为我们的系统是centos7,所以移除其他的选项,只保留redhat7

第四步:添加节点信息,使用主节点私钥形式,将主节点私钥填入,用于集群间免密登录。

第五步:等待host安装验证。

第六步:处理提示异常,保证环境可用。

处理检查出来的问题,保证没有任何警告。

第七步:选择需要安装的框架。

均匀分配到各个节点


依次确认安装信息,下一步


按需调整配置


等待安装

安装完成。

看到这个界面,就表示我们通过ambari安装hadoop集群,大功告成啦!
后续组件安装,如Hive可以在这个界面继续添加即可。
