全新以最小化包安装了64位的CentOS7.6系统,作为本地的Web服务器使用,现记录全过程
第二步,安装mysql8数据库v8.0.15,无法用yum源安装的相关依赖有cmake-3.14.5、gcc6.3
※ 知悉
源码安装mysql,其中两个版本对编译环境有要求
1.
mysql从5.5版本开始,不再使用./configure编译,而是使用cmake编译器。
2.
mysql从8.0.16版本开始,要求cmake的版本是cmake3以上
3.
centos7.6默认安装的是cmake
2.8.12.2和
gcc4.8.5,这是为考虑向下兼容centos6.2及稳定性,但对编辑安装mysql8.0.16会形成阻碍,所以安装前建议升级cmake到cmake3以上(最新为3.14),并以
scl软件集(Software Collections)的方式临时切换为高版本的gcc6.3完成mysql编辑(本文会分别讲述此两项)
4.
务必记得先删除mariadb相关内容,尤其要
删除/etc/my.cnf文件
,mysql启动时会默认加载该配置文件,导致在安装参数里的设置无效,会默认加载原系统自带的mariadb目录,然后引发一系列的错误
5. 请仔细查看mysql的cmake预编译参数以及正确正确的mysql源码包,很多同学在这里乱来
mysql8.0官方编译参数:
https://dev.mysql.com/doc/refman/8.0/en/source-configuration-options.html
mysql-8.0.15
.tar.gz源码包下载地址:
https://cdn.mysql.com/archives/mysql-8.0/mysql-8.0.15.tar.gz
准备工作1
,安装wget,用wget下载相应安装包,卸载centos自带的
mariadb
[root@localhost ~]# yum remove mariadb
[root@localhost ~]# yum install -y wget
[root@localhost ~]# wget https://github.com/Kitware/CMake/releases/download/v3.14.5/cmake-3.14.5.tar.gz
[root@localhost ~]# wget https://cdn.mysql.com/archives/mysql-8.0/mysql-8.0.15.tar.gz
准备工作2
:安装基本依赖包,先用yum安装cmake
、
automake 、autoconf ,另
MySQL 8.x需要最少安装的包有:bison,gcc、gcc-c++
、
ncurses-devel、
openssl-devel
[root@localhost ~]# yum install cmake make -y
[root@localhost ~]# yum install gcc gcc-c++ autoconf bison automake \
openssl openssl-devel zlib* fiex* libxml* \
ncurses-devel libmcrypt* libtool-ltdl-devel* -y
准备工作3
:
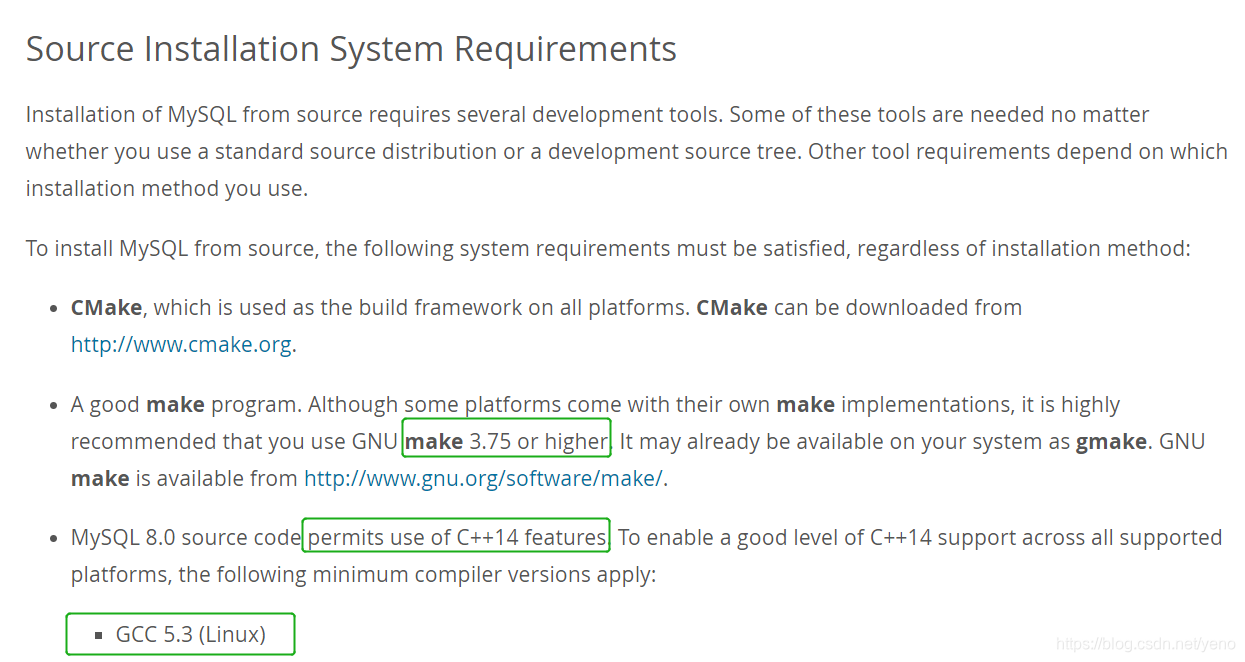
安装环境要求:gcc5.3及以上版本,cmake3.75以上版本(本文用gcc6.3和cmake3.14)
官方文档说明及截图如下
https://dev.mysql.com/doc/refman/8.0/en/source-installation.html

查看当前 gcc 版本,显示yum默认安装的是
gcc4.8.5,由于旧版本gcc对各种c语言特性不支持
[root@localhost ~]# gcc -v
使用内建 specs。
COLLECT_GCC=gcc
COLLECT_LTO_WRAPPER=/usr/libexec/gcc/x86_64-redhat-linux/4.8.5/lto-wrapper
目标:x86_64-redhat-linux
配置为:../configure --prefix=/usr --mandir=/usr/share/man --infodir=/usr/share/info --with-bugurl=http://bugzilla.redhat.com/bugzilla --enable-bootstrap --enable-shared --enable-threads=posix --enable-checking=release --with-system-zlib --enable-__cxa_atexit --disable-libunwind-exceptions --enable-gnu-unique-object --enable-linker-build-id --with-linker-hash-style=gnu --enable-languages=c,c++,objc,obj-c++,java,fortran,ada,go,lto --enable-plugin --enable-initfini-array --disable-libgcj --with-isl=/builddir/build/BUILD/gcc-4.8.5-20150702/obj-x86_64-redhat-linux/isl-install --with-cloog=/builddir/build/BUILD/gcc-4.8.5-20150702/obj-x86_64-redhat-linux/cloog-install --enable-gnu-indirect-function --with-tune=generic --with-arch_32=x86-64 --build=x86_64-redhat-linux
线程模型:posix
gcc 版本 4.8.5 20150623 (Red Hat 4.8.5-36) (GCC)
安装gcc6.3,这里介绍使用
scl软件集(Software Collections)实现多个gcc版本之间的灵活切换
1. 安装scl源
[root@localhost ~]# yum install centos-release-scl -y
2.
列出scl有哪些源可以用,下面只截图部分版本
[root@localhost ~]# yum list|grep gcc
devtoolset-3-gcc.x86_64                   4.9.2-6.el7           centos-sclo-rh
devtoolset-3-gcc-c++.x86_64               4.9.2-6.el7           centos-sclo-rh
devtoolset-3-gcc-gfortran.x86_64          4.9.2-6.el7           centos-sclo-rh
devtoolset-3-gcc-plugin-devel.x86_64      4.9.2-6.el7           centos-sclo-rh
devtoolset-4-gcc.x86_64                   5.3.1-6.1.el7         centos-sclo-rh
devtoolset-4-gcc-c++.x86_64               5.3.1-6.1.el7         centos-sclo-rh
devtoolset-4-gcc-gdb-plugin.x86_64        5.3.1-6.1.el7         centos-sclo-rh
devtoolset-4-gcc-gfortran.x86_64          5.3.1-6.1.el7         centos-sclo-rh
devtoolset-4-gcc-plugin-devel.x86_64      5.3.1-6.1.el7         centos-sclo-rh
devtoolset-4-libgccjit.x86_64             5.3.1-6.1.el7         centos-sclo-rh
devtoolset-4-libgccjit-devel.x86_64       5.3.1-6.1.el7         centos-sclo-rh
devtoolset-4-libgccjit-docs.x86_64        5.3.1-6.1.el7         centos-sclo-rh
devtoolset-7-gcc.x86_64                   7.3.1-5.15.el7        centos-sclo-rh
devtoolset-7-gcc-c++.x86_64               7.3.1-5.15.el7        centos-sclo-rh
devtoolset-7-gcc-gdb-plugin.x86_64        7.3.1-5.15.el7        centos-sclo-rh
devtoolset-7-gcc-gfortran.x86_64          7.3.1-5.15.el7        centos-sclo-rh
devtoolset-7-gcc-plugin-devel.x86_64      7.3.1-5.15.el7        centos-sclo-rh
devtoolset-7-libgccjit.x86_64             7.3.1-5.15.el7        centos-sclo-rh
devtoolset-7-libgccjit-devel.x86_64       7.3.1-5.15.el7        centos-sclo-rh
devtoolset-7-libgccjit-docs.x86_64        7.3.1-5.15.el7        centos-sclo-rh
devtoolset-8-gcc.x86_64                   8.2.1-3.el7           centos-sclo-rh
devtoolset-8-gcc-c++.x86_64               8.2.1-3.el7           centos-sclo-rh
devtoolset-8-gcc-gdb-plugin.x86_64        8.2.1-3.el7           centos-sclo-rh
devtoolset-8-gcc-gfortran.x86_64          8.2.1-3.el7           centos-sclo-rh
devtoolset-8-gcc-plugin-devel.x86_64      8.2.1-3.el7           centos-sclo-rh
devtoolset-8-libgccjit.x86_64             8.2.1-3.el7           centos-sclo-rh
devtoolset-8-libgccjit-devel.x86_64       8.2.1-3.el7           centos-sclo-rh
devtoolset-8-libgccjit-docs.x86_64        8.2.1-3.el7           centos-sclo-rh
3.
安装5.3版本的gcc、gcc-c++、gdb,当前
CentOS7支持3,4,6,7,8五个版本,分别对应GCC4.9,GCC5.3,GCC6.3
,GCC7.3,
,GCC8.2
,用户可以根据自己的需要选择安装哪一个版本,本文安装GCC8.2
[root@localhost ~]# yum install devtoolset-8-gcc* -y
4.临时切换gcc为新版本有两个命令(
source /opt/rh/devtoolset-8/enable
或
scl enable devtoolset-8 bash)
[root@localhost ~]# source /opt/rh/devtoolset-8/enable

[root@localhost ~]# gcc -v
Using built-in specs.
COLLECT_GCC=gcc
COLLECT_LTO_WRAPPER=/opt/rh/devtoolset-8/root/usr/libexec/gcc/x86_64-redhat-linux/8/lto-wrapper
Target: x86_64-redhat-linux
Configured with: ../configure --enable-bootstrap --enable-languages=c,c++,fortran,lto --prefix=/opt/rh/devtoolset-8/root/usr --mandir=/opt/rh/devtoolset-8/root/usr/share/man --infodir=/opt/rh/devtoolset-8/root/usr/share/info --with-bugurl=http://bugzilla.redhat.com/bugzilla --enable-shared --enable-threads=posix --enable-checking=release --enable-multilib --with-system-zlib --enable-__cxa_atexit --disable-libunwind-exceptions --enable-gnu-unique-object --enable-linker-build-id --with-gcc-major-version-only --with-linker-hash-style=gnu --with-default-libstdcxx-abi=gcc4-compatible --enable-plugin --enable-initfini-array --with-isl=/builddir/build/BUILD/gcc-8.2.1-20180905/obj-x86_64-redhat-linux/isl-install --disable-libmpx --enable-gnu-indirect-function --with-tune=generic --with-arch_32=x86-64 --build=x86_64-redhat-linux
Thread model: posix
gcc version 8.2.1 20180905 (Red Hat 8.2.1-3) (GCC)
至此,gcc已显示为6.3版本,
若要在启动的时候就生效,可以放置到~/.bashrc之中即可
只要make编译通不过,请检查当前的gcc版本(命令:gcc -v),版本要求5.3以上
(
※ 非常重要)
准备工作4
:升级cmake2为cmake3以上
yum默认安装2.8.12.2,编译
mysql8.0.16会提示以下错误
:
-- Running cmake version 2.8.12.2
CMake Warning at CMakeLists.txt:43 (MESSAGE):
  Please use cmake3 rather than cmake on this platform
-- Please install cmake3 (yum install cmake3)
CMake Error at CMakeLists.txt:55 (CMAKE_MINIMUM_REQUIRED):
  CMake 3.4.3 or higher is required.  You are running version 2.8.12.2
-- Configuring incomplete, errors occurred!
更新cmake,先用yum移除原cmake
[root@localhost ~]# yum -remove cmake -y
[root@localhost ~]# tar zxvf cmake-3.14.5.tar.gz
[root@localhost ~]# cd cmake-3.14.5
[root@localhost cmake-3.14.5]# ./bootstrap
[root@localhost cmake-3.14.5]# gmake && gmake install
[root@localhost cmake-3.14.5]# /usr/local/bin/cmake  --version
cmake version 3.14.5
CMake suite maintained and supported by Kitware (kitware.com/cmake).
显示的版本号为
cmake version 3.14.5,再建立软连接[cmake更新完毕]
[root@localhost cmake-3.14.5]# ln -s /usr/local/bin/cmake /usr/bin/
下面开始正式进入mysql的安装步骤:
我的mysql目录配置如下:
安装路径:/usr/local/mysql
数据库路径:/data/mysql
源码包存放位置:
/root/
[root@localhost ~]# tar zxvf mysql-8.0.15.tar.gz
[root@localhost ~]# mkdir /data
[root@localhost ~]# mkdir /data/mysql
[root@localhost ~]# cd mysql-8.0.15
[root@localhost mysql-8.0.15]# mkdir -p build
[root@localhost mysql-8.0.15]# cd build
[root@localhost build]# cmake .. -DCMAKE_INSTALL_PREFIX=/usr/local/mysql \
-DSYSCONFDIR=/usr/local/mysql \
-DMYSQL_UNIX_ADDR=/data/mysql/mysql.sock \
-DDEFAULT_CHARSET=utf8mb4 \
-DDEFAULT_COLLATION=utf8mb4_0900_ai_ci \
-DWITH_SSL=system \
-DWITH_ARCHIVE_STORAGE_ENGINE=1 \
-DWITH_BLACKHOLE_STORAGE_ENGINE=1 \
-DWITH_INNODB_MEMCACHED=ON \
-DENABLED_LOCAL_INFILE=ON \
-DMYSQL_TCP_PORT=3306 \
-DDOWNLOAD_BOOST=1 \
-DWITH_BOOST=/tmp \
-DMYSQL_DATADIR=/data/mysql

[root@localhost build]# make -j 8  && make install
执行多任务并发编译安装,make -j x(x为任务数)
※ 部分编译参数特别说明
-DDOWNLOAD_BOOST=1
-DWITH_BOOST=/tmp
若mysql编译时未加入上述参数,会报错如下:
报错:CMake Error at cmake/boost.cmake:101 (MESSAGE): You can download it with -DDOWNLOAD_BOOST=1 -DWITH_BOOST=<directory>
-DDOWNLOAD_BOOST=1,表示系统会自动下载解压boost,若已下载,请将该参数置0
下面开始正式进入mysql的配置步骤:
1. 创建mysql用户组(查看mysql.mysql的用户及组是否存在,不存在就创建)
[root@localhost ~]# cat /etc/passwd |grep mysql
[root@localhost ~]# groupadd mysql
[root@localhost ~]# useradd mysql -g mysql -s /sbin/nologin
[root@localhost ~]# cat /etc/passwd |grep mysql
mysql:x:1000:1000::/home/mysql:/sbin/nologin
2. 将mysql目录赋予mysql用户的执行权限
[root@localhost ~]# chown mysql.mysql -R /usr/local/mysql
[root@localhost ~]# chown mysql.mysql -R /data/mysql
3. 初始化mysql,会生成root初始化密码,注意保存
[root@localhost ~]# /usr/local/mysql/bin/mysqld --initialize --user=mysql
※
临时密码:[Server] A temporary password is generated for root@localhost:
G!K+EPYn0=Oe
4. 启动mysql
[root@localhost ~]# /usr/local/mysql/bin/mysqld_safe --user=mysql &用secureCRT开启新会话,进入数据库(G!K+EPYn0=Oe是刚才生成的临时密码)
[root@localhost ~]# /usr/local/mysql/bin/mysql -uroot -p'G!K+EPYn0=Oe'# 修改root 密码为 888888
mysql> alter user 'root'@'localhost' identified by "888888";
mysql> show databases;

+--------------------+
| Database           |
+--------------------+
| information_schema |
| mysql              |
| performance_schema |
| sys                |
+--------------------+

4 rows in set (0.01 sec)
# 添加mysql远程登录账号
mysql> create user root@'%' identified by '888888';
Query OK, 0 rows affected (0.02 sec)

mysql> grant all privileges on *.* to root@'%';
Query OK, 0 rows affected (0.00 sec)

mysql> flush privileges;
Query OK, 0 rows affected (0.01 sec)
# 查看目前的帐号,有%的root账号表示远程登录账号配置成功
mysql> select user,host from mysql.user;

+------------------+-----------+
| user             | host      |
+------------------+-----------+
| root             | %         |
| mysql.infoschema | localhost |
| mysql.session    | localhost |
| mysql.sys        | localhost |
| root             | localhost |
+------------------+-----------+
5 rows in set (0.00 sec)

mysql> quit
5. 配置为系统服务并加入开机启动
[root@localhost ~]# cp /usr/local/mysql/support-files/mysql.server /etc/init.d/mysqld
[root@localhost ~]# chmod 755 /etc/init.d/mysqld
[root@localhost ~]# chkconfig --list|grep mysqld
[root@localhost ~]# chkconfig mysqld on
[root@localhost ~]# chkconfig --list|grep mysqld
mysqld          0:关    1:关    2:开    3:开    4:开    5:开    6:关
mysqld已加入系统服务,设置为开机自启动,至此,mysql安装配置讲解结束!
在防火墙中开启mysql的3306的远程访问,这样就可以使用navicat等工具连上mysql
[root@localhost ~]# firewall-cmd --zone=public --add-port=3306/tcp --permanent
success
[root@localhost ~]# firewall-cmd --reload
success
附录:
centos7默认的防火墙为firewalld,基本命令如下:
开启3306端口,(–permanent永久生效,没有此参数重启后失效)
[root@localhost ~]# firewall-cmd --zone=public --add-port=3306/tcp --permanent 重新载入,使修改立即生效(每次修改都执行该命令)
[root@localhost ~]# firewall-cmd --reload查看所有打开的端口
[root@localhost ~]# firewall-cmd --zone=public --list-ports查看指定的端口是否打开
[root@localhost ~]# firewall-cmd --zone= public --query-port=3306/tcp删除指定的端口
[root@localhost ~]# firewall-cmd --zone= public --remove-port=3306/tcp --permanent
mysql8.0官方编译参数的
英文文档简单翻译说明一下
:
https://dev.mysql.com/doc/refman/8.0/en/source-configuration-options.html
The
InnoDB
,
MyISAM
,
MERGE
,
MEMORY
, and
CSV
engines are mandatory (always compiled into the server) and need not be installed explicitly.
(说明:
mysql默认支持的数据库引擎有InnoDB,MyISAM, MERGE, MEMORY, CSV,无需在编译时再声明)
所以上面的编译条件省掉了如下行
-DWITH_MYISAM_STORAGE_ENGINE=1 \
-DWITH_MEMORY_STORAGE_ENGINE=1 \
-DWITH_INNOBASE_STORAGE_ENGINE=1 \
相关错误处理
1.
CMake Error: The source directory “/xxx/mysql-8.0.15” does not appear to contain CMakeLists.txt
解决:
下载的mysql版本有问题。应下载:选择Source Code

2. mysql8源码编译运行CMake,提示Please do not build in-source. Out-of source builds are highly recommended,提示不要在源文档中cmake
解决:在源文档中建个子目录来执行cmake即可(本例中建立了build目录),
不在源目录中cmake是良好的习惯。
3
.
CMake Error at cmake/ssl.cmake:68 (MESSAGE): Please install the appropriate openssl developer package
解决:
yum install ncurses-devel 和 yum install openssl-devel