基础推荐模型——传送门
:
-
推荐系统 | 基础推荐模型 | 协同过滤 | UserCF与ItemCF的Python实现及优化
-
推荐系统 | 基础推荐模型 | 矩阵分解模型 | 隐语义模型 | PyTorch实现
-
推荐系统 | 基础推荐模型 | 逻辑回归模型 | LS-PLM | PyTorch实现
-
推荐系统 | 基础推荐模型 | 特征交叉 | FM | FFM | PyTorch实现
-
推荐系统 | 基础推荐模型 | GBDT+LR模型 | Python实现
一、逻辑回归(LR模型)
相比协同过滤模型仅利用用户与物品的相互行为信息进行推荐,逻辑回归模型能够综合利用用户、物品、上下文等多种不同的特征,生成较为”全面”的推荐结果。另外,逻辑回归的另一种表现形式”感知机”作为神经网络中最基础的神经元,是深度学习的基础性结构。因此,
多特征融合的逻辑回归模型
成了独立于协同过滤的推荐模型发展的另一个主要方向。
相比协同过滤和矩阵分解利用用户和物品的”相似度”进行推荐,逻辑回归将推荐问题看成一个
分类问题
,通过
预测正样本的概率对物品进行排序
。这里的正样本可以是用户”点击”了某商品,也可以是用户”观看”了某视频,均是推荐系统希望用户产生的”正反馈”行为。 因此,逻辑回归模型将推荐问题转换成一个
点击率
( Click Through Rate ,
CTR
) 预估问题。
1.基于逻辑回归模型的推荐流程
基于逻辑回归的推荐过程如下:
-
将用户年龄、性别、物品属性、物品描述、当前时间、当前地点等特征
转换成数值型特征向量
-
确定逻辑回归模型的
优化目标
(以优化”点击率”为例),利用已有样本数据对逻辑回归模型进行
训练
,确定逻辑回归模型的内部参数 - 在模型服务阶段,将特征向量输入逻辑回归模型,经过逻辑回归模型的推断,得到用户”点击” (这里用点击作为推荐系统正反馈行为的例子)物品的概率
-
利用”
点击
”
概率
对所有候选物品进行排序,得到推荐列表
基于逻辑回归的推荐过程的重点
在于利用样本的特征向量进行模型训练和在线推断。
2.逻辑回归的数学形式
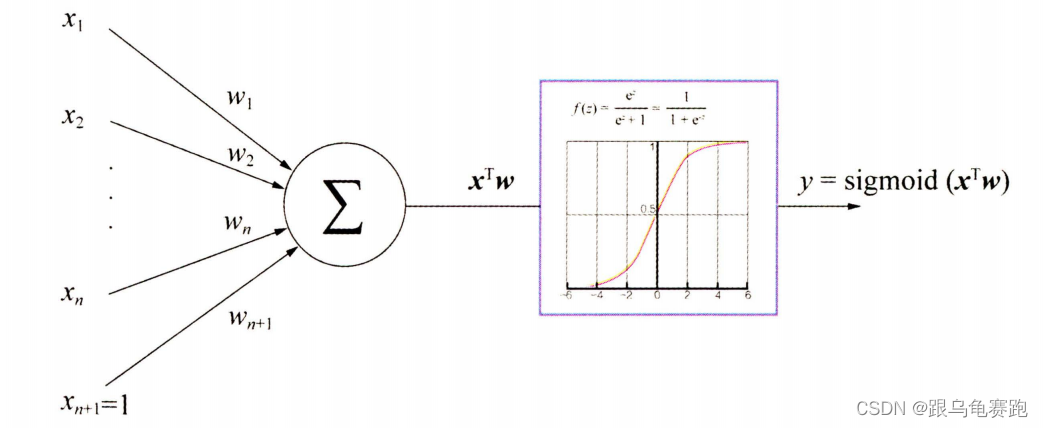
如图所示,逻辑回归模型的
推断过程
可以分为如下几步:
-
将特征向量
x=
(
x
1
,
x
2
,
.
.
.
x
n
)
x=(x_1,x_2,…x_n)
x
=
(
x
1
,
x
2
,
…
x
n
)
作为模型的输入 -
通过为各特征赋予相应的权重
(w
1
,
w
2
,
.
.
.
,
w
n
+
1
)
(w_1,w_2,…,w_{n+1})
(
w
1
,
w
2
,
…
,
w
n
+
1
)
来表示各特征的重要性差异,将各特征进行加权求和,得到
xT
w
x^Tw
x
T
w
-
将
xT
w
x^Tw
x
T
w
输入 sigmoid 函数,使之映射到 0~1 的区间,得到最终的”点击率”
其中, sigmoid 函数的具体形式为:
f
(
z
)
=
1
1
+
e
−
z
f(z)=\frac{1}{1+e^{-z}}
f
(
z
)
=
1
+
e
−
z
1
因此,逻辑回归模型整个推断过程的
数学形式
为:
f
(
x
)
=
f
w
(
x
)
=
1
1
+
e
−
(
w
⋅
b
+
x
)
f(x)=f_w(x)=\frac{1}{1+e^{-(w·b+x)}}
f
(
x
)
=
f
w
(
x
)
=
1
+
e
−
(
w
⋅
b
+
x
)
1
对于标准的逻辑回归模型来说,要确定的参数就是特征向量相应的权重向量
w
w
w
。
3.逻辑回归模型的训练方法
逻辑回归模型常用的训练方法是梯度下降法、牛顿法、拟牛顿法等,其中
梯度下降法
是应用最广泛的训练方法。
使用梯度下降法求解逻辑回归模型的第一步是确定逻辑回归的目标函数。对于一个输入样本
x
x
x
,预测结果为正样本(类别1)和负样本(类别0)的概率如下:
p
(
y
=
1
∣
x
;
w
)
=
f
w
(
x
)
p(y=1|x;w)=f_w(x)
p
(
y
=
1∣
x
;
w
)
=
f
w
(
x
)
p
(
y
=
0
∣
x
;
w
)
=
1
−
f
w
(
x
)
p(y=0|x;w)=1-f_w(x)
p
(
y
=
0∣
x
;
w
)
=
1
−
f
w
(
x
)
其中,
f
w
(
x
)
f_w(x)
f
w
(
x
)
是逻辑回归的数学形式。
将上面两个式子综合起来,可以写成如下形式:
p
(
y
∣
x
;
w
)
=
(
f
w
(
x
)
)
y
(
1
−
f
w
(
x
)
)
1
−
y
p(y|x;w)=(f_w(x))^y(1-f_w(x))^{1-y}
p
(
y
∣
x
;
w
)
=
(
f
w
(
x
)
)
y
(
1
−
f
w
(
x
)
)
1
−
y
由极大似然估计的原理可以写出逻辑回归的目标函数,如下所示:
L
(
w
)
=
∏
i
=
1
m
P
(
y
∣
x
;
w
)
L(w)=\prod_{i=1}^{m}P(y|x;w)
L
(
w
)
=
i
=
1
∏
m
P
(
y
∣
x
;
w
)
由于目标函数连乘的形式不便于求导,故在上式两侧取
log
,并乘以系数
−
1
m
-\frac{1}{m}
−
m
1
,将求最大值的问题转换成求极小值的问题,最终的
目标函数
形式如下所示:
J
(
w
)
=
−
1
m
L
(
w
)
=
−
1
m
(
∑
i
=
1
m
(
y
i
l
o
g
f
w
(
x
i
)
)
+
(
1
−
y
i
)
l
o
g
(
1
−
f
w
(
x
i
)
)
)
J(w)=-\frac{1}{m}L(w)=-\frac{1}{m}(\sum_{i=1}^{m}(y^ilogf_w(x^i))+(1-y^i)log(1-f_w(x^i)))
J
(
w
)
=
−
m
1
L
(
w
)
=
−
m
1
(
i
=
1
∑
m
(
y
i
l
o
g
f
w
(
x
i
))
+
(
1
−
y
i
)
l
o
g
(
1
−
f
w
(
x
i
)))
在得到逻辑回归的目标函数后,需对每个参数求偏导,得到梯度方向,对
J
(
w
)
J(w)
J
(
w
)
中的参数
w
j
w_j
w
j
求偏导的结果如下所示:
∂
J
(
w
)
∂
w
j
=
1
m
∑
i
=
1
m
(
f
w
(
x
i
)
−
y
i
)
x
j
i
\frac{\partial{J(w)}}{\partial{w_j}}=\frac{1}{m}\sum_{i=1}^{m}(f_w(x^i)-y^i)x_j^i
∂
w
j
∂
J
(
w
)
=
m
1
i
=
1
∑
m
(
f
w
(
x
i
)
−
y
i
)
x
j
i
在得到梯度后,即可得到模型参数的更新公式,如下所示:
w
j
=
w
j
−
γ
1
m
∑
i
=
1
m
(
f
w
(
x
i
)
−
y
i
)
x
j
i
w_j=w_j-\gamma\frac{1}{m}\sum_{i=1}^{m}(f_w(x^i)-y^i)x_j^i
w
j
=
w
j
−
γ
m
1
i
=
1
∑
m
(
f
w
(
x
i
)
−
y
i
)
x
j
i
至此,完成逻辑回归模型的更新推导。
4.逻辑回归的优势
在深度学习模型流行之前,逻辑回归模型曾在相当长的一段时间里是推荐系统、计算广告业界的主要选择之一。除了在形式上适于融合不同特征,形成较”全面”的推荐结果,其流行还有一方面的原因: 一是数学含义上的支撑;二是可解释性强; 三是工程化的需要
4.1 数学含义上的支撑
逻辑回归作为广义线性模型的一种,它的假设是因变量
y
y
y
服从
伯努利分布
。那么,在
CTR
预估这个问题上,”点击”事件是否发生就是模型的因变量
y
y
y
,而用户是否点击广告是一个经典的掷偏心硬币问题。 因此,
CTR
模型的因变量显然应该服从伯努利分布。 所以,采用逻辑回归作为 CTR 模型是符合”点击”这一事件的物理意义的。
与之相比,线性回归作为广义线性模型的另一个特例,其假设是因变量
y
y
y
服从
高斯分布
,这明显不是点击这类二分类问题的数学假设。
4.2 可解释强
直观地讲,逻辑回归模型的数学形式是各特征的加权和,再施以
sigmoid
函数。在逻辑回归数学基础的支撑下,逻辑回归的简单数学形式也非常符合人类对预估过程的直觉认知。
使用各特征的加权和是为了综合不同特征对
CTR
的影响,而不同特征的重要程度不一样,所以为不同特征指定不同的权重代表不同特征的重要程度后,通过
sigmoid
函数,使其值能够映射到
0-1
区间,正好符合
CTR
的物理意义。
线性回归如此符合直觉认知显然有其他的好处一一使模型具有极强的可解释性。算法工程师可以轻易地根据权重的不同解释哪些特征比较重要,在
CTR
模型的预测有偏差时定位是哪些因素影响了最后的结果。 在与负责运营、产品的同事合作时,也便于给出可解释的原因,有效降低沟通成本。
4.3 工程化需要
在互联网公司每天动辄
TB
级别的数据面前,模型的训练开销和在线推断效率显得异常重要。
GPU
尚未流行的 2012 年之前,逻辑回归模型凭借其易于并行化、模型简单、训练开销小等特点,占据着工程领域的主流。 圄于工程团队的限制,即使其他复杂模型的效果有所提升,在没有明显击败逻辑回归模型之前,公司也不会贸然加大计算资源的投入,升级推荐模型或
CTR
模型,这是逻辑回归持续流行的另一重要原因。
5.逻辑回归模型的局限性
逻辑回归作为一个基础模型,显然有其简单、直观、易用的特点。但其局限性也是非常明显的:
表达能力不强,无法进行特征交叉、特征筛选等一系列较为”高级”的操作,因此不可避免地造成信息的损失
。 为解决这一问题,推荐模型朝着复杂化的方向继续发展,衍生出因子分解机等高维的复杂模型。在进入深度学习时代之后,多层神经网络强大的表达能力可以完全替代逻辑回归模型,让它逐渐从各公司退役。各公司也将转而投入深度学习模型的应用浪潮之中。
二、LR模型在criteo数据集上的实验
1.数据集介绍
criteo
数据集每行对应一个由
Criteo
提供的展示广告。有如下特征:
-
Label
:待预测广告,被点击是1,没有被点击是0 -
I1-I13
:共有 13 列数值型特征(主要是计数特征) -
C1-C26
:共有 26 列类别型特征
数据集下载地址为:
https://www.kaggle.com/c/criteo-display-ad-challenge/data
。我这里采用前
100k
个样本进行实验。
2.PyTorch实现
LR推荐模型在criteo数据集上的PyTorch实现,分为以下几个步骤:
-
数据预处理:
dataProcess.py
-
构造数据集:
dataSet.py
-
模型搭建:
LR_Model.py
-
主函数:训练及预测-
main.py
2.1 数据集预处理
#!usr/bin/env python
# -*- coding:utf-8 -*-
"""
@author: liujie
@file: dataProcess.py
@time: 2022/09/05
@desc:
    数据预处理流程:
        1.特征处理
        2.数据分割
"""
import torch
import numpy as np
import pandas as pd
from sklearn.preprocessing import LabelEncoder, OrdinalEncoder, KBinsDiscretizer
from sklearn.model_selection import train_test_split


class DataProcess():
    def __init__(self, file, nrows, sizes, device):
        # 特征列名
        names = ['label', 'I1', 'I2', 'I3', 'I4', 'I5', 'I6', 'I7', 'I8', 'I9', 'I10', 'I11',
                 'I12', 'I13', 'C1', 'C2', 'C3', 'C4', 'C5', 'C6', 'C7', 'C8', 'C9', 'C10', 'C11',
                 'C12', 'C13', 'C14', 'C15', 'C16', 'C17', 'C18', 'C19', 'C20', 'C21', 'C22',
                 'C23', 'C24', 'C25', 'C26']
        self.device = device
        # 读取数据
        self.data_df = pd.read_csv(file, sep="\t", names=names, nrows=nrows)
        self.data = self.feature_process()

    def feature_process(self):
        # 连续特征
        dense_features = ['I' + str(i) for i in range(1, 14)]
        # 离散特征
        sparse_features = ['C' + str(i) for i in range(1, 27)]
        features = dense_features + sparse_features

        # 缺失值填充:连续特征缺失值填充0;离散特征缺失值填充'-1'
        self.data_df[dense_features] = self.data_df[dense_features].fillna(0)
        self.data_df[sparse_features] = self.data_df[sparse_features].fillna('-1')

        # 连续特征等间隔分箱
        kb = KBinsDiscretizer(n_bins=100, encode='ordinal', strategy='uniform')
        self.data_df[dense_features] = kb.fit_transform(self.data_df[dense_features])

        # 特征进行连续编码,为了在与参数计算时使用索引的方式计算,而不是向量乘积
        ord = OrdinalEncoder()
        self.data_df[features] = ord.fit_transform(self.data_df[features])

        self.data = self.data_df[features + ['label']].values
        return self.data

    def train_valid_test_split(self, sizes):
        train_size, test_size = sizes[0], sizes[1]

        # 每一列的最大值加1
        field_dims = (self.data.max(axis=0).astype(int) + 1).tolist()[:-1]

        # 数据集分割为训练集、验证集、测试集
        train_data, test_data = train_test_split(self.data, train_size=train_size, random_state=2022)

        # 将ndarray格式转为tensor格式
        x_train = torch.tensor(train_data[:, :-1], dtype=torch.long).to(self.device)
        y_train = torch.tensor(train_data[:, -1], dtype=torch.float32).to(self.device)
        x_test = torch.tensor(test_data[:, :-1], dtype=torch.long).to(self.device)
        y_test = torch.tensor(test_data[:, -1], dtype=torch.float32).to(self.device)

        return field_dims, (x_train, y_train), (x_test, y_test)


if __name__ == '__main__':
    file = 'criteo-100k.txt'
    nrows = 100000
    sizes = [0.75, 0.25]
    device = torch.device("cuda" if torch.cuda.is_available() else "cpu")
    dataprocess = DataProcess(file, nrows, sizes, device)
    field_dims, (x_train, y_train), (x_test, y_test) \
        = dataprocess.train_valid_test_split(sizes)
    print(x_train.shape)
    print(field_dims)
    offsets = np.array((0, *np.cumsum(field_dims)[:-1]), dtype=np.long)
    print(offsets)
2.2 构造数据集
#!usr/bin/env python
# -*- coding:utf-8 -*-
"""
@author: liujie
@file: dataSet.py
@time: 2022/09/05
@desc:构造加载数据集模块
"""
from torch.utils.data import Dataset


class My_DataSet(Dataset):
    def __init__(self, X, y):
        assert len(X) == len(y)
        self.X = X
        self.y = y

    def __len__(self):
        return len(self.X)

    def __getitem__(self, index):
        return self.X[index], self.y[index]
2.3 模型搭建
#!usr/bin/env python
# -*- coding:utf-8 -*-
"""
@author: liujie
@file: LR_Model.py
@time: 2022/09/05
@desc:PyTorch实现LR模型
"""
import torch
import numpy as np
import torch.nn as nn


class LogisticRegression(nn.Module):
    def __init__(self, field_dims, emb_size):
        """
        :param field_dims: 特征数量列表,其和为总特征数量
        :param emb_size: embedding的维度
        """
        super(LogisticRegression, self).__init__()
        # embedding层
        self.emb = nn.Embedding(sum(field_dims), emb_size)
        # 模型初始化
        nn.init.xavier_uniform(self.emb.weight.data)
        # 偏置项
        self.offset = np.array((0, *np.cumsum(field_dims)[:-1]), dtype=np.long)
        # 可梯度更新
        self.bias = nn.Parameter(torch.zeros((1,)))

    def forward(self, x):
        """
        前向传播
        :param x: 输入数据,(batch,seq_len)
        :return:
        """
        # self.offset中存储的是每一列特征计数的开始值
        # x + x.new_tensor(self.offset):x中的每一列是分别进行顺序编码+起始值后就可以在self.emb中找到真正的索引
        x = x + x.new_tensor(self.offset)
        # (batch,seq_len) => (batch,seq_len,1) => (batch,1)
        x = self.emb(x).sum(1) + self.bias
        x = torch.sigmoid(x)
        return x
2.4 训练及预测
#!usr/bin/env python
# -*- coding:utf-8 -*-
"""
@author: admin
@file: main.py
@time: 2022/09/05
@desc:
"""

import tqdm
import torch
import numpy as np
import pandas as pd
import torch.nn as nn
from torch import optim
from LR_Model import LogisticRegression
import matplotlib.pyplot as plt
from dataSet import My_DataSet
from torch.utils.data import DataLoader
from dataProcess import DataProcess
from sklearn.metrics import f1_score, recall_score

device = torch.device("cuda" if torch.cuda.is_available() else "cpu")
criteo_file = "criteo-100k.txt"
nrows = 100000
sizes = [0.75, 0.25]
embedding_size = 1
batch_size = 4096
num_epochs = 100
learning_rate = 1e-4
weight_decay = 1e-6


def train_and_test(train_dataloader, test_dataloader, model):
    # 损失函数
    criterion = nn.BCELoss()
    # 优化器
    optimizer = optim.Adam(model.parameters(), lr=learning_rate, weight_decay=weight_decay)
    # 记录训练与测试过程的损失,用于绘图
    train_loss, test_loss, train_acc, test_acc = [], [], [], []
    for epoch in range(num_epochs):
        train_loss_sum = 0.0
        train_len = 0
        train_correct = 0
        # 显示训练进度
        train_dataloader = tqdm.tqdm(train_dataloader)
        train_dataloader.set_description('[%s%04d/%04d]' % ('Epoch:', epoch + 1, num_epochs))

        # 训练模式
        model.train()
        model.to(device)
        for i, data_ in enumerate(train_dataloader):
            x, y = data_[0].to(device), data_[1].to(device)
            # 开始当前批次训练时,优化器的梯度置零,否则,梯度会累加
            optimizer.zero_grad()
            # output size = (batch,)
            output = model(x)
            loss = criterion(output, y)
            # 反向传播
            loss.backward()
            # 利用优化器更新参数
            optimizer.step()

            train_loss_sum += loss.detach() * len(x)
            train_len += len(y)
            _, predicted = torch.max(output, 1)
            train_correct += (predicted == y).sum().item()
            # print("train_correct=\n", train_correct)
            # print("train_acc=\n", train_correct / train_len)
            F1 = f1_score(y.cpu(), predicted.cpu(), average="weighted")
            Recall = recall_score(y.cpu(), predicted.cpu(), average="micro")

            # 设置日志
            postfic = {"train_loss: {:.5f},train_acc:{:.3f}%,F1: {:.3f}%,Recall:{:.3f}%".
                           format(train_loss_sum / train_len, 100 * train_correct / train_len, 100 * F1, 100 * Recall)}
            train_dataloader.set_postfix(log=postfic)
        train_loss.append((train_loss_sum / train_len).item())
        train_acc.append(round(train_correct / train_len, 4))

        # 测试
        test_dataloader = tqdm.tqdm(test_dataloader)
        test_dataloader.set_description('[%s%04d/%04d]' % ('Epoch:', epoch + 1, num_epochs))
        model.eval()
        model.to(device)
        with torch.no_grad():
            test_loss_sum = 0.0
            test_len = 0
            test_correct = 0
            for i, data_ in enumerate(test_dataloader):
                x, y = data_[0].to(device), data_[1].to(device)
                output = model(x)
                loss = criterion(output, y)
                test_loss_sum += loss.detach() * len(x)
                test_len += len(y)
                _, predicted = torch.max(output, 1)
                test_correct += (predicted == y).sum().item()
                F1 = f1_score(y.cpu(), predicted.cpu(), average="weighted")
                Recall = recall_score(y.cpu(), predicted.cpu(), average="micro")
                # 设置日志
                postfic = {"test_loss: {:.5f},test_acc:{:.3f}%,F1: {:.3f}%,Recall:{:.3f}%".
                               format(test_loss_sum / test_len, 100 * test_correct / test_len, 100 * F1, 100 * Recall)}
                test_dataloader.set_postfix(log=postfic)
            test_loss.append((test_loss_sum / test_len).item())
            test_acc.append(round(test_correct / test_len, 4))


    return train_loss, test_loss, train_acc, test_acc


def main():
    """
    主函数
    :return:
    """
    dataProcess = DataProcess(criteo_file, nrows, sizes, device)
    field_dims, (x_train, y_train), (x_test, y_test) \
        = dataProcess.train_valid_test_split(sizes)
    # 构造数据集
    trainDataset = My_DataSet(x_train, y_train)
    train_dataloader = DataLoader(trainDataset, batch_size=batch_size, shuffle=True)

    testDataset = My_DataSet(x_test, y_test)
    test_dataloader = DataLoader(testDataset, batch_size=batch_size)

    # 模型实例化
    model = LogisticRegression(field_dims, embedding_size)

    # 训练与测试
    train_loss, test_loss, train_acc, test_acc = train_and_test(train_dataloader, test_dataloader, model)

    # 绘图,展示损失变化
    epochs = np.arange(num_epochs)
    plt.plot(epochs, train_loss, 'b-', label='Training loss')
    plt.plot(epochs, test_loss, 'r--', label='Validation loss')
    plt.title('Training And Validation Loss')
    plt.xlabel('Epochs')
    plt.ylabel('Loss')
    plt.legend()
    plt.show()

    epochs = np.arange(num_epochs)
    plt.plot(epochs, train_acc, 'b-', label='Training acc')
    plt.plot(epochs, test_acc, 'r--', label='Validation acc')
    plt.title('Training And Validation acc')
    plt.xlabel('Epochs')
    plt.ylabel('acc')
    plt.legend()
    plt.show()


if __name__ == '__main__':
    main()
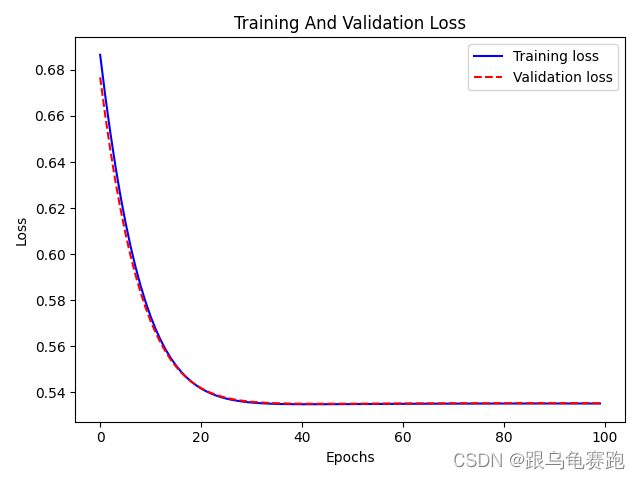
其损失变化图为:
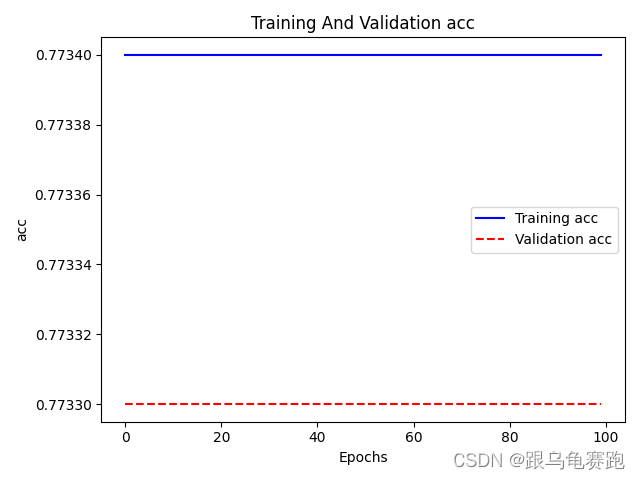
其准确率变化图为:
三、LS-PLM模型
“大规模分段线性模型” ——Large Scale Piece-wise Linear Model,简称
LS-PLM
。
1.LS-PLM模型的主要结构
LS-PLM
,又被称为
MLR
(
Mixed Logistic Regression
,混合逻辑回归)模型。本质上,
LS-PLM
可以看作对逻辑回归的自然推广,它在逻辑回归的基础上采用分而治之的思路,先对样本进行分片,再在样本分片中应用逻辑回归进行
CTR
预估。
在逻辑回归的基础上加入
聚类
的思想,其灵感来自对广告推荐领域样本特点的观察。举例来说,如果
CTR
模型要预估的是女性受众点击女装广告的
CTR
,那么显然,我们不希望把男性用户点击数码类产品的样本数据也考虑进来,因为这样的样本不仅与女性购买女装的广告场景毫无相关性,甚至会在模型训练过程中扰乱相关特征的权重。 为了让
CTR
模型对不同用户群体,不同使用场景更有针对性,其
采用的方法是先对全量样本进行聚类,再对每个分类施以逻辑回归模型进行
CTR
预估
。
LS-PLM
的实现思路就是由该灵感产生的。
LS-PLM
的数学形式如下所示,,首先用聚类函数
π
π
π
对样本进行分类(这里的
π
π
π
采用了
softmax
函数对样本进行多分类),再用
LR
模型计算样本在分片中具体的
CTR
,然后将两者相乘后求和。
f
(
x
)
=
∑
i
=
1
m
π
i
(
x
)
⋅
η
i
(
x
)
=
∑
i
=
1
m
e
μ
i
⋅
x
∑
j
=
1
m
e
μ
j
⋅
x
⋅
1
1
+
e
−
w
i
⋅
x
f(x)=\sum_{i=1}^{m}π_{i}(x)·\eta_{i}(x)=\sum_{i=1}^{m}\frac{e^{\mu_{i}·x}}{\sum_{j=1}^{m}e^{\mu_{j}·x}}·\frac{1}{1+e^{-w_i·x}}
f
(
x
)
=
i
=
1
∑
m
π
i
(
x
)
⋅
η
i
(
x
)
=
i
=
1
∑
m
∑
j
=
1
m
e
μ
j
⋅
x
e
μ
i
⋅
x
⋅
1
+
e
−
w
i
⋅
x
1
其中的超参数”分片数”
m
m
m
可以较好地平衡模型的拟合与推广能力。当
m
=
1
m=1
m
=
1
时,
LS-PLM
就退化为普通的逻辑回归。
m
m
m
越大,模型的拟合能力越强。 与此同时,模型参数规模也随
m
m
m
的增大而线性增长,模型收敛所需的训练样本也随之增长。在实践中,阿里巴巴给出的
m
m
m
的经验值为 12。
在下图中,分别用红色和蓝色表示两类训练数据,传统
LR
模型的拟合能力不足,无法找到非线性的分类面,而
MLR
模型用4个分片完美地拟合出了数据中的菱形分类面。

2.LS-PLM模型的优点
LS-PLM
模型适用于工业级的推荐、广告等大规模稀疏数据的场景,主要是因为其具有以下两个优势:
-
端到端的非线性学习能力
:
LS-PLM
具有样本分片的能力,因此能够挖掘出数据中蕴藏的非线性模式,省去了大量的人工样本处理和特征工程的过程,使
LS-PLM
算法可以端到端地完成训练,便于用一个全局模型对不同应用领域、业务场景进行统一建模。 -
模型的稀疏性强
:
LS-PLM
在建模时引入了
L1
和
L2,1
范数,可以使最终训练出来的模型具有较高的稀疏度,使模型的部署更加轻量级。模型服务过程仅需使用权重非零特征,因此稀疏模型也使其在线推断的效率更高。
3.从深度学习的角度重新审视 LS-PLM 模型
从模型结构层面上,
LS-PLM
可以看作一个加入了注意力(
Attention
)机制的三层神经网络模型,其中输入层是样本的特征向量,中间层是由
m
m
m
个神经元组成的隐层,其中,
m
m
m
是分片的个数,对于一个
CTR
预估问题,
LS-PLM
的最后一层自然是由单一神经元组成的输出层。
那么,注意力机制又是在哪里应用的呢?其实是在隐层和输出层之间,神经元之间的权重是由分片函数得出的注意力得分来确定的。也就是说,
样本属于哪个分片的概率
就是其注意力得分。
四、MLR模型在criteo数据集上的实验
1.数据集介绍
criteo
数据集每行对应一个由
Criteo
提供的展示广告。有如下特征:
-
Label
:待预测广告,被点击是1,没有被点击是0 -
I1-I13
:共有 13 列数值型特征(主要是计数特征) -
C1-C26
:共有 26 列类别型特征
数据集下载地址为:
https://www.kaggle.com/c/criteo-display-ad-challenge/data
。我这里采用前
100k
个样本进行实验。
2.PyTorch实现
MLR推荐模型在criteo数据集上的PyTorch实现,分为以下几个步骤:
-
数据预处理:
dataProcess.py
-
构造数据集:
dataSet.py
-
模型搭建:
MLR_Model.py
-
主函数:训练及预测-
main.py
2.1 数据预处理
#!usr/bin/env python
# -*- coding:utf-8 -*-
"""
@author: liujie
@file: dataProcess.py
@time: 2022/09/05
@desc:
    数据预处理流程:
        1.特征处理
        2.数据分割
"""
import torch
import numpy as np
import pandas as pd
from sklearn.preprocessing import LabelEncoder, OrdinalEncoder, KBinsDiscretizer
from sklearn.model_selection import train_test_split


class DataProcess():
    def __init__(self, file, nrows, sizes, device):
        # 特征列名
        names = ['label', 'I1', 'I2', 'I3', 'I4', 'I5', 'I6', 'I7', 'I8', 'I9', 'I10', 'I11',
                 'I12', 'I13', 'C1', 'C2', 'C3', 'C4', 'C5', 'C6', 'C7', 'C8', 'C9', 'C10', 'C11',
                 'C12', 'C13', 'C14', 'C15', 'C16', 'C17', 'C18', 'C19', 'C20', 'C21', 'C22',
                 'C23', 'C24', 'C25', 'C26']
        self.device = device
        # 读取数据
        self.data_df = pd.read_csv(file, sep="\t", names=names, nrows=nrows)
        self.data = self.feature_process()

    def feature_process(self):
        # 连续特征
        dense_features = ['I' + str(i) for i in range(1, 14)]
        # 离散特征
        sparse_features = ['C' + str(i) for i in range(1, 27)]
        features = dense_features + sparse_features

        # 缺失值填充:连续特征缺失值填充0;离散特征缺失值填充'-1'
        self.data_df[dense_features] = self.data_df[dense_features].fillna(0)
        self.data_df[sparse_features] = self.data_df[sparse_features].fillna('-1')

        # 连续特征等间隔分箱
        kb = KBinsDiscretizer(n_bins=100, encode='ordinal', strategy='uniform')
        self.data_df[dense_features] = kb.fit_transform(self.data_df[dense_features])

        # 特征进行连续编码,为了在与参数计算时使用索引的方式计算,而不是向量乘积
        ord = OrdinalEncoder()
        self.data_df[features] = ord.fit_transform(self.data_df[features])

        self.data = self.data_df[features + ['label']].values
        return self.data

    def train_valid_test_split(self, sizes):
        train_size, test_size = sizes[0], sizes[1]

        # 每一列的最大值加1
        field_dims = (self.data.max(axis=0).astype(int) + 1).tolist()[:-1]

        # 数据集分割为训练集、验证集、测试集
        train_data, test_data = train_test_split(self.data, train_size=train_size, random_state=2022)

        # 将ndarray格式转为tensor格式
        x_train = torch.tensor(train_data[:, :-1], dtype=torch.long).to(self.device)
        y_train = torch.tensor(train_data[:, -1], dtype=torch.float32).to(self.device)
        x_test = torch.tensor(test_data[:, :-1], dtype=torch.long).to(self.device)
        y_test = torch.tensor(test_data[:, -1], dtype=torch.float32).to(self.device)

        return field_dims, (x_train, y_train), (x_test, y_test)


if __name__ == '__main__':
    file = 'criteo-100k.txt'
    nrows = 100000
    sizes = [0.75, 0.25]
    device = torch.device("cuda" if torch.cuda.is_available() else "cpu")
    dataprocess = DataProcess(file, nrows, sizes, device)
    field_dims, (x_train, y_train), (x_test, y_test) \
        = dataprocess.train_valid_test_split(sizes)
    print(x_train.shape)
    print(field_dims)
    offsets = np.array((0, *np.cumsum(field_dims)[:-1]), dtype=np.long)
    print(offsets)
2.2 构造数据集
#!usr/bin/env python
# -*- coding:utf-8 -*-
"""
@author: liujie
@file: dataSet.py
@time: 2022/09/05
@desc:构造加载数据集模块
"""
from torch.utils.data import Dataset


class My_DataSet(Dataset):
    def __init__(self, X, y):
        assert len(X) == len(y)
        self.X = X
        self.y = y

    def __len__(self):
        return len(self.X)

    def __getitem__(self, index):
        return self.X[index], self.y[index]
2.3 搭建MLR模型
#!usr/bin/env python
# -*- coding:utf-8 -*-
"""
@author: liujie
@file: MLR_Model.py
@time: 2022/09/05
@desc:PyTorch实现MLR模型
    1.LR模型经softmax分类后得到注意力分数
    2.注意力分数分别乘以多个LR模型的结果,得到最终的结果
"""
import torch
import numpy as np
import torch.nn as nn


class Feature_Embedding(nn.Module):
    def __init__(self, field_dims, emb_size):
        """
        :param field_dims: 特征数量列表,其和为总特征数量
        :param emb_size: embedding的维度
        """
        super(Feature_Embedding, self).__init__()
        # embedding层
        self.emb = nn.Embedding(sum(field_dims), emb_size)
        # 模型初始化
        nn.init.xavier_uniform_(self.emb.weight.data)
        # 偏置项
        self.offset = np.array((0, *np.cumsum(field_dims)[:-1]), dtype=np.long)

    def forward(self, x):
    	# self.offset中存储的是每一列特征计数的开始值
        # x + x.new_tensor(self.offset):x中的每一列是分别进行顺序编码+起始值后就可以在self.emb中找到真正的索引
        x = x + x.new_tensor(self.offset)
        return self.emb(x)


class LogisticRegression(nn.Module):
    def __init__(self, field_dims):
        """
        LR模型
        :param field_dims: 特征数量列表,其和为总特征数量
        :param emb_size: embedding的维度
        """
        super(LogisticRegression, self).__init__()
        # 可梯度更新
        self.bias = nn.Parameter(torch.zeros((1,)))
        self.emb = Feature_Embedding(field_dims, 1)

    def forward(self, x):
        """
        前向传播
        :param x: 输入数据,(batch,seq_len)
        :return:
        """
        # (batch,seq_len) => (batch,seq_len,1) => (batch,1)
        x = self.emb(x).sum(1) + self.bias
        x = torch.sigmoid(x)
        return x


class Classifier(nn.Module):
    def __init__(self, field_dims, k):
        """
        分片层
        :param field_dims:特征数量列表,其和为总特征数量
        :param k:分片数
        """
        super(Classifier, self).__init__()
        self.emb = Feature_Embedding(field_dims, k)

    def forward(self, x):
        x = self.emb(x).sum(1)
        return torch.softmax(x, dim=1)


class MixedLogisticRegression(nn.Module):
    def __init__(self, field_dims, k):
        """
        大规模分段线性模型
        :param field_dims:特征数量列表,其和为总特征数量
        :param k:分片数
        """
        super(MixedLogisticRegression, self).__init__()
        self.classifier = Classifier(field_dims, k)
        self.lr_list = nn.ModuleList(LogisticRegression(field_dims) for _ in range(k))

    def forward(self, x):
        """
        前向传播
        :param x: 输入数据
        :return:
        """
        # (batch,seq_len) => (batch,k)
        clf_output = self.classifier(x)
        lr_output = torch.zeros_like(clf_output)
        # 得到每个分段LR的结果
        for i, lr in enumerate(self.lr_list):
            lr_output[:, i] = lr(x).squeeze(-1)

        # 相当于公式中的相乘后求和
        output = torch.mul(clf_output, lr_output).sum(1, keepdim=True)
        return output
2.4 主函数-训练及预测
#!usr/bin/env python
# -*- coding:utf-8 -*-
"""
@author: liujie
@file: main.py
@time: 2022/09/05
@desc:训练及预测
"""

import tqdm
import torch
import numpy as np
import pandas as pd
import torch.nn as nn
from torch import optim
from MLR_Model import MixedLogisticRegression
import matplotlib.pyplot as plt
from dataSet import My_DataSet
from torch.utils.data import DataLoader
from dataProcess import DataProcess
from sklearn.metrics import f1_score, recall_score,roc_auc_score

device = torch.device("cuda" if torch.cuda.is_available() else "cpu")
criteo_file = "criteo-100k.txt"
nrows = 100000
sizes = [0.75, 0.25]
embedding_size = 1
batch_size = 4096
num_epochs = 100
learning_rate = 1e-4
weight_decay = 1e-6
k = 5


def train_and_test(train_dataloader, test_dataloader, model):
    # 损失函数
    criterion = nn.BCELoss()
    # 优化器
    optimizer = optim.Adam(model.parameters(), lr=learning_rate, weight_decay=weight_decay)
    # 记录训练与测试过程的损失,用于绘图
    train_loss, test_loss, train_acc, test_acc = [], [], [], []
    for epoch in range(num_epochs):
        train_loss_sum = 0.0
        train_len = 0
        train_correct = 0
        # 显示训练进度
        train_dataloader = tqdm.tqdm(train_dataloader)
        train_dataloader.set_description('[%s%04d/%04d]' % ('Epoch:', epoch + 1, num_epochs))

        # 训练模式
        model.train()
        model.to(device)
        for i, data_ in enumerate(train_dataloader):
            x, y = data_[0].to(device), data_[1].to(device)
            # 开始当前批次训练时,优化器的梯度置零,否则,梯度会累加
            optimizer.zero_grad()
            # output size = (batch,)
            output = model(x)
            loss = criterion(output.squeeze(1), y)
            # 反向传播
            loss.backward()
            # 利用优化器更新参数
            optimizer.step()
            # BCELoss默认reduction="mean",因此需要乘以个数
            train_loss_sum += loss.detach() * len(x)
            train_len += len(y)
            _, predicted = torch.max(output, 1)
            train_correct += (predicted == y).sum().item()
            # print("train_correct=\n", train_correct)
            # print("train_acc=\n", train_correct / train_len)
            F1 = f1_score(y.cpu(), predicted.cpu(), average="weighted")
            Recall = recall_score(y.cpu(), predicted.cpu(), average="micro")

            # 设置日志
            postfic = {"train_loss: {:.5f},train_acc:{:.3f}%,F1: {:.3f}%,Recall:{:.3f}%".
                           format(train_loss_sum / train_len, 100 * train_correct / train_len, 100 * F1, 100 * Recall)}
            train_dataloader.set_postfix(log=postfic)
        train_loss.append((train_loss_sum / train_len).item())
        train_acc.append(round(train_correct / train_len, 4))

        # 测试
        test_dataloader = tqdm.tqdm(test_dataloader)
        test_dataloader.set_description('[%s%04d/%04d]' % ('Epoch:', epoch + 1, num_epochs))
        model.eval()
        model.to(device)
        with torch.no_grad():
            test_loss_sum = 0.0
            test_len = 0
            test_correct = 0
            for i, data_ in enumerate(test_dataloader):
                x, y = data_[0].to(device), data_[1].to(device)
                output = model(x)
                loss = criterion(output.squeeze(1), y)
                test_loss_sum += loss.detach() * len(x)
                test_len += len(y)
                _, predicted = torch.max(output, 1)
                test_correct += (predicted == y).sum().item()
                F1 = f1_score(y.cpu(), predicted.cpu(), average="weighted")
                Recall = recall_score(y.cpu(), predicted.cpu(), average="micro")
                # 设置日志
                postfic = {"test_loss: {:.5f},test_acc:{:.3f}%,F1: {:.3f}%,Recall:{:.3f}%".
                               format(test_loss_sum / test_len, 100 * test_correct / test_len, 100 * F1, 100 * Recall)}
                test_dataloader.set_postfix(log=postfic)
            test_loss.append((test_loss_sum / test_len).item())
            test_acc.append(round(test_correct / test_len, 4))

    return train_loss, test_loss, train_acc, test_acc


def main():
    """
    主函数
    :return:
    """
    dataProcess = DataProcess(criteo_file, nrows, sizes, device)
    field_dims, (x_train, y_train), (x_test, y_test) \
        = dataProcess.train_valid_test_split(sizes)
    # 构造数据集
    trainDataset = My_DataSet(x_train, y_train)
    train_dataloader = DataLoader(trainDataset, batch_size=batch_size, shuffle=True)

    testDataset = My_DataSet(x_test, y_test)
    test_dataloader = DataLoader(testDataset, batch_size=batch_size)

    # 模型实例化
    model = MixedLogisticRegression(field_dims, k)

    # 训练与测试
    train_loss, test_loss, train_acc, test_acc = train_and_test(train_dataloader, test_dataloader, model)

    # 绘图,展示损失变化
    epochs = np.arange(num_epochs)
    plt.plot(epochs, train_loss, 'b-', label='Training loss')
    plt.plot(epochs, test_loss, 'r--', label='Validation loss')
    plt.title('Training And Validation Loss')
    plt.xlabel('Epochs')
    plt.ylabel('Loss')
    plt.legend()
    plt.show()

    epochs = np.arange(num_epochs)
    plt.plot(epochs, train_acc, 'b-', label='Training acc')
    plt.plot(epochs, test_acc, 'r--', label='Validation acc')
    plt.title('Training And Validation acc')
    plt.xlabel('Epochs')
    plt.ylabel('acc')
    plt.legend()
    plt.show()


if __name__ == '__main__':
    main()
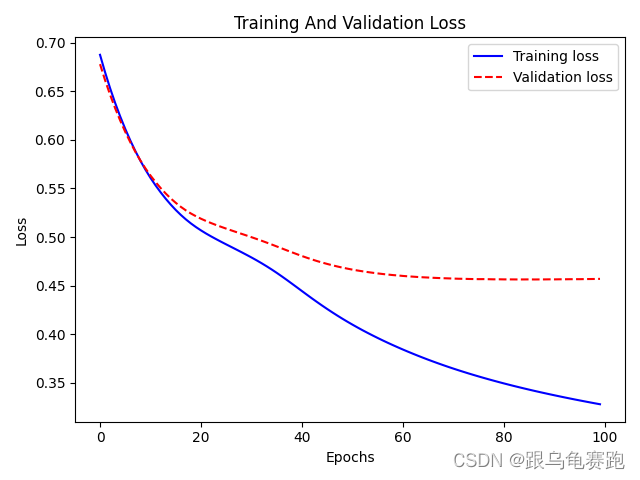
损失变化图为:
准确率变化图为:
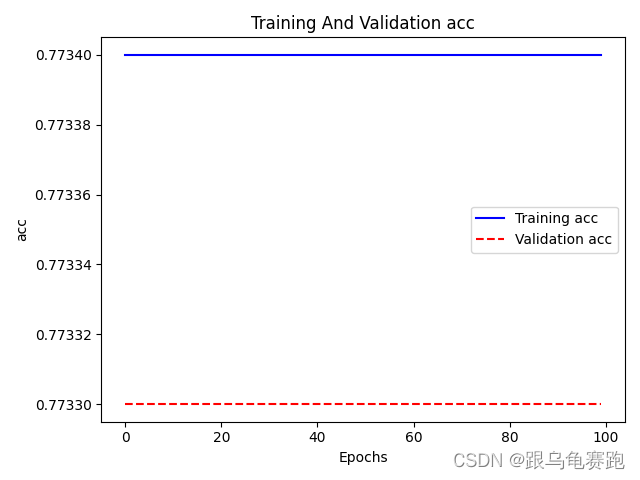
可以看到LR模型与MLR模型在迭代过程中,随着BCE损失的降低,准确率结果始终不变,我也不知道为什么?有知道的,麻烦留言告诉我一下!