1文件结构
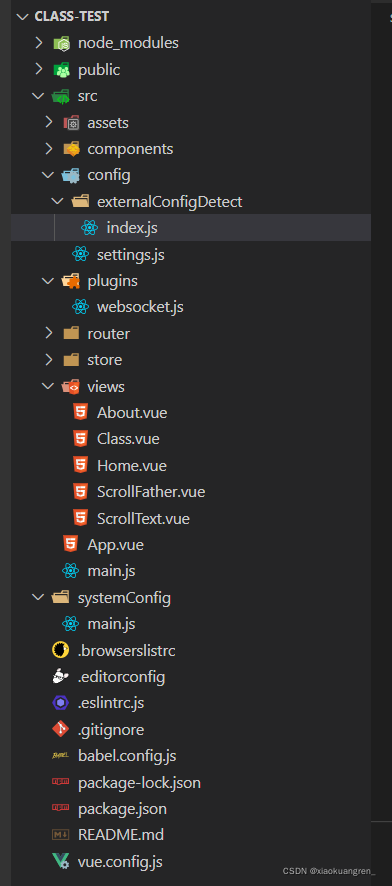
2.重点文件夹中的文件代码以及作用
① 根目录中systemConfig文件夹中的main.js文件
/**
 *作用:作为项目中的配置文件,放了websocket连接的url,用户名(admin),密码(123456)
 *项目中基础API等一些配置参数
 * ==================================
 */
/* eslint-disable */
(function (global, factory) {
  "use strict";

  if (typeof module === "object" && typeof module.exports === "object") {
    module.exports = global.document ?
      factory(global) :
      function (w) {
        if (!w.document) {
          throw new Error('systemConfig must apply to a window with document');
        }
        return factory(w)
      }
  } else {
    factory(global)
  }

})(typeof window !== 'undefined' ? window : this, function (window) {
  "use strict";
  const systemConfig = window.systemConfig = {
    /**
     *
     * 该配置项中的路径配置会覆盖系统内部配置项,主要用于部署应用时,地址变动等情况。
     * =======================================================================
     * 请严格按照配置相修改,禁止添加任何其他内容至该文件中
     *
     */
    api: {
      // 开发地址配置
      mockBaseUrl: '',
      // 生成部署地址配置
      prodBaseUrl: '',
    },
    websocket: [{	// 下面的三个参数是需要和后端沟通的
      url: '',
      login: '',
      passcode: '',
      name: ''
    }],
  }
  return systemConfig
})
②根目录中的src下的config中的externalConfigDetect下的index.js文件
/**作用:对配置参数安全校验
 * ==============================================
 * Author: wang
 * Date: 2022.3.4
 *
 */
import systemConfig from 'systemConfig'

class PlatformBaseConfig {
  constructor () {
    this.config = systemConfig
  }

  getConfig () {
    if (detectCurrectConfig(this.config)) {
      const { api, websocket } = this.config
      return {
        api,
        websocket,
        external: true
      }
    } else {
      console.error('外部配置文件引入失败,系统将采用内置原始配置。如需正常引用,请先检查外部配置项。')
      return {
        external: false
      }
    }
  }

  getApi () {
    return this.getConfig().api || {}
  }

  getWs () {
    return this.getConfig().websocket || []
  }
}

// 对外部引入的对象做一些安全检查
function detectCurrectConfig (config) {
  if (typeof (config) !== 'object' || typeof (config) === 'undefined') return false
  if (!config.api || !config.websocket) return false
  const apiKeys = Object.keys(config.api)
  if (apiKeys.indexOf('mockBaseUrl') === -1 || apiKeys.indexOf('prodBaseUrl') === -1) {
    return false
  }
  config.websocket.map((item) => {
    const wsKeys = Object.keys(item)
    if (wsKeys.indexOf('url') === -1 || wsKeys.indexOf('login') === -1 || wsKeys.indexOf('passcode') === -1) {
      return false
    }
  })
  return true
}

export default new PlatformBaseConfig()
③根目录中的src下的config中的externalConfigDetect下的settings.js文件
/**作用:统一输出配置参数
 * Global Configurations
 * =========================
 * Author: wang
 * Date: 2022.3.4
 */

// 此文件只需要看Websocket 配置项即可
import platformBaseConfig from './externalConfigDetect'

/**
  * API接口默认参数配置
*/
const baseConfig = {
  isMocked: process.env.NODE_ENV !== 'production',
  isDebug: process.env.NODE_ENV !== 'production',
  sep: '.'
}
export const API_DEFAULT_CONFIG = Object.assign(baseConfig, platformBaseConfig.getApi())

/**
 * Websocket 配置项
 */
const baseWsConfig = []
export const WS_CONFIG = Object.assign(baseWsConfig, platformBaseConfig.getWs())
④根目录中的src下的config中的plugins下的websocket.js文件
/**
 * ================================
 * Content: 使用class创建websocket
 * Author: wang
 * Date: 2022.3.4
 * Technology: Stomp组件 WebSocket
 * ================================
 */

// Stomp组件
import Stomp from 'stompjs'
import { WS_CONFIG } from '@/config/settings'
// import store from '@/plugins/store'
class DispatchWebsocket {
  // constructor 方法是类的构造函数,是一个默认方法,通过 new 命令创建对象实例时,自动调用该方法
  constructor ({ url, login, passcode }) {
    this.url = url
    this.ws = null
    this.client = null
    this.headers = {
      login: login,
      passcode: passcode
    }
    this.onConnect = {}
    this.onError = () => {}
    this.isConnect = false
    this.count = 0
    this.timer = null
  }

  createWSConnection (ws) {
    if (!ws && this.url) {
      return new Promise((resolve, reject) => {
        this.ws = new WebSocket(this.url)
        this.client = Stomp.over(this.ws)
        this.client.debug = false
        this.onConnect = () => {
          this.isConnect = true
          resolve()
        }
        this.onError = () => {
          this.reconnectWSConnection()
          reject(new Error('创建websoket链接失败.'))
        }
        this.client.connect(this.headers, this.onConnect, this.onError)
      })
    } else {
      console.warn('已经创建了webscoket链接,不需要重复创建!')
    }
  }

  reconnectWSConnection () {
    this.isConnect = false
    if (this.timer === null) {
      this.timer = setInterval(() => {
        if (this.count === 150) {
          console.log('ws重连5分钟未成功,请刷新页面')
          clearInterval(this.timer)
          return
        }
        this.ws = new WebSocket(this.url)
        this.client = Stomp.over(this.ws)
        this.client.debug = false
        this.handleSuccess = () => {
          console.log('重新连接成功!')
          this.count = 0
          this.isConnect = true
          clearInterval(this.timer)
          this.timer = null
        }
        this.handleError = () => {
          console.error('重新连接失败!')
          const reconInv = setInterval(() => {
            clearInterval(reconInv)
            this.reconnectWSConnection()
          }, 10000)
        }
        this.client.connect(this.headers, this.handleSuccess, this.handleError)
        this.count++
      }, 2000)
    }
  }

  destroyWSConnection () {
    return new Promise((resolve) => {
      this.ws && this.client.disconnect(() => {
        this.isConnect = false
        resolve()
      })
    })
  }
}

export default {
  install (Vue) {
    WS_CONFIG.forEach((item) => {
      console.log('item', item)
      const ws = new DispatchWebsocket(item)
      ws.createWSConnection(Vue.prototype[`$ws${item.name}`])
      // 消息提示推送
      Object.defineProperty(Vue.prototype, `$ws${item.name}`, {
        value: ws
      })
    })
    // ws.createWSConnection()
    // Vue.prototype.$ws = websocket
    // 绑定websocket至原型对象
  }
}
⑤以上四步就是简单的创建websocket,这一步是如何将websocket挂载到vue项目中
在根目录的main.js文件中
import Vue from 'vue'
import App from '@/App.vue'
import router from '@/router'
import store from '@/store'
import ElementUI from 'element-ui'
import websocket from '@/plugins/websocket'

import 'element-ui/lib/theme-chalk/index.css'

Vue.use(ElementUI)
// 此处创建websocket在性能上还可以优化,项目中建议将websocket创建的时机放在用户登录成功之后
Vue.use(websocket)

Vue.config.productionTip = false

new Vue({
  router,
  store,
  render: h => h(App)
}).$mount('#app')
⑥使用
<template>
  <div>
    <el-button type="success" round @click="handleOpen">开启ws</el-button>
    <el-button type="success" round @click="handleClose">关闭ws</el-button>
  </div>
</template>
<script>
export default {
  data() {
    return {
      lineIdArray: ["6489", "63699"],
      lineSubscibes: [],
    };
  },
  mounted() {},
  methods: {
    handleOpen() {
      // JavaScript 类不是对象。它是 JavaScript 对象的模板。
      this.lineIdArray.forEach((lineId) => {
        this.subcribeLine(lineId);
      });
    },
    handleClose() {
      this.destroyWSConnection();
    },
    subcribeLine(lineId) {
      this.lineSubscibes[lineId] = this.$ws.client.subscribe(
        `/topic/pos.base.${lineId}.*`,
        (data) => {
          const busData = JSON.parse(data.body);
          console.log(busData, busData);
        }
      );
    },
    destroyWSConnection() {
      console.log(this.lineSubscibes);
      if (this.lineIdArray.length > 0) {
        console.log("-------------------------------------------");
        for (let index = 0; index < this.lineIdArray.length; index++) {
          let unscr = this.lineSubscibes[this.lineIdArray[index]];
          console.log("unscr", unscr);
          if (unscr) {
            console.log(`执行了${unscr}`);
            unscr.unsubscribe();
          }
        }
      }
    },
  },
};
</script>
4.按照我提供的文件路劲和代码就能够创建出一个简单的websocket的demo,注意需要后端配合
版权声明:本文为xiaokuangren_原创文章,遵循 CC 4.0 BY-SA 版权协议,转载请附上原文出处链接和本声明。