基于ubuntu在linux环境下对TF/SD卡进行分区、格式化,并完成文件写入。
1. ubuntu连接TF/SD卡
将读卡器插入电脑USB端口,点击虚拟机vmware的如下图标连接到ubuntu系统

选择
连接(断开与 主机的连接)(C)
。
正常连接ubuntu后,可以通过如下命令查看卡的挂载情况:
ubuntu16@ubuntu:linux$ df -l
Filesystem     1K-bloubuntu      Used Available Use% Mounted on
udev             1977084         0   1977084   0% /dev
tmpfs             401592     16688    384904   5% /run
/dev/sda1      122735644  31807804  84670128  28% /
tmpfs            2007952       212   2007740   1% /dev/shm
tmpfs               5120         4      5116   1% /run/lock
tmpfs            2007952         0   2007952   0% /sys/fs/cgroup
/dev/loop0        113408    113408         0 100% /snap/core/12821
/dev/loop1        224512    224512         0 100% /snap/code/93
/dev/loop2        113280    113280         0 100% /snap/core/12834
/dev/loop3        224512    224512         0 100% /snap/code/94
vmhgfs-fuse    393942012 340255184  53686828  87% /mnt/hgfs
tmpfs             401592        72    401520   1% /run/user/1000
/dev/sdb1       15549952   3300128  12249824  22% /media/ubuntu16/3762-3239
ubuntu16@ubuntu:linux$
我们的卡连接后对应的设备是
/dev/sdb1
2. 分区
首先去除卡的挂载
ubuntu16@ubuntu:linux$ sudo umount /dev/sdb1
[sudo] password for ubuntu16:
ubuntu16@ubuntu:linux$ df -l
Filesystem     1K-bloubuntu      Used Available Use% Mounted on
udev             1977084         0   1977084   0% /dev
tmpfs             401592     16680    384912   5% /run
/dev/sda1      122735644  31807784  84670148  28% /
tmpfs            2007952       212   2007740   1% /dev/shm
tmpfs               5120         4      5116   1% /run/lock
tmpfs            2007952         0   2007952   0% /sys/fs/cgroup
/dev/loop0        113408    113408         0 100% /snap/core/12821
/dev/loop1        224512    224512         0 100% /snap/code/93
/dev/loop2        113280    113280         0 100% /snap/core/12834
/dev/loop3        224512    224512         0 100% /snap/code/94
vmhgfs-fuse    393942012 340255188  53686824  87% /mnt/hgfs
tmpfs             401592        76    401516   1% /run/user/1000
ubuntu16@ubuntu:linux$
再次查看系统设备情况
ubuntu16@ubuntu:linux$ sudo fdisk -l
......

Disk /dev/sdb: 14.9 GiB, 15931539456 bytes, 31116288 sectors
Units: sectors of 1 * 512 = 512 bytes
Sector size (logical/physical): 512 bytes / 512 bytes
I/O size (minimum/optimal): 512 bytes / 512 bytes
Disklabel type: dos
Disk identifier: 0x00000000

Device     Boot Start      End  Sectors  Size Id Type
/dev/sdb1        8192 31116287 31108096 14.9G  c W95 FAT32 (LBA)
ubuntu16@ubuntu:linux$
从以上信息可以看出,我们需要操作的设备是
/dev/sdb
,执行分区命令:
# 注意,此处是sdb,不是sdb1
ubuntu16@ubuntu:linux$ sudo fdisk /dev/sdb

Welcome to fdisk (util-linux 2.27.1).
Changes will remain in memory only, until you decide to write them.
Be careful before using the write command.


Command (m for help): p #输入p查看分区
Disk /dev/sdb: 14.9 GiB, 15931539456 bytes, 31116288 sectors
Units: sectors of 1 * 512 = 512 bytes
Sector size (logical/physical): 512 bytes / 512 bytes
I/O size (minimum/optimal): 512 bytes / 512 bytes
Disklabel type: dos
Disk identifier: 0x00000000

Device     Boot Start      End  Sectors  Size Id Type
/dev/sdb1        8192 31116287 31108096 14.9G  c W95 FAT32 (LBA)

Command (m for help): d #输入d删除原有分区
Selected partition 1
Partition 1 has been deleted.

Command (m for help): d #输入d确认分区是否删除成功
No partition is defined yet!
Could not delete partition 1

Command (m for help): n #输入n创建新分区
Partition type
   p   primary (0 primary, 0 extended, 4 free)
   e   extended (container for logical partitions)
Select (default p): p #输入p选择分区空间
Partition number (1-4, default 1): 1
First sector (2048-31116287, default 2048): 16384
Last sector, +sectors or +size{K,M,G,T,P} (16384-31116287, default 31116287): +3G

Created a new partition 1 of type 'Linux' and of size 3 GiB.

Command (m for help): p
Disk /dev/sdb: 14.9 GiB, 15931539456 bytes, 31116288 sectors
Units: sectors of 1 * 512 = 512 bytes
Sector size (logical/physical): 512 bytes / 512 bytes
I/O size (minimum/optimal): 512 bytes / 512 bytes
Disklabel type: dos
Disk identifier: 0x00000000

Device     Boot Start     End Sectors Size Id Type
/dev/sdb1       16384 6307839 6291456   3G 83 Linux

Command (m for help): n
Partition type
   p   primary (1 primary, 0 extended, 3 free)
   e   extended (container for logical partitions)
Select (default p): p
Partition number (2-4, default 2): 2
First sector (2048-31116287, default 2048): 6307840
Last sector, +sectors or +size{K,M,G,T,P} (6307840-31116287, default 31116287):

Created a new partition 2 of type 'Linux' and of size 11.8 GiB.

Command (m for help): p
Disk /dev/sdb: 14.9 GiB, 15931539456 bytes, 31116288 sectors
Units: sectors of 1 * 512 = 512 bytes
Sector size (logical/physical): 512 bytes / 512 bytes
I/O size (minimum/optimal): 512 bytes / 512 bytes
Disklabel type: dos
Disk identifier: 0x00000000

Device     Boot   Start      End  Sectors  Size Id Type
/dev/sdb1         16384  6307839  6291456    3G 83 Linux
/dev/sdb2       6307840 31116287 24808448 11.8G 83 Linux

Command (m for help): w #输入w保存分区
The partition table has been altered.
Calling ioctl() to re-read partition table.
Syncing disks.
查看刚才的分区情况,如下:
ubuntu16@ubuntu:linux$ sudo lsblk
[sudo] password for ubuntu16:
NAME   MAJ:MIN RM   SIZE RO TYPE MOUNTPOINT
loop1    7:1    0 219.1M  1 loop /snap/code/93
sdb      8:16   1  14.9G  0 disk
├─sdb2   8:18   1  11.8G  0 part
└─sdb1   8:17   1     3G  0 part
......
ubuntu16@ubuntu:linux$
3.格式化
ubuntu系统自带了多种格式化工具,如下图所示:
ubuntu16@ubuntu:linux$ mkfs
mkfs          mkfs.cramfs   mkfs.ext3     mkfs.ext4dev  mkfs.minix    mkfs.ntfs
mkfs.bfs      mkfs.ext2     mkfs.ext4     mkfs.fat      mkfs.msdos    mkfs.vfat
将卡的两个分区格式化成ext3格式:
ubuntu16@ubuntu:linux$ sudo mkfs.ext3 /dev/sdb1
mke2fs 1.42.13 (17-May-2015)
Creating filesystem with 786432 4k bloubuntu and 196608 inodes
Filesystem UUID: 3fe3147c-e558-46fe-b197-e537e1852122
Superblock backups stored on bloubuntu:
	32768, 98304, 163840, 229376, 294912

Allocating group tables: 完成
正在写入inode表: 完成
Creating journal (16384 bloubuntu): 完成
Writing superbloubuntu and filesystem accounting information: 完成

ubuntu16@ubuntu:linux$ sudo mkfs.ext3 /dev/sdb2
mke2fs 1.42.13 (17-May-2015)
Creating filesystem with 3101056 4k bloubuntu and 776720 inodes
Filesystem UUID: d7d23a79-b91b-413d-be42-903d1fc9e5a2
Superblock backups stored on bloubuntu:
	32768, 98304, 163840, 229376, 294912, 819200, 884736, 1605632, 2654208

Allocating group tables: 完成
正在写入inode表: 完成
Creating journal (32768 bloubuntu): 完成
Writing superbloubuntu and filesystem accounting information: 完成
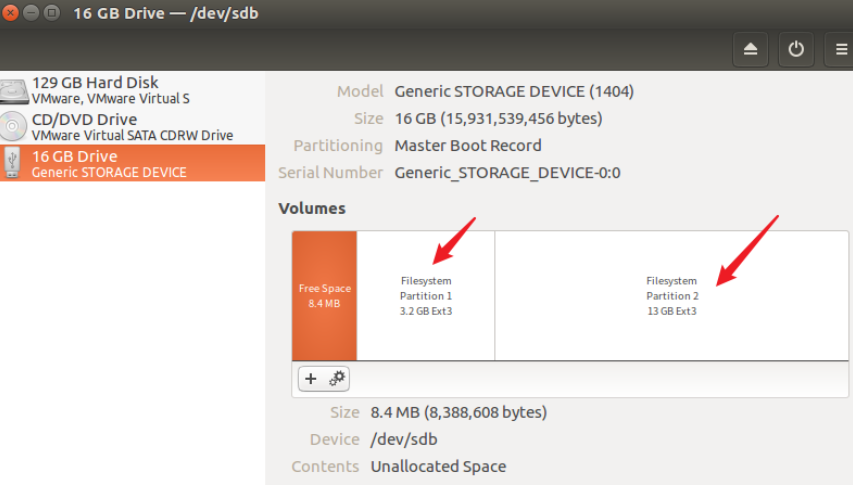
查看格式化结果,如下图:

4. 写入文件
将卡挂载,如果不想手动挂载,可以将卡从ubuntu系统中弹出,然后重新连接到ubuntu就会自动挂载。
buntu20@ubuntu:~/rootfs-ubuntu20$ df -l
Filesystem     1K-bloubuntu      Used Available Use% Mounted on
......
/dev/sdb1        3030800      4676   2868840   1% /media/ubuntu20/3fe3147c-e558-46fe-b197-e537e1852122
/dev/sdb2       12078132     30436  11427488   1% /media/ubuntu20/d7d23a79-b91b-413d-be42-903d1fc9e5a2
将文件拷贝到
/dev/sdb1
buntu20@ubuntu:~/rootfs-ubuntu20$ df -l
Filesystem     1K-bloubuntu      Used Available Use% Mounted on
......
tmpfs             398264        36    398228   1% /run/user/1000
/dev/sdb1        3030800    824180   2049336  29% /media/ubuntu20/3fe3147c-e558-46fe-b197-e537e1852122
/dev/sdb2       12078132     30436  11427488   1% /media/ubuntu20/d7d23a79-b91b-413d-be42-903d1fc9e5a2
ubuntu20@ubuntu:~/rootfs-ubuntu20$ ll /media/ubuntu20/d7d23a79-b91b-413d-be42-903d1fc9e5a2
total 24
drwxr-xr-x  3 root root  4096 Apr 20 00:42 ./
drwxr-x---+ 4 root root  4096 Apr 20 01:44 ../
drwx------  2 root root 16384 Apr 20 00:42 lost+found/
# cp命令加上-d选项,也可以使用dd命令
ubuntu20@ubuntu:~/rootfs-ubuntu20$ sudo cp -d -rf ./* /media/ubuntu20/d7d23a79-b91b-413d-be42-903d1fc9e5a2
最后需要执行sync,以免没有真正写入到磁盘中。
ubuntu20@ubuntu:~/rootfs-ubuntu20$ sudo sync
Linux sync命令用于数据同步,sync命令是在关闭Linux系统时使用的。
Linux 系统中欲写入硬盘的资料有的时候为了效率起见,会写到 filesystem buffer 中,这个 buffer 是一块记忆体空间,如果欲写入硬盘的资料存于此 buffer 中,而系统又突然断电的话,那么资料就会流失了,sync 指令会将存于 buffer 中的资料强制写入硬盘中。