有时候我们在android布局的时候需要这样一种布局,这个布局左上、右下是圆角的,左下、右上是直角,而且不管你内部如何放置view,它都能维持这样的整体效果。
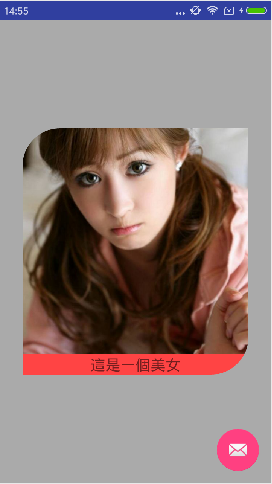
如图:
图片中上面部分是ImageView,下面部分是TextView,可以看出左上、右下被自然的圆角化了,这其中并未对ImageView、TextView做任何处理,下面我们就来看看如何实现这一布局。
我们需要选择需要的四大布局中的一种进行继承,维持其原有布局特性:
package com.v.testapp;

import android.content.Context;
import android.content.res.TypedArray;
import android.graphics.Bitmap;
import android.graphics.Canvas;
import android.graphics.Color;
import android.graphics.Paint;
import android.graphics.Path;
import android.graphics.PorterDuff;
import android.graphics.PorterDuffXfermode;
import android.graphics.RectF;
import android.util.AttributeSet;
import android.widget.LinearLayout;

/**
 * Created by qw on 2016/9/19.
 */
public class RoundLinearLayout extends LinearLayout {
    private Paint mBitmapPaint;

    /**
     * 图片可视区
     */
    protected Path roundPath;

    private float leftTopRadius;
    private float rightTopRadius;
    private float rightBottomRadius;
    private float leftBottomRadius;

    public RoundLinearLayout(Context context) {
        this(context, null);
    }

    public RoundLinearLayout(Context context, AttributeSet attrs) {
        this(context, attrs, 0);
    }

    public RoundLinearLayout(Context context, AttributeSet attrs, int defStyleAttr) {
        super(context, attrs, defStyleAttr);
        initAttrs(attrs);
        init();
    }

    @Override
    protected void onLayout(boolean changed, int l, int t, int r, int b) {
        super.onLayout(changed, l, t, r, b);
        if (changed) {
            initRoundPath();
        }
    }

    protected void initAttrs(AttributeSet attrs) {
        if (attrs != null) {
            TypedArray ta = getContext().obtainStyledAttributes(attrs, R.styleable.RoundImageView);
            leftTopRadius = ta.getDimension(R.styleable.RoundImageView_leftTopRadius, 0);
            rightTopRadius = ta.getDimension(R.styleable.RoundImageView_rightTopRadius, 0);
            rightBottomRadius = ta.getDimension(R.styleable.RoundImageView_rightBottomRadius, 0);
            leftBottomRadius = ta.getDimension(R.styleable.RoundImageView_leftBottomRadius, 0);
            ta.recycle();
        }
    }

    private void init() {
        mBitmapPaint = new Paint(Paint.ANTI_ALIAS_FLAG);
        mBitmapPaint.setFilterBitmap(false);
        mBitmapPaint.setXfermode(new PorterDuffXfermode(PorterDuff.Mode.DST_IN));
        roundPath = new Path();
    }

    protected void initRoundPath() {
        roundPath.reset();
        final int width = getWidth();
        final int height = getHeight();
        // 圓角始終不超過試圖一半
//        leftTopRadius = Math.min(leftTopRadius, Math.min(width, height) * 0.5f);
//        rightTopRadius = Math.min(rightTopRadius, Math.min(width, height) * 0.5f);
//        rightBottomRadius = Math.min(rightBottomRadius, Math.min(width, height) * 0.5f);
//        leftBottomRadius = Math.min(leftBottomRadius, Math.min(width, height) * 0.5f);

        RectF rect = new RectF(0, 0, width, height);
        roundPath.addRoundRect(rect,
                /**
                 * 8个值对应左上、右上、右下、左下4个坐标
                 * 对于矩形左上点,那么圆弧起点是(rect.left,rect.top + leftTopRadius),
                 * 圆弧终点是(rect.top, rect.left + leftTopRadius)
                 *
                 * 右上点:(rect.top, rect.right - rightTopRadius)
                 * (rect.top + rightTopRadius,rect.right)
                 */
                new float[]{leftTopRadius, leftTopRadius, rightTopRadius, rightTopRadius,
                        rightBottomRadius, rightBottomRadius, leftBottomRadius, leftBottomRadius},
                Path.Direction.CW);
    }

    @Override
    public void draw(Canvas canvas) {
        try {
            canvas.saveLayer(0, 0, getWidth(), getHeight(),
                    null, Canvas.ALL_SAVE_FLAG);
            super.draw(canvas);
            Bitmap roundBm = getRoundBitmap();
            canvas.drawBitmap(roundBm, 0, 0, mBitmapPaint);
            canvas.restore();
        } catch (Exception e) {

        }
    }

    /**
     * 获取图片区域纯颜色Bitmap
     *
     * @return
     */
    protected Bitmap getRoundBitmap() {
        Bitmap bitmap = Bitmap.createBitmap(getWidth(), getHeight(),
                Bitmap.Config.ARGB_8888);
        Canvas canvas = new Canvas(bitmap);
        Paint paint = new Paint(Paint.ANTI_ALIAS_FLAG);
        paint.setColor(Color.GREEN);
        canvas.drawPath(roundPath, paint);
        return bitmap;
    }


}
自定义xml属性:
<?xml version="1.0" encoding="utf-8"?>
<resources>
    <declare-styleable name="RoundImageView">
        <attr name="border_width" format="dimension|reference"/>
        <attr name="border_color" format="color|reference"/>
        <attr name="leftTopRadius" format="dimension|reference"/>
        <attr name="rightTopRadius" format="dimension|reference"/>
        <attr name="rightBottomRadius" format="dimension|reference"/>
        <attr name="leftBottomRadius" format="dimension|reference"/>
    </declare-styleable>
</resources>
使用:
<?xml version="1.0" encoding="utf-8"?>
<FrameLayout xmlns:android="http://schemas.android.com/apk/res/android"
    xmlns:app="http://schemas.android.com/apk/res-auto"
    android:layout_width="match_parent"
    android:layout_height="match_parent"
    android:background="@android:color/darker_gray"
    android:orientation="vertical">

    <com.v.testapp.RoundLinearLayout
        android:layout_width="wrap_content"
        android:layout_height="wrap_content"
        android:layout_gravity="center"
        android:background="@android:color/holo_green_light"
        android:orientation="vertical"
        app:leftBottomRadius="00dp"
        app:leftTopRadius="50dp"
        app:rightBottomRadius="50dp"
        app:rightTopRadius="0dp">

        <ImageView
            android:layout_width="300dp"
            android:layout_height="300dp"
            android:scaleType="centerCrop"
            android:src="@drawable/img2" />

        <TextView
            android:layout_width="match_parent"
            android:layout_height="wrap_content"
            android:background="@android:color/holo_red_light"
            android:gravity="center"
            android:text="這是一個美女"
            android:textSize="20dp" />
    </com.v.testapp.RoundLinearLayout>

</FrameLayout>
代码没有太大的难度,关键核心代码是对draw方法的重写,对Paint的setXfermode方法还不了解的请先行了解。
版权声明:本文为quwei3930921原创文章,遵循 CC 4.0 BY-SA 版权协议,转载请附上原文出处链接和本声明。