本文仅针对vue-electron库打包后多窗口页面空白(主窗口页面正常显示)的问题解决,如果在主窗口页面就已经无法显示了,请自行百度或参考
electron入坑指南
。
1.问题描述及原因分析
因项目需要制作一个桌面字幕系统,实现方案是通过主窗口打开字幕窗口显示字幕。在本地测试服务器跑通之后,通过electron-builder打包exe,成功后运行,主窗口一切正常,字幕窗口一片空白。
因为字幕窗口是无边框的透明窗体,我一度认为是BrowserWindow的配置出现问题,在这折腾半天,后来发现无论我如何修改配置,字幕窗口都是空白页面,忽然明白了不是electron的窗口问题,是vue中的页面代码没有加载出来。于是去修改打包环境的加载url,发现了一个问题——主窗口的页面路由都没有问题,但是其他窗口的路由都失效了。通过思考,我认为electron在打包的时候可能把路由地址访问都换成桌面程序的调转方式,所以访问vue路由地址便无法获取页面,主窗口访问的是html文件,所以能显示,页面跳转也被electron做了处理,而字幕窗口因为是路由访问地址,地址已经被electron处理了,所以自然无法显示页面了。
想要解决这个问题,就需要给每个窗口都增加一个入口文件,然而,vue默认是SPA(单页面应用),所有交互和界面都在一个页面完成,入口文件当然也只有一个。解决方案是:寻找vue多页面应用的配置,为每一个窗口添加一个入口文件。
2.踩坑过程
第一步当然是让vue成为多页面应用啦,参考此篇文章
用vue构建多页面应用
。步骤如下:
1、在配置文件目录下新增
muti-page.config.js
const glob = require('glob');
const path = require('path');
const PAGE_PATH = path.resolve(__dirname, '../src/renderer/page');
const HtmlWebpackPlugin = require('html-webpack-plugin');

exports.entries = function () {
  /*用于匹配 pages 下一级文件夹中的 index.js 文件 */
  var entryFiles = glob.sync(PAGE_PATH + '/*/main.js')
  var map = {}
  entryFiles.forEach((filePath) => {
    /* 下述两句代码用于取出 pages 下一级文件夹的名称 */
    var entryPath = path.dirname(filePath)
    var filename = entryPath.substring(entryPath.lastIndexOf('\/') + 1)
    /* 生成对应的键值对 */
    map[filename] = filePath
  })
  return map
}

exports.htmlPlugin = function () {
  let entryHtml = glob.sync(PAGE_PATH + '/*/index.ejs')
  let arr = []
  entryHtml.forEach((filePath) => {
      var entryPath = path.dirname(filePath)
      var filename = entryPath.substring(entryPath.lastIndexOf('\/') + 1)
      let conf = {
        template: filePath,
        filename: filename + `/index.html`,
        chunks: ['manifest', 'vendor', filename],
        inject: true,
        nodeModules: path.resolve(__dirname, '../node_modules')
      }
      if (process.env.NODE_ENV === 'production') {
        let productionConfig = {
          minify: {
            removeComments: true,         // 移除注释
            collapseWhitespace: true,     // 删除空白符和换行符
            removeAttributeQuotes: true   // 移除属性引号
          },
          chunksSortMode: 'dependency'    // 对引入的chunk模块进行排序
        }
        conf = {...conf, ...productionConfig} //合并基础配置和生产环境专属配置
      }
      arr.push(new HtmlWebpackPlugin(conf))
  })
  return arr
}
2、在
webpack.renderer.config.js
做以下改动
// 为了避免篇幅过长,删去无关的配置
let rendererConfig = {
 // 将入口改为自定义入口,注意,这里的entries是function,不是object,否则在测试环境会报错
 // entry: {
 //   renderer: path.join(__dirname, '../src/renderer/main.js')
 // },
 entry: entries,
 plugins: [
   new VueLoaderPlugin(),
   new MiniCssExtractPlugin({filename: 'styles.css'}),
   // new HtmlWebpackPlugin({
   //   filename: 'index.html',
   //   template: path.resolve(__dirname, '../src/index.ejs'),
   //   minify: {
   //     collapseWhitespace: true,
   //     removeAttributeQuotes: true,
   //     removeComments: true
   //   },
   //   nodeModules: path.resolve(__dirname, '../node_modules')
   //     // process.env.NODE_ENV !== 'production'
   //     // ? path.resolve(__dirname, '../node_modules')
   //     // : false
   // }),
   new webpack.HotModuleReplacementPlugin(),
   new webpack.NoEmitOnErrorsPlugin()
   // 注释原来的HtmlWebpackPlugin插件代码,在数组后添加.concat(htmlPlugin())
 ].concat(htmlPlugin()),
 output: {
 // 修改filename的[name].js 为[name]/index.js,1、是为了将js文件和html文件归类在一起;2、[name].js时html访问的是绝对路径
   filename: '[name]/index.js',
   libraryTarget: 'commonjs2',
   path: path.join(__dirname, '../dist/electron')
 }
}
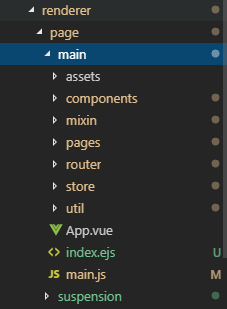
3、渲染目录结构
4、package.json配置,依然参考这篇文章
electron入坑指南
"build": {
  "productName": "shorthands",
  "appId": "com.example.shorthands",
  "directories": {
    "output": "build",
    "app": "."
  },
  "files": [
    "./**/*"
  ],
  "dmg": {
    "contents": [
      {
        "x": 410,
        "y": 150,
        "type": "link",
        "path": "/Applications"
      },
      {
        "x": 130,
        "y": 150,
        "type": "file"
      }
    ]
  },
  "mac": {
    "icon": "build/icons/icon.icns"
  },
  "win": {
    "icon": "build/icons/icon.ico"
  },
  "linux": {
    "icon": "build/icons"
  }
}
3、待解决问题
1、
打包后项目过大(应该引入node_modules的问题)
2、打包成安装包
4、demo