日志审计–定制规则
目录布局
规则集文件夹结构如下所示:
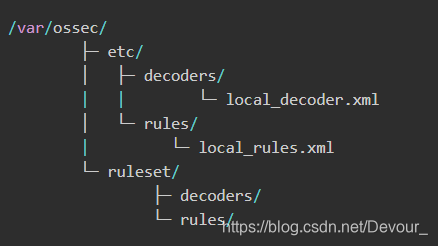
在接收到agent传来的日志后,manager会根据/var/ossec/ruleset/decoders里面的各种规则对日志进行处理,提取到了指定字段的值之后再根据/var/ossec/ruleset/rules里面的各种规则进行匹配,告警日志输出到/var/ossec/logs/alerts/alerts.json,logstash再将其解析后传输到elasticsearch上面。
更新规则集
每周运行
update_ruleset
,通过向系统中添加crontab作业,使Wazuh规则集安装保持最新。
一种方法是运行
sudo crontab -e
,并在文件的末尾添加以下行
@weekly
root cd
/
var
/
ossec
/
bin
&&
./
update_ruleset
–
r
Jeson规则解释器
Wazuh
现在为
JSON
日志合并了一个集成的解码器,使之能够以这种格式从任何来源提取数据。
此解码器有能力提取以下数据类型
:

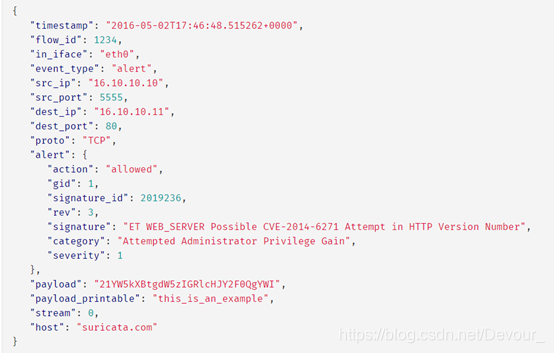
示例一:
下面的示例展示了Wazuh如何解码JSON日志并为Suricata生成警报。
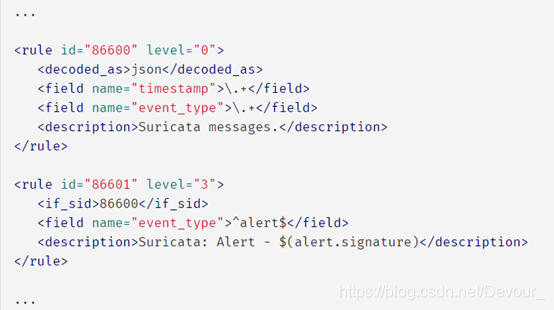
下面的示例展示了包含在文件
0470-suricata_rules.xml
中的规则是如何工作的。最初,有一个
父规则检查
‘ timestamp ‘
和’ event_type ‘字段是否存在,以确定日志的类型(Suricata),然后
子规则
使用
提取
的字段的值显示警报
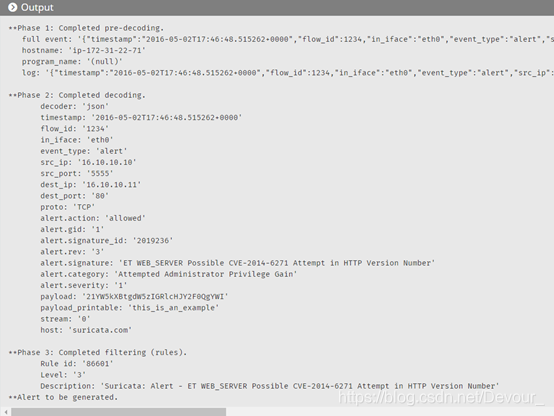
JSON记录的ossec-logtest输出如下:
示例二:
我们使用这个输入日志::
2018 Apr 04 13:11:52 nba_program: this_is_an_example:
” player_information: ”
{
“name”
:
“Stephen”
,
“surname”
:
“Curry”
,
“team”
:
“Golden State Warriors”
,
“number”
: 30,
“position”
:
“point guard”
}
Docker解释器:
<decoder name="raw_json"> <program_name>nba_program</program_name> <prematch>player_information: "</prematch> <plugin_decoder offset="after_prematch">JSON_Decoder</plugin_decoder></decoder>Rule规则:
<rule id="100001" level="5"> <decoded_as>raw_json</decoded_as> <description>Raw JSON event</description></rule>解析结果:
**Phase 1: Completed pre-decoding. full event: '2018 Apr 04 13:11:52 nba_program: this_is_an_example: " player_information: "{ "name": "Stephen", "surname": "Curry", "team": "Golden State Warriors", "number": 30, "position": "point guard"}' timestamp: '2018 Apr 04 13:11:52' hostname: 'ubuntu18' program_name: 'nba_program'log: 'this_is_an_example: " player_information: "{ "name": "Stephen", "surname": "Curry", "team": "Golden State Warriors", "number": 30, "position": "point guard "}' **Phase 2: Completed decoding. decoder: 'raw_json' name: 'Stephen' surname: 'Curry' team: 'Golden State Warriors' number: '30'position: 'point guard' **Phase 3: Completed filtering (rules). Rule id: '100001' Level: '5' Description: 'Raw JSON event'**Alert to be generated.
示例三
我们使用如下日志:
2018 Jun 08 13:11:52 nba_email_db: json_data: { "name": "Stephen", "surname": "Curry", "email": "curry@gmail.com"}新特性是混合插件解码器和正则表达式的能力,看看下面的日志:<decoder name="json_parent"> <program_name>nba_email_db</program_name></decoder> <decoder name="json_child"> <parent>json_parent</parent> <prematch>json_data: </prematch> <plugin_decoder offset="after_prematch">JSON_Decoder</plugin_decoder></decoder> <decoder name="json_child"> <parent>json_parent</parent> <regex>@(\S+)"</regex> <order>email.domain</order></decoder>解析结果:**Phase 1: Completed pre-decoding. full event: '2018 Apr 04 13:11:52 nba_email_db: json_data: { "name": "Stephen", "surname": "Curry", "email": "curry@gmail.com"}' timestamp: '2018 Apr 04 13:11:52' hostname: 'ubuntu18' program_name: 'nba_email_db' log: 'json_data: { "name": "Stephen", "surname": "Curry", "email": "curry@gmail.com"}' **Phase 2: Completed decoding. decoder: 'json_parent' name: 'Stephen' surname: 'Curry' email: 'curry@gmail.com' email.domain: 'gmail.com'
自定制规则和解码器
场景一:自定义规则和解释器
我们将使用
local_decoder.xml
和
local_rules.xml
来实现一些小的更改。对于对现有解码器和规则进行更大规模的更改
/
添加,我们建议您创建一个新的解码器和
/
或规则文件在
/var/ossec/etc/decoders
或
/var/ossec/etc/rules
下。
场景二:修改现有规则和解释器
修改规则
:
如果我们想将
SSH
规则
5710
的级别值从
5
更改为
10
,我们将执行以下操作
:
1
、打开规则文件
/var/ossec/ruleset/rules/0095-sshd_rules.xml
。
2
、从规则文件中找到并复制对应要修改的
rule
代码
3、将代码粘贴到/var/ossec/etc/rules/local_rules中。,修改level值,并添加overwrite="yes",表示该规则覆盖已定义的规则。<rule id="5710" level="10" overwrite="yes">
修改解释器
:
1、
/ruleset/decoders/0310-ssh_decoders.xml
从默认文件夹转移到用户文件夹
/var/ossec /etc/decoders
,以保持更改。
2
、从
OSSEC
加载列表中排除原始的解码器文件
ruleset/decoders/0310-ssh_decoders.xml
。为此,在
ossec .conf
文件中使用标签
<decoder_exclude>
。因此,指定的解码器将不会从默认的解码器文件夹加载,而会加载保存在用户文件夹中的解码器文件。
3
、在
/var/ossec /etc/decoders/0310-ssh_decoders.xml
文件中执行更改。
例如:负责处理Windows日志的decoder就是/var/ossec/ruleset/decoders/0380-windows_decoders.xml
为了让自己修改后的规则库不会因为后期的软件包更新而被覆盖,如下操作
1、先手动复制一份原有的规则cp -a ruleset/decoders/0380-windows_decoders.xml etc/decoders/
2
、修改
etc/ossec.conf
,在
</ruleset>
节点新增一行,将原有的解码器从
ossec
的载入列表中排除,看上去如下:
3
、
在/var/ossec /etc/decoders/0310-ssh_decoders.xml文件中执行更改。

4
、如果以后官方更新了
0380-windows_decoders.xml
,就需要手动合并新旧两个版本了。打开
0380-windows_decoders.xml

合并后:
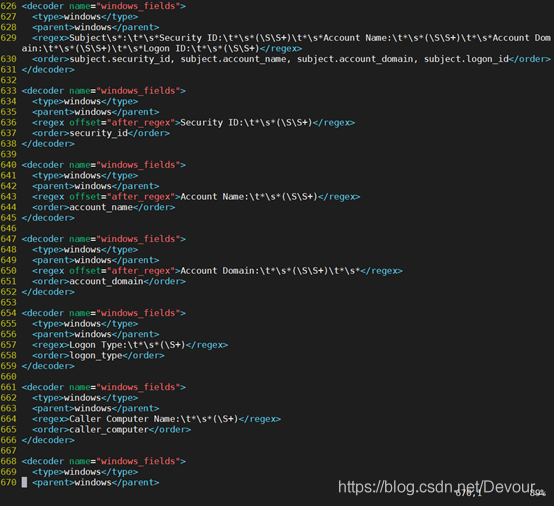
出现了两次security_id的取值,是按照先后顺序取到的。
因为无法匹配中英混合字符串,于是改为单次匹配提取,即将其原本一次性提取4个特征改为分为4次提取特征。
提取规则会跟下面有所重复,但是<order></order>是不一样的,而且是按字符串先后顺序
只提取一次
。
比如第一次匹配到的安全ID是S-1-5-18,会作为subject.security_id的值。
第二次匹配到的安全ID是S-1-5-21-3320951223-3242959419-3755421162-500,会作为security_id的值。
每次修改规则之后,需要重新运行
bin/ossec-logtest
,才能验证规则是否有效。
验证通过后,重启
manager
以便让新规则生效,另外
kibana
会提示你刷新索引以便更新字段。
测试:
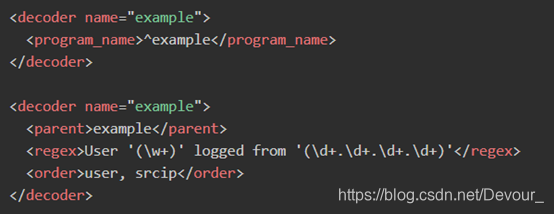
有这样一条日志
Dec 25 20:45:02 MyHost example[12345]: User ‘admin’ logged from ‘192.168.1.100’
。
为了解码这条日志,需要编写自定义解码器,修改
/var/ossec/etc/decoders/local_decoder.xml
,name是解码规则的名称,program_name是匹配日志以example开头,regex表示用正则提取,order表示正则提取出来值依次是user,srcip。
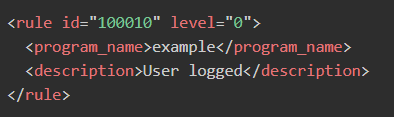
现在修改
/var/ossec/etc/rules/local_rules.xml
,
level
就是告警的等级。
然后运行
/var/ossec/bin/ossec-logtest
来测试写的规则是否能正常运作。另外这个命令还有好几个参数(
-v
),可以看到更详细的过程。

解释器语法:
官方链接:
https://documentation.wazuh.com/3.13/user-manual/ruleset/ruleset-xml-syntax/decoders.html#parent
decoder
:
它的属性将用于定义解码器。
parent
:它将引用父解码器,当前的解码器将成为子解码器。
accumulate
:它允许在多个日志消息上跟踪事件。
program_name
:它定义了与解码器相关联的程序的名称。
prematch
:它将在日志中寻找匹配,如果匹配,则将使用解码器。
regex
:解码器将使用此选项来查找感兴趣的字段并提取它们。
order
:
regex
将提取的值将存储在这些组中。
fts
:第一次见过。
ftscomment
:添加一个评论到
fts
。
plugin_decoder
:指定一个插件来进行解码。当用正则表达式提取是不可行的。
use_own_name
:仅适用于子解码器。
json_null_field
:添加决定如何存储
JSON
中的空值的选项。
json_array_structure
:添加决定如何存储
JSON
中的数组结构的选项。
var
:定义可以在同一文件中重用的变量。
decoder
规则示例:
设置
ossec
的解码器名称
:
<decoder
name=
“ossec”
>
…
</decoder>
program_name
规则示例:
定义译码器与
syslogd
进程相关
:
<decoder
name=
“syslogd_decoder”
>
<program_name>
syslogd
</program_name>
…
</decoder>
规则语法:
官方链接:
https://documentation.wazuh.com/3.13/user-manual/ruleset/ruleset-xml-syntax/rules.html
rule
:
它开始一个新的规则和它的定义选项。
match
:它将尝试在日志中找到匹配项,决定是否应该触发该规则。
regex
:它的作用与
match
相同,但使用的是
regex
而不是
sregex
。
decided_as
:它将与由特定解码器解码的日志进行匹配。
if_sid
:它的工作类似于父解码器。如果规则
ID
之前已经匹配,则它将匹配。
rule
规则示例
:
使用ID: 3151创建规则,如果规则3102在过去120秒内匹配了8次,则将触发10级警报。
<rule
id=
“3151”
level=
“10”
frequency=
“8”
timeframe=
“120”
>
<if_matched_sid>
3102
</if_matched_sid>
<same_source_ip
/>
<description>
sendmail: Sender domain has bogus MX record.
</description>
<description>
It should not be sending e-mail.
</description>
<group>
multiple_spam,pci_dss_11.4,gdpr_IV_35.7.d,nist_800_53_SI.4,
</group>
</rule>
match规则示例:
如果规则匹配id 100200并且日志包含队列溢出!短语在它,规则激活和触发一个3级警报。
<rule
id=
“100001”
maxsize=
“300”
level=
“3”
>
<if_sid>
100200
</if_sid>
<match>
Queue flood!
</match>
<description>
Flooded events queue.
</description>
</rule>
regex规则示例:
如果规则匹配id 100500,并且事件包含任何有效的IP,则触发规则并生成一个3级警报。
<rule
id=
“100001”
level=
“3”
>
<if_sid>
100500
</if_sid>
<regex>
\d+.\d+.\d+.\d+
</regex>
<description>
Matches any valid IP
</description>
</rule>
正则表达语法:
正则表达式是定义模式的字符序列。
正则表达式有两种类型:regex (OS_Regex)和sregex (OS_Match)。
正则表达式
(OS_Regex)
语法
这是一个快速而简单的C语言正则表达式库。
这个库设计得很简单,同时仍然支持最常见的正则表达式。
支持表达式:

编辑器:

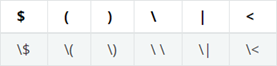
特殊字符:

转义字符:
注意事项(限制):
1
、
*
和
+
修饰符只能用于反斜杠表达式,而不能用于纯字符
(
例如,支持
\d+
,不支持
0+)
2
、你不能在组中使用变更,例如
(foo|bar)
是不允许的
3
、不支持复杂的回溯,例如
\p*\d*\s*\w*:
不匹配单个冒号,因为
\p*
消耗冒号
4
、
.
匹配文字点,而
\ .
匹配任何字符
5
、
\s
只匹配
ASCII
空格
(32)
,不匹配制表符等其他空格
6
、没有匹配文字插入符号、星号或加号的语法
(
尽管
\p
将匹配星号或加号以及其他一些字符
)
Sregex (OS_Match) syntax
这比
OS_Regex
快,但是只支持简单的字符串匹配和以下特殊字符。

测试解码器和规则
工具ossec-logtest允许我们测试事件是如何解码的,以及是否生成了警报。
运行工具/var/os /bin/os -logtest,粘贴以下日志:
Mar
8
22
:
39
:
13
ip
–
10
–
0
–
0
–
10
sshd[
2742
]: Accepted publickey
for
root
from
73.189
.
131.56
port
57516
$
/var/ossec/bin/ossec-logtest
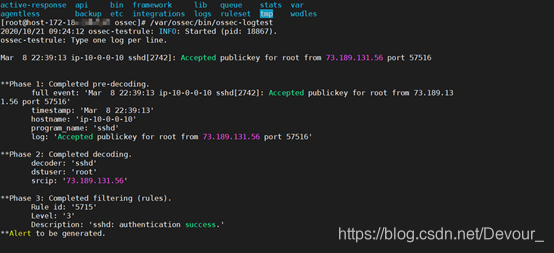
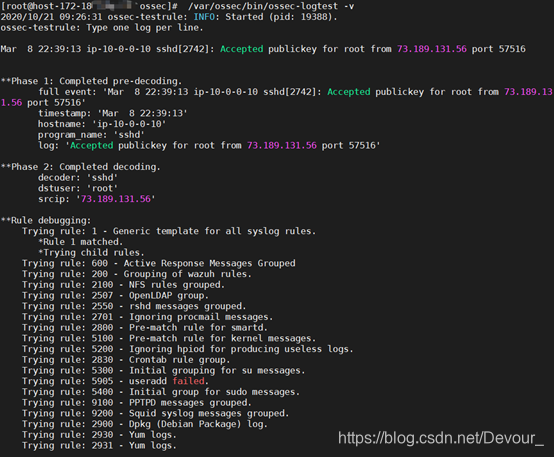
阶段2中显示的解码器名称将是父解码器的名称。此外,您可以使用“-v”选项来显示有关规则的更多信息:
$
/var/ossec/bin/ossec-logtest -v
自定义警报:
配置示例:
ID T1110
与暴力攻击有关。这种技术非常适合以下规则
100002
,该规则检测暴力破解攻击并生成警报。下面是一个如何将此技术扩展到该规则的例子。
将以下代码行添加到
/var/ossec /etc/rules/local_rule.xml
中
:

重启
Wazuh
,您将完成规则的配置。
如果你想配置一个规则使用两个以上的技术,你可以这样做
:

警报示例:……待更新
(个人学习笔记,若有侵权请联系我删除)