TFTP 服务器搭建
1.更新源
因为开发环境版本较低,已经不支持tftp包安装,所以要更新一下源
打开sources.list 文档
gedit /etc/apt/sources.list
将下面的内容覆盖住原来的内容
deb http://old-releases.ubuntu.com/ubuntu/  precise main restricted
deb-src http://old-releases.ubuntu.com/ubuntu/  precise main restricted
deb http://old-releases.ubuntu.com/ubuntu/  precise-updates main restricted
deb-src http://old-releases.ubuntu.com/ubuntu/  precise-updates main restricted
deb http://old-releases.ubuntu.com/ubuntu/  precise universe
deb-src http://old-releases.ubuntu.com/ubuntu/  precise universe
deb http://old-releases.ubuntu.com/ubuntu/  precise-updates universe
deb-src http://old-releases.ubuntu.com/ubuntu/  precise-updates universe
deb http://old-releases.ubuntu.com/ubuntu/  precise multiverse
deb-src http://old-releases.ubuntu.com/ubuntu/  precise multiverse
deb http://old-releases.ubuntu.com/ubuntu/  precise-updates multiverse
deb-src http://old-releases.ubuntu.com/ubuntu/  precise-updates multiverse
deb http://old-releases.ubuntu.com/ubuntu/  precise-backports main restricted universe multiverse
deb-src http://old-releases.ubuntu.com/ubuntu/  precise-backports main restricted universe multiverse
deb http://old-releases.ubuntu.com/ubuntu/  precise-security main restricted
deb-src http://old-releases.ubuntu.com/ubuntu/  precise-security main restricted
deb http://old-releases.ubuntu.com/ubuntu/  precise-security universe
deb-src http://old-releases.ubuntu.com/ubuntu/  precise-security universe
deb http://old-releases.ubuntu.com/ubuntu/  precise-security multiverse
deb-src http://old-releases.ubuntu.com/ubuntu/  precise-security multiverse
deb http://old-releases.ubuntu.com/ubuntu/  precise main
deb-src http://old-releases.ubuntu.com/ubuntu/  precise main
保存退出
sudo apt-get update //更新源
各大镜像站
华为的:https://repo.huaweicloud.com/java/jdk/
清华(只有adoptopenjdk镜像):https://mirrors.tuna.tsinghua.edu.cn/AdoptOpenJDK/
aws jdk:https://docs.aws.amazon.com/corretto/latest/corretto-8-ug/downloads-list.html
阿里镜像站(只有linux的):https://developer.aliyun.com/mirror/
阿里drangonwell: https://cn.aliyun.com/product/dragonwell
2.安装Tftp服务端,客户端和守护进程
安装:
sudo apt-get install tftp-hpa tftpd-hpa xinetd
之后,在根目录下建一个 tftpboot,并把属性改成任意用户可读写:
cd /
sudo mkdir tftpboot
sudo chmod 777 tftpboot

然后,进入目录 /etc/xinetd.d/,并在其中新建文件 tftp,把指定的内容加入到 tftp 文件中:
cd /etc/xinetd.d/
sudo vim tftp
添加以下内容到 tftp 文件
service tftp
{
disable = no 138
socket_type = dgram
protocol = udp
wait = yes
user = root
server = /usr/sbin/in.tftpd
server_args = -s /tftpboot -c
per_source = 11
cps = 100 2
}
最后,修改配置文件/etc/default/tftpd-hpa,修改为
TFTP_USERNAME="tftp"
TFTP_DIRECTORY="/tftpboot"
TFTP_ADDRESS="0.0.0.0:69"
TFTP_OPTIONS="--secure -l -c -s"
注意:将”TFTP_DIRECTORY“改为新建tftpboot目录所在的路径。
3.重新启动服务
#sudo /etc/init.d/xinetd reload
#sudo /etc/init.d/xinetd restart
#sudo /etc/init.d/tftpd-hpa restart
reload xinetd
xinetd -restart
service tftpd-hpa restart

4.测试服务器
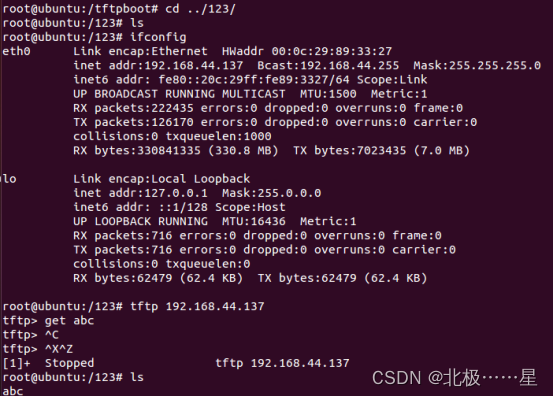
测试一下,在/tftpboot文件夹下新建立一个文件
touch abc
进入另外一个文件夹
tftp 192.168.2.51 (192.168.2.51 为本机 IP)
tftp> get abc

然后按Ctrl+z退出,如果可以下载说明服务器已经安装成功,将开发板同 PC 通过网线进行连接后即可使用 tftp 下载文件,如果下载失败,请稍后尝试或者重新启动服务器。
5.Uboot 使用 tftp
- 用网线连接主机和开发板的网口并将编译好的内核镜像zImage和设备树文件复制到tftpboot目录下
- 进入到uboot阶段,修改环境变量并保存:
setenv ethaddr e6:97:d9:0c:f7:7a //设置MAC
设置tftp服务器的IP
setenv serverip 192.168.2.51
设置本地的IP
setenv ipaddr 192.168.2.85
保存
saveenv
查看网络连接状态:
ping 192.168.2.51
将ubuntu中tftp共享文件夹下test.txt加载到内存0X80800000
tftpboot 80800000 zImage