Spring Boot 2.0之理解SpringApplication
-
-
SpringApplication的基本使用
-
SpringApplication 准备阶段
-
SpringApplication 运行阶段
-
刷新上下文
-
SpringApplication的基本使用
SpringApplication 运行
SpringApplication.run(SpringApplicationBootstrap.class,args);
自定义 SpringApplication
通过 SpringApplication API 调整
SpringApplication springApplication = new SpringApplication(SpringApplicationBootstrap.class);
springApplication.setBannerMode(Banner.Mode.CONSOLE);
springApplication.setWebApplicationType(WebApplicationType.NONE);
springApplication.setAdditionalProfiles("prod");
springApplication.setHeadless(true);
通过 SpringApplicationBuilder API 调整
流式方法处理,更优雅
new SpringApplicationBuilder(SpringApplicationBootstrap.class)
.bannerMode(Banner.Mode.CONSOLE)
.web(WebApplicationType.NONE)
.profiles("prod")
.headless(true)
.run(args);
SpringApplication 准备阶段
配置 Spring Boot Bean 源
Java 配置 Class 或 XML 上下文配置文件集合,用于 Spring Boot
BeanDefinitionLoader
读取并且将配置源解析加载为Spring Bean 定义
Java 配置 Class
用于 Spring 注解驱动中 Java 配置类,大多数情况是 Spring 模式注解所标注的类,如
@Configuration
。在spring boot中是
@SpringBootApplication
@SpringBootApplication
—>
@SpringBootConfiguration
—>
@Configuration
/**
 * {@link SpringApplication}
 * Created by Yuk on 2019/3/9.
 */
@SpringBootApplication
public class SpringApplicationBootstrap {

    public static void main(String[] args) {

        SpringApplication.run(SpringApplicationBootstrap.class,args);
    }
}
@SpringBootApplication
public class SpringApplicationBootstrap {

    public static void main(String[] args) {

        //SpringApplication.run(SpringApplicationBootstrap.class,args);
        Set sources = new HashSet();
        sources.add(SpringApplicationBootstrap.class.getName());

        SpringApplication application = new SpringApplication();
        application.setSources(new HashSet<>(sources));
        application.run(args);
    }
}
这两种方式都可以正常启动,重点看
application.setSources(new HashSet<>(sources));
/**
	 * Set additional sources that will be used to create an ApplicationContext. A source
	 * can be: a class name, package name, or an XML resource location.
	 * <p>
	 * Sources set here will be used in addition to any primary sources set in the
	 * constructor.
	 * @param sources the application sources to set
	 * @see #SpringApplication(Class...)
	 * @see #getAllSources()
	 */
	public void setSources(Set<String> sources) {
		Assert.notNull(sources, "Sources must not be null");
		this.sources = new LinkedHashSet<>(sources);
	}
看英文注释可以知道
A source can be: a class name, package name, or an XML resource location.
这里Set集合的sources可以是className(但必须是加了
@Configuration
),可以是包名,也可以是spring的配置文件
推断 Web 应用类型
根据当前应用 ClassPath 中是否存在相关实现类来推断 Web 应用的类型,包括:
-
Web Reactive
: WebApplicationType.REACTIVE -
Web Servlet
: WebApplicationType.SERVLET -
非 Web
: WebApplicationType.NONE
参考方法:
spring boot 2.0.7版本
this.webApplicationType = WebApplicationType.deduceFromClasspath();
static WebApplicationType deduceFromClasspath() {
		if (ClassUtils.isPresent(WEBFLUX_INDICATOR_CLASS, null)
				&& !ClassUtils.isPresent(WEBMVC_INDICATOR_CLASS, null)
				&& !ClassUtils.isPresent(JERSEY_INDICATOR_CLASS, null)) {
			return WebApplicationType.REACTIVE;
		}
		for (String className : SERVLET_INDICATOR_CLASSES) {
			if (!ClassUtils.isPresent(className, null)) {
				return WebApplicationType.NONE;
			}
		}
		return WebApplicationType.SERVLET;
	}
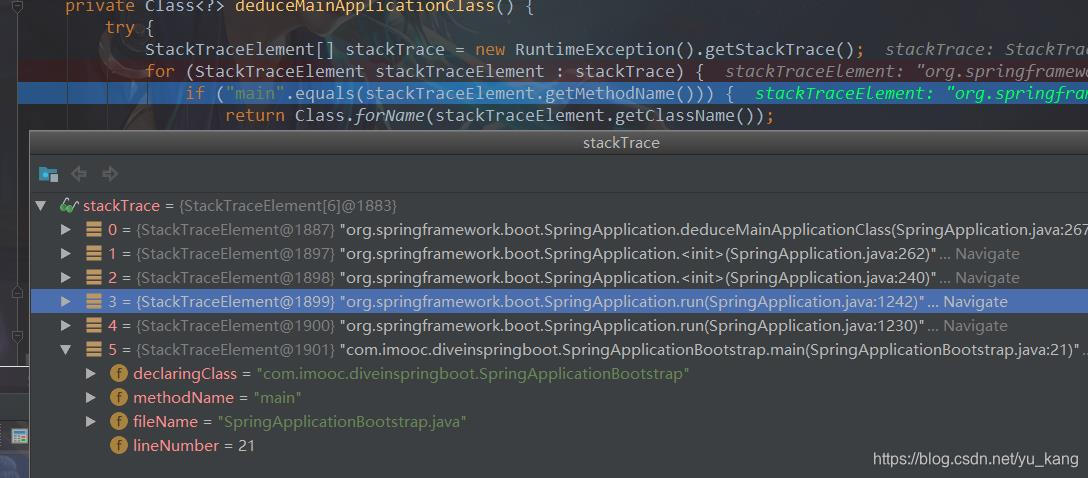
推断引导类(Main Class)
这里可能会有个疑问,引导类不就是Main Class吗?
注意,这样写确实是的
@SpringBootApplication
public class SpringApplicationBootstrap {

   public static void main(String[] args) {
        SpringApplication.run(ApplicationConfiguration.class,args);
    }
}
但是这样写,引导类就不是当前运行main方法的class了
public class SpringApplicationBootstrap {

    public static void main(String[] args) {

        SpringApplication.run(ApplicationConfiguration.class,args);
    }

    @SpringBootApplication
    public static class ApplicationConfiguration{

    }
}
参考方法
:
org.springframework.boot.SpringApplication#deduceMainApplicationClass
抛出异常获取堆栈,然后判断堆栈的方法是否为main,从而获取类名,反射得到引导类
private Class<?> deduceMainApplicationClass() {
		try {
			StackTraceElement[] stackTrace = new RuntimeException().getStackTrace();
			for (StackTraceElement stackTraceElement : stackTrace) {
				if ("main".equals(stackTraceElement.getMethodName())) {
					return Class.forName(stackTraceElement.getClassName());
				}
			}
		}
		catch (ClassNotFoundException ex) {
			// Swallow and continue
		}
		return null;
	}
我们可以断点看一下
加载应用上下文初始器 ( ApplicationContextInitializer )
初始化时可以拿到上下文
ConfigurableApplicationContext
,做一些其他事情。
setInitializers((Collection) getSpringFactoriesInstances(
				ApplicationContextInitializer.class));
private <T> Collection<T> getSpringFactoriesInstances(Class<T> type,
			Class<?>[] parameterTypes, Object... args) {
		ClassLoader classLoader = Thread.currentThread().getContextClassLoader();
		// Use names and ensure unique to protect against duplicates
		Set<String> names = new LinkedHashSet<>(
				SpringFactoriesLoader.loadFactoryNames(type, classLoader));
		List<T> instances = createSpringFactoriesInstances(type, parameterTypes,
				classLoader, args, names);
		AnnotationAwareOrderComparator.sort(instances);
		return instances;
	}
跟踪这个方法,最后发现会去
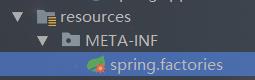
META-INF/spring.factories
中查找。利用 Spring 工厂加载机制,实例化
ApplicationContextInitializer
的实现类,并排序对象集合。
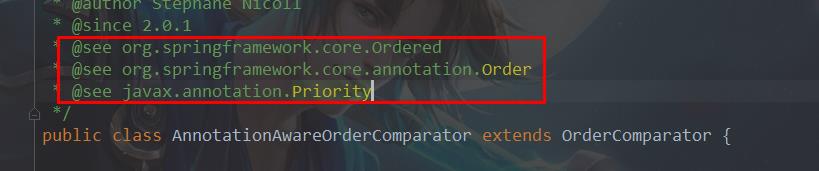
可以看到spring boot默认有两个实现类实现了
ApplicationContextInitializer

并且,
AnnotationAwareOrderComparator.sort(instances);
对实现类进行排序,看截图可知。
ApplicationContextInitializer
的实现类定义排序有三种方式:
1.实现Ordered接口
2.注解Order
3.注解priority
自定义上下文初始器
- 实现Ordered接口定义优先级
public class AfterApplicationContextInitiazer implements ApplicationContextInitializer,Ordered{
    @Override
    public int getOrder() {
        return Ordered.LOWEST_PRECEDENCE; // 最低优先级
    }

    @Override
    public void initialize(ConfigurableApplicationContext applicationContext) {
        System.out.println("After ApplicationContext.id="+applicationContext.getId());
    }
}
- @Order注解定义优先级
@Order(Ordered.HIGHEST_PRECEDENCE)// 最高优先级
public class HelloWorldApplicationContextInitiazer implements ApplicationContextInitializer{

    @Override
    public void initialize(ConfigurableApplicationContext applicationContext) {
        System.out.println("helloWorld ApplicationContext.id="+applicationContext.getId());
    }
}
spring.factories
# Initializers
org.springframework.context.ApplicationContextInitializer=\
com.imooc.diveinspringboot.context.AfterApplicationContextInitiazer,\
com.imooc.diveinspringboot.context.HelloWorldApplicationContextInitiazer
测试
控制台打印
helloWorld ApplicationContext.id=org.springframework.boot.web.servlet.context.AnnotationConfigServletWebServerApplicationContext@327b636c
After ApplicationContext.id=application
加载应用事件监听器( ApplicationListener )
利用 Spring 工厂加载机制,实例化
ApplicationListener
的实现类,并排序对象集合,与加载应用上下文初始器的机制一样。
setListeners((Collection) getSpringFactoriesInstances(ApplicationListener.class));
自定义事件监听器
这里只是自定义监听器,监听的是spring默认的事件
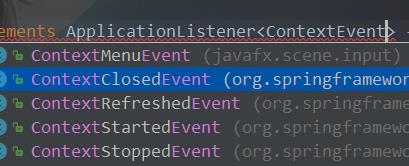
public class AfterApplicationListener implements ApplicationListener<ContextRefreshedEvent>,Ordered {
    @Override
    public void onApplicationEvent(ContextRefreshedEvent event) {
        System.out.println("After ApplicationListener :"+event.getApplicationContext().getId()
                +",timestamp:"+event.getTimestamp());
    }

    @Override
    public int getOrder() {
        return Ordered.LOWEST_PRECEDENCE;
    }
}
@Order(Ordered.HIGHEST_PRECEDENCE)
public class HelloWorldApplicationListener implements ApplicationListener<ContextRefreshedEvent> {

    @Override
    public void onApplicationEvent(ContextRefreshedEvent event) {
        System.out.println("HelloWorld ApplicationListener :"+event.getApplicationContext().getId()
            +",timestamp:"+event.getTimestamp());
    }
}
spring.factories
org.springframework.context.ApplicationListener=\
com.imooc.diveinspringboot.listen.AfterApplicationListener,\
com.imooc.diveinspringboot.listen.HelloWorldApplicationListener
测试
控制台打印
HelloWorld ApplicationListener :application,timestamp:1552139922079
After ApplicationListener :application,timestamp:1552139922079
spring的事件监听特别好用,可以多个监听一个事件,是
观察者模式
的一种体现。这里只是自定义了监听器,其实还可以自定义事件,到时候在讲spring源码的时候具体会写一篇文章。
SpringApplication 运行阶段
加载 SpringApplication 运行监听器( SpringApplicationRunListeners )
利用 Spring 工厂加载机制,读取
SpringApplicationRunListener
对象集合,并且封装到组合类
SpringApplicationRunListeners
在
SpringApplication
最终的
run
方法中
SpringApplicationRunListeners listeners = getRunListeners(args);
private SpringApplicationRunListeners getRunListeners(String[] args) {
		Class<?>[] types = new Class<?>[] { SpringApplication.class, String[].class };
		return new SpringApplicationRunListeners(logger, getSpringFactoriesInstances(
				SpringApplicationRunListener.class, types, this, args));
	}
其中
getSpringFactoriesInstances
方法,上面也讲到过,就是根据类型去
spring.factories
中获取相对应的类。这里可以看到获取的是实现了
SpringApplicationRunListener
接口的实现类
运行 SpringApplication 运行监听器( SpringApplicationRunListeners )
SpringApplicationRunListener
有7个方法,对应容器运行阶段的7种状态,可以自定义实现不同方法。比如容器开始时要做什么,启动时要做什么等等。。。
public interface SpringApplicationRunListener {

	void starting();

	void environmentPrepared(ConfigurableEnvironment environment);

	void contextPrepared(ConfigurableApplicationContext context);

	void contextLoaded(ConfigurableApplicationContext context);

	void started(ConfigurableApplicationContext context);

	void running(ConfigurableApplicationContext context);

	void failed(ConfigurableApplicationContext context, Throwable exception);

}
| 监听方法 | 阶段说明 | Spring Boot 起始版本 |
|---|---|---|
| starting() | Spring 应用刚启动 | 1.0 |
| environmentPrepared(ConfigurableEnvironment) | ConfigurableEnvironment 准备妥当,允许将其调整 | 1.5 |
| contextPrepared(ConfigurableApplicationContext) | ConfigurableApplicationContext 准备妥当,允许将其调整 | 1.0 |
| contextLoaded(ConfigurableApplicationContext context) | ConfigurableApplicationContext 已装载,但仍未启动 | 1.0 |
| started(ConfigurableApplicationContext context) | ConfigurableApplicationContext 已启动,此时 Spring Bean 已初始化完成 | 2.0 |
| running(ConfigurableApplicationContext) | Spring 应用正在运行 | 2.0 |
| failed(ConfigurableApplicationContext,Throwable) | Spring 应用运行失败 | 1.0 |
监听 Spring Boot 事件 / Spring 事件
Spring Boot 通过
SpringApplicationRunListener
的实现类
EventPublishingRunListener
利用 Spring Framework 事件API ,广播 Spring Boot 事件。
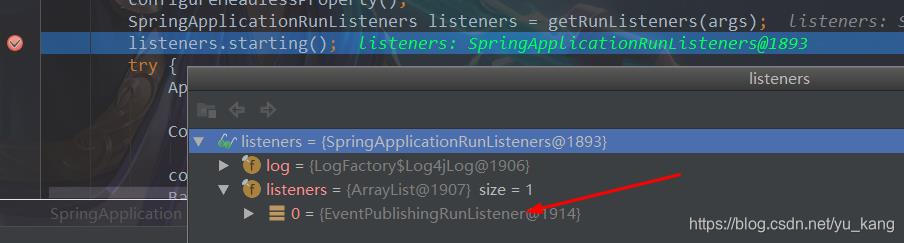
在
listeners.starting();
时,发布了一个
ApplicationStartingEvent
事件,如果自定义监听器监听了该事件,则会在这里触发监听器。
EventPublishingRunListener.java
public void starting() {
		this.initialMulticaster.multicastEvent(
				new ApplicationStartingEvent(this.application, this.args));
	}
EventPublishingRunListener 监听方法与 Spring Boot 事件对应关系
| 监听方法 | Spring Boot 事件 | Spring Boot 起始版本 |
|---|---|---|
| starting() | ApplicationStartingEvent | 1.5 |
| environmentPrepared(ConfigurableEnvironment) | ApplicationEnvironmentPreparedEvent | 1.0 |
| contextPrepared(ConfigurableApplicationContext) | ||
| contextLoaded(ConfigurableApplicationContext) | ApplicationPreparedEvent | 1.0 |
| started(ConfigurableApplicationContext) | ApplicationStartedEvent | 2.0 |
| running(ConfigurableApplicationContext) | ApplicationReadyEvent | 2.0 |
| failed(ConfigurableApplicationContext,Throwable) | ApplicationFailedEvent | 1.0 |
Spring Framework 事件/监听器编程模型
-
Spring 应用事件
- 普通应用事件: ApplicationEvent
- 应用上下文事件: ApplicationContextEvent
-
Spring 应用监听器
- 接口编程模型: ApplicationListener
-
注解编程模型: @EventListener
@EventListener注解的处理
-
Spring 应用事广播器
- 接口: ApplicationEventMulticaster
- 实现类: SimpleApplicationEventMulticaster
- 执行模式:同步或异步
事件监听默认为同步,异步就是在
onApplicationEvent
方法上加
@Async
@Async
public void onApplicationEvent(ContextRefreshedEvent event) {
    System.out.println("After ApplicationListener :"+event.getApplicationContext().getId()
            +",timestamp:"+event.getTimestamp());
}
自定义 SpringApplication 运行监听器
public class HelloApplicationRunListener implements SpringApplicationRunListener{
    @Override
    public void starting() {
        System.out.println("Hello ApplicationRunListener is starting.");
    }

    @Override
    public void environmentPrepared(ConfigurableEnvironment environment) {

    }

    @Override
    public void contextPrepared(ConfigurableApplicationContext context) {

    }

    @Override
    public void contextLoaded(ConfigurableApplicationContext context) {

    }

    @Override
    public void started(ConfigurableApplicationContext context) {

    }

    @Override
    public void running(ConfigurableApplicationContext context) {

    }

    @Override
    public void failed(ConfigurableApplicationContext context, Throwable exception) {

    }
}
添加到spring.factories中
# Run Listeners
org.springframework.boot.SpringApplicationRunListener=\
com.imooc.diveinspringboot.run.HelloApplicationRunListener
运行报错:
Caused by: java.lang.NoSuchMethodException: com.imooc.diveinspringboot.run.HelloApplicationRunListener.<init>(org.springframework.boot.SpringApplication, [Ljava.lang.String;) at java.lang.Class.getConstructor0(Class.java:3082) at java.lang.Class.getDeclaredConstructor(Class.java:2178) at org.springframework.boot.SpringApplication.createSpringFactoriesInstances(SpringApplication.java:434) ... 6 more
构造方法报错,我们看一下spring boot的运行运行监听器
EventPublishingRunListener
怎么实现的,它有一个带参数的构造函数
public EventPublishingRunListener(SpringApplication application, String[] args) {
		this.application = application;
		this.args = args;
		this.initialMulticaster = new SimpleApplicationEventMulticaster();
		for (ApplicationListener<?> listener : application.getListeners()) {
			this.initialMulticaster.addApplicationListener(listener);
		}
	}
我么仿照着写一个一样的构造函数,启动正常,打印出了
Hello ApplicationRunListener is starting.
为什么要加一个这样的构造函数,是因为创建运行监听器实例的时候,通过带参数的构造函数实例化的
private <T> List<T> createSpringFactoriesInstances(Class<T> type,
			Class<?>[] parameterTypes, ClassLoader classLoader, Object[] args,
			Set<String> names) {
		List<T> instances = new ArrayList<>(names.size());
		for (String name : names) {
			try {
				Class<?> instanceClass = ClassUtils.forName(name, classLoader);
				Assert.isAssignable(type, instanceClass);
				Constructor<?> constructor = instanceClass
						.getDeclaredConstructor(parameterTypes);
				T instance = (T) BeanUtils.instantiateClass(constructor, args);
				instances.add(instance);
			}
			catch (Throwable ex) {
				throw new IllegalArgumentException(
						"Cannot instantiate " + type + " : " + name, ex);
			}
		}
		return instances;
	}
创建 Spring 应用上下文( ConfigurableApplicationContext )
根据准备阶段的推断 Web 应用类型创建对应的
ConfigurableApplicationContext
实例:
- Web Reactive: AnnotationConfigReactiveWebServerApplicationContext
- Web Servlet: AnnotationConfigServletWebServerApplicationContext
- 非 Web: AnnotationConfigApplicationContext
protected ConfigurableApplicationContext createApplicationContext() {
		Class<?> contextClass = this.applicationContextClass;
		if (contextClass == null) {
			try {
				switch (this.webApplicationType) {
				case SERVLET:
					contextClass = Class.forName(DEFAULT_SERVLET_WEB_CONTEXT_CLASS);
					break;
				case REACTIVE:
					contextClass = Class.forName(DEFAULT_REACTIVE_WEB_CONTEXT_CLASS);
					break;
				default:
					contextClass = Class.forName(DEFAULT_CONTEXT_CLASS);
				}
			}
			catch (ClassNotFoundException ex) {
				throw new IllegalStateException(
						"Unable create a default ApplicationContext, "
								+ "please specify an ApplicationContextClass",
						ex);
			}
		}
		return (ConfigurableApplicationContext) BeanUtils.instantiateClass(contextClass);
	}
创建 Environment
根据准备阶段的推断 Web 应用类型创建对应的 ConfigurableEnvironment 实例:
- Web Reactive: StandardReactiveWebEnvironment
- Web Servlet: StandardServletEnvironment
- 非 Web: StandardEnvironment
private ConfigurableEnvironment getOrCreateEnvironment() {
		if (this.environment != null) {
			return this.environment;
		}
		switch (this.webApplicationType) {
		case SERVLET:
			return new StandardServletEnvironment();
		case REACTIVE:
			return new StandardReactiveWebEnvironment();
		default:
			return new StandardEnvironment();
		}
	}
刷新上下文
run
方法中会执行
refreshContext(context);
,最后执行的就是
AbstractApplicationContext
中的
refresh()
方法
spring加载流程之refresh()