此节介绍两个广场的展示实现。
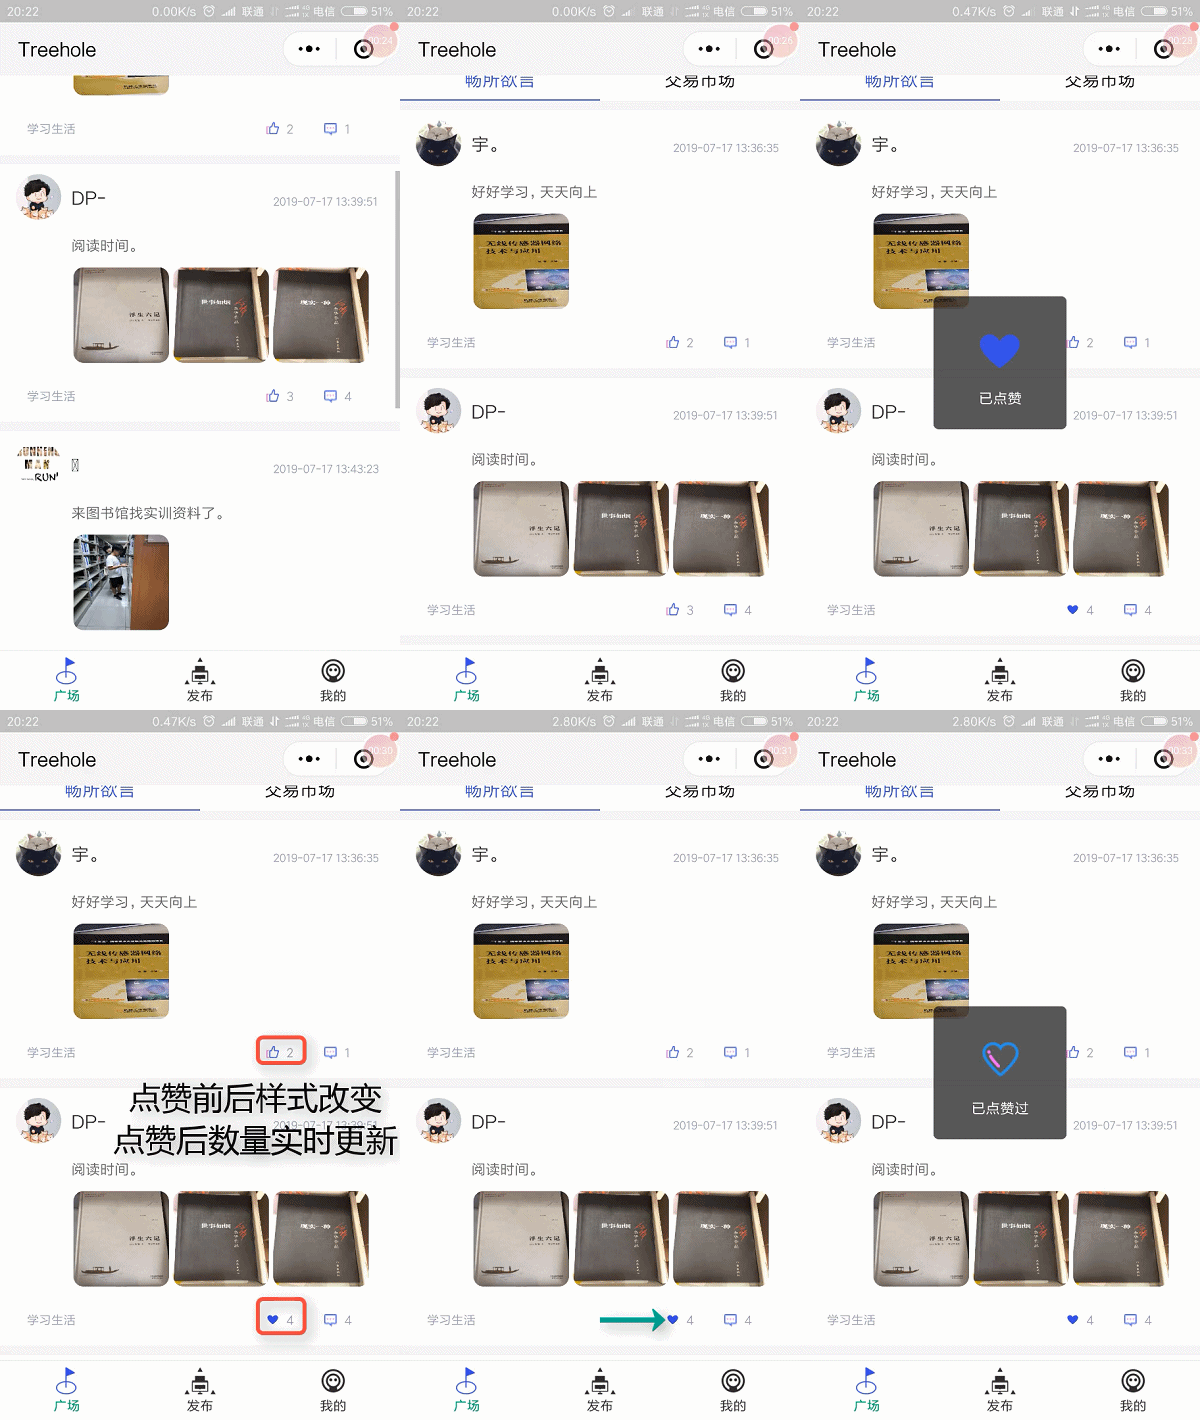
先看一下效果图:

交易市场:


两个页面的切换使用的是navbar,因为只用到了两个页面,我设置了进去的时候首先加载两个页面
只是在显示哪一个页面的时候进行隐藏和Show的操作。
加载速度情况视网络情况而定。
其余显示的数据在js里面获取。
分块组成,每一块用样式定位。
广场wxml:
<view class='main'>
<view class='navbar_main'>
<!-->头部<-->
  <view class="navbar">
    <text wx:for="{{navbar}}" data-idx="{{index}}" class="item {{currentTab==index ? 'active' : ''}}" wx:key="unique" bindtap="navbarTap">{{item}}</text>
    </view>
      <!--树洞广场-->
    <view hidden="{{currentTab!==0}}">
     <view wx:for="{{DataPostArry.length}}" wx:key='DataPostArry.length' class = 'item-contain' ><!--循环生成body-->
      <view class='top'>
        <view class='hidden_head'>

          <view class='userphoto'><image src='{{UserHeadurlArry[index]}}'></image></view>
          <view class='username'><label class='lb_name'>{{UsernameArry[index]}}</label></view>
          <view class='time'><label class='lb_time'>{{DataPostArry[index].Time}}</label></view>
        </view>
        <view class='hidden_second'>
          <label class='lb_tx'>{{DataPostArry[index].Context}}</label>
        </view>
        <view class='hidden_third'>
         <image wx:for="{{DataPostArry[index].Photo_arr}}" wx:key='Photo_arr' wx:for-item="url" src='{{url}}' bindtap="previewImage" data-myimg='{{url}}' ></image>
        </view>
        <view class='hidden_buttom'>
          <view class='b_1'><text>{{DataPostArry[index].Type}}</text></view>
           <block wx:if="{{DataPostArry[index]._openid==UserId}}">
          <view class='b_11' bindtap='Remove_Post' data-post_id="{{DataPostArry[index]._id}}" data-postopenid="{{DataPostArry[index]._openid}}" data-nowIndex="{{index}}"><image src='/images/del1.png'></image><label>删除</label></view>
          </block>
          <block wx:else>
          <view class='b_11_2'></view>
          </block>


          <block wx:if="{{UpArray[index]==0}}">
          <view class='b_2' bindtap='upclickbutton' data-post_id="{{DataPostArry[index]._id}}" data-postopenid="{{DataPostArry[index]._openid}}" data-nowIndex="{{index}}"><image src='/images/dz.png'></image></view>
          </block>

          <block wx:else>
           <view class='b_2' bindtap='upclickbutton' data-post_id="{{DataPostArry[index]._id}}" data-postopenid="{{DataPostArry[index]._openid}}" data-nowIndex="{{index}}"><image src='/images/Up_heart.png'></image></view>
          </block>

          <view class='b_3'><label>{{DataPostArry[index].Up_Record_num}}</label></view>
          <view class='b_4' bindtap='to_Reply' data-post_id="{{DataPostArry[index]._id}}" data-postopenid="{{DataPostArry[index]._openid}}" data-nowIndex="{{index}}"><image src='/images/Reply.png'></image></view>
          <view class='b_5'><label>{{DataPostArry[index].Reply_Record_num}}</label></view>

        </view>

      </view>

    </view>

    </view>

    <!--二手交易-->
<view hidden="{{currentTab!==1}}">
  <view wx:for="{{SellDataPostArry.length}}" wx:key='SellDataPostArry' class = 'item-contain' ><!--循环生成body-->
      <view class='top'>

<view class='top1'>
<image class='icon' src='{{SellUserHeadurlArry[index]}}'></image>
<text class='name'>{{SellUsernameArry[index]}}</text>
<text class='time'>{{SellDataPostArry[index].Time}}</text>
</view>


<view class='money'>
<text class='top2text1'>商品价格:</text>
<text class='money1'>¥</text>
<text class='money2'>{{SellDataPostArry[index].Price}}</text>
</view>

<view class='inform'>
<text class='top2text1'>商品描述:</text>
<view class='textroom'>
<text class='top2text2'>{{SellDataPostArry[index].Context}}</text>
</view>
</view>

<view class='inform'>
<text class='top2text1'>类目:</text>
<text class='top2text2'>{{SellDataPostArry[index].Type}} </text>
</view>

<view class='inform'>
<text class='top2text1'>交易方式:</text>
<text class='top2text2'>{{SellDataPostArry[index].Deal_Type}}</text>
</view>

<view class='top3'>
<image wx:for="{{SellDataPostArry[index].Photo_arr}}" wx:key='SellPhoto_arr' wx:for-item="url" src='{{url}}'
bindtap="previewImage" data-myimg='{{url}}' ></image>
</view>

<view class='top4'>


<view class='b_1'>


 <text>{{SellDataPostArry[index].Type}}</text>

</view>

 <block wx:if="{{SellUpArray[index]==0}}">
          <view class='b_2' bindtap='wanttobuy' data-buypost_id="{{SellDataPostArry[index]._id}}" data-buypostopenid="{{SellDataPostArry[index]._openid}}" data-buyindex="{{index}}"><image src='/images/buy.png'></image></view>
          </block>

          <block wx:else>
           <view class='b_2' bindtap='wanttobuy' data-buypost_id="{{SellDataPostArry[index]._id}}" data-buypostopenid="{{SellDataPostArry[index]._openid}}" data-buyindex="{{index}}"><image src='/images/pic_on_buy.png'></image></view>
          </block>

<view class='b_3'><text>{{SellDataPostArry[index].Intention_Record_num}} 人想买</text></view>

</view>

</view>
 </view>
        </view> <!--currenttab1><-->

</view>


</view>
下面是Js里面的逻辑代码:
定义所用到的Array,全局的Array主要存储的是点赞系列的。每一个Array对应这wxml中所需要显示的内容。
var app = getApp()
var util=require('../../utils/util.js');
//var template = require('../../template/template.js');
var UserIdArry = new Array()
var UserUpId = new Array()
var SellUserId = new Array()
var SellUserUpId = new Array()
Page({

  data: {
    navbar: ['畅所欲言', '交易市场'],
    currentTab: 0,
    SellDataPostArry:[],
    SellUserHeadurlArry:[],
    SellUsernameArry:[],
    SellUpArray:[],
    DataPostArry:[],
    UserHeadurlArry:[],
    UpArray: [],
    UsernameArry: [],
    UserId:'',//app.globalData.openid
    replyData: []
  },
下面按照函数来介绍:
首先是navbarTap,作为两个页面的切换。
  navbarTap: function (e) {
    this.setData({
      currentTab: e.currentTarget.dataset.idx
    })
    if (e.currentTarget.dataset.idx==0)
    {this.get_DBinf();}
    else
    {this.get_Sell_DBinf();}
  }
get_DBinf,就是获取帖子/用户的数据。
上半部分是把是否点赞的数组进行赋值(这个原理在前一篇的项目中有详细介绍,这里就不再做介绍了。)
下半部分Promise.all里面,即是获取全部帖子的内容之后,再按照用户的openid作一一对应,这样的话就会把帖子的用户信息对应好。(如果这里处理不好,会出现混乱,即A发的帖子,变成B的用户信息。)
get_DBinf:function(){
   let that = this
    wx.getStorage({
      key: 'User_openid',
      success(res) {
        that.setData({
          UserId: res.data
        })

        var db = wx.cloud.database()//{ env: 'textllinpro-5br77' }
        let userid = res.data;
        //console.log("My openid:"+userid);
        db.collection('Assistant_Up').where({//获取自己的点赞列表
          _openid: userid
        }).get({
          success: res => {

            //console.log("点赞列表:", res.data)

            for (var i = 0; i < res.data.length; i++) {
              UserUpId[i] = res.data[i].Up_Post_id//点赞列表赋值
            }

            db.collection('Assistant_DataSheet').get({
              success: res => {
                //console.log("Assistant_DataSheet Res"+res);
                that.setData({
                  alldata: res.data//所有的用户列表数据
                })
                for (var i = 0; i < res.data.length; i++) {
                  UserIdArry[i] = res.data[i]._id  //所有的用户列表_id
                  if (UserUpId.indexOf(UserIdArry[i]) == -1) {
                    var item = 'UpArray[' + i + ']'
                    that.setData({
                      [item]: 0
                    })
                  }
                  else {
                    var item = 'UpArray[' + i + ']'
                    that.setData({
                      [item]: 1
                    })
                  }
                }
                //console.log(that.data.UpArray)
              }
            })
          },
        })
      }
    })
    const get_inf_db = wx.cloud.database()//{ env: 'textllinpro-5br77' }
    get_inf_db.collection('Assistant_DataSheet').get({
      success: res => {
        that.setData({
          DataPostArry: res.data
        })
        Promise.all(res.data.map((item)=>{
          return item._openid
        })).then(res=>{
          let _ = get_inf_db.command;
            get_inf_db.collection('Assistant_User').where({
              _openid: _.in(res)
            }).get().then(res => {
              that.data.UsernameArry = [];
              that.data.UserHeadurlArry=[];
              for (let i = 0; i < this.data.DataPostArry.length;i++){
                let openId = this.data.DataPostArry[i]._openid;
                for(let j=0;j<res.data.length;j++){
                  if(openId == res.data[j]._openid){
                    that.data.UsernameArry.push(res.data[j].Username);
                    that.data.UserHeadurlArry.push(res.data[j].User_head_url);
                  }
                }
              }
              that.setData({
                UsernameArry: that.data.UsernameArry,
                UserHeadurlArry: that.data.UserHeadurlArry
              });
            })

        }).catch((ex)=>{
          console.log(ex);
        })

      }
    })
  }
下面是点赞功能的介绍,原理与前一个项目相同,即判断前面获取的数组数据信息,1 or 0,判断是否已经点赞。
这里没有做取消点赞的功能,优化成提示已点赞过。
对应的意向购买功能也是如此。
upclickbutton: function (e) {
    var that = this
    var ind = e.currentTarget.dataset.nowindex
    //console.log("Post_id:" + e.currentTarget.dataset.post_id)
    const postuserid = e.currentTarget.dataset.postopenid

    //console.log(this.data.UpArray[ind] == 0)

    if (this.data.UpArray[ind] == 0)//说明没点赞过
    {

      var nowup = 'UpArray[' + ind + ']'//设置为点赞过
      this.setData({
        [nowup]: 1
      })
      const db = wx.cloud.database({ env: 'textllinpro-5br77' })
      return db.collection('Assistant_Up').add({ //添加帖子
        data: {
          Up_Post_id: e.currentTarget.dataset.post_id,
          Up_id: e.currentTarget.dataset.postopenid,
          Time_s: Date.now()
        }
      }).then(res => {
        console.log("Assistant_Up OK!");
        console.log("Pick the post_id:"+e.currentTarget.dataset.post_id);
        wx.cloud.callFunction({
          name: 'Up_Assistant_Post',
          data: {
            Post_id: e.currentTarget.dataset.post_id,
          },
          success: function (res) {
            console.log("Up_Assistant_Post OK!");
            that.get_DBinf()
            wx.showToast({
              title: '已点赞',
              image: '../../images/Up_heart.png',
              duration: 2000
            })
          },
          fail: err => {
            console.log('error:', err)
          }
        })
      })
    }
    else{
      wx.showToast({
        title: '已点赞过',
        image: '../../images/Up_heart2.png',
        duration: 2000
      })
    }
  }
效果图见:

交易大厅的数据同理get_Sell_DBinf函数的代码就不贴出来了,跟get_DBinf类似。
下面是删除帖子功能Remove_Post和Remove_Sell,调用云函数进行操作:
Remove_Post:function(e){
    let that = this
    wx.showModal({
      title: '提示',
      content: '请问是否删除本条树洞?',
      success: function (res) {
        if (res.confirm) {
          console.log(e.currentTarget.dataset.post_id)//事件的id
          wx.cloud.callFunction({
            name: 'Remove_Assistant_DataSheet',
            data: {
              youid: e.currentTarget.dataset.post_id,
            },
            success: function (res) {
              that.get_DBinf()
            }
          })
        }
      }
    })
  },

  Remove_Sell: function (e) {
    let that = this
    wx.showModal({
      title: '提示',
      content: '请问是否删除本条交易记录?',
      success: function (res) {
        if (res.confirm) {
          console.log(e.currentTarget.dataset.tobuy_id)//事件的id
          wx.cloud.callFunction({
            name: 'Remove_Assistant_Sell',
            data: {
              youid: e.currentTarget.dataset.tobuy_id,
            },
            success: function (res) {
              that.get_Sell_DBinf();
            }
          })
        }
      }
    })
  },
这里贴一个删除帖子的云函数:
// 云函数入口文件
const cloud = require('wx-server-sdk')

cloud.init()

const db = cloud.database({ env: 'textllinpro-5br77' })
// 云函数入口函数
exports.main = async (event, context) => {
  const Post_id = event.youid
  return db.collection('Assistant_Sell_DataSheet').doc(Post_id).remove({
  }).then(res => {
    console.log(res);
  })
}
跳转评论功能其实也没啥,就是跳转到另外的页面上去,顺便把数据提取过去。
评论的功能下一章节讲到。
 to_Reply: function (e) {
    let that = this
    console.log(e.currentTarget.dataset.post_id);//事件的id
    console.log(e.currentTarget.dataset.postopenid);//创建表的用户openid
    //console.log(e.currentTarget.dataset)
    that.setData({
      replyData: e.currentTarget.dataset
    })
    console.log(that.data.replyData)
    wx.setStorage({
      key: "key",
      data: that.data.replyData
    })
    wx.navigateTo({
      url: '../Reply_page/Reply_page',

    })
  }

这一节最主要的是数据的获取,点赞删除功能原理在前一个项目可获悉。
在onshow里面最好的话要做一个数据获取的刷新,不然如果新发的帖子,再次进来没有进行刷新。
详见微信小程序的生命周期。
谢谢大家。