winfrom玩多了,总觉得每次更新BUG总是需要通知用户更新客户端,非常的不方便。所以决定学习使用webfrom。原本是想从webfrom入手的,那个简单一点,但是想想以后估计都是MVC模式的天下,还不如一次到位从MVC学起好了。
使用VS2015新建一个项目,web项目,选择空白—MVC。
因为要使用MVC中的EF类操作数据库,所以在建立数据表的时候尽可能的将信息建立齐全。以下为我创建的两个表:
CREATE TABLE [dbo].[Employee](
	[id] [int] IDENTITY(1,1) NOT NULL,
	[Ename] [varchar](10) NOT NULL,
	[Empid] [varchar](5) NOT NULL,
	[dept_id] [int] NULL,
PRIMARY KEY CLUSTERED
(
	[id] ASC
)WITH (PAD_INDEX = OFF, STATISTICS_NORECOMPUTE = OFF, IGNORE_DUP_KEY = OFF, ALLOW_ROW_LOCKS = ON, ALLOW_PAGE_LOCKS = ON) ON [PRIMARY]
) ON [PRIMARY]

GO

SET ANSI_PADDING OFF
GO

ALTER TABLE [dbo].[Employee]  WITH CHECK ADD FOREIGN KEY([dept_id])
REFERENCES [dbo].[Dept] ([id])
GO
CREATE TABLE [dbo].[Dept](
[id] [int] IDENTITY(1,1) NOT NULL,
[Dname] [varchar](10) NULL,
PRIMARY KEY CLUSTERED
(
[id] ASC
)WITH (PAD_INDEX = OFF, STATISTICS_NORECOMPUTE = OFF, IGNORE_DUP_KEY = OFF, ALLOW_ROW_LOCKS = ON, ALLOW_PAGE_LOCKS = ON) ON [PRIMARY]
) ON [PRIMARY]
GO1:在Controllers文件夹中新建一个控制器。命名为EmployeeControllers.
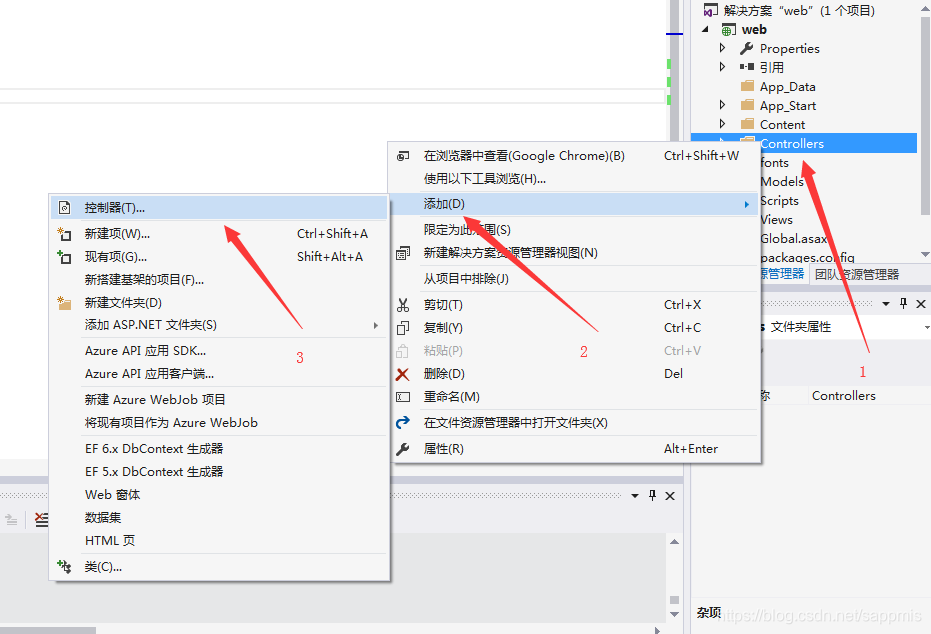
:2:创建好控制器之后,打开EmployeeControllers.cs文件。代码应该如下:
using System;
using System.Collections.Generic;
using System.Linq;
using System.Web;
using System.Web.Mvc;


namespace web.Controllers
{
    public class EmployeeController : Controller
    {

        // GET: Employee
        public ActionResult Index()
        {

            return View(mrpsql.Employee.ToList());
        }
这样,就建立了一个控制器。
一般来说,MVC模式的程序分工是比较明确的,控制器只负责干逻辑处理这类的事情。所以,处理数据,就需要用到model模型这个东西了。:
3:在项目中 model—右键—添加—新建项—数据—ADO.NET实体数据模型.然后将名称改为:Empdb

4:之后,在数据列表中选择employee,dept 两个表。最后在model文件夹下看到一个empdb的数据实体类。先不用管里面的数据,接着回到EmployeeControllers中,在Index方法中右键—添加视图。视图名称:Index,不需要修改。模板选择List,模型类选择刚才建立好的employee,确定。

5:打开View文件夹–Employee–Index.cshtml,双击该文件,打开文件,将会看到差不多的代码:
@model IEnumerable<web.Models.Employee>
@{
ViewBag.Title = "Index";
}
<h2>Index</h2>
<p>
@Html.ActionLink("Create New", "Create")
</p>
<table class="table">
<tr>
<th>
姓名 // @Html.DisplayFor(modelItem => item.Ename)
</th>
<th>
工号// @Html.DisplayFor(modelItem => item.Empid)
</th>
<th>
部门 // @Html.DisplayFor(modelItem => item.dept_id)
</th>
<th></th>
</tr>
@foreach (var item in Model) {
<tr>
<td>
@Html.DisplayFor(modelItem => item.Ename)
</td>
<td>
@Html.DisplayFor(modelItem => item.Empid)
</td>
<td>
@Html.DisplayFor(modelItem => item.dept_id)
</td>
<td>
@Html.ActionLink("Edit", "Edit", new { id=item.id }) |
@Html.ActionLink("Details", "Details", new { id=item.id }) |
@Html.ActionLink("Delete", "Delete", new { id=item.id })
</td>
</tr>
}
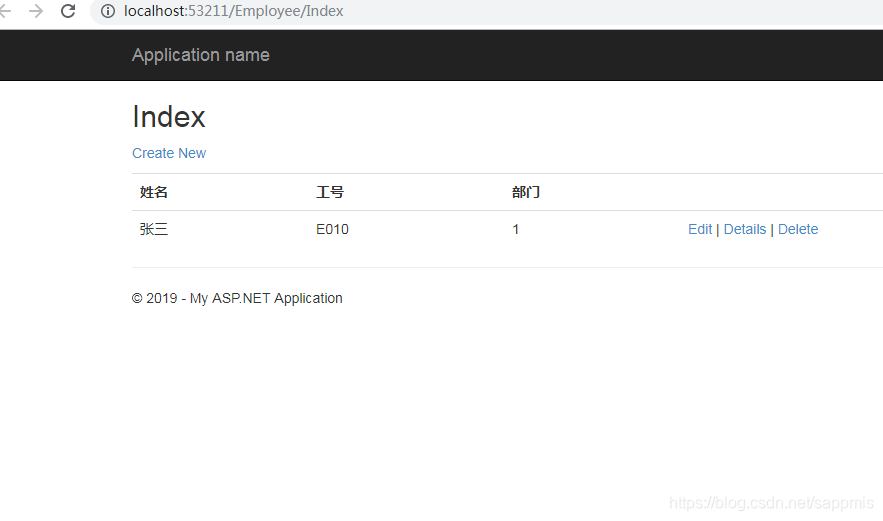
</table>6:这样,一个查看Employee表的页面就完成了。按F5调试。
在页面上方中,有一个Creaet New的链接,在条记录的右边分别有Edit,Details,Delete这机个链接是视图自动生成的。
Creaet New这个链接是为在Employee表中新建一个条目。顾名思义,右边的几个链接也是为了操作数据的。
下面新建一个条目。
7:在Employee中新建两个方法,建立好之后的Employee控制器的代码应该是这样的:
mrpsqlEntities mrpsql = new mrpsqlEntities(); //这个是将模型中的实体数据类初始化。初始化之前要先引用 using web.Models;
然后新建立了两个Create方法,两个方法的区别在于一个是打开空白页面的方法,一个是带有httpPost数据的方法。
using System;
using System.Collections.Generic;
using System.Linq;
using System.Web;
using System.Web.Mvc;
using web.Models;

namespace web.Controllers
{
    public class EmployeeController : Controller
    {
        mrpsqlEntities mrpsql = new mrpsqlEntities();
        // GET: Employee
        public ActionResult Index()
        {

            return View(mrpsql.Employee.ToList());
        }

        public ActionResult Create()
        {
            return View();
        }
        [HttpPost]
        [ValidateAntiForgeryToken]
        public ActionResult Create([Bind(Include ="ename,empid,dept_id")]Employee employee)
        {
            if (ModelState.IsValid)
            {
                mrpsql.Employee.Add(employee);
                mrpsql.SaveChanges();
                return RedirectToAction("Index");
            }
            return View();
        }

    }
}
8:对着没有使用Post的Create方法右键–添加视图。选项按照下图中的选择。这样就成功添加了一个视图。

9:打开View—Employee–Create的代码,代码如下:
@model web.Models.Employee

@{
    ViewBag.Title = "Create";
}

<h2>Create</h2>


@using (Html.BeginForm())
{
    @Html.AntiForgeryToken()

    <div class="form-horizontal">
        <h4>Employee</h4>
        <hr />
        @Html.ValidationSummary(true, "", new { @class = "text-danger" })
        <div class="form-group">
            @Html.LabelFor(model => model.Ename, htmlAttributes: new { @class = "control-label col-md-2" })
            <div class="col-md-10">
                @Html.EditorFor(model => model.Ename, new { htmlAttributes = new { @class = "form-control" } })
                @Html.ValidationMessageFor(model => model.Ename, "", new { @class = "text-danger" })
            </div>
        </div>

        <div class="form-group">
            @Html.LabelFor(model => model.Empid, htmlAttributes: new { @class = "control-label col-md-2" })
            <div class="col-md-10">
                @Html.EditorFor(model => model.Empid, new { htmlAttributes = new { @class = "form-control" } })
                @Html.ValidationMessageFor(model => model.Empid, "", new { @class = "text-danger" })
            </div>
        </div>

        <div class="form-group">
            @Html.LabelFor(model => model.dept_id, htmlAttributes: new { @class = "control-label col-md-2" })
            <div class="col-md-10">
                @Html.EditorFor(model => model.dept_id, new { htmlAttributes = new { @class = "form-control" } })
                @Html.ValidationMessageFor(model => model.dept_id, "", new { @class = "text-danger" })
            </div>
        </div>

        <div class="form-group">
            <div class="col-md-offset-2 col-md-10">
                <input type="submit" value="Create" class="btn btn-default" />
            </div>
        </div>
    </div>
}

<div>
    @Html.ActionLink("Back to List", "Index")
</div>

<script src="~/Scripts/jquery-1.10.2.min.js"></script>
<script src="~/Scripts/jquery.validate.min.js"></script>
<script src="~/Scripts/jquery.validate.unobtrusive.min.js"></script>
这些代码之后就完成了新建条目的操作。当用户点击页面下方的Create按钮,页面将会将用户输入的数据提交到后台控制器处理。后台处理的代码就是带有Post标签的那一段Create代码。Create方法需要三个参数:ename,empid,deptid。这三个参数传递给Create函数之后,函数ModelState.IsValid验证数据状态之后写入数据库。