mac os下面编译FFmpeg
1.下载FFmpeg
官网地址是
http://ffmpeg.org/
,然后找到mac os版本的,点击下载。
下载后进行解压。
因为FFmpeg需要用到ndk开发环境,同时还需要下载ndk安装包,安装后解压。
2.配置环境
启动终端,进入home目录
创建.bash_profile文件(touch .bash_profile)
编辑.bash_profile文件(open -e .bash_profile)
如同我们编辑android sdk开发环境一样,我们如果要编译ffmpeg,就需要配置AndroidNDK开发环境,
下载ndk的网址如下:
https://developer.android.google.cn/ndk/downloads/
我的配置后的文件如下:

关闭文件,执行 source .bash_profile命令。
这时候随便打开一个终端窗口,输入ndk-build命令来查看刚才的配置是否成功。
3.修改configure文件
因为android平台不能识别FFmpeg编译出来的动态库文件名,所以需要手动修改FFmpeg的configure文件。
用文本编辑器打开configure文件,并且找到代码
SLIBNAME_WITH_MAJOR='$(SLIBNAME).$(LIBMAJOR)'
LIB_INSTALL_EXTRA_CMD='$$(RANLIB) "$(LIBDIR)/$(LIBNAME)"'
SLIB_INSTALL_NAME='$(SLIBNAME_WITH_VERSION)'
SLIB_INSTALL_LINKS='$(SLIBNAME_WITH_MAJOR) $(SLIBNAME)'
修改为:
SLIBNAME_WITH_MAJOR='$(SLIBPREF)$(FULLNAME)-$(LIBMAJOR)$(SLIBSUF)'
LIB_INSTALL_EXTRA_CMD='$$(RANLIB) "$(LIBDIR)/$(LIBNAME)"'
SLIB_INSTALL_NAME='$(SLIBNAME_WITH_MAJOR)'
SLIB_INSTALL_LINKS='$(SLIBNAME)'
4.编写shell文件
在ffmpeg目录下面新建一个名叫build_android.sh里面的内容如下:
#!/bin/sh
NDK=/Users/preqel/AndroidStudioProjects/android-ndk-r20b/androidndk_r20b
SYSROOT=$NDK/platforms/android-21/arch-arm
NDKTOOLCHAIN=$NDK/toolchains/arm-linux-androideabi-4.9/prebuilt/darwin-x86_64
function build_one
{
  ./configure \
  --prefix=$PREFIX \
  --enable-shared \
  --disable-static \
  --disable-doc \
  --disable-ffmpeg \
  --disable-ffplay \
  --disable-ffprobe \
  --disable-ffserver \
  --disable-advevice \
  --disable-doc \
  --disable-symver \
  --cross-prefix=$TOOLCHAIN/bin/arm-linux-androideabi- \
  --target-os=linux \
  --arch=arm \
  --enable-cross-compile \
  --sysroot=$SYSROOT \
  --extra-cflags="-Os -fpic $ADDI_CFLAGS" \
  --extra-ldflags="$ADDI_LDFLAGS" \
  $ADDITIONAL_CONFIGURE_FLAG
  make clean
  make
  make install
}
CPU=arm
PREFIX=${pwd}/android/$CPU
ADDI_CFLAGS="-marm"
build_one
这一步比较难,必须要熟悉shell脚本中每个语句的意思,否则很有可能因为手敲多了一个空格,或者路径配置不对,造成编译不通过,而且排查原因也十分困难。
比如我遇到的错误有:
arm-linux-androideabi-gcc is unable an executable file C compiler test failed
这个问题困扰了我很久,起初我是认为自己的环境里面没有正确安装gcc,结果使用brew 安装了gcc环境,brew install gcc ,结果发现还是报这个错误。
反复检查脚本,确保脚本每句代码没有多余的空格,而且每个地址都是正确的。
最后发现是我的ndk版本的问题,具体问题可以参见下面这篇文章。
发现是我的ndk r20b 编译ffmpeg会有点问题,结果把ndk的版本换到了ndk r10。
最后执行编译脚本,一杯咖啡的时间后。。。。还是有信息报错,提示
error: request for member 's_addr' in something not a structure or union
         mreqs.imr_multiaddr.s_addr = ((struct sockaddr_in *)addr)->sin_addr.s_addr;
                            ^
libavformat/udp.c:292:32: error: incompatible types when assigning to type '__be32' from type 'struct in_addr'
             mreqs.imr_interface= ((struct sockaddr_in *)local_addr)->sin_addr;
                                ^
libavformat/udp.c:294:32: error: request for member 's_addr' in something not a structure or union
             mreqs.imr_interface.s_addr= INADDR_ANY;
                                ^
libavformat/udp.c:295:29: error: request for member 's_addr' in something not a structure or union
         mreqs.imr_sourceaddr.s_addr = ((struct sockaddr_in *)&sources[i])->sin_addr.s_addr;
ffmpeg的版本如果很超前,编译的时候就有各种问题。
最后解决的方法是将ffmpeg的版本由最新版本降到比较稳定的3.3.x版本,然后编译成功。
ffmpeg在mac下的编译最好选择比较稳定的ndk的版本和ffmpeg的版本,我的ndk版本是android-ndk-r10e,ffmpeg的版本是3.3.9版本。
#5.编译动态链接库
在命令行直接执行./ build_android.sh
集成ffmpeg到AndroidStudio
编译成功后,会发现在ffmpeg的文件夹下面生成了一个android_all文件夹,然后里面是armeabi-v7a文件夹,里面是include文件夹和lib文件夹,
lib文件夹
里面都是相关的so包
好了,接下来要把ffmpeg的so库集成到咱们的Android项目中去。
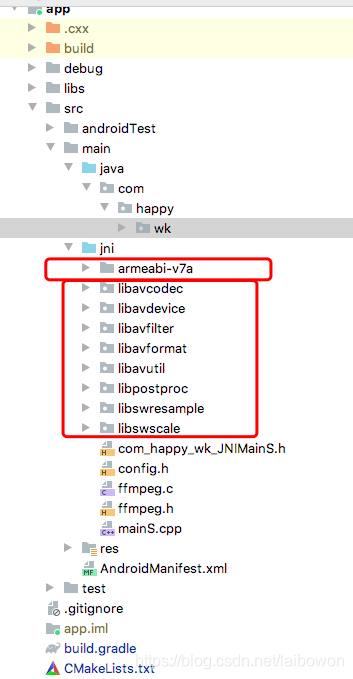
1.在
Android工程jni文件夹
(不一定是这个名字,实际以自己的目录为准)的目录下新建
armeabi-v7a文件夹,然后把lib文件夹里面的so包都拷贝进去。
2.将include里面的所有文件都拷贝到
Android工程jni文件夹
下面。
3.编写Cmakelist文件
# For more information about using CMake with Android Studio, read the
# documentation: https://d.android.com/studio/projects/add-native-code.html

# Sets the minimum version of CMake required to build the native library.

cmake_minimum_required(VERSION 3.4.1)

# Creates and names a library, sets it as either STATIC
# or SHARED, and provides the relative paths to its source code.
# You can define multiple libraries, and CMake builds them for you.
# Gradle automatically packages shared libraries with your APK.

add_library( # Sets the name of the library.
          jnilib

             # Sets the library as a shared library.
             SHARED

             # Provides a relative path to your source file(s).
        src/main/jni/mainS.cpp)

# Searches for a specified prebuilt library and stores the path as a
# variable. Because CMake includes system libraries in the search path by
# default, you only need to specify the name of the public NDK library
# you want to add. CMake verifies that the library exists before
# completing its build.

find_library( # Sets the name of the path variable.
              log-lib

              # Specifies the name of the NDK library that
              # you want CMake to locate.
              log )

# Specifies libraries CMake should link to your target library. You
# can link multiple libraries, such as libraries you define in this
# build script, prebuilt third-party libraries, or system libraries.


find_library( log-lib
        log )
#include_directories(src/main/jni/prebuilt)
message("hello")
message(${CMAKE_SOURCE_DIR})
#set(JNI_LIBS_DIR /Users/preqel/AndroidStudioProjects/gitee/MakeHappyt/app/src/main/jni)
set(JNI_LIBS_DIR ${CMAKE_SOURCE_DIR}/src/main/jni)
message(${JNI_LIBS_DIR})
add_library(avutil
        SHARED
        IMPORTED)
set_target_properties(avutil
        PROPERTIES IMPORTED_LOCATION
        ${JNI_LIBS_DIR}/${ANDROID_ABI}/libavutil.so)

add_library(swresample
        SHARED
        IMPORTED )
set_target_properties(swresample
        PROPERTIES IMPORTED_LOCATION
        ${JNI_LIBS_DIR}/${ANDROID_ABI}/libswresample.so)
message( ${JNI_LIBS_DIR} )
message(${ANDROID_ABI})
add_library(swscale
        SHARED
        IMPORTED )
set_target_properties(swscale
        PROPERTIES IMPORTED_LOCATION
        ${JNI_LIBS_DIR}/${ANDROID_ABI}/libswscale.so )

add_library(avcodec
        SHARED
        IMPORTED )
set_target_properties(avcodec
        PROPERTIES IMPORTED_LOCATION
        ${JNI_LIBS_DIR}/${ANDROID_ABI}/libavcodec.so )

add_library(avformat
        SHARED
        IMPORTED )
set_target_properties(avformat
        PROPERTIES IMPORTED_LOCATION
        ${JNI_LIBS_DIR}/${ANDROID_ABI}/libavformat.so )

add_library(avfilter
        SHARED
        IMPORTED )
set_target_properties(avfilter
        PROPERTIES IMPORTED_LOCATION
        ${JNI_LIBS_DIR}/${ANDROID_ABI}/libavfilter.so )

add_library(avdevice
        SHARED
        IMPORTED )
set_target_properties(avdevice
        PROPERTIES IMPORTED_LOCATION
        ${JNI_LIBS_DIR}/${ANDROID_ABI}/libavdevice.so )

#include_directories(src/main/jni)

target_link_libraries(
        jnilib
        avutil
        swresample
        swscale
        avcodec
        avformat
        avfilter
        avdevice
      )
这一步比较难,会遇到一些坑。我把我遇到的问题以及解决办法罗列一下。
Cannot specify link libraries for target “avutil” which is not built by this project.
确认引用路径没有问题后,反复提示这个错误,最后原因在target_link_libraries需要link的库要按照顺序进行导入,比如
add_library 的第一个c++库为jnilib,第二个引入的c++库为avutil,那么target_link_libraries需要将第一个jnilib写到最前面,否则会提示上面这个错误。
Cmake Ninja error android. “missing and no known rule to make it” although file exists
这个问题的原因是
add_library的路径有没有填写错,尽量不要写相对路径,这个问题是因为要引入的库里面某个地址路径搞错了。我的工程目录如下:
