Spring boot2.x-第05讲:监控
部分资料
引用自各路大神,具体见“99.参考资料”,
感谢各路大神的鼎力支持
!!!
1. SpringBoot整合Actuator监控中心
简介
:针对微服务器监控、服务器内存变化(堆内存,线程,日志管理等)、检测服务配置连接池是否可用(模拟访问、懒加载)、统计现有Bean(通过Spring容器)、Http接口(@RequestMapping)的一系列数据管理。可以使用HTTP的各个请求路径来监管、审计、收集引用的运行情况。
这个功能只需要在我们的
业务工程
中进行整合即可。
1.1 maven依赖
<dependency>
	<groupId>org.springframework.boot</groupId>
	<artifactId>spring-boot-starter-actuator</artifactId>
</dependency>
1.2 配置
application.properties
# ######################################################################
# 【SpringBoot Actuator监控中心配置】                                   #
# ######################################################################
# spring boot2.0后,默认的监控endpoint(端点)加了上下文路径/actuator[即spring-boot-actuator-autoconfigure.jar/org.springframework.boot.actuate.autoconfigure.endpoint.web.WebEndpointProperties类basePath属性],可通过下面的进行修改
management.endpoints.web.base-path=/shactuator
# spring boot2.0之后默认只开启了info和health(spring-boot-actuator-autoconfigure.jar/META-INF/spring-configuration-metadata.json中进行了配置)
# 这里我们开启所有端点,允许监控所有接口
management.endpoints.web.exposure.include=*
# 显示 health 端点的详细信息
management.endpoint.health.show-details=always
1.3 验证
启动服务。打印日志可以看出一共有20个端点,也可以看到我们在1.1.2配置的 端点上下文路径
org.springframework.boot.actuate.endpoint.web.EndpointLinksResolver : Exposing 20 endpoint(s) beneath base path '/shactuator'
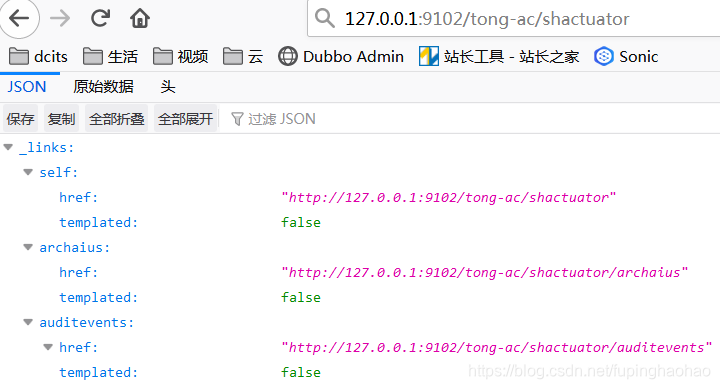
访问路径,http://127.0.0.1:9102/tong-ac/shactuator,可以看到如下端点信息:

我们点击Endpoint的ref链接,可以看到更详细的信息,我们来看一下端点health的信息

2. SpringBootAdmin初阶
简介
:Actuator监控应用只通过JSON形式返回数据统计结果,没有UI界面处理,不好看;
AdminUI则内置Actuator服务监控,并对返回JSON数据进行图形化处理展示。
SpringBootAdmin分为服务端和客户端
。
Admin Client
: 就是我们的业务工程,通过配置连接到Admin Server端;
Admin Server
: 独立于业务工程,检测到Admin Client的连接后对其进行监控。
2.1 Admin Server
2.1.1 maven依赖
<!-- 1- SpringBoot Admin Server(admin服务端) -->
<dependency>
	<groupId>de.codecentric</groupId>
    <artifactId>spring-boot-admin-starter-server</artifactId>
</dependency>
<!-- web -->
<dependency>
	<groupId>org.springframework.boot</groupId>
    <artifactId>spring-boot-starter-web</artifactId>
    <exclusions>
		<exclusion>
			<groupId>org.springframework.boot</groupId>
            <artifactId>spring-boot-starter-tomcat</artifactId>
        </exclusion>
    </exclusions>
</dependency>
<!-- jetty -->
<dependency>
	<groupId>org.springframework.boot</groupId>
	<artifactId>spring-boot-starter-jetty</artifactId>
</dependency>
【注意】
:这里我们要
剔除spring-boot-starter-web中的Tomcat,添加jetty
。
原因
:直接使用Tomcat,启动浏览器访问 http://127.0.0.1:9051 后,在页面上点击Applications会报错:
Tomcat: java.lang.IllegalStateException: Calling [asyncError()] is not valid for a request with Async state [MUST_DISPATCH]
2.1.2 配置
# 应用名
spring.application.name=tong-jea-admin-server
# 端口号
server.port=9051
# ######################################################################
# 【1- SpringBoot Admin Server 配置】                                  #
# ######################################################################
# 显示的页面标题
spring.boot.admin.ui.title=Tong Admin
# 在导航栏中显示的brand值
spring.boot.admin.ui.brand=Tong Admin
# 监控刷新时间 单位毫秒
spring.boot.admin.monitor.period=60000
2.1.3 启动类
【注意】
:这里的启动类跟我们常见的spring boot有点区别。
package cn.buddha.jea;

import de.codecentric.boot.admin.server.config.EnableAdminServer;
import lombok.extern.slf4j.Slf4j;
import org.springframework.boot.SpringApplication;
import org.springframework.boot.autoconfigure.EnableAutoConfiguration;
import org.springframework.context.annotation.Configuration;

/**
 * @ClassName JeaAdminApp
 * @Author 友野浩二
 * @Date 2019/12/12 18:26
 * @Description SpringBoot Admin Server
 * @Version 1.0
 *
 * <pre>
 *     @EnableAdminServer : 开启监控功能
 * </pre>
 */
@Configuration
@EnableAutoConfiguration
@EnableAdminServer
@Slf4j
public class JeaAdminApp {
    public static void main(String[] args) {
        SpringApplication.run(JeaAdminApp.class, args);
        log.info("<<<<======== Tong SpringBoot Admin Server Started ========>>>>");
    }
}
2.2 Admin Client
2.2.1 maven依赖
【注意】
:在《1.SpringBoot整合Actuator监控中心/1.1maven依赖》的基础上
添加
如下依赖
<!-- SpringBoot Admin client -->
<dependency>
	<groupId>de.codecentric</groupId>
	<artifactId>spring-boot-admin-starter-client</artifactId>
</dependency>
2.2.2 配置
application.properties
【注意】
:在《1.SpringBoot整合Actuator监控中心/1.2配置》的基础上
添加
如下配置
# 注册当前服务到Admin-Server服务中
spring.boot.admin.client.url=http://127.0.0.1:9051
2.3 验证
启动server和client,浏览器地址
http://127.0.0.1:9051

我们可以看到admin server监控的应用,包含了应用的状态等。我们点击 wallboard,可以看到有已注册的应用,这里我注册了两个。

我们可以随便点开一个看一下详细的监控信息

初阶结束了,我们可以看到AdminClient需要配置AdminServer的地址(spring.boot.admin.client.url=http://127.0.0.1:9051)。如果我们的工程使用了Spring Cloud,那么必然也会使用注册中心这个东西的,比如eureka。神奇的eureka,AdminServer可以通过eureka server来完成服务实例的发现。
3. SpringBootAdmin进阶
通过Eureka来完成AdminServer对于AdminClient服务实例的监控。
3.1 Admin Server
3.1.1 maven依赖
【注意】
:在《2.1 Admin Server/2.1.1maven依赖》基础上
添加
如下依赖。
<!-- admin server ui也需要的,要不然登录页面会很丑的 -->
<dependency>
	<groupId>de.codecentric</groupId>
    <artifactId>spring-boot-admin-server-ui</artifactId>
</dependency>
<!-- 2- 安全认证 -->
<dependency>
	<groupId>org.springframework.boot</groupId>
	<artifactId>spring-boot-starter-security</artifactId>
</dependency>
<!-- 3- Eureka客户端
     声明依赖位置: spring-cloud-dependencies -> spring-cloud-netflix-dependencies
-->
<dependency>
	<groupId>org.springframework.cloud</groupId>
	<artifactId>spring-cloud-starter-netflix-eureka-client</artifactId>
</dependency>
<!-- 4- 对外暴露引用的监控信息, Jolokia提供使用HTTP接口获取json -->
<dependency>
	<groupId>org.jolokia</groupId>
	<artifactId>jolokia-core</artifactId>
</dependency>
3.1.2 配置
application.properties
【注意】
:在《2.1 Admin Server/2.1.2配置》基础上
添加
如下配置。
# ######################################################################
# 【2- SpringBoot Actuator 监控中心配置】                              #
# ######################################################################
# spring boot2.0后,默认的监控endpoint(端点)加了上下文路径/actuator[即spring-boot-actuator-autoconfigure.jar/org.springframework.boot.actuate.autoconfigure.endpoint.web.WebEndpointProperties类basePath属性],可通过下面的进行修改
management.endpoints.web.base-path=/TongAdmin
# spring boot2.0之后默认只开启了info和health(spring-boot-actuator-autoconfigure.jar/META-INF/spring-configuration-metadata.json中进行了配置)
# 这里我们开启所有端点,允许监控所有接口
# 端点说明:
#   refresh(org.springframework.cloud.endpoint.RefreshEndpoint类):
#           默认情况下,Config Client分布式配置中心的客户端是不会自动感知配置的变化的。此时,可以使用/refresh端点来进行配置更新。
management.endpoints.web.exposure.include=*
# 显示 health 端点的详细信息
management.endpoint.health.show-details=always
# ######################################################################
# 【3- Eureka 配置】: Admin通过心跳机制去监听Eureka上注册的实例        #
# ######################################################################
# ==================== 【3-1 服务注册类配置】 ====================
# 设置与Eureka Server交互的地址,查询服务和注册服务都需要依赖这个地址。
# 默认地址org.springframework.cloud.netflix.eureka.EurekaClientConfigBean中有配置http://localhost:8761/eureka/
# 多个地址可使用 , 分隔
eureka.client.service-url.defaultZone=http://127.0.0.1:8000/eureka/
# 表示是否将自己注册到Eureka Server(admin server就不往eureka server上注册了)
eureka.client.register-with-eureka=false
# 表示是否从eureka server获取服务(因为admin server需要通过eureka server获取实例,所以配置为true)
eureka.client.fetch-registry=true
# ==================== 【3-2 服务实例类配置】 ====================
# 启用ip配置,在注册中心列表中呈现的方式: ip + port
eureka.instance.prefer-ip-address=true
# 实例名称,默认值为${spring.cloud.client.hostname}:${spring.application.name}:${spring.application.instance_id}:${server.port}}
# spring.cloud.client.ip-address在org.springframework.cloud.client.HostInfoEnvironmentPostProcessor类中可以查看
eureka.instance.instance-id=${spring.cloud.client.ip-address}:${server.port}
# 健康检查页面的URL,相对路径,默认使用 HTTP 访问,如需使用 HTTPS则要使用绝对路径配置,缺省:/actuator/health
eureka.instance.health-check-url-path=${management.endpoints.web.base-path}/health
# ==================== 【激活文件】 ====================
spring.profiles.active=secure
【
注意
】:配置 [eureka.client.register-with-eureka=false] ,这里我没有将Admin Server服务注册到eureka server上,只是从eureka server上获取服务实例。
application-secure.properties
# ######################################################################
# 【security 配置】                                                 #
# ######################################################################
# 安全认证,配置Admin Client登陆所需的账号密码
spring.security.user.name=shihao
spring.security.user.password=zhangtong
3.1.3 启动类
【注意】
:直接
替换
《2.1 Admin Server/2.1.3启动类》。
package cn.buddha.jea;

import de.codecentric.boot.admin.server.config.AdminServerProperties;
import de.codecentric.boot.admin.server.config.EnableAdminServer;
import lombok.extern.slf4j.Slf4j;
import org.springframework.boot.SpringApplication;
import org.springframework.boot.autoconfigure.EnableAutoConfiguration;
import org.springframework.cloud.netflix.eureka.EnableEurekaClient;
import org.springframework.context.annotation.Configuration;
import org.springframework.context.annotation.Profile;
import org.springframework.security.config.annotation.web.builders.HttpSecurity;
import org.springframework.security.config.annotation.web.configuration.WebSecurityConfigurerAdapter;
import org.springframework.security.web.authentication.SavedRequestAwareAuthenticationSuccessHandler;
import org.springframework.security.web.csrf.CookieCsrfTokenRepository;

/**
 * @ClassName JeaAdminApp
 * @Author 友野浩二
 * @Date 2019/12/12 18:26
 * @Description SpringBoot Admin Server
 * @Version 1.0
 *
 * <pre>
 *     @EnableAdminServer : 开启监控功能
 *     @EnableEurekaClient : 把 Spring Boot Admin 注册到 Eureka Server
 * </pre>
 */
@Configuration
@EnableAutoConfiguration
@EnableAdminServer
@EnableEurekaClient
@Slf4j
public class JeaAdminApp {

    public static void main(String[] args) {
        SpringApplication.run(JeaAdminApp.class, args);
        log.info("<<<<======== Tong SpringBoot Admin Server Started ========>>>>");
    }

    @Profile("secure")
    @Configuration
    public static class SecuritySecureConfig extends WebSecurityConfigurerAdapter {
        private final String adminContextPath;

        public SecuritySecureConfig(AdminServerProperties adminServerProperties) {
            this.adminContextPath = adminServerProperties.getContextPath();
        }

        @Override
        protected void configure(HttpSecurity http) throws Exception {
            // @formatter:off
            SavedRequestAwareAuthenticationSuccessHandler successHandler = new SavedRequestAwareAuthenticationSuccessHandler();
            successHandler.setTargetUrlParameter("redirectTo");
            successHandler.setDefaultTargetUrl(adminContextPath + "/");

            http.authorizeRequests()
                    .antMatchers(adminContextPath + "/assets/**").permitAll()
                    .antMatchers(adminContextPath + "/login").permitAll()
                    .anyRequest().authenticated()
                    .and()
                    .formLogin().loginPage(adminContextPath + "/login").successHandler(successHandler).and()
                    .logout().logoutUrl(adminContextPath + "/logout").and()
                    .httpBasic().and()
                    .csrf()
                    .csrfTokenRepository(CookieCsrfTokenRepository.withHttpOnlyFalse())
                    .ignoringAntMatchers(adminContextPath + "/instances", adminContextPath + "/TongAdmin/**");
            // @formatter:on
        }
    }
}
3.2 Admin Client
3.2.1 maven依赖
【注意】
:在《2.2 Admin Client/2.2.1maven依赖》基础上
添加
如下依赖。
<!-- 2- Eureka客户端
    声明依赖位置: spring-cloud-dependencies -> spring-cloud-netflix-dependencies
-->
<dependency>
	<groupId>org.springframework.cloud</groupId>
	<artifactId>spring-cloud-starter-netflix-eureka-client</artifactId>
</dependency>
3.2.2 配置
【注意】
:直接
替换
《2.2 Admin Client/2.2.2配置》。
# ######################################################################
# 【1- 基本配置】                                                      #
# ######################################################################
# 应用上下文路径(dispather servlet的监听路径,默认为: /): 访问controller的时候必须在原有访问路径之前加一个/tong
# 例如: http://127.0.0.1:9090/tong-ac/home/family
server.servlet.context-path=/tong-ac
# ==================== 【http访问端口(server配置)】 ====================
server.port=9100
# ######################################################################
# 【2- Spring 配置】                                                   #
# ######################################################################
# 应用名:在使用spring cloud时很重要,服务与服务之间的调用一般都需要依据这个name.
spring.application.name=tong-online-ac
# ######################################################################
# 【3- Eureka 配置】                                                   #
# ######################################################################
# ==================== 【3-1 服务注册类配置】 ====================
# 【注意】: 注册中心的配置需要放在bootstrap.properties中,这样才能利用注册中心从分布式配置中心Config Server服务端获取配置信息。
# 设置与Eureka Server交互的地址,查询服务和注册服务都需要依赖这个地址。
# 默认地址org.springframework.cloud.netflix.eureka.EurekaClientConfigBean中有配置http://localhost:8761/eureka/
# 多个地址可使用 , 分隔
eureka.client.service-url.defaultZone=http://127.0.0.1:8000/eureka/
# ==================== 【3-2 服务实例类配置】 ====================
# 启用ip配置,在注册中心列表中呈现的方式: ip + port
eureka.instance.prefer-ip-address=true
# 实例名称,默认值为${spring.cloud.client.hostname}:${spring.application.name}:${spring.application.instance_id}:${server.port}}
# spring.cloud.client.ip-address在org.springframework.cloud.client.HostInfoEnvironmentPostProcessor类中可以查看
eureka.instance.instance-id=${spring.cloud.client.ip-address}:${server.port}
# ######################################################################
# 【5- SpringBoot Actuator监控中心配置】                               #
# ######################################################################
# spring boot2.0后,默认的监控endpoint(端点)加了上下文路径/actuator[即spring-boot-actuator-autoconfigure.jar/org.springframework.boot.actuate.autoconfigure.endpoint.web.WebEndpointProperties类basePath属性],可通过下面的进行修改
management.endpoints.web.base-path=/shactuator
# spring boot2.0之后默认只开启了info和health(spring-boot-actuator-autoconfigure.jar/META-INF/spring-configuration-metadata.json中进行了配置)
# 这里我们开启所有端点,允许监控所有接口
# 端点说明:
#   refresh(org.springframework.cloud.endpoint.RefreshEndpoint类):
#           默认情况下,Config Client分布式配置中心的客户端是不会自动感知配置的变化的。此时,可以使用/refresh端点来进行配置更新。
management.endpoints.web.exposure.include=*
# 显示 health 端点的详细信息
management.endpoint.health.show-details=always
# ######################################################################
# 【5-2 Actuator延伸 ---> 可视化配置,SpringBoot Admin Client】         #
# ######################################################################
# 注册当前服务到AdminUI-Server服务中
#spring.boot.admin.client.url=http://127.0.0.1:9051
# 如果Admin端设置了用户名密码访问,则需要在客户端配置它们(通过用户名、密码访问敏感端口)
eureka.instance.metadata-map.user.name=shihao
eureka.instance.metadata-map.user.password=zhangtong
# 【如果项目配置有 server.servlet.context-path 属性,想要被 spring boot admin 监控,就要配置以下属性】
eureka.instance.metadata-map.management.context-path=${server.servlet.context-path}${management.endpoints.web.base-path}
# 健康检查页面URL,绝对路径(默认/actuator/health)
#eureka.instance.health-check-url=http://localhost:${server.port}/${server.servlet.context-path}${management.endpoints.web.base-path}/health
eureka.instance.health-check-url-path=${server.servlet.context-path}${management.endpoints.web.base-path}/health
# 状态页面的URL,绝对路径(默认/actuator/info)
#eureka.instance.status-page-url=http://localhost:${server.port}/${server.servlet.context-path}${management.endpoints.web.base-path}/info
eureka.instance.status-page-url-path=${server.servlet.context-path}${management.endpoints.web.base-path}/info
3.2.3 启动类
@EnableEurekaClient
@SpringBootApplication

......
3.3 验证

99. 参考
-
SpringBoot:Actuator监控中心+AdminUI界面管理
-
Spring Boot Admin 详解(Spring Boot 2.0,基于 Eureka 的实现)
-
【十一】Spring Boot之 Actuator监控(各个接口介绍)
-
解决 Spring Cloud 的服务应用配置 context-path 后 Spring Boot Admin 监控不到信息的问题
SpringBootAdmin源码地址
:
码云地址
https://gitee.com/mirrors/spring-boot-admin
GitHub地址
https://github.com/codecentric/spring-boot-admin