1.获取OpenSSH 8.0
wget https://openbsd.hk/pub/OpenBSD/OpenSSH/portable/openssh-8.0p1.tar.gz
2.安装依赖并解压
yum install openssl-devel -y
tar xvf openssh-8.0p1.tar.gz
3.编译
#删除原先ssh的配置文件和目录
rm -rf /etc/ssh/*
cd openssh-8.0p1
./configure --prefix=/usr/ --sysconfdir=/etc/ssh --with-openssl-includes=/usr/local/ssl/include --with-ssl-dir=/usr/local/ssl --with-zlib --with-md5-passwords --with-pam && make && make install
4.处理报错
没有删除 /etc/ssh/*出现以下错误
@@@@@@@@@@@@@@@@@@@@@@@@@@@@@@@@@@@@@@@@@@@@@@@@@@@@@@@@@@@
@         WARNING: UNPROTECTED PRIVATE KEY FILE!          @
@@@@@@@@@@@@@@@@@@@@@@@@@@@@@@@@@@@@@@@@@@@@@@@@@@@@@@@@@@@
Permissions 0640 for '/etc/ssh/ssh_host_rsa_key' are too open.
It is required that your private key files are NOT accessible by others.
This private key will be ignored.
Unable to load host key "/etc/ssh/ssh_host_rsa_key": bad permissions
Unable to load host key: /etc/ssh/ssh_host_rsa_key
@@@@@@@@@@@@@@@@@@@@@@@@@@@@@@@@@@@@@@@@@@@@@@@@@@@@@@@@@@@
@         WARNING: UNPROTECTED PRIVATE KEY FILE!          @
@@@@@@@@@@@@@@@@@@@@@@@@@@@@@@@@@@@@@@@@@@@@@@@@@@@@@@@@@@@
Permissions 0640 for '/etc/ssh/ssh_host_ecdsa_key' are too open.
It is required that your private key files are NOT accessible by others.
This private key will be ignored.
Unable to load host key "/etc/ssh/ssh_host_ecdsa_key": bad permissions
Unable to load host key: /etc/ssh/ssh_host_ecdsa_key
@@@@@@@@@@@@@@@@@@@@@@@@@@@@@@@@@@@@@@@@@@@@@@@@@@@@@@@@@@@
@         WARNING: UNPROTECTED PRIVATE KEY FILE!          @
@@@@@@@@@@@@@@@@@@@@@@@@@@@@@@@@@@@@@@@@@@@@@@@@@@@@@@@@@@@
Permissions 0640 for '/etc/ssh/ssh_host_ed25519_key' are too open.
It is required that your private key files are NOT accessible by others.
This private key will be ignored.
Unable to load host key "/etc/ssh/ssh_host_ed25519_key": bad permissions
Unable to load host key: /etc/ssh/ssh_host_ed25519_key
sshd: no hostkeys available -- exiting.
make: [check-config] 错误 1 (忽略)
4.1 删除对应的KEY
rm -rf /etc/ssh/ssh_host_ed25519_key /etc/ssh/ssh_host_ed25519_key.pub /etc/ssh/ssh_host_ecdsa_key /etc/ssh/ssh_host_ecdsa_key.pub /etc/ssh/ssh_host_rsa_key /etc/ssh/ssh_host_rsa_key.pub
创建新的KEY
ssh-keygen -t rsa -f /etc/ssh/ssh_host_rsa_key
ssh-keygen -t ecdsa -f /etc/ssh/ssh_host_ecdsa_key
ssh-keygen -t dsa -f /etc/ssh/ssh_host_ed25519_key
重新编译
make install
修改配置文件最终为如下内容,其他的不要动
[root@localhost ]# grep  "UseDNS"  /etc/ssh/sshd_config
UseDNS no
[root@localhost ]# grep "^PermitRootLogin"  /etc/ssh/sshd_config
PermitRootLogin yes
若有错误可注释后重启
[root@localhost ~]# systemctl status sshd
.....
8月 13 16:21:50 localhost.localdomain sshd[19652]: Server listening on :: port 22.
8月 13 16:22:12 localhost.localdomain sshd[19653]: rexec line 96: Unsupported option UsePAM
8月 13 16:22:12 localhost.localdomain sshd[19653]: rexec line 109: Deprecated option UsePrivilegeSeparation
8月 13 16:22:12 localhost.localdomain sshd[19653]: Accepted publickey for root from 10.226.123.107 port 38918 ssh2: RSA SHA256:dIqLMZ11D3zLvkJS7LpnA8i60wProsbUTyvjWP7fU2I
注释掉UsePAM和UsePrivilegeSeparation重启
[root@localhost ]# vim /etc/ssh/sshd_config
[root@localhost ]# systemctl restart sshd
5.查看版本并启动服务
#查看ssh的版本
ssh -V

#开机启动sshd
systemctl enable sshd

#重启sshd刷新配置
systemctl restart sshd
启动失败查看日志
方法1
[root@localhost ]# tail -n 100 /var/log/messages
方法2
[root@localhost ]# tail -n 100 /var/log/secure
方法3
[root@localhost ]# journalctl -xe
6.远程连接失败
[root@localhost ~]# ssh 192.168.10.17
@@@@@@@@@@@@@@@@@@@@@@@@@@@@@@@@@@@@@@@@@@@@@@@@@@@@@@@@@@@
@    WARNING: REMOTE HOST IDENTIFICATION HAS CHANGED!     @
@@@@@@@@@@@@@@@@@@@@@@@@@@@@@@@@@@@@@@@@@@@@@@@@@@@@@@@@@@@
IT IS POSSIBLE THAT SOMEONE IS DOING SOMETHING NASTY!
Someone could be eavesdropping on you right now (man-in-the-middle attack)!
It is also possible that a host key has just been changed.
The fingerprint for the ECDSA key sent by the remote host is
SHA256:a38bCmSrjtm49JHFZbPomEnAEUZ9UwgXOBAcF4vW8co.
Please contact your system administrator.
Add correct host key in /root/.ssh/known_hosts to get rid of this message.
Offending ECDSA key in /root/.ssh/known_hosts:1
ECDSA host key for 192.168.10.17 has changed and you have requested strict checking.
Host key verification failed.
[root@localhost ~]# vim /root/.ssh/known_hosts
删除/root/.ssh/known_hosts 中192.168.10.17的信息即可
7.安装telnet并开起来,防止意外导致ssh无法连接
1、检测telnet-server的rpm包是否安装:
rpm -qa telnet-server
如没有输出就要安装,安装命令:
yum install telnet-server
2、检测xinetd 的rpm包是否安装:
rpm -qa xinetd
如没有输出就要安装,安装命令:
yum install xinetd
安装完成后,将xinetd服务和telnet加入开机自启动:
systemctl enable xinetd.service
systemctl enable telnet.socket
由于telnet服务也是由xinetd守护的,所以安装完telnet-server,要启动telnet服务就必须重新启动xinetd
systemctl start telnet.socket
systemctl start xinetd
默认情况下,系统是不允许root用户telnet远程登录的。如果要使用root用户直接登录,需设置如下内容
echo  'pts/0'  >>/etc/securetty
echo 'pts/1' >>/etc/securetty
以上命令需要root权限才能执行,最后才重启服务
重启服务:service xinetd restart
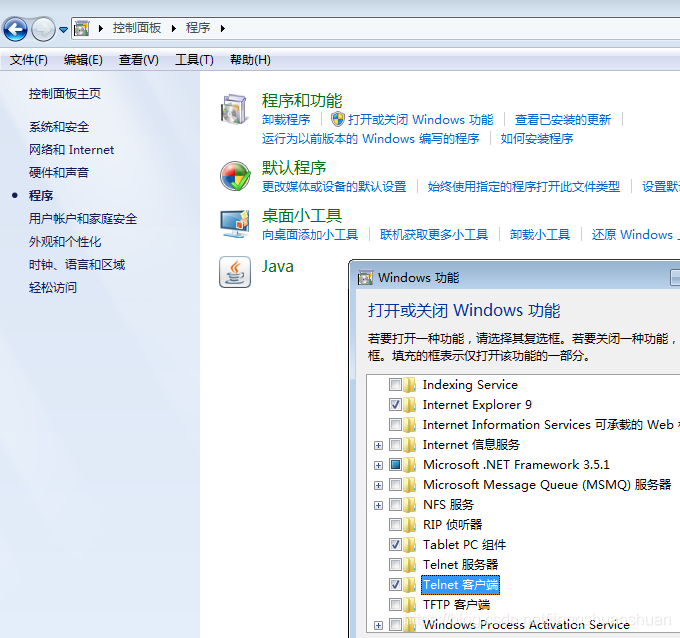
而且还开通相对应的23端口,接下来在你计算机上打开telnet客户端:

然后测试打开cmd.exe看看能不能登录,telnet+IP,回车
版权声明:本文为jiangshuanshuan原创文章,遵循 CC 4.0 BY-SA 版权协议,转载请附上原文出处链接和本声明。