Yolov4-tiny pth模型转换成onnx
trt加载推理代码 提取码:ou91
载入模型并完成转换
def pth2onnx(pth_model,input,model_name):
    torch.onnx.export(pth_model,                           # 需要转换的模型
                    input,                                 # 模型的输入
                    "model_data/%s.onnx" % model_name,     # 保存位置
                    export_params=True,                    # 是否在模型中保存训练过的参数
                    opset_version=11,                      # ONNX版本
                    input_names=['input'],

                    )

    # 转化为可以再netro查看每步尺寸的模型
    onnx.save(onnx.shape_inference.infer_shapes(onnx.load("model_data/%s.onnx" % model_name)), "model_data/%s.onnx" % model_name)
    print('%s.pth convert to onnx is done' % model_name)

    batch_size = 1
    model_name = 'Digital_large_crop'
    class_path = '../data/%s/classes.txt' % model_name
    model_path = 'model_data/%s.pth' % model_name

    yolo = YoloBody(anchors_mask=[[3,4,5],[1,2,3]],num_classes=11, phi = 0)
    yolo.load_state_dict(torch.load('model_data/%s.pth'%model_name))
    x = torch.ones(batch_size, 3, 416, 416, requires_grad=False)
    # out1,out2 = yolo(x)

    pth2onnx(yolo,x,model_name)
模型可视化
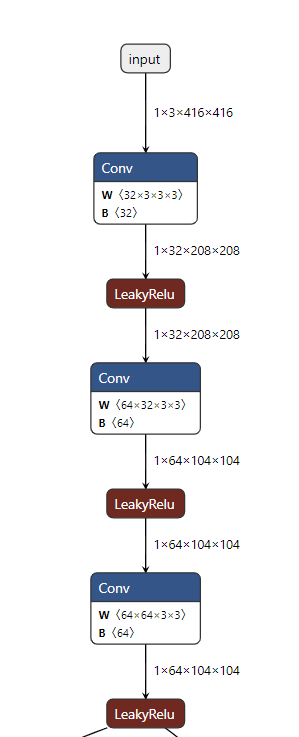
在网站 https://netron.app/ 中加载生成的onnx模型,便可以看到整个网络结构。

载入onnx模型
加载onnx模型,对比pth模型推理的结果是否正确。
def compare_pth_onnx(model_name):
    session = onnxruntime.InferenceSession('model_data/%s.onnx' %model_name)
    yolo = YoloBody(anchors_mask=[[3,4,5],[1,2,3]],num_classes=11, phi = 0)
    yolo.load_state_dict(torch.load('model_data/%s.pth'%model_name))
    yolo.evel()
    img = Image.open('../data/Digital_crop/JPEGImages/1.jpg')
    image_data  = resize_image(img, (416,416), False)
    #---------------------------------------------------------#
    #   添加上batch_size维度
    #---------------------------------------------------------#
    image_data  = np.expand_dims(np.transpose(preprocess_input(np.array(image_data, dtype='float32')), (2, 0, 1)), 0)

    pth_out = yolo(torch.from_numpy(image_data))
    onnx_out = session.run([], {"input": image_data})

    print(torch.max(torch.abs(pth_out[0]-torch.from_numpy(onnx_out[0]))))


发现推理结果基本吻合,查看模型权重是否一样。


发现第一个第一个卷积层的BN权重并不相同,查找原因。
查阅官方文档可以看到在训练/评估模式中,Dropout,BatchNorm等操作会有不同的参数值。
发现是因为导出时Conv层和Bn层整合到了一起,torch.onnx.export 时添加参数 training=2,可以将conv和bn 分开显示。


这时我们可以看到,参数是对应上了的。那之前的参数是怎么来的呢?参考文章 https://zhuanlan.zhihu.com/p/353697121 通过公式融合参数:

结果与前图对应上了。至此验证pth转换onnx成功。
onnx转trt
首先配置好环境可以参考我之前的文章 https://blog.csdn.net/weixin_44241884/article/details/122084953
locate trtexec
# 找到转换程序的路径
/yourtrtexecpath/trtexec --onnx=youmodelname.onnx --saveEngine=yourmodelname.trt


[01/11/2022-15:34:10] [I] Average on 10 runs - GPU latency: 0.771057 ms - Host latency: 0.976514 ms (end to end 1.41353 ms, enqueue 0.361804 ms)
[01/11/2022-15:34:10] [I] Average on 10 runs - GPU latency: 0.788892 ms - Host latency: 1.04755 ms (end to end 1.46624 ms, enqueue 0.568628 ms)
[01/11/2022-15:34:10] [I] Average on 10 runs - GPU latency: 0.768213 ms - Host latency: 0.977173 ms (end to end 1.40577 ms, enqueue 0.404419 ms)
[01/11/2022-15:34:10] [I] Host Latency
[01/11/2022-15:34:10] [I] min: 0.946533 ms (end to end 0.971191 ms)
[01/11/2022-15:34:10] [I] max: 3.65527 ms (end to end 4.02917 ms)
[01/11/2022-15:34:10] [I] mean: 0.983374 ms (end to end 1.39919 ms)
[01/11/2022-15:34:10] [I] median: 0.972412 ms (end to end 1.39661 ms)
[01/11/2022-15:34:10] [I] percentile: 1.11963 ms at 99% (end to end 1.52612 ms at 99%)
[01/11/2022-15:34:10] [I] throughput: 0 qps
[01/11/2022-15:34:10] [I] walltime: 3.00267 s
[01/11/2022-15:34:10] [I] Enqueue Time
[01/11/2022-15:34:10] [I] min: 0.267456 ms
[01/11/2022-15:34:10] [I] max: 3.63794 ms
[01/11/2022-15:34:10] [I] median: 0.374756 ms
[01/11/2022-15:34:10] [I] GPU Compute
[01/11/2022-15:34:10] [I] min: 0.74646 ms
[01/11/2022-15:34:10] [I] max: 3.43762 ms
[01/11/2022-15:34:10] [I] mean: 0.767578 ms
[01/11/2022-15:34:10] [I] median: 0.764893 ms
[01/11/2022-15:34:10] [I] percentile: 0.811005 ms at 99%
[01/11/2022-15:34:10] [I] total compute time: 2.97513 s
至此转换成功,后续通过python或者c++读取trt文件推理,还需学习了解。
TensorRT推理Python实现
参考官方文档:https://github.com/NVIDIA/TensorRT/blob/main/quickstart/SemanticSegmentation/tutorial-runtime.ipynb
import numpy as np
import os
import torch
import pycuda.driver as cuda
import pycuda.autoinit
import tensorrt as trt

import matplotlib.pyplot as plt
from PIL import Image

TRT_LOGGER = trt.Logger()

def preprocess_input(image):
    image /= 255.0
    return image

def resize_image(image, size, letterbox_image):
    iw, ih  = image.size
    w, h    = size
    if letterbox_image:
        scale   = min(w/iw, h/ih)
        nw      = int(iw*scale)
        nh      = int(ih*scale)

        image   = image.resize((nw,nh), Image.BICUBIC)
        new_image = Image.new('RGB', size, (128,128,128))
        new_image.paste(image, ((w-nw)//2, (h-nh)//2))
    else:
        new_image = image.resize((w, h), Image.BICUBIC)
    return new_image


def load_engine(engine_file_path):
    assert os.path.exists(engine_file_path)
    print("Reading engine from file {}".format(engine_file_path))
    with open(engine_file_path, "rb") as f, trt.Runtime(TRT_LOGGER) as runtime:
        return runtime.deserialize_cuda_engine(f.read())


if __name__ == '__main__':
    img = Image.open('../data/Digital_crop/JPEGImages/1.jpg')
    image_data = resize_image(img, (416, 416), False)
    # ---------------------------------------------------------#
    #   添加上batch_size维度
    # ---------------------------------------------------------#
    image_data = np.expand_dims(np.transpose(preprocess_input(np.array(image_data, dtype='float32')), (2, 0, 1)), 0)
    input_image = image_data
    engine = load_engine('model_data/Digital_large_crop.trt')

    with engine.create_execution_context() as context:
        # Set input shape based on image dimensions for inference
        context.set_binding_shape(engine.get_binding_index("input.1"), (1, 3, 416, 416))
        # Allocate host and device buffers
        bindings, output_memory, output_buffer = [], [], []

        for binding in engine:
            binding_idx = engine.get_binding_index(binding)
            size = trt.volume(context.get_binding_shape(binding_idx))
            dtype = trt.nptype(engine.get_binding_dtype(binding))
            if engine.binding_is_input(binding):
                input_buffer = np.ascontiguousarray(input_image)
                input_memory = cuda.mem_alloc(input_image.nbytes)
                bindings.append(int(input_memory))
            else:
                output_buffer.append(cuda.pagelocked_empty(size, dtype))
                output_memory.append(cuda.mem_alloc(output_buffer[-1].nbytes))
                bindings.append(int(output_memory[-1]))

        stream = cuda.Stream()
        # Transfer input data to the GPU.
        cuda.memcpy_htod_async(input_memory, input_buffer, stream)
        # Run inference
        context.execute_async_v2(bindings=bindings, stream_handle=stream.handle)
        # Transfer prediction output from the GPU.
        for i in range(len(output_buffer)):
            cuda.memcpy_dtoh_async(output_buffer[i], output_memory[i], stream)
        output_buffer[0]=output_buffer[0].reshape(1,48,13,13)
        output_buffer[1]=output_buffer[1].reshape(1,48,26,26)
        # Synchronize the stream
        stream.synchronize()
        print(output_buffer)


推理结果却大相径庭,原因待查。
经过后处理后,发现结果是正确的,不需要考虑其得出的推理张量是否一致。

左边为pth推理结果,右边为trt推理结果,置信度略有不同,个别框也有些区别。但是推理速度pth反而比trt快一些,原因待查。


下一步学习在C++环境下实现trt推理。