gcc、g++编译器
apt-get install gcc
apt-get install g++
apt-get install build-essential
apt-get install libtool
Nginx的安装和部署
准备
PCRE库
- PCRE(Perl Compatible Regular Expressions):perl语言兼容正则表达式。PCRE是一个用C语言编写的正则表达式函数库。PCRE是一个轻量级的函数库,比Boost之中的正则表达式库小得多。PCRE十分易用,同时功能也很强大,性能超过了POSIX正则表达式库和一些经典的正则表达式库
- PCRE(Perl Compatible Regular Expressions):perl语言兼容正则表达式。PCRE是一个用C语言编写的正则表达式函数库。PCRE是一个轻量级的函数库,比Boost之中的正则表达式库小得多。PCRE十分易用,同时功能也很强大,性能超过了POSIX正则表达式库和一些经典的正则表达式库
- PCRE被广泛使用在许多开源软件之中,最著名的莫过于Apache HTTP服务器和PHP脚本语言、R脚本语言,此外,正如从其名字所能看到的,PCRE也是perl语言的缺省正则库
- PCRE是用C语言实现的,其C++实现版本叫PCRE++
wget https://sourceforge.net/projects/pcre/files/pcre/8.44/pcre-8.44.tar.gz
tar -zxvf pcre-8.44.tar.gz
cd pcre-8.44/
./configure
make
make install
zlib库
- zlib 适用于数据压缩的函式库,由Jean-loup Gailly (负责compression)和 Mark Adler (负责decompression)开发。
- zlib被设计成一个免费的、通用的、法律上不受阻碍(即没有被任何专利覆盖) 的无损数据压缩库。zlib几乎适用于任何计算器硬件和操作系统。
- zlib本身的数据格式可以进行跨平台的移植。 与在Unix上适用的LZW压缩方法 以及 GIF 图像压缩不同, zlib中适用的压缩方法从不对数据进行拓展。(LZW在极端情况下会导致文件大小变为原来的两倍、甚至三倍)。zlib的内存占用也是独立于输入数据的,并且在必要的情况下可以适当减少部分内存占用。
wget https://nchc.dl.sourceforge.net/project/libpng/zlib/1.2.11/zlib-1.2.11.tar.gz
tar -zxvf zlib-1.2.11.tar.gz
cd zlib-1.2.11/
./configure
make
make install
OpenSSL开发库
- 在计算机网络上,OpenSSL是一个开放源代码的软件库包,应用程序可以使用这个包来进行安全通信,避免窃听,同时确认另一端连接者的身份。这个包广泛被应用在互联网的网页服务器上。
wget https://www.openssl.org/source/openssl-1.1.1g.tar.gz
tar -zxvf openssl-1.1.1g.tar.gz
cd openssl-1.1.1g/
./config
make
make install
Nginx的安装和启动
编译和安装
wget http://nginx.org/download/nginx-1.16.1.tar.gz
tar -zxvf nginx-1.16.1.tar.gz
cd nginx-1.16.1/
./configure --with-http_ssl_module
make
make install


//./configure --prefix=/usr/local/nginx --with-http_stub_status_module --with-http_ssl_module --with-http_realip_module --with-http_v2_module --with-openssl=../openssl-1.1.1g
启动和关闭
默认情况下,Nginx被安装在目录/usr/local/nginx中
$ cd /usr/local/nginx/
$ ls
conf  html  logs  sbin
其中,nginx的配置文件是conf/nginx.conf,bin文件位于sbin目录下的nginx
1)
默认方式启动nginx服务器
/usr/local/nginx/sbin/nginx
这时,会自动读取配置文件:/usr/local/nginx/conf/nginx.conf
2)
查看nginx进程
ps -ef | grep nginx/
root       93540    1384  0 08:40 ?        00:00:00 nginx: master process /usr/local/nginx/sbin/nginx
root       97295    2911  0 08:41 pts/0    00:00:00 grep --color=auto nginx/
可以看到,nginx的主进程已经启动(nginx: master process)
打开浏览器访问此机器的IP,如果浏览器出现 Welcome to nginx! 则表示 Nginx 已经安装并运⾏成功

3)
指定配置⽂件启动服务器
$ /usr/local/nginx/sbin/nginx -c /usr/local/nginx/conf/nginx.conf
4)
)测试配置信息
$ /usr/local/nginx/sbin/nginx -t
nginx: the configuration file /usr/local/nginx/conf/nginx.conf syntax is ok
nginx: configuration file /usr/local/nginx/conf/nginx.conf test is successful
FastDFS 安装与配置
版本:
- libfastcommon 1.0.50
- fastdfs 6.0.7
中文地址:
https://gitee.com/fastdfs100
安装libfastcommon
libfastcommon是一款开源的C基础库,是从FastDFS项目中剥离出来的C基础库
git clone https://gitee.com/fastdfs100/libfastcommon
cd libfastcommon
git checkout V1.0.50
./make.sh
./make.sh install
注意版本一定要切换到V1.0.50,否则安装 FastDFS时可能出现莫名其妙的错误
安装 FastDFS
git clone https://gitee.com/fastdfs100/fastdfs.git
cd fastdfs
git checkout V6.07
./make.sh
./make.sh install
配置Tracker
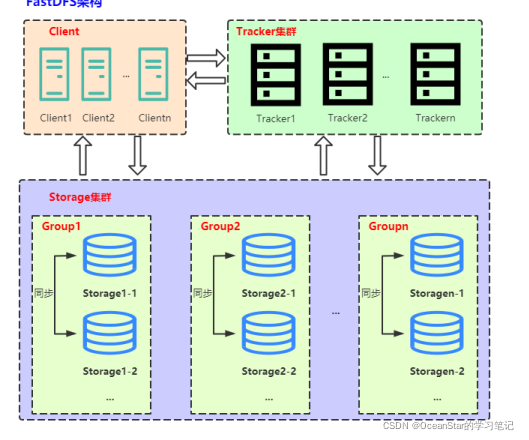
- Tracker是FastDFS的协调者,负责管理所有的storage server和group
- 每个storage在启动后会连接Tracker,告知⾃⼰所属的group等信息,并保持周期性的⼼跳,tracker根据storage的⼼跳信息,建⽴group==>[storage server list]的映射表。
# 创建Tracker的存储日志和数据的根目录
mkdir -p /home/fastdfs/tracker
cd /etc/fdf
cp tracker.conf.sample tracker.conf
# 配置tracker.conf
gedit tracker.conf
在这里,tracker.conf只是修改一下tracker存储日志和数据的路径
# 启⽤配置⽂件(默认为 false,表示启⽤配置⽂件)
disabled=false
# Tracker 服务端⼝(默认为 22122)
port=22122
# 存储⽇志和数据的根⽬录
base_path=/home/fastdfs/tracker
主要修改base_path路径。
配置storage
- Storage server(后简称storage)以组(卷,group或volume)为单位组织,⼀个group内包含多台storage机器,数据互为备份
- group内每个storage的存储依赖于本地⽂件系统,storage可配置多个数据存储⽬录,⽐如有10块磁盘,分别挂载在/data/disk1-/data/disk10,则可将这10个⽬录都配置为storage的数据存储⽬录。
# 创建 Storage 的存储⽇志和数据的根⽬录
mkdir -p /home/fastdfs/storage
cd /etc/fdfs
cp storage.conf.sample storage.conf
# 配置 storage.conf
gedit  storage.conf
在这⾥,storage.conf 只是修改⼀下 storage 存储⽇志和数据的路径
# 启⽤配置⽂件(默认为 false,表示启⽤配置⽂件)
disabled = false
# Storage服务端口,默认为23000
port = 23000
# 数据和日志文件存储根目录
base_path = /home/fastdfs/storage
# store_path1 则为 M01,以此递增到 M99(如果配置了多个存储⽬录的话,这⾥只指定 1 个)
store_path0=/home/fastdfs/storage
# Tracker 服务器 IP 地址和端⼝,单机搭建时也不要写 127.0.0.1
# tracker_server 可以多次出现,如果有多个,则配置多个
tracker_server=192.168.0.59:22122  #192.168.0.59为本机IP地址
# 设置 HTTP 访问⽂件的端⼝。这个配置已经不⽤配置了,配置了也没什么⽤
# 这也是为何 Storage 服务器需要 Nginx 来提供 HTTP 访问的原因
http.server_port=8888
主要修改:base_path、store_path0、tracker_server
启动 Tracker 和 Storage 服务
启动服务
# 启动 Tracker 服务
# 其它操作则把 start 改为 stop、restart、reload、status 即可。Storage 服务相同
/etc/init.d/fdfs_trackerd start
# 启动 Storage 服务
/etc/init.d/fdfs_storaged start
可以通过对应服务的端⼝查看服务是否正常启动
$ lsof -i:22122
COMMAND      PID USER   FD   TYPE  DEVICE SIZE/OFF NODE NAME
fdfs_trac 132006 root    5u  IPv4 1862830      0t0  TCP *:22122 (LISTEN)
$ lsof -i:23000
COMMAND      PID USER   FD   TYPE  DEVICE SIZE/OFF NODE NAME
fdfs_stor 131914 root    5u  IPv4 1860968      0t0  TCP *:23000 (LISTEN)
可以通过 fdfs_monitor 查看集群的情况
# 查看 Storage 是否已经注册到 Tracker 服务器中
# 当查看到 ip_addr = 192.168.0.59: (localhost.localdomain) ACTIVE
# ACTIVE 表示成功
/usr/bin/fdfs_monitor /etc/fdfs/storage.conf

查看⽇志
tracker:
- tail -f /home/fastdfs/tracker/logs/trackerd.log
storage:
- tail -f /home/fastdfs/storage/logs/storaged.log
上传文件测试
1)修改配置
# 修改 Tracker 服务器客户端配置⽂件
mkdir -p /home/fastdfs/client
cp /etc/fdfs/client.conf.sample /etc/fdfs/client.conf
gedit /etc/fdfs/client.conf
client.conf 中修改 base_path 和 Tracker 服务器的 IP 地址与端⼝号即可
# 存储⽇志⽂件的基本路径
base_path=/home/fastdfs/client
# Tracker 服务器 IP 地址与端⼝号
tracker_server=192.168.0.59:22122
主要修改base_path和tracker_server
2)开始上传
# 存储到FastDFS服务器中
# 格式:  /usr/bin/fdfs_upload_file 配置⽂件 要上传的⽂件
$ /usr/bin/fdfs_upload_file /etc/fdfs/client.conf ./client.conf
group1/M00/00/00/wKgAO2IgGsaAepcnAAAHdc51W4U54.conf
返回了文件ID号group1/M00/00/00/wKgAO2IgGsaAepcnAAAHdc51W4U54.conf,表示上传成功
进入目录/home/fastdfs/storage/data/00/00,可以看到wKgAO2IgGsaAepcnAAAHdc51W4U54.conf就是我们刚刚上传的文件
$ cd  /home/fastdfs/storage/data/00/00
$ ls
wKgAO2IgGsaAepcnAAAHdc51W4U54.conf
下载文件测试
- 下载文件
$ fdfs_download_file /etc/fdfs/client.conf  group1/M00/00/00/wKgAO2IgGsaAepcnAAAHdc51W4U54.conf
$ ls
wKgAO2IgGsaAepcnAAAHdc51W4U54.conf
- 删除文件
$ fdfs_delete_file /etc/fdfs/client.conf group1/M00/00/00/wKgAO2IgGsaAepcnAAAHdc51W4U54.conf
进入目录/home/fastdfs/storage/data/00/00,可以看到wKgAO2IgGsaAepcnAAAHdc51W4U54.conf这个目录没有了
到目前为止,我们已经 完成了FastDFS的安装和测试,可以使用api来完成文件的上传、同步和下载。
接下来,我们还会安装nginx,目的如下:
- Storage安装nginx:提供http的访问和下载服务,同时解决group中storage服务器的同步延迟问题
- Tracker安装nginx:提供http访问的反向代理、负载均衡、缓存服务
fastdfs-nginx-module安装
备份原来的nginx
为了避免端口冲突,建议备份原来的nginx服务
$ cd /usr/local
$ /usr/local/nginx/sbin/nginx -s stop
$ mv nginx bk-nginx-20220223
安装
注意:在安装之前,先
确保之前fastDFS的tracker、storage、client可以正常使用(服务必须已经开启)
,否则上传/下载文件时会出现:
ERROR - file: connection_pool.c, line: 140, connect to server 192.168.0.59:22122 fail, errno: 111, error info: Connection refused
下载fastdfs-nginx-module
$ git clone https://github.com/happyfish100/fastdfs-nginx-module.git
$ cd fastdfs-nginx-module
$ ls
HISTORY  INSTALL  LICENSE  src
$ git checkout V1.22
$ pwd
/home/oceanstar/workspace/fastdfs-nginx-module/src
cd fastdfs-nginx-module可以看到里面有个INSTALL和src目录,这个不需要make而是需要重新编译一些storage的nginx模块
重新编译nginx
1)
添加FastDFS模块
$ cd nginx-1.16.1  # 进入之前下载的nginx源目录
$ ./configure --add-module=/home/oceanstar/workspace/fastdfs-nginx-module/src  #是在编译Nginx时候,连同刚刚下载的fastdfs-nginx-module模块⼀起编译
编译时, 出现以下信息表示添加成功

2)
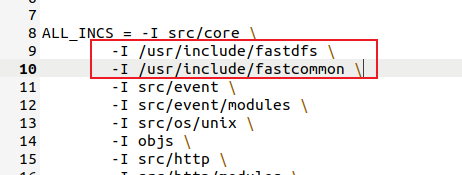
给 nginx ⽬录下的 objs/Makefile ⽂件中增加头⽂件⽬录
gedit objs/Makefile
添加
ALL_INCS = -I src/core \
-I /usr/include/fastdfs \
-I /usr/include/fastcommon \
-I src/event \
-I src/event/modules \
3)
重新编译并安装nginx
make
make install
配置fastdfs-nginx-module
拷贝配置文件
1)
拷⻉fastdfs-nginx-module配置⽂件
$ cd /home/oceanstar/workspace/fastdfs-nginx-module/src/
$ ls
common.c  common.h  config  mod_fastdfs.conf  ngx_http_fastdfs_module.c
$ cp mod_fastdfs.conf /etc/fdfs/
2)
拷⻉fastdfs/conf 配置⽂件
$ cd /home/oceanstar/workspace/fastdfs/conf
$ cp http.conf /etc/fdfs/
$ cp mime.types /etc/fdfs/
修改配置文件
$ mkdir -p /home/fastdfs/mod_fastdfs
$ gedit  /etc/fdfs/mod_fastdfs.conf
修改base_path 、tracker_server、url_have_group_name、store_path0。
#保存⽇志⽬录
base_path =/home/fastdfs/mod_fastdfs
# Tracker 服务器IP和端⼝修改,确保跟storage.conf⼀致即可
tracker_server=192.168.0.59:22122
# url 中是否包含 group 名称,改为 true,包含 group
url_have_group_name = true
# store_path0的路径必须和storage.conf的配置⼀致
store_path0=/home/fastdfs/storage
# 其它的⼀般默认即可,例如
group_name=group1
storage_server_port=23000
store_path_count=1
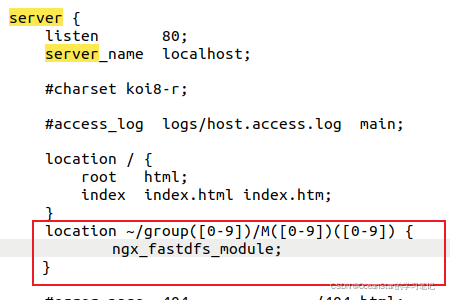
配置nginx
gedit /usr/local/nginx/conf/nginx.conf
配置为⽀持 group0-group9,以及 M00-M99,以便于以后扩容
location ~/group([0-9])/M([0-9])([0-9]) {
	ngx_fastdfs_module;
}
启动nginx
/usr/local/nginx/sbin/nginx
测试环境
服务器中测试上传
$ touch 0voice.txt
$ echo "You are not strong, no one brave for you" > 0voice.txt
$ fdfs_upload_file /etc/fdfs/client.conf 0voice.txt
group1/M00/00/00/wKgAO2IgJzeANR9sAAAAKTIQHvk110.txt
浏览器中输入: http://192.168.0.59:80/group1/M00/00/00/wKgAO2IgJzeANR9sAAAAKTIQHvk110.txt

协议格式
协议
FastDFS采用二进制TCP通信协议。一个数据包由包头(header)和包体(body)组成。包头只有10个字节,格式如下:
- pkg_len:8字节整数,body长度,不包含header,只是body的长度
- cmd:1字节整数,命令码
- status:1字节整数,状态码,0表示成功,非0失败(unix错误码)
tracker\tracker_proto.h TrackerHeader
typede fstruct
{
   char pkg_len[FDFS_PROTO_PKG_LEN_SIZE]; // body⻓度,不包括header
   char cmd;   //command 命令
   char status; //status code for response 响应的状态码
} TrackerHeader;
即是头部固定10字节,body⻓度通过pkg_len给出。
即是⼀帧完整的协议为 TrackerHeader + body数据(可以为0).
数据包中的类型说明:
- 整数类型采用网络字节序(Big-Endian),包括4字节整数和8字节整数
- 1字节整数不存在字节序问题,在java中直接映射为byte类型,在C/C++中为char类型
- 固定长度的字符串类型以ASCII码0结尾,对于Java等语言语⾔需要调⽤trim处理返回的字符串。变⻓字符串的⻓度可以直接拿到或者根据包⻓度计算出来,不以ASCII 0结尾。
下⾯将列举client发送给FastDFS server的命令码及其body(包体)结构。
公共命令码
-
FDFS_PROTO_CMD_ACTIVE_TEST:激活测试,通常⽤于检测连接是否有效。客户端使⽤连接池的情况下,建⽴连接后发送⼀次active test即可和server端保持⻓连接。
- 请求body:⽆
- 响应body:⽆
发送给tracker server的命令码
-
TRACKER_PROTO_CMD_SERVER_LIST_ONE_GROUP:查看⼀个group状态
-
请求body:
- @group_name:16字节字符串,组名
-
响应body:
-
@
group_name
:17字节字符串 -
@
total_mb
:8字节整数,磁盘空间总量,单位MB -
@
free_mb
:8字节整数,磁盘剩余空间,单位MB -
@
trunk_free_mb
:8字节整数,trunk⽂件剩余空间,单位MB(合并存储开启时有效) -
@
server_count
:8字节整数,storage server数量 -
@
storage_port
:8字节整数,storage server端⼝号 -
@
storage_http_port
:8字节整数,storage server上的HTTP端⼝号 -
@
active_count
:8字节整数,当前活着的storage server数量 -
@
current_write_server
:8字节整数,当前写⼊的storage server顺序号 -
@
store_path_count
:8字节整数,storage server存储路径数 -
@
subdir_count_per_path
:8字节整数,存储路径下的⼦⽬录数(FastDFS采⽤两级⼦⽬录),如 256 -
@
current_trunk_file_id
:8字节整数,当前使⽤的trunk⽂件ID(合并存储开启时有效)
-
@
-
请求body:
⽂件上传
client\fdfs_test1.c
- FDFS_UPLOAD_BY_FILE: storage_upload_by_filename1
- FDFS_UPLOAD_BY_BUFF:storage_upload_by_filebuff1
- FDFS_UPLOAD_BY_CALLBACK: storage_upload_by_callback1

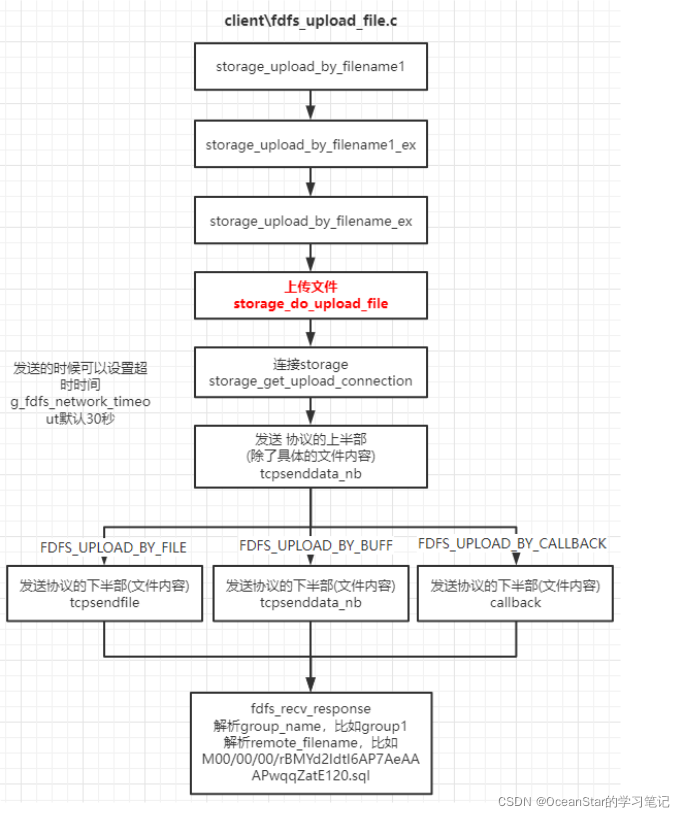
⽂件上传函数层次接⼝
#define storage_upload_by_filename1(pTrackerServer, // tracker server的地
址信息
   pStorageServer, // storage server的地址信息
   store_path_index, // 具体path,⽐如0、1 对应配置⽂件的store_path0、
store_path1
   local_filename, // 要上传的⽂件名
   file_ext_name, // ⽂件类型,⽐如txt、jpg
   meta_list, //⽐如 "width"  "160" 参考:client\fdfs_test1.c 201⾏
   meta_count, // meta_list列表的元素个数
   group_name, // 所属的group名
   file_id) // 上传成功后返回file_id
实际上传调⽤的函数
storage_upload_by_filename1_ex(pTrackerServer, pStorageServer, \
   store_path_index,
   STORAGE_PROTO_CMD_UPLOAD_FILE, \ // 服务器响应的命令
   local_filename, file_ext_name, meta_list, meta_count, \
   group_name, file_id)

继续往下调⽤
int storage_upload_by_filename_ex(ConnectionInfo *pTrackerServer, \
 ConnectionInfo *pStorageServer, const int store_path_index, \
 const char cmd, const char *local_filename, \
 const char *file_ext_name, const FDFSMetaData *meta_list, \
 const int meta_count, char *group_name, char *remote_filename)


在继续
storage_do_upload_file(pTrackerServer, pStorageServer, \
 store_path_index, cmd, \
 FDFS_UPLOAD_BY_FILE, // 以⽂件的⽅式上传内容,还有FDFS_UPLOAD_BY_BUFF以内存的
载体⽅式上传
 local_filename, \ // 作为⽂件名或者 内存数据的起始地址
 NULL, // arg
 stat_buf.st_size, // file_size
 NULL, // master_filename
 NULL, // prefix_name
 file_ext_name, \ // file_ext_name
 meta_list,
 meta_count, group_name,
 remote_filename // file_id
 )
调试
对应命令:
/usr/bin/fdfs_upload_file /etc/fdfs/client.conf /etc/fdfs/client.conf
怎么调试:
(1) gdb启动上传⽂件程序:
gdb /usr/bin/fdfs_upload_file
(2) 设置参数:
set args /etc/fdfs/client.conf /etc/fdfs/client.conf
(3) 在main函数打断点:
b main
(4) 在上传函数断点:
b storage_do_upload_file
(5) 开始运行:
r

(6) 令程序进行执行,其会在下一个断点处停止: c

⽂件下载
client\fdfs_test1.c client\fdfs_download_file.c
- FDFS_DOWNLOAD_TO_FILE:storage_do_download_file1_ex
- FDFS_DOWNLOAD_TO_BUFF:storage_download_file1
- FDFS_DOWNLOAD_TO_CALLBACK:storage_download_file_ex

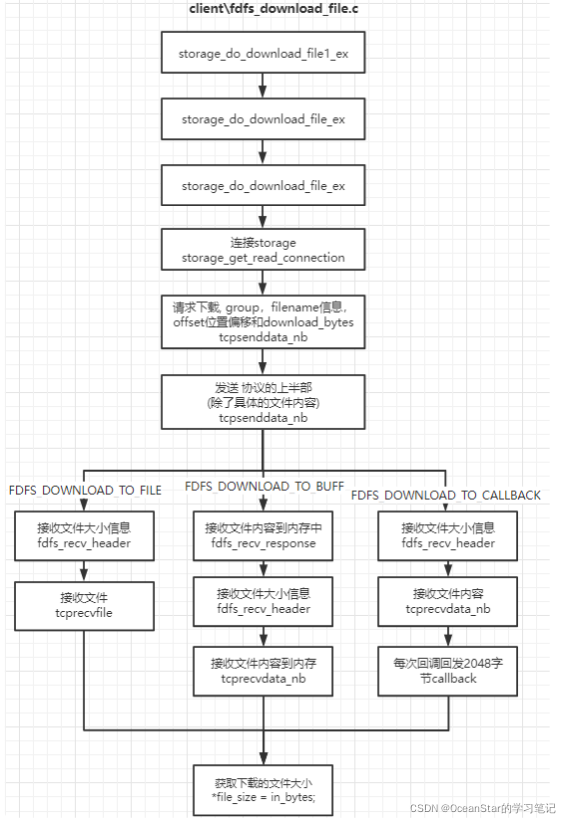
对应命令:
fdfs_download_file /etc/fdfs/client.conf group1/M00/00/00/wKgAO2IgGsaAepcnAAAHdc51W4U54.conf
怎么调试:
(1) gdb启动上传⽂件程序:
gdb /usr/bin/fdfs_download_file
(2) 设置参数:
set args /etc/fdfs/client.conf group1/M00/00/00/wKgAO2InXbSAF9vpAAAHdc51W4U06.conf
(3) 打断点:
b main
b storage_do_download_file1_ex
(4) 开始运行:
r
断点续传
对应命令:
- 准备
echo hello > test1.txt
echo world > test2.txt
- 上传第一部分
fdfs_upload_appender /etc/fdfs/client.conf test1.txt
得到:group1/M00/00/00/rBMYd2Id2FmEay2-AAAAADY6MCA286.txt ,在fdfs_append_file的时候需要
- 上传第二部分
fdfs_append_file /etc/fdfs/client.conf group1/M00/00/00/rBMYd2Id2FmEay2-AAAAADY6MCA286.txt test2.txt
- 在服务器相应的⽬录下查找对应的⽂件,⽤cat读取⽂件内容。
root@iZbp1h2l856zgoegc8rvnhZ:/home/fastdfs/storage/data/00/00# cat
rBMYd2Id2FmEay2-AAAAADY6MCA286.txt
hello
world
可以看出,断点续传文件分为两个阶段:
-
fdfs_upload_appender 上传第⼀部分⽂件,以
STORAGE_PROTO_CMD_UPLOAD_APPENDER_FILE
命令 -
fdfs_append_file 上传其他部分的⽂件,以
STORAGE_PROTO_CMD_APPEND_FILE
命令
需要注意:
- 注意断点续传的顺序性
- fastdfs支持断点续传,但是不支持多线程分片上传同一个文件
网络IO模型
对应配置项
# accept thread count
# default value is 1 which is recommended
# since V4.07
accept_threads = 1
# work thread count
# work threads to deal network io
# default value is 4
# since V2.00
work_threads = 4
# if disk read / write separated
## false for mixed read and write
## true for separated read and write
# default value is true
# since V2.00
disk_rw_separated = true
# disk reader thread count per store path
# for mixed read / write, this parameter can be 0
# default value is 1
# since V2.00
disk_reader_threads = 1
# disk writer thread count per store path
# for mixed read / write, this parameter can be 0
# default value is 1
# since V2.00
disk_writer_threads = 1
线程初始化
默认:
g_accept_threads 1
g_work_threads 4
g_disk_reader_threads默认1
g_disk_writer_threads 1
⽂件操作线程: 根据读写线程数量,path数量确定 ⽂件操作线程数量
threads_count_per_path = g_disk_reader_threads + g_disk_writer_threads;
context_count = threads_count_per_path * g_fdfs_store_paths.count;
| 文件名 | 作用 | 初始化函数 | 工作线程 |
|---|---|---|---|
| storage\storage_service.c | ⽹络IO任务处理 | storage_service_init | work_thread_entrance |
| storage\storage_service.c | accept线程 | storage_accept_loop | accept_thread_entrance |
| storage\storage_dio.c | ⽂件操作相关初始化 | storage_dio_init | dio_thread_entrance |
队列:
- storage_dio_queue ⽂件处理队列
- task_queue 任务对象池队列
管道:
- thread_data.pipe_fds[2]:IO⼯作线程的触发
- storage_nio_notify 触发取读取⽹络io数据
accept_thread_entrance:
- 本身是一个线程
-
调用accept获取新的连接:
incomesock = accept(server_sock, (struct sockaddr*)&inaddr, &sockaddr_len);
-
获取对方IP地址:
client_addr = getPeerIpaddr(incomesock, szClientIp, IP_ADDRESS_SIZE);
-
从对象池取⼀个task对象:
pTask = free_queue_pop()
-
task对象里面有client的封装信息,需要设置:
-
pTask->event.fd = incomesock
-
pClientInfo = (StorageClientInfo
*
)pTask->arg;
-
pClientInfo->stage = FDFS_STORAGE_STAGE_NIO_INIT;
-
轮询线程:
pClientInfo->nio_thread_index = pTask->event.fd % g_work_threads;`
-
通知IO线程有新的连接:
write(pThreadData->thread_data.pipe_fds[1], &task_addr, sizeof(task_addr)) != sizeof(task_addr)
-
work_thread_entrance:
- 本身是一个线程
-
核⼼调⽤
ioevent_loop(&pThreadData->thread_data, storage_recv_notify_read, task_finish_clean_up, &g_continue_flag);
-
storage_recv_notify_read
当数据可读时触发
-
-
进⼊到ioevent_loop核⼼:
-
实际是调⽤epoll_wait:
pThreadData->ev_puller.iterator.count = ioevent_poll(&pThreadData->ev_puller);
返回可处理事件 -
循环处理事件:deal_ioevents
-
调⽤
storage_recv_notify_read
-
调⽤
-
实际是调⽤epoll_wait:
⽂件IO线程dio_thread_entrance:
- 本身是一个线程
- 任务由storage_dio_queue_push 投递
- 从blocked_queue_pop读取任务
- 通过回调写⼊⽂件dio_write_file 或者 读取⽂件dio_read_file
(gdb) b storage_dio.c:748Breakpoint 1 at 0x55c62441f084: file storage_dio.c, line 748.
(gdb) b client_sock_read
Breakpoint 2 at 0x55c62441e852: file storage_nio.c, line 245.
(gdb) b client_sock_write
Breakpoint 3 at 0x55c62441eb80: file storage_nio.c, line 434.
(gdb) b storage_recv_notify_read
Breakpoint 4 at 0x55c62441ee7f: file storage_nio.c, line 121.
(gdb) b dio_write_file
Breakpoint 5 at 0x55c62441fa46: file storage_dio.c, line 405.
(gdb) b storage_nio_notify
Breakpoint 6 at 0x55c62440adf1: file storage_service.c, line 1918.
(gdb) b storage_upload_file_done_callback
Breakpoint 7 at 0x55c624416da4: file storage_service.c, line 1131.
框架
核⼼函数:
- accept_thread_entrance accept线程⼊⼝
- work_thread_entrance nio线程⼊⼝
- dio_thread_entrance 数据处理线程⼊⼝
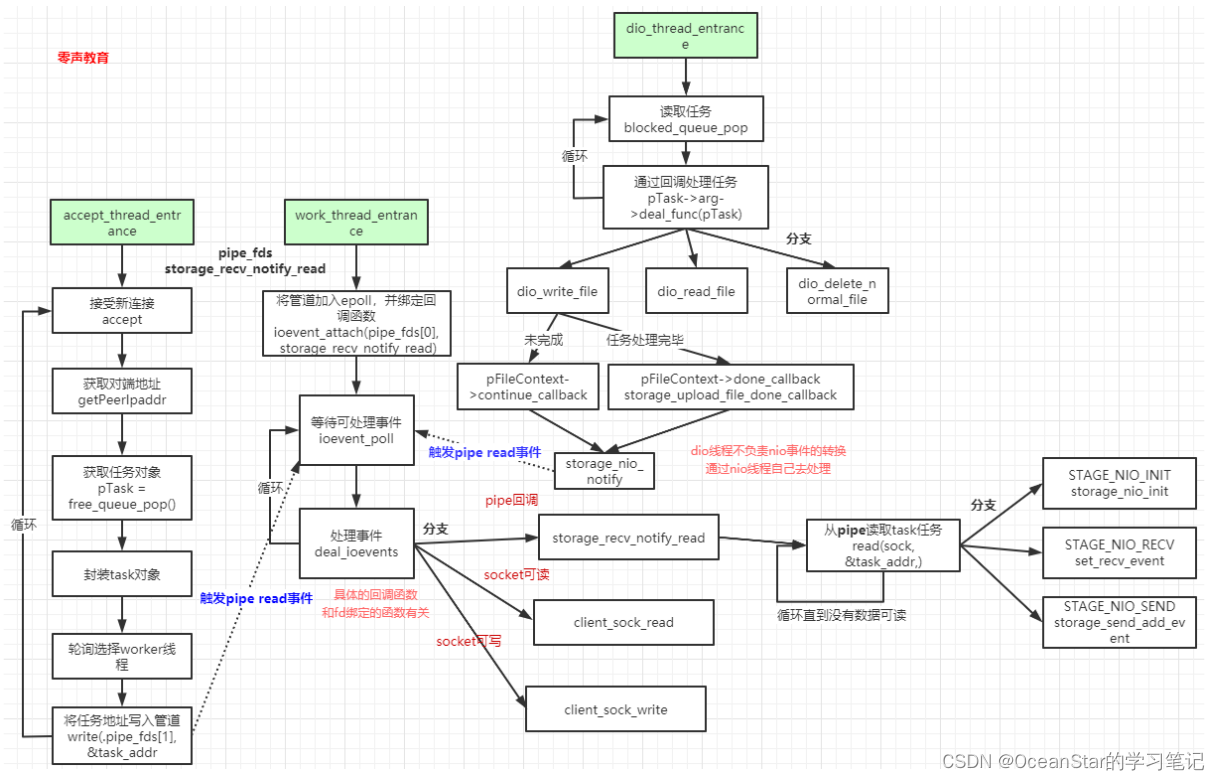
dio线程不会直接给nio线程设置各种读写事件,⽽是通过FDFS_STORAGE_STAGE_NIO_INIT、FDFS_STORAGE_STAGE_NIO_RECV、FDFS_STORAGE_STAGE_NIO_SEND、FDFS_STORAGE_STAGE_NIO_CLOSE、FDFS_STORAGE_STAGE_DIO_THREAD等状态 + 通过pipe通知nio线程响应storage_recv_notify_read进⾏io事件的处理。
数据流程
