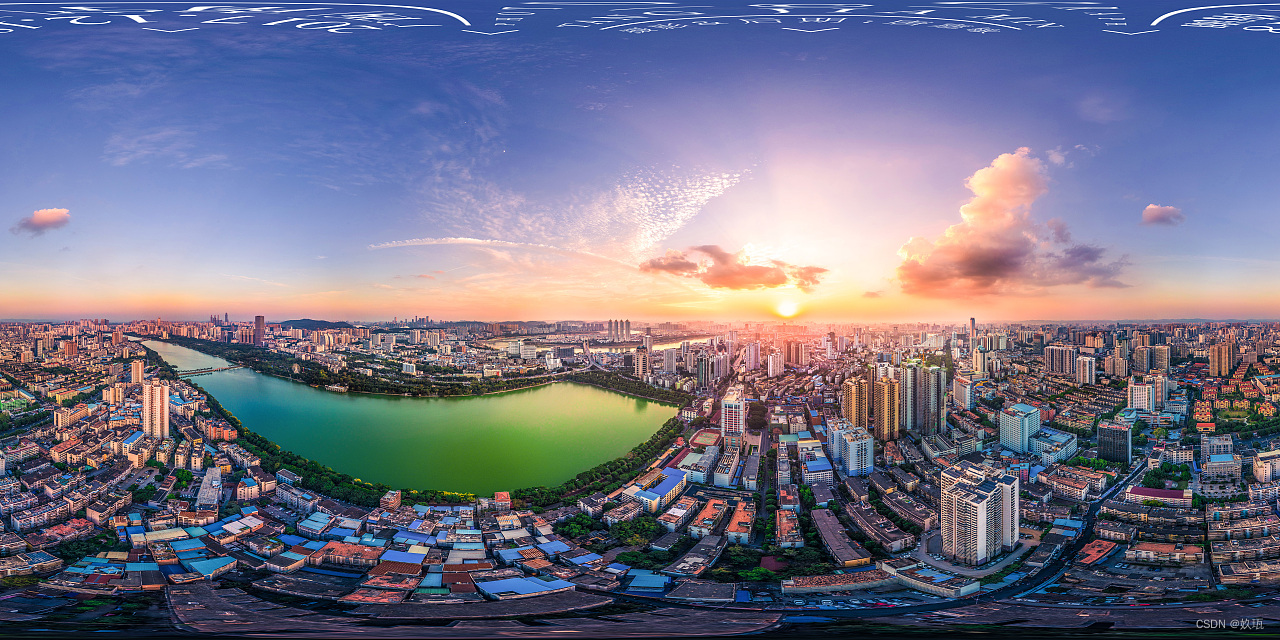
Photo Sphere Viewer是一款基于Three.js的360X180度全景图预览js插件。该js插件可以360度旋转查看全景图,也可以上下180度查看图片。使用该插件的唯一要求是浏览器支持canvas或WebGL。

这只是一个简单的全景图,我们还可以在全景图上面不同位置添加标注,修改、删除标注等操作。
一、插件引入
1、npm 安装
npm install photo-sphere-viewer
2、直接导入
<link rel="stylesheet" href="https://cdn.jsdelivr.net/npm/photo-sphere-viewer@4/dist/photo-sphere-viewer.min.css"/>
<script src="https://cdn.jsdelivr.net/npm/three/build/three.min.js"></script>
<script src="https://cdn.jsdelivr.net/npm/uevent@2/browser.min.js"></script>
<script src="https://cdn.jsdelivr.net/npm/photo-sphere-viewer@4/dist/photo-sphere-viewer.min.js"></script>
但是在此处,个人建议使用 npm 进行安装。
二、全景图的基本使用
1、插件引入
import { Viewer } from 'photo-sphere-viewer' // 引入插件
import 'photo-sphere-viewer/dist/photo-sphere-viewer.css' //引入CSS样式
2、创建容器
<div id="viewer"></div>
3、正式使用
// 全景视图
let panoramaViewer = null
// 全景图初始化
const initViewer = async function () {
  panoramaViewer = new Viewer({
    container: document.querySelector('#viewer'), // 容器
    panorama: img, // 全景图片地址
    navbar: [
      'autorotate',
      'zoom',
      'caption',
      'fullscreen'
    ],
    plugins: [], // 标记点
    size: {
      width: '100%',
      height: '100%'
    }
  })
}

onBeforeMount(() => {
  initViewer()
})
4、多张全景图切换使用
在切换使用其他全景图之前,首先要注意销毁之前的全景图,然后在重新初始化新的全景图。
panoramaViewer.destroy() // 销毁全景图
三、全景图标注的使用
1、插件引入
import * as Marker from 'photo-sphere-viewer/dist/plugins/markers' // 引入插件
import 'photo-sphere-viewer/dist/plugins/markers.css' // 引入标注样式
2、基本使用
// 全景视图
let panoramaViewer = null
// 全景图初始化
const initViewer = async function () {
  // panoramaViewer.destroy()
  panoramaViewer = new Viewer({
    container: document.querySelector('#viewer'),
    panorama: img, // 全景图片地址
    navbar: [
      'autorotate',
      'zoom',
      'caption',
      'fullscreen'
    ],
    // 标记点
    plugins: [
      [Marker, {
        markers: [
          {
            id: '1',
            imageLayer: img,
            width: 120,
            height: 94,
            longitude: -0.22188456912854737,
            latitude: 6.1139406999543375,
            tooltip: 'test-1',
            content: '<div class="tooltip-content"><h3>test-1</h3><p>描述描述描述</p></div>'
          }
        ]
      }]
    ],
    size: {
      width: '100%',
      height: '100%'
    }
  })
}

onBeforeMount(() => {
  initViewer()
})
3、标注比较高级使用
// 全景视图
let panoramaViewer = null
// 注标列表
const markerList = ref([])

// 全景图初始化
const initViewer = async function () {
  panoramaViewer = new Viewer({
    container: document.querySelector('#viewer'),
    panorama: img, // 全景图片地址
    navbar: [
      'autorotate',
      'zoom',
      'caption',
      'fullscreen'
    ],
    // 标记点
    plugins: [
      [Marker.MarkersPlugin]
    ],
    size: {
      width: '100%',
      height: '100%'
    }
  })
  markersPlugin = panoramaViewer.getPlugin(Marker.MarkersPlugin)
  readyEvents()
}

onBeforeMount(() => {
  initViewer()
})

// 全景图加载完毕
const readyEvents = function () {
  // 加载完毕
  panoramaViewer.once('ready', () => {
    // 初始化标注坐标
    initMarkers()
  })
  // 全景图点击事件
  panoramaViewer.on('click', (e, data) => {
    // console.log(`${data.rightclick ? 'right ' : ''}clicked at longitude: ${data.longitude} latitude: ${data.latitude}`)
  })
  // 选中标注事件
  markersPlugin.on('select-marker', (e, marker) => {
    // console.log('选中标注事件')
  })
}

// 初始化标注坐标
const initMarkers = async function () {
  markersPlugin.clearMarkers()
  markerList.value.forEach(markerItem => {
    const { latitude, longitude, markerId, title, style } = markerItem
    markersPlugin.addMarker({
      longitude: longitude,
      latitude: latitude,
      width: 20,
      height: 20,
      id: markerId,
      data: markerItem
    })
  })
}
四、Photo-Sphere-Viewer常用的属性
panorama:必填参数,全景图的路径。
container:必填参数,放置全景图的div元素。
autoload:可选,默认值为true,true为自动调用全景图,false为在后面加载全景图(通过.load()方法)。
us empdata:可选,默认值为true,如果Photo Sphere Viewer必须读入XMP数据则为true。
default_position:可选,默认值为{},定义默认的位置,及用户看见的第一个点,例如:{long: Math.PI, lat: Math.PI/2}。
min_fov:可选,默认值为30,观察的最小区域,单位degrees,在1-179之间。
max_fov:可选,默认值为90,观察的最大区域,单位degrees,在1-179之间。
allow_user_interactions:可选,默认值为true,设置为false则禁止用户和全景图交互(导航条不可用)。
tilt_up_max:可选,默认值为Math.PI/2,向上倾斜的最大角度,单位radians。
tilt_down_max:可选,默认值为Math.PI/2,向下倾斜的最大角度,单位radians。
zoom_level:可选,默认值为0,默认的缩放级别,值在0-100之间。
long_offset:可选,默认值为 Math.PI/360,mouse/touch移动时每像素经过的经度值。
lat_offset:可选,默认值为 Math.PI/180,mouse/touch移动时每像素经过的纬度值。
time_anim:可选,默认值为2000,全景图在time_anim毫秒后会自动进行动画。(设置为false禁用它)
theta_offset:过时的选项,可选,默认值为1440,自动动画时水平方向的速度。
anim_speed:可选,默认值为2rpm,动画的速度,每秒/分钟多少radians/degrees/revolutions。
navbar:可选值,默认为false。显示导航条。
navbar_style:可选值,默认为{}。导航条的自定义样式。下面是可用的样式列表:
backgroundColor:导航条的背景颜色,默认值为rgba(61, 61, 61, 0.5)。
buttonsColor:按钮的前景颜色,默认值为transparent。
activeButtonsBackgroundColor:按钮激活状态的背景颜色,默认值为rgba(255, 255, 255, 0.1)。
buttonsHeight:按钮的高度,单位像素,默认值为20。
autorotateThickness:autorotate图标的厚度,单位像素,默认值为1。
zoomRangeWidth:缩放的范围,单位显示,默认值50。
zoomRangeThickness:缩放的范围的厚度,单位像素,默认值1。
zoomRangeDisk:缩放范围的圆盘直径,单位像素,默认值为7。
fullscreenRatio:全屏图标的比例,默认值为3/4。
fullscreenThickness:全屏图标的厚度,单位像素,默认值为2。
loading_msg:可选,默认值为Loading…,图片加载时的提示文字。
loading_img:可选,默认值为null,在加载时显示的图片的路径。
size:可选,默认值null,全景图容器的最终尺寸。例如:{width: 500, height: 300}。
onready:可选值,默认值为null。当全景图准备就绪并且第一张图片显示时的回调函数。
五、参考文章
photo-sphere-viewe 官网:https://photo-sphere-viewer.js.org/
vue + photo-sphere-viewer 渲染全景图片:https://blog.csdn.net/qq_32051663/article/details/120955999
photo-sphere-viewer 中文文档:https://blog.csdn.net/weixin_42752574/article/details/122243459
版权声明:本文为weixin_46243213原创文章,遵循 CC 4.0 BY-SA 版权协议,转载请附上原文出处链接和本声明。