Cacti+Nagios完全攻略(一)cacti与rrdtool安装部署
Cacti与rrdtool简介
一、概述
Linux下用的最多的是MRTG的性能监视,MRTG配置比较简单,MRTG的确是非常好的东东,但我认为它毕竟已经是一套很旧的软件了,其作者在多年前就已经开发了RRDTool代替该软件,现在已经发展得很成熟。既然有更好的选择,为什么我们还要用MRTG呢?
简单的说,rrdtool就是一个强大的绘图的引擎,很多语言都可以调用rrdtool绘图。
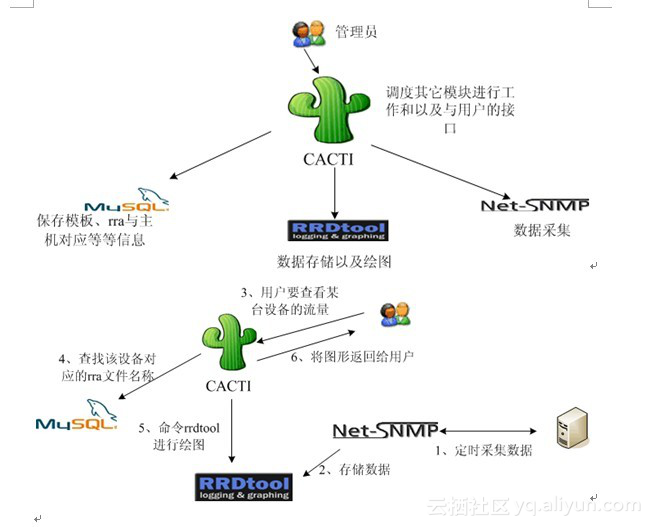
整个系统的架构是这样的:
基于SNMP协议,被监控端是服务器,或一些网络设备,
网络管理工作站,采用Linux(或Freebsd)操作系统,并且安装Net-SNMP工具,使用RRDTOOL采集数据,存储数据,并用Cacti调用rrdtool显示出来。
CACTI采用PHP编写,基于B/S结构。
二、介绍
MRTG的优点:简单、易上手,基本安装完了之后只要更改一下配置文件即可。
缺点:
1、使用文本式的数据库,数据不能重复使用;
2、只能按日、周、月、年来查看数据;
3、只能画两个DS(一条线、一个块);
4、每取一次数据即需要绘图一次,浪费系统资源;
5、无管理功能;
rrdtool的优点:
1、使用rrd存储格式,数据能重复使用,比如我可以将一个rrd文件中的数据与另一个rrd文件中的数据相加。
2、可以定义任意时间段画图,即你可以画出一张半年以来的数据的图,也可以画出一张半小时以来的图。
3、能画任意个DS。
4、CDEF让你能任意摆弄数据。
缺点:
1、rrdtool的作用只是存储数据和画图,它没有mrtg中集成的数据采集功能;
2、在命令行的使用非常复杂,参数极多。
3、无管理功能。
简单的说,rrdtool就是一个强大的绘图的引擎。
由于其非常复杂的命令,对用户非常不友好,我一度想自己用php写一套系统。幸运的是,半年前我找到了cacti(www.cacti.net)。对该工具我只有一个字形容:“great!”。
cacti 其实是一套php程序,它运用snmpget采集数据,使用rrdtool绘图。它的界面非常漂亮,能让你根本无需明白rrdtool的参数能轻易的绘出漂亮的图形。更难能可贵的是,它提供了强大的数据管理和用户管理功能,一张图是属于一个host的,每一个host又可以挂载到一个树状的结构上。用户的管理上,作为一个开源软件,它居然做到为指定一个用户能查看的“树”、host、甚至每一张图,还可以与LDAP结合进行用户的验证!我不由得佩服作者考虑的周到!Cacti还提供自己增加模板的功能,让你添加自己的snmp_query和script!可以说,cacti将rrdtool的所有“缺点” 都补足了!
cacti 安装环境:
操作系统:CentOS 7.3
安装方式:全新安装并以文本方式与自定义安装软件
内核版本:
2.6.18-194.el5
Apache:
httpd-2.2.3-43.el5.centos.3
PHP:
php-5.1.6-27.el5_5.3
Mysql:
mysql-5.0.77-4.el5_5.4
Net-snmp:
net-snmp-5.3.2.2-9.el5_5.1
RRDtool:
rrdtool-1.2.30-1.el5.wrl
Cacti:
cacti-0.8.7g.tar.gz
Cacti架构图:
数据实现层
apache php
——————————————————————–
数据存储层
mysql rrdtool
——————————————————————–
数据采集层
net-snmp script
——————————————————————–
Cacti工作原理图:
全新linux系统安装
以文本方式并自定义安装软件
……………………省略…………………….
去掉所有打勾
然后把红色标记移到
development tools
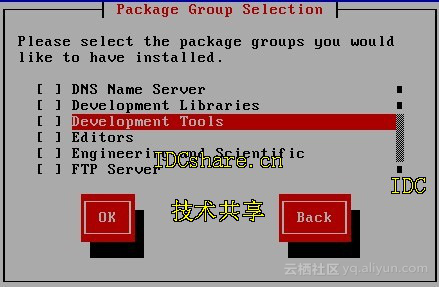
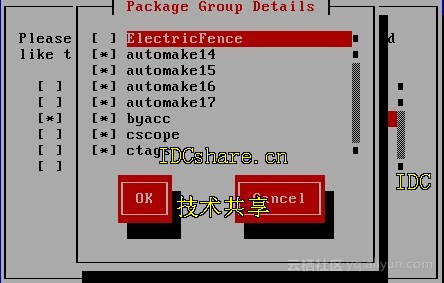
接下来按F2,跳出详细菜单
选择OK就行了,
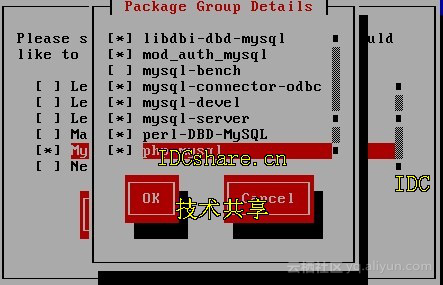
同样步骤把红色标记移到MySQL Database,按F2.除了默认打勾还要把以下三个一起打勾
Mod_auth_mysql mysql-devel php-mysql
接下来同样步骤选择
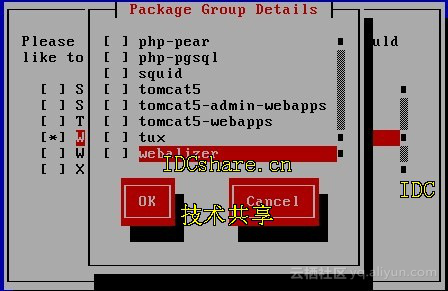
web server
,去掉默认
squid tux webalizer
的安装
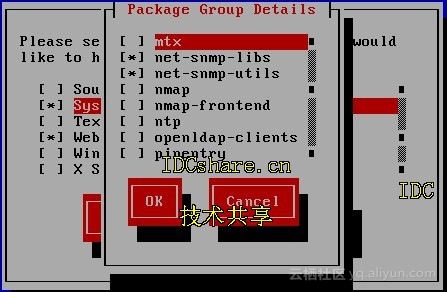
接下来选择system tools ,然后按回车,再选中它按F2,去掉所有默认安装
只留Net-snmp-libs 与net-snmp-utils连个打上勾
安装完后重启
选择firewall configuration,禁用selinux
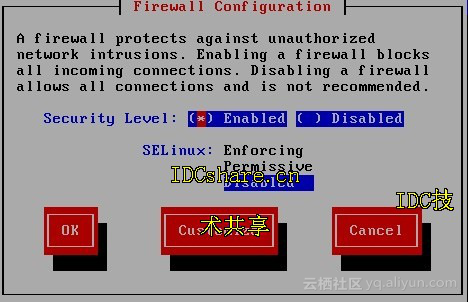
开放http-80端口


启动结束进入系统
=====================================================================
(大家也可以通过把yum源更换到光盘或centos资源库,具体可以参考我另外一篇bolg。
http://viong.blog.51cto.com/844766/278402
先yum mysql apache php
yum -y install mysql mysql-server php-mysql httpd php
再yum需要用到的包
yum -y install php-pdo lm_sensors net-snmp php-snmp net-snmp-utils perl-Net-Daemon perl-PlRPC perl-DBI perl-DBD-MySQL
=====================================================================
设置 mysql Apache snmp 开机自动启动
[root@localhost soft]# chkconfig mysqld on
[root@localhost soft]# chkconfig httpd on
[root@localhost soft]# chkconfig snmpd on
[root@localhost soft]# service mysqld start
[root@localhost soft]# service httpd start
[root@localhost soft]# service snmpd start
PHP配置(默认已都激活)
激活PHP扩展
/
etc/php.ini
Extension_dir=”usr/lib/php/modules”
激活mysql扩展
/etc/php.d/mysql.ini
Extension=mysql.so
Apache配置(默认已支持)
配置支持PHP:/etc/httpd/conf.d/php.conf
LoadModule php5_module modules/libphp5.so
AddHandler php5-script .php
AddType text/html .php
DirectoryIndex index.php
Mysql配置
为mysql数据库root账号设置密码
[root@localhost soft]#
mysqladmin –user=root password 000000
[root@localhost soft]#
mysqladmin –user=root –password reload
Enter password:
输入刚设置密码,检验是否正确
Rrdtool安装
[root@localhost soft]# rpm -ivh rrdtool-perl-1.2.30-1.el5.wrl.i386.rpm
rrdtool-1.2.30-1.el5.wrl.i386.rpm rrdtool-devel-1.2.30-1.el5.wrl.i386.rpm
Preparing… ########################################### [100%]
1:rrdtool ########################################### [ 33%]
2:rrdtool-perl ########################################### [ 67%]
3:rrdtool-devel ########################################### [100%]
Cacti安装
[root@localhost soft]# wget http://www.cacti.net/downloads/cacti-0.8.7g.tar.gz
[root@localhost soft]# tar -zxvf cacti-0.8.7g.tar.gz
[root@localhost soft]# mv cacti-0.8.7g /var/www/html/cacti
[root@localhost soft]# chown -R root.root /var/www/html/cacti
修改cacti文件目录的拥有者
在mysql建立cacti数据库环境
[root@localhost soft]# mysql -uroot -h127.0.0.1 -p
Enter password:
mysql> create database cacti;
Query OK, 1 row affected (0.00 sec)
mysql> grant all on cacti.* to
root
@localhost identified by ‘000000’;
Query OK, 0 rows affected (0.00 sec)
mysql> flush privileges;
Query OK, 0 rows affected (0.00 sec)
mysql> quit
Bye
[root@localhost soft]# cd /var/www/html/cacti/
到cacti根目录下把cacti.sql中的数据导入到数据库cacti中
[root@localhost cacti]# mysql -uroot -p000000 cacti<cacti.sql
配置mysql连接参数
[root@localhost cacti]# vi /var/www/html/cacti/include/config.php
/* make sure these values refect your actual database/host/user/password */
$database_type = “mysql”;
$database_default = “cacti”;
$database_hostname = “localhost”;
$database_username = ”
root
“;
$database_password = “000000”;
$database_port = “3306”;
[root@localhost cacti]# vi /var/www/html/cacti/include/global.php
/* Default database settings*/
$database_type = “mysql”;
$database_default = “cacti”;
$database_hostname = “localhost”;
$database_username = ”
root
“;
$database_password = “000000”;
$database_port = “3306”;
cacti-plugins插件安装
[root@localhost soft]# tar -zxvf cacti-plugin-0.8.7g-PA-v2.8.tar.gz
[root@localhost soft]# cd cacti-plugin-arch/
[root@localhost cacti-plugin-arch]# ll
total 172
-rw-r–r– 1 1000 users 122631 Jul 10 2010 cacti-plugin-0.8.7g-PA-v2.8.diff
drwxr-xr-x 6 1000 users 4096 Jul 10 2010 files-0.8.7g
-rw-r–r– 1 1000 users 15240 Jun 9 2010 LICENSE
-rw-r–r– 1 1000 users 1971 Jun 9 2010 pa.sql
-rw-r–r– 1 1000 users 1218 Jun 9 2010 README
[root@localhost cacti-plugin-arch]# cp cacti-plugin-0.8.7g-PA-v2.8.diff /var/www/html/cacti/
[root@localhost cacti-plugin-arch]# cp pa.sql /var/www/html/cacti/
[root@localhost cacti-plugin-arch]# cd /var/www/html/cacti/
[root@localhost cacti]# patch -p1 -N <cacti-plugin-0.8.7g-PA-v2.8.diff
[root@localhost cacti]# mysql -uroot -p000000 cacti<pa.sql
[root@localhost cacti]# vi include/global.php
修改一下参数
$config[‘url_path’] = ‘/cacti/’;
保存退出
建立任务调度
[root@localhost cacti]# crontab -e
输入以下内容,代表每5分钟来执行后面PHP解析内容,把显示信息重定向到空的路径
*/5 * * * * php /var/www/html/cacti/poller.php > /dev/null 2>&1
[root@localhost cacti]# crontab -l
*/5 * * * * php /var/www/html/cacti/poller.php > /dev/null 2>&1
也可手工跑一次:/usr/bin/php /var/www/html/cacti/poller.php
Cacti的web初始化
在浏览器输入
http://192.168.181.11/cacti/
登陆cacti
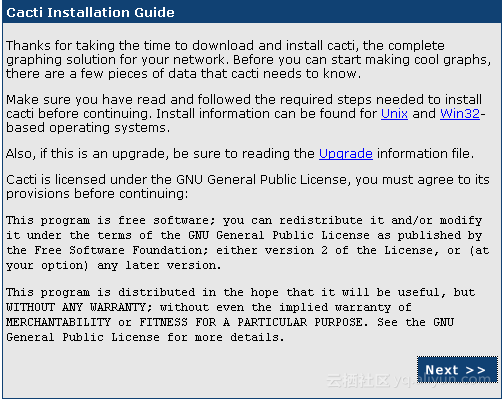
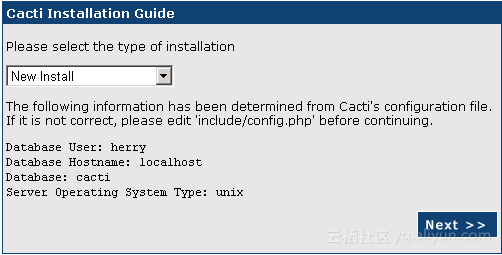
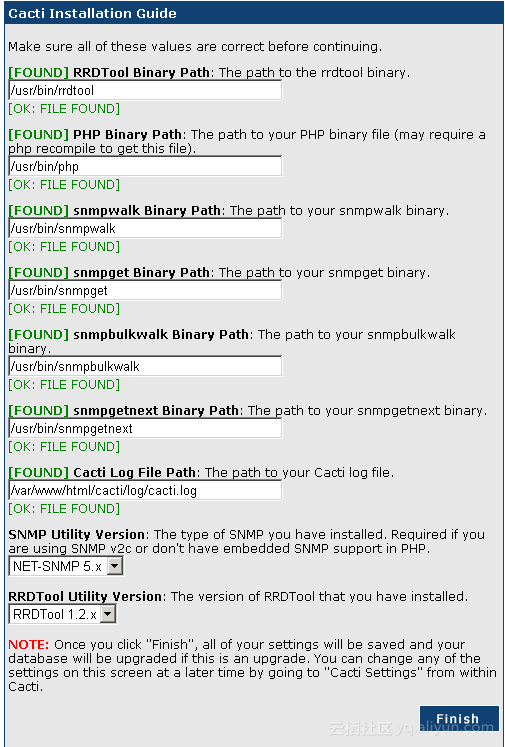
默认账号密码是:admin/admin,第一次登录后需要修改密码
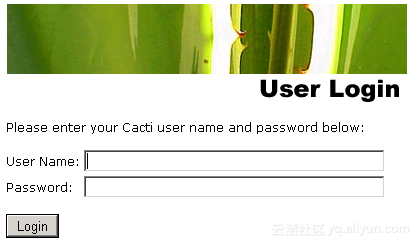
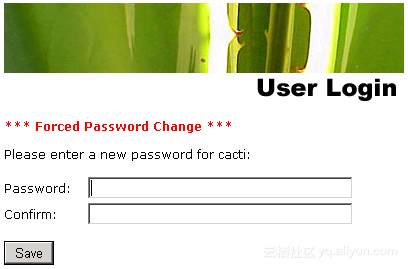
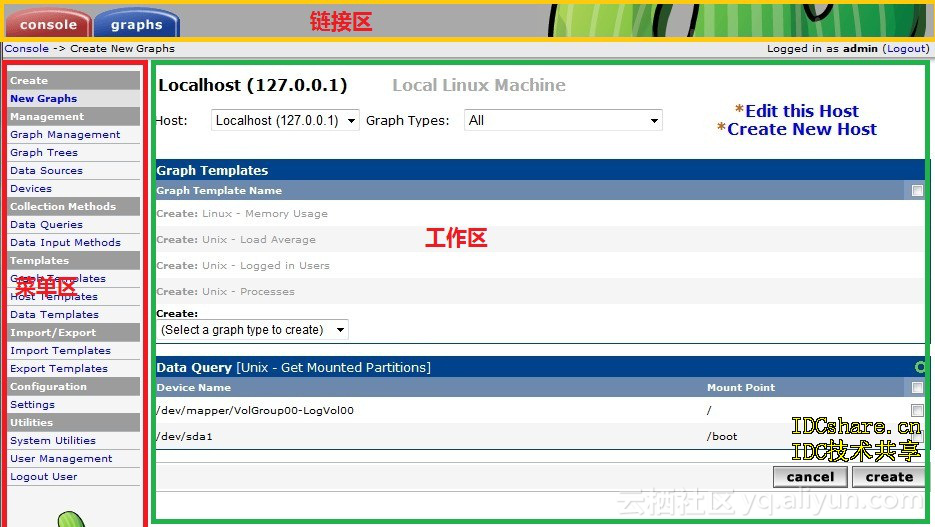
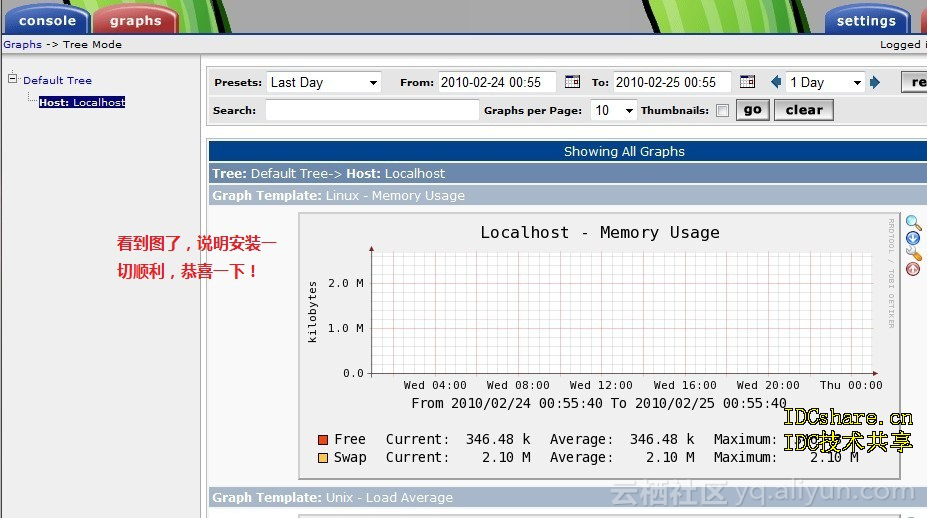
被监控主机snmp文件设置
Linux
被监控主机需要配置snmp.
#vi /etc/snmp/snmpd.conf
1更改:com2sec notConfigUser default public
改为:com2sec notConfigUser 127.0.0.1 public
2、更改:access notConfigGroup “” any noauth exact
systemview none none
改为:access notConfigGroup “” any noauth exact
all none none
#
view all included .1 80
将前面的 # 注释 去掉。 保存退出
测试snmp是否正常
#snmpwalk -c public -v 2c localhost
#snmpwalk -v 1 -c public localhost IP-MIB::ipAdEntIfIndex
IP-MIB::ipAdEntIfIndex.61.xxx.xxx.xxx = INTEGER: 2 IP-MIB::ipAdEntIfIndex.127.0.0.1 = INTEGER: 1 IP-MIB::ipAdEntIfIndex.172.xxx.xxx.xxx = INTEGER: 3
也可以用snmpd -f -Le 命令查看当前有没有出什么错
Windows
需要安装snmp服务
开启—运行—appwiz.cpl 把管理和监视工具打上勾,然后点详细信息进去,勾起我们需要用的组件
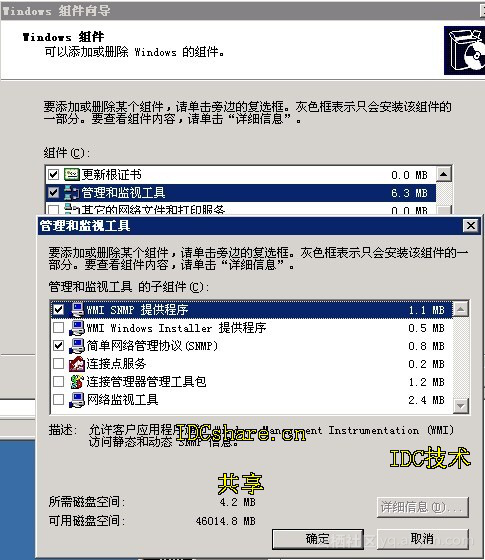
安装好后,运行—services.msc,点snmp server设置一下选项
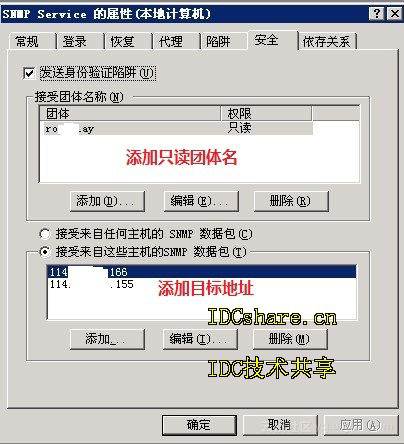
小插曲:很感谢方老师制作了一个cacti视频教程,自己用cacti也几年时间了。为了加固自己的知识。把这些整理出来当备用,并附上方老师发给我的一系列的视频教程.下载看附件
Nagios简介
Nagios是一个用来监视系统和网络的开源应用软件,它通常运行于一个主服务器上,这个服务器运行 Liunx 或 Unix 操作系统。Nagios 利用其众多的插件实现对本机和远端服务的监控,当被监控对象出现异常,Nagios 就会及时给管理人员告警。它是一个基于TCP/IP协议的软件包,包含有nagios主程序和它的各个插件,配置非常灵活,可以监视的项目很多,也可以通过自定义 shell 脚本进行监控服务,非常适合各类企业的网络应用。
Nagios功能非常强大,它可以监控服务和主机,但是他自身并不包括这部分功能的代码,所有的监控、检测功能都是有插件来完成的。再说报警功能,如果监控系统发现问题不能报警那就没有意义了,所以报警也是nagios很重要的功能之一。但是,同样的,nagios自身也没有报警部分的代码,甚至没有插件,而是交给用户或者其他相关开源项目组去完成。nagios安装,是指基本平台,也就是nagios软件包的安装。它是监控体系的框架,也是所有监控的基础。
打开nagios官方的文档,会发现nagios基本上没有什么依赖包,只要求系统是linux或者其他nagios支持的系统。不过如果你没有安装apache(http服务),那么你就没有那么直观的界面来查看监控信息了,所以apache姑且算是一个前提条件。
Nagios 系统的特点主要有下面几点:
监控主机资源和网络服务
允许用户通过设计实现简单的插件来监控自己特定的服务
当被监控对象出现问题时,会及时通知管理人员
事先定义事件处理程序,当对象出现问题时自动调用对应的处理程序
通过 web 页面来监视对象状态,警告提示和日志文件。
需要安装软件列表:
php-devel-5.1.6-23.2.el5_3.i386.rpm
php-json-ext-1.2.1.tar.bz2
cacti-plugin-0.8.7g-PA-v2.9.tar.gz
nagios-3.2.3.tar.gz
nagios-plugins-1.4.15.tar.gz
ndoutils-1.4b9.tar.gz
npc-2.0.4.tar.gz
Nagios安装
http://sourceforge.net/projects/nagios/files/
[root@localhost soft]# wget http://ncu.dl.sourceforge.net/project/nagios/nagios-3.x/nagios-3.2.3/nagios-3.2.3.tar.gz
[root@localhost soft]# tar -zxvf nagios-3.2.3.tar.gz
[root@localhost nagios-3.2.3]# ./configure –prefix=/usr/local/nagios
[root@localhost nagios-3.2.3]# make all
输入make all 得到下面具体信息
*** Compile finished ***
If the main program and CGIs compiled without any errors, you
can continue with installing Nagios as follows (type ‘make’
without any arguments for a list of all possible options):
make install
– This installs the main program, CGIs, and HTML files
使用make install来安装主程序,CGI和HTML文件
make install-init
– This installs the init script in /etc/rc.d/init.d
使用make install-init在/etc/rc.d/init.d安装启动脚本
make install-commandmode
– This installs and configures permissions on the
directory for holding the external command file
使用make install-commandmode来配置目录权限
make install-config
– This installs *SAMPLE* config files in /usr/local/nagios/etc
You’ll have to modify these sample files before you can
use Nagios. Read the HTML documentation for more info
on doing this. Pay particular attention to the docs on
object configuration files, as they determine what/how
things get monitored!
使用make install-commandmode来安装示例配置文件,安装的路径是/usr/local/nagios/etc
make install-webconf
– This installs the Apache config file for the Nagios
web interface
使用make install-webconf来安装apache的配置文件
=================================================================
make install在安装这个动作之前要增加一个nagios用户,并修改它的权限,不然会出现以下错误:
=================================================================
cd ./base && make install
make[1]: Entering directory `/home/yahoon/nagios/nagios-2.9/base’
make install-basic
make[2]: Entering directory `/home/yahoon/nagios/nagios-2.9/base’
/usr/bin/install -c -m 775 -o nagios -g nagios -d /usr/local/nagios/bin
/usr/bin/install: invalid user `nagios’ 非法用户nagios
make[2]: *** [install-basic] Error 1
make[2]: Leaving directory `/home/yahoon/nagios/nagios-2.9/base’
make[1]: *** [install] Error 2
make[1]: Leaving directory `/home/yahoon/nagios/nagios-2.9/base’
make: *** [install] Error 2
=====================================================================
[root@localhost nagios-3.2.3]# useradd nagios
[root@localhost nagios-3.2.3]# mkdir /usr/local/nagios
[root@localhost nagios-3.2.3]# chown nagios.nagios /usr/local/nagios
[root@localhost nagios-3.2.3]# make all
[root@localhost nagios-3.2.3]# make install; make install-init;make install-commandmode;make install-config;make install-webconf
验证程序是否被正确安装
切换目录到安装路径(这里是/usr/local/nagios),看是否存在 etc、bin、 sbin、 share、 var这五个目录,如果存在则可以表明程序被正确的安装到系统了。后表是五个目录功能的简要说明:
bin Nagios执行程序所在目录,nagios文件即为主程序
etc Nagios配置文件位置,初始安装完后,只有几个*.cfg-sample文件
sbin Nagios Cgi文件所在目录,也就是执行外部命令所需文件所在的目录
Share Nagios网页文件所在的目录
Var Nagios日志文件、spid 等文件所在的目录
修改nagios页面文件
[root@localhost nagios]# more /etc/httpd/conf.d/nagios.conf
# SAMPLE CONFIG SNIPPETS FOR APACHE WEB SERVER
# Last Modified: 11-26-2005
#
# This file contains examples of entries that need
# to be incorporated into your Apache web server
# configuration file. Customize the paths, etc. as
# needed to fit your system.
ScriptAlias /nagios/cgi-bin “/usr/local/nagios/sbin”
<Directory “/usr/local/nagios/sbin”>
# SSLRequireSSL
Options ExecCGI
AllowOverride None
Order allow,deny
Allow from all
# Order deny,allow
# Deny from all
# Allow from 127.0.0.1
AuthName “Nagios Access”
AuthType Basic
AuthUserFile /usr/local/nagios/etc/htpasswd.users
Require valid-user
</Directory>
Alias /nagios “/usr/local/nagios/share”
<Directory “/usr/local/nagios/share”>
# SSLRequireSSL
Options None
AllowOverride None
Order allow,deny
Allow from all
# Order deny,allow
# Deny from all
# Allow from 127.0.0.1
AuthName “Nagios Access”
AuthType Basic
AuthUserFile /usr/local/nagios/etc/htpasswd.users
Require valid-user
</Directory>
基本上这个文件可以直接使用,所以直接复制过去
[root@localhost nagios]# cp /etc/httpd/conf.d/nagios.conf /var/www/html/
生成nagios页面访问账号
根据这个配置文件中指定的AuthUserFile项,它指定的是通过Apache访问Nagios的合法用户的帐户名单库文件,需要使用htpasswd命令对这个名单库进行用户的添加。而默认安装环境下在/usr/local/nagios/etc/目录下是没有 htpasswd.uses这个文件的,所以需要手动添加。请特别注意,用root身份建立的htpasswd.user文件的权限问题,应该在建立该文件完毕后立即更改为nagios用户nagios组的所有权
[root@localhost nagios]# touch /usr/local/nagios/etc/htpasswd.users
建立Nagios的网页访问用户帐户文件(这里必须要与Nagios网页配置文件当中AuthUserFile指定的路径文件名一致)
[root@localhost nagios]# /usr/bin/htpasswd -c /usr/local/nagios/etc/htpasswd.users root
New password:
Re-type new password:
Adding password for user root
[root@localhost nagios]# cat /usr/local/nagios/etc/htpasswd.users
root:WvscG2LMqQrYY
修改nagios主配置文件
[root@localhost nagios]# vi /usr/local/nagios/etc/nagios.cfg
log_file=/usr/local/nagios/var/nagios.log( 默认无nagios.log文件,需要手动创建)
command_check_interval=15s
#command_check_interval=-1
设定命令检查的时间间隔,将原来值-1的项注释掉,启用原来备用值为15s(15秒)。这项的时间间隔值请按实际需求情况设定。
[root@localhost nagios]# touch /usr/local/nagios/var/nagios.log
[root@localhost nagios]# chown nagios.nagios /usr/local/nagios/var/nagios.log
Nagios的CGI配置文件
[root@localhost nagios]# vi /usr/local/nagios/etc/cgi.cfg
use_authentication=1 (默认是启动身份验证)
设定启用身份验证
authorized_for_system_information=viong
设定系统信息的授权用户
authorized_for_configuration_information=viong
设定配置信息的授权用户
authorized_for_system_commands=viong
设定系统命令的授权用户
authorized_for_all_services=viong
设定全部监测服务的授权用户。
authorized_for_all_hosts=viong
设定全部被监测主机的授权用户
authorized_for_all_service_commands=viong
设定全部监测服务命令的授权用
authorized_for_all_host_commands=viong
设定全部主机命令的授权用户
测试nagios是否成功
设置nagios为开机启动
[root@localhost nagios]# chkconfig nagios on
[root@localhost nagios]# service nagios start
[root@localhost soft]# service httpd restart
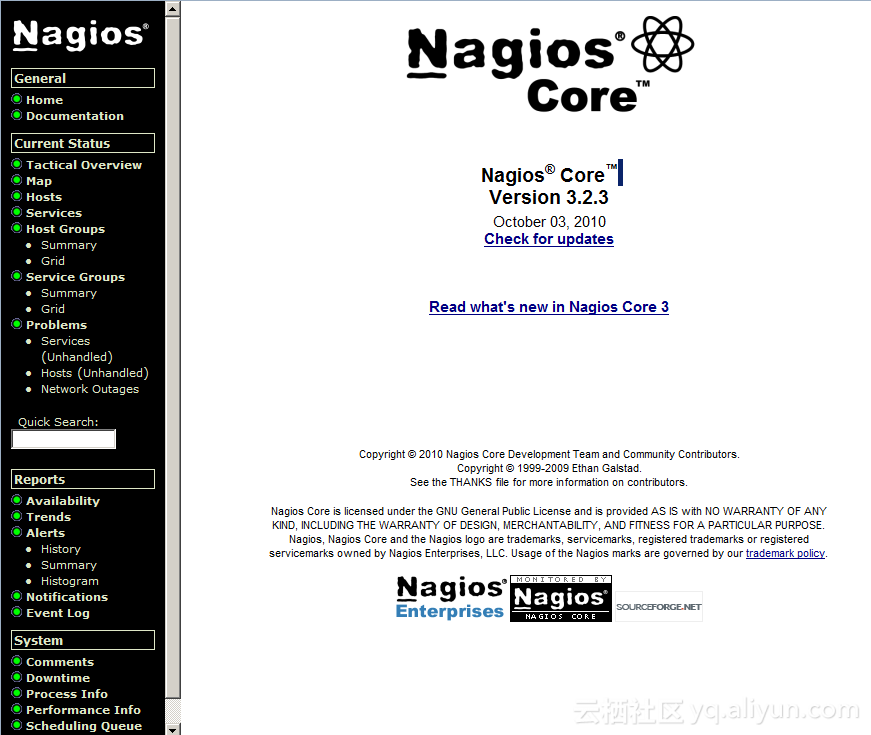
测试nagios是否成功启动
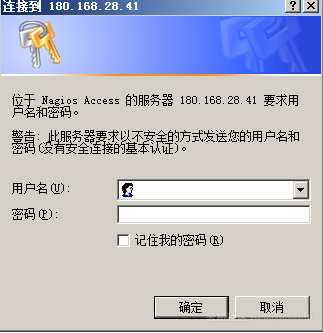
在IE输入 http://180.168.28.41/nagios/ 跳出以下窗口
nagios-plugins插件安装
[root@localhost soft]# wget
http://kent.dl.sourceforge.net/sourceforge/nagiosplug/nagios-plugins-1.4.15.tar.gz
[root@localhost soft]# tar -zxvf nagios-plugins-1.4.15.tar.gz
[root@localhost soft]# cd nagios-plugins-1.4.15
[root@localhost nagios-plugins-1.4.15]# ./configure –prefix=/usr/local/nagios/
(注意:安装目录是nagios而不是nagios-plugins的原因是直接把libexec目录的插件覆盖到nagios里面去的)
[root@localhost nagios-plugins-1.4.15]# make; make install
[root@localhost nagios-plugins-1.4.15]# grep ^User /etc/httpd/conf/httpd.conf
User apache
将apache的运行用户加到nagios组里面,从httpd.conf中过滤出当前的apache运行用户
我这里过滤出的用户无,如有用户需要运行以下命令
[root@localhost nagios-plugins-1.4.15]# usermod -G nagios apache
PHP支持JSON扩展
PHP必须安装PDO 和 JSON扩展。由于NPC使用了Ext JS,如果没有JSON扩展,NPC的界面不会出来,只能看到一个空白页面。初始化PHP环境 需要用phpize命令,所以也要安装 php-devel
[root@localhost soft]#
wget http://www.aurore.net/projects/php-json/php-json-ext-1.2.1.tar.bz2
[root@localhost soft]# tar jxvf php-json-ext-1.2.1.tar.bz2
[root@localhost soft]# cd php-json-ext-1.2.1
[root@localhost php-json-ext-1.2.1]# phpize
-bash: phpize: command not found
[root@localhost php-json-ext-1.2.1]# yum install php-devel
[root@localhost php-json-ext-1.2.1]# phpize
Configuring for:
PHP Api Version: 20041225
Zend Module Api No: 20050922
Zend Extension Api No: 220051025
[root@localhost php-json-ext-1.2.1]# ./configure
===================================================================
如果遇到报以下错误,请直接yum install gcc-c++
a.configure: error: no acceptable C compiler found in $PATH
See `config.log’ for more details. 请直接yum install gcc
b.configure: error: C++ preprocessor “/lib/cpp” fails sanity check
====================================================================
[root@localhost php-json-ext-1.2.1]# make; make install
[root@localhost php-json-ext-1.2.1]# find / -name *json.so
/soft/php-json-ext-1.2.1/.libs/json.so
/soft/php-json-ext-1.2.1/modules/json.so
/usr/lib/php/modules/json.so
[root@localhost php-json-ext-1.2.1]# vi /etc/php.d/json.ini
添加以下内容
extension=json.so
保存退出
[root@localhost php-json-ext-1.2.1]# service httpd restart
测试PHP是否支持json扩展
添加以下内容
<?php
phpinfo();
phpinfo(INFO_GENERAL);
phpinfo(1);
?>
保存退出
在IE输入http://180.168.28.41/test.php 看到以下信息

ndoutils安装
ndoutils是将Nagios的配置及监控信息存储到数据库里,NPC通过调用ndo所存储的数据来展现Nagios的信息。ndoutils需要用到mysql的mysql-lib及mysql-inc,因此需要安装mysql-devel。由于刚装系统的时候已经装过了.这个软件本节就不用安装.
[root@localhost soft]# tar -zxvf ndoutils-1.4b9.tar.gz
[root@localhost ndoutils-1.4b9]#
./configure –with-mysql-inc=/usr/include/mysql –with-mysql-lib=/usr/lib/mysql –enable-mysql –with-ndo2db-user=nagios –with-ndo2db-group=nagios
[root@localhost ndoutils-1.4b9]# make
编译完成后(不需要make install)
[root@localhost ndoutils-1.4b9]#
cd src/
[root@localhost src]# ll
total 1624
-rw-r–r– 1 1001 1001 22480 Sep 15 2009 db.c
-rw-r–r– 1 root root 145464 Feb 25 18:52 dbhandlers-2x.o
-rw-r–r– 1 root root 145436 Feb 25 18:52 dbhandlers-3x.o
-rw-r–r– 1 1001 1001 169907 Oct 27 2009 dbhandlers.c
-rw-r–r– 1 root root 37868 Feb 25 18:52 db.o
-rwxr-xr-x 1 root root 31338 Feb 25 18:52 file2sock
-rw-r–r– 1 1001 1001 5421 Oct 27 2009 file2sock.c
-rw-r–r– 1 1001 1001 11485 Oct 21 2009 io.c
-rw-r–r– 1 root root 16424 Feb 25 18:52 io.o
-rwxr-xr-x 1 root root 32594 Feb 25 18:52 log2ndo
-rw-r–r– 1 1001 1001 6780 Oct 27 2009 log2ndo.c
-rw-r–r– 1 root root 4427 Feb 25 18:51 Makefile
-rw-r–r– 1 1001 1001 4336 Sep 15 2009 Makefile.in
-rwxr-xr-x 1 root root 224641 Feb 25 18:52 ndo2db-2x
-rwxr-xr-x 1 root root 224621 Feb 25 18:52 ndo2db-3x
-rw-r–r– 1 1001 1001 57565 Oct 27 2009 ndo2db.c
-rwxr-xr-x 1 root root 120329 Feb 25 18:52 ndomod-2x.o
-rwxr-xr-x 1 root root 128490 Feb 25 18:52 ndomod-3x.o
-rw-r–r– 1 1001 1001 136855 Oct 27 2009 ndomod.c
-rw-r–r– 1 1001 1001 514 Jan 8 2007 protonum.c
-rwxr-xr-x 1 root root 28499 Feb 25 18:52 sockdebug
-rw-r–r– 1 1001 1001 3418 Oct 27 2009 sockdebug.c
-rw-r–r– 1 1001 1001 4623 Jul 17 2009 utils.c
-rw-r–r– 1 root root 8820 Feb 25 18:52 utils.o
[root@localhost src]# cp ndomod-3x.o ndo2db-3x log2ndo file2sock /usr/bin/
[root@localhost src]# cd ../config
[root@localhost config]# ll
total 48
-rw——- 1 root root 439 Feb 25 18:51 misccommands.cfg
-rw-r–r– 1 1001 1001 427 Sep 7 2009 misccommands.cfg.in
-rw——- 1 root root 566 Feb 25 18:51 nagios.cfg
-rw-r–r– 1 1001 1001 522 Sep 7 2009 nagios.cfg.in
-rw——- 1 root root 4493 Feb 25 18:51 ndo2db.cfg-sample
-rw-r–r– 1 1001 1001 4489 Sep 15 2009 ndo2db.cfg-sample.in
-rw——- 1 root root 5130 Feb 25 18:51 ndomod.cfg-sample
-rw-r–r– 1 1001 1001 5112 Sep 7 2009 ndomod.cfg-sample.in
[root@localhost config]# cp ndo2db.cfg-sample ndo2db.cfg
[root@localhost config]# cp ndomod.cfg-sample ndomod.cfg
[root@localhost config]# cp ndo2db.cfg ndomod.cfg /usr/local/nagios/etc/
[root@localhost config]# cd /usr/local/nagios/etc
[root@localhost etc]# vi ndo2db.cfg
修改以下参数
socket_name=/usr/local/nagios/var/ndo.sock
db_name=cacti
db_prefix=npc_
db_user=viong
db_pass=viong0623
debug_level=1
debug_file=/usr/local/nagios/var/ndo2db.debug
保存退出
[root@localhost etc]# vi ndomod.cfg
修改以下参数
output=/usr/local/nagios/var/ndo.sock
buffer_file=/usr/local/nagios/var/ndomod.tmp
保存退出
NPC安装
NPC(Nagios Plugin for Cacti)是一个Cacti插件,安装后可以在Cacti界面里使用Nagios的功能
[root@localhost soft]#
wget http://www.constructaegis.com/downloads/npc-2.0.4.tar.gz
[root@localhost soft]# tar -zxvf npc-2.0.4.tar.gz
[root@localhost soft]# mv npc/ /var/www/html/cacti/plugins/
[root@localhost soft]# vi /var/www/html/cacti/include/global.php
添加以下参数
$plugins= array();
$plugins[] = ‘npc’;
如下图:

保存退出
NPC界面设置
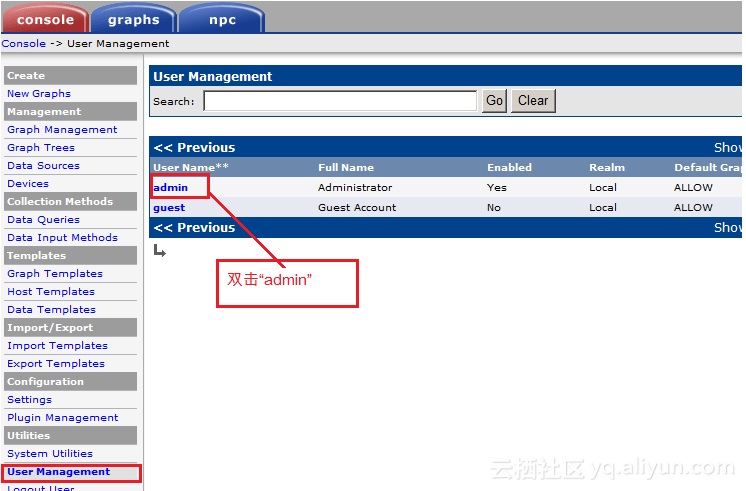
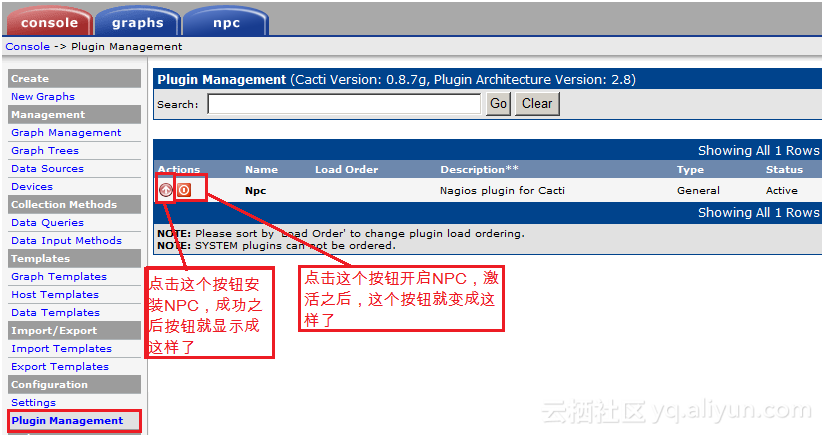
点击(console)菜单栏 user management——->admin

总结!现在比较传统旧一些的监控也逐渐被淘汰 怀念一下!